


Uvitron International PORTA-RAY 400/600W Instruction Manual, Rev. E
Page 16 of 22
MAINTENANCE (CONTINUED)
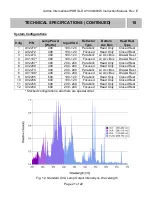
7
3. Using a clean soft cloth dampened with isopropyl alcohol, clean the surfaces of the
aluminum reflector.
CAUTION:
Do not use abrasive cleaning compounds or steel wool for cleaning the
reflector. These harsh products will remove the finish and reduce the reflector efficiency.
4. Wipe the lamp lightly with a clean isopropyl dampened cloth. If the lamp shows signs of
bulging or shape distortion, then replace it. Otherwise, dry and polish the lamp with a
clean dry cloth.
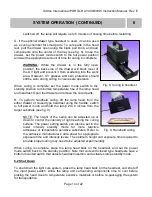
5. Re-insert the cleaned or new lamp between the lamp sockets, with the filler nipple facing
the reflector. Be sure to center each lamp electrode in its socket to insure proper electrical
connection and to avoid arcing (which could damage the lamp or socket). The lamp is
non-polarized so it does not matter which electrode is placed in which socket.
6. Mount the lamp head back on its headrest or fixture, and
reconnect the input power cord.
7. Re-test the unit to insure satisfactory light intensity and
cure time is achieved.
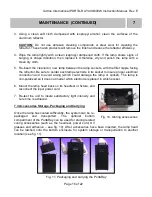
7.3 Accessories Storage, Packaging and Carrying
Once the lamp has cooled sufficiently, the system can be re-
packaged
and
transported.
The
optional
bottom
compartment of the PortaRay can be used for storing related
curing accessories (such as the headrest, power cord, UV
glasses and adhesive
– see fig. 10). After accessories have been inserted, the lamp head
can be latched onto the bottom enclosure for system storage or transportation to another
location (see fig. 11).
Fig. 10, Storing accessories
Fig. 11, Packaging and carrying the PortaRay


