background image


DAX-­‐16   Installation   &   Operation   Manual   


Rev   1.4   


13   


The   table   below   describes   bypass   operation:   


Mode   

Closed   Switches   

Outputs   Driven   

Comments   

Full   Range   

2   

1A,   2A   

HF   audio   also   appears   on   1B,   2B   

Biamp   330Hz   

2,   3,   5   

LO:   1A,   2A   
HI:   1B,   2B   


Biamp   1kHz   

2,   4,   6   

LO:   1A,   2A   
HI:   1B,   2B   


Triamp   

1   

LO:   7A,   7B   
MID:   1A,   2A      
HI:   1B,   2B   


DAX

-­‐

16  Installation


and  Configuration


1.


Install   the   DAX-­‐16   in   the   equipment   rack   near   the   amplifiers   it   is   to   drive.   Since   most   of   the   
cabling   is   between   the   DAX-­‐16   and   the   amplifiers,   it   should   be   near   the   amplifiers   to   reduce   the   
length   of   these   cables.   

2.


Connect   a   laptop   computer   to   the   rear   panel   Ethernet   connector.      

3.


Connect   AC   power   to   the   DAX-­‐16   and   turn   on   the   power   switch.   The   front   panel   LEDs   will   flash   
as   the   unit   initializes.   Connect   the   bypass   power   switch   and   plug   it   in.   

4.


If   analog   bypass   is   to   be   used,   connect   the   bypass   audio   source   to   the   bypass   audio   input   on   the   
rear   panel   of   the   DAX-­‐16.   The   USL   JSD-­‐100xD   has   a   bypass   audio   output   that   can   drive   the   DAX-­‐
16.   The   JSD-­‐60   model   with   AES/EBU   outputs   also   has   analog   outputs.   Use   the   left   channel   
analog   output   as   a   bypass   output.   

5.


Open   a   web   browser   on   the   laptop   computer.   Enter   169.254.1.12   in   the   address   field.   The   home   
page   (see   figure   1)   should   appear.   If   it   does   not,   change   the   laptop’s   IP   address   to   169.254.1.123   
and   try   again.   If   it   still   does   not   work,   you   may   need   an   Ethernet   crossover   cable   between   the   
laptop   and   the   DAX-­‐16.   

6.


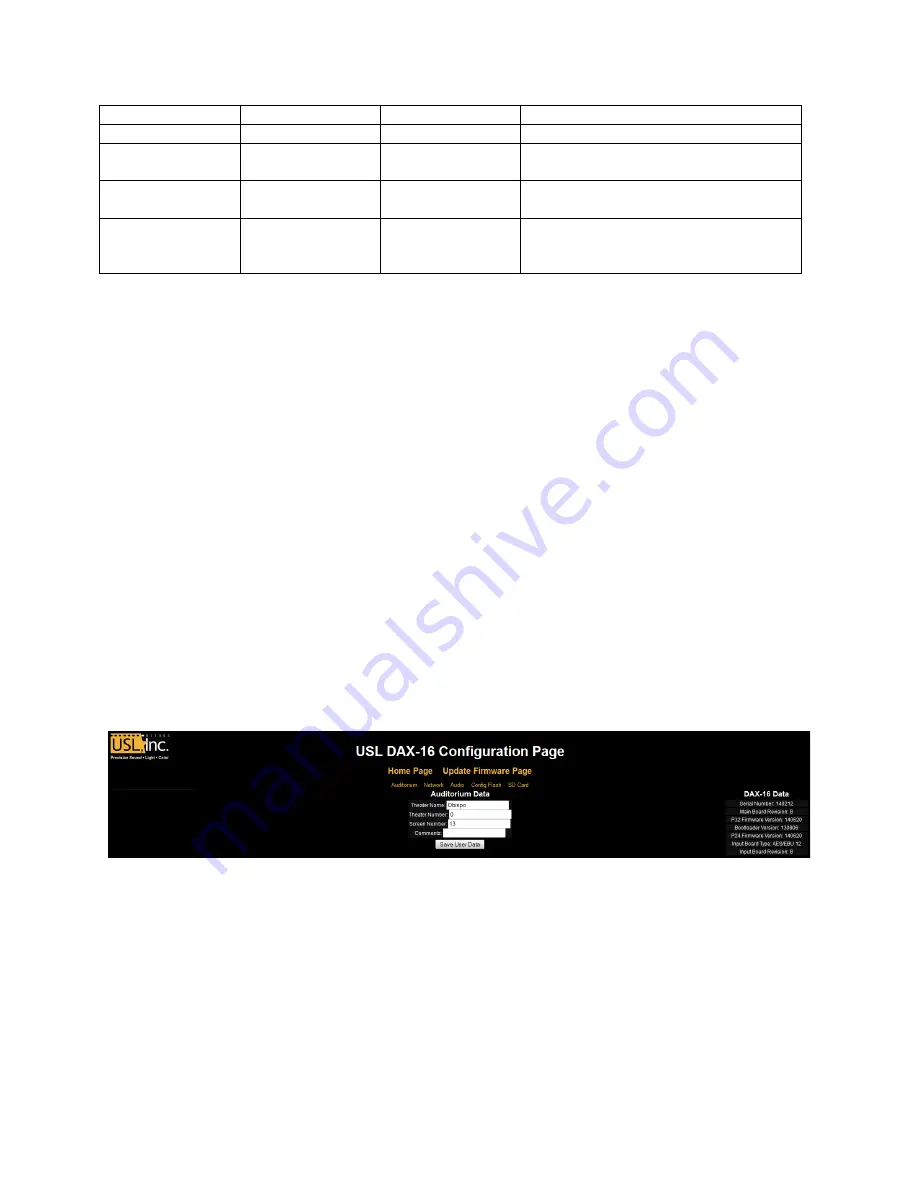
Click   the   Configure   link   at   the   bottom   of   the   home   page.   The   username   is   admin,   and   the   
password   is   ultra.   The   configuration   page   is   shown   in   figure   4.   


Figure   4-­‐   DAX16   configuration   page.


7.


Fill   in   the   information   about   this   auditorium.   This   information   will   be   shown   on   the   home   page.   
Click   the   Save   User   Data   button   to   save   this   information.   

8.


Click   the   Network   link   at   the   top   of   the   page.   The   network   information   is   shown   in   figure   5.   The   
host   name   is   the   NET   BIOS   host   name.   You   may   want   to   set   this   to   something   identifying   the   
auditorium   and   the   DAX-­‐16   number.   Set   the   IP   address,   gateway,   and   subnet   mask   according   to   
the   auditorium   network   scheme.   Click   the   Save   IP   Config   and   Reboot   button.   The   DAX-­‐16   will   
immediately   change   to   the   new   IP   address.   Set   your   laptop   to   an   IP   address   in   the   same   subnet   
and   point   the   browser   to   the   new   IP   address.   


Содержание DAX-16

Страница 1: ...181 Bonetti Dr San Luis Obispo CA 93401 USA 1 805 549 0161 Office 1 805 549 0163 Fax DAX 16 Installation and Operation Manual...

Страница 2: ...ent Class 6 Disposal and Recycling 6 Introduction 7 Features 7 Specifications 8 Model Numbers 9 Browser Support 10 Front Panel 11 Rear Panel 11 DAX 16 Output Assignments 12 DAX 16 Installation and Con...

Страница 3: ...as radiators heat registers or stoves Provide proper ventilation The operating temperature range is between 0 C and 40 C The humidity range is between 20 and 80 non condensing The cooling method is c...

Страница 4: ...iateurs registres de la chaleur po les ou amplificateurs Fournissez Ventilation Ad quate La temp rature dufonctionnement devrait tre entre 0 C et 40 C L humidit devrait tre 20 et 80 La m thoderefroidi...

Страница 5: ...t sollte sein 20 und 80 Die erfrischend Methode ist durch Konvektion und einen innereren F cher Bleiben Sie Produkt Oberfl chen reinigen und Trocken Trennen Sie das Macht Kabel von der Macht Quelle vo...

Страница 6: ...hnology Video and similar Electronic Apparatus IEC 60950 Safety Requirements CE UL cUL Safety and Overall Compliance VDE Certified Power Cords Pollution Not intended for environments where conductive...

Страница 7: ...audio from the multiple units Outputs can be named by the user to indicate a speaker position and band for applications where the crossover is in the sound processor Buttons and level indicators take...

Страница 8: ...h two channels per connector Amplifier Returns o 16 amplifier returns on 8 DE 15 amplifier connectors o Levels can be monitored o Returns can be listened to on audio stream Ethernet 10 100Mbps AES EBU...

Страница 9: ...available in two different versions as shown in the table below Model Inputs DAX 16S 16 channels of AES EBU on two RJ45 connectors Analog bypass on pluggable terminal strip DAX 16N 256 channels 48kHz...

Страница 10: ...touch after slide Fedora 19 Arora 0 11 0 PCM supported New level sent during slide Fedora 19 Firefox 30 0 ADPCM and PCM supported New level sent on mouse up When using arrow keys new level sent on tab...

Страница 11: ...te failure If the button is pressed momentarily after the system has powered up after the front panel LEDs have stopped flashing the configuration on the SD card is copied into the system and to flash...

Страница 12: ...will behave when the DAX 16 is in bypass loss of digital input The DAX 16 bypass circuitry contains a passive crossover that supports full range biamp and triamp operation The system is intended to dr...

Страница 13: ...has analog outputs Use the left channel analog output as a bypass output 5 Open a web browser on the laptop computer Enter 169 254 1 12 in the address field The home page see figure 1 should appear If...

Страница 14: ...In BLU link systems connector A is the IN port and connector B is the OUT port The IN port should be connected to the OUT port of the previous device in the loop The OUT port should be connected to th...

Страница 15: ...DAX 16 Installation Operation Manual Rev 1 4 15 Figure 6 DAX 16 audio configuration page...

Страница 16: ...o reduce pumping and the release time can be decreased to increase the average volume 17 If desired sent Bypass on digital input loss to Enabled An analog bypass signal fed to the DAX 16 on the rear p...

Страница 17: ...card If this page says Could not initialize SD card or some other error message ensure an SD card is in place and that its write protect is not enabled SD cards are write protected or locked when the...

Страница 18: ...utput level on each channel The buttons below the bars are labeled with channel and band information provided during system configuration Pressing the buttons enable and disable audio from that channe...

Страница 19: ...T will show the cause of the error Clicking on the BLU link status box will bring up a page of BLU link registers that can help troubleshoot any issues Firmware Updates USL may issue firmware updates...

Страница 20: ...M 8E 10 Signal Ground reference for Vmon and Imon 11 Channel B input 12 No Connect 13 Channel B Vmon output voltage monitor 14 Channel B Imon output current monitor not used by DAX 16 15 No Connect RJ...

Страница 21: ...find most USL products on your network Double click on the product to open a web browser pointed to that product Appendix C System Restore The DAX 16 has a restore button on the front panel It can be...

Страница 22: ...by it will be free from defects in material and workmanship under normal usage over a period of one 1 year after its purchase new from and authorized dealer Our obligation under this warranty is limit...

Страница 23: ...nual Revisions Rev Description Date 1 0 Original manual 140707 1 1 Formatting Standardized 140709 1 2 Fixed typos changed LED threshold added specifications 140714 1 3 Revise info on bypass 140715 1 4...

Страница 24: ...DAX 16 Installation Operation Manual Rev 1 4 24...

Отзывы: