background image

Charging System

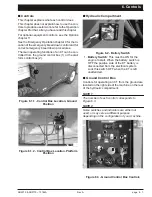
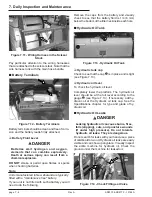
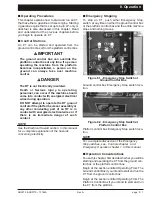
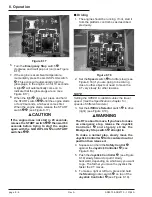
Figure 7.24 - Ammeter Gauge

With the en gine idling, the nee dle in the AMPS
gauge should not be to the left of 0" (left of 0" is dis -
charg ing). 

NOTE

Leave the engine running for the next step 

Ground Controls

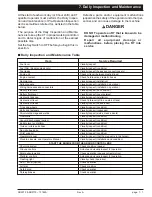
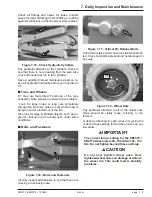
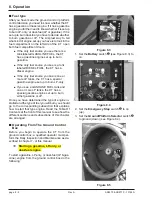
Figure 7.26 - Ground Controls

Check the Plat form Lift/Lower switch 


 (see Fig -

ure 7.26) to see that it is func tion ing prop erly by
hold ing the switch up to rise plat form and push ing
the switch down to lower the plat form. 

Pay  par tic u lar  at ten tion  to  the  Emer gency  Stop
switch 

€

 (see Fig ure 7.26) to see that it turns the

RT

 en gine off when struck. 

Flashing Light

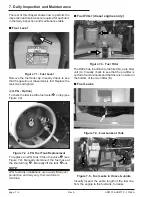
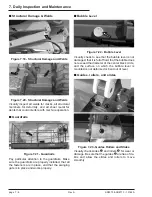
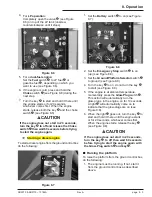
Figure 7.27 - Flashing Light

Check to see that the light flashes ap prox i mately
once a sec ond when the 

RT

 en gine is run ning.

Platform Controls

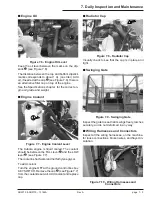
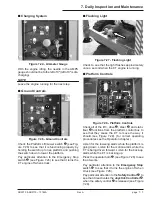
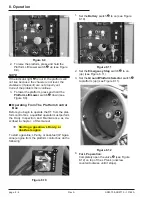
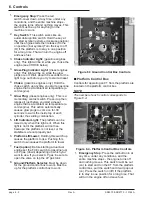
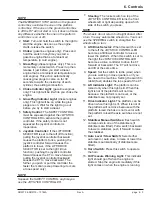
Figure 7.28 - Platform Controls

Check all of the lift •, drive 

€

, steer 



, and sta bi -

liser 

‚

 func tions from the plat form con trol box to

see that they cause the 

RT

 to move the way it

should (see Fig 

ure 7.28). (for cor 

rect op 

er 

at 

ing

pro ce dures  see  the  Op er a tion  chap ter  ). 

Lis ten for the low er ing alarm while the plat form is
go ing down. Lis ten for the mo tion alarm while the

RT

 is be ing driven for ward. Lis ten for the back-up

alarm while the 

RT

 is back ing up. 

Press  the  op er a tor  horn 

ƒ

 (see Fig ure 7.28) to see

that it works. 

Pay  par tic u lar  at ten tion  to  the 

Emer gency  Stop

switch 

„

 to see that it turns the en gine off when

struck (see Fig ure 7.28). 

Pay  par tic u lar  at ten tion  to  the 

Safety Con trol


…

 to

see that it de ac ti vates the 

Joy stick  Con trol ler


†

when the safety con trol 

…

 is re leased (see Fig ure

7.28). 

SR3370 & SR2770 – 13184A

Rev A

page  7 - 7

7. Daily Inspection and Maintenance

Содержание X27BE

Страница 1: ...This first section of the Operator manual is the English language version EN Manual part number 508401 003 EN for serial numbers 10131 to current June 08 Rev C VERSION II X27RT X33RT X27BE X33BE Diesel Bi Energy 24V DC ...

Страница 2: ......

Страница 3: ...ntre Birtley Road Washington Tyne Wear NE38 9DA Tel 44 0 845 1550 057 Fax 44 0 845 1557 756 POWERED ACCESS www upright com Please note The Upright X 27 33 RT BE is also sold as the Snorkel SR Series in some regions Therefore any reference to the Snorkel SR Series also applies to the UpRight X 27 33 RT BE o o o xxx Tanfield Engineering Systems Ltd Vigo Centre Washington Tyne and Wear UK Upright 508...

Страница 4: ......

Страница 5: ...ps curbs or de bris and avoiding them OPERATE machine only on surfaces capable of supporting wheel loads NEVER operate the machine when wind speeds exceed this machine s wind rating See Beaufort Scale on page 4 for details IN CASE OF EMERGENCY push EMERGENCY STOP switch to deactivate all powered functions IF ALARM SOUNDS while the platform is elevated STOP carefully lower the platform Move machine...

Страница 6: ......

Страница 7: ...y the model and manual part number from the front cover to assure that the cor rect manual will be supplied All information in this manual is based on the latest product information at the time of publication Snor kel reserves the right to make product changes at any time without obligation Photographs Photographs are taken to represent the machine and its component parts as clearly as possible Ho...

Страница 8: ...ned mechanic qualified to work on the RT Call qualified maintenance personnel if you find prob lems or malfunctions Do not modify this machine without written ap proval from the Engineering Department of Snor kel Modification may void the warranty adversely affect stability or affect the operational character istics of the RT Responsibilities of parties It is imperative that all owners and users o...

Страница 9: ...perating the RT Additional information For additional information contact your local dealer or UpRight at SR3370 SR2770 13184A Rev A page v Introduction UpRight Power Access HQ Vigo Centre Birtley Road Washington Tyne Wear NE38 9DA Tel 44 0 845 1550 057 Fax 44 0 845 1557 756 ...

Страница 10: ...2 2 Safety Control 2 3 Bubble Level 2 3 Operator Horn 2 3 Stabilisers Option 2 3 RCD ELCB AC Outlet option 2 3 Flashing Light option 2 4 Lanyard Anchor Points option 2 4 3 Specifications Specifications 3 1 General Specifications Standard Machine X33RT 3 1 Recommended Hydraulic Oil 3 1 General Specifications Standard Machine X27RT 3 2 Engine Oil Charts 3 3 Engine Data 3 3 DF752 3 3 D902 3 3 Machine...

Страница 11: ...9 Setting the stabilisers automatically 8 9 Raising the stabilisers automatically 8 9 Extending The Multi Position Platform 8 9 9 Emergency Operation Emergency Operation Procedures 9 1 Emergency Stop 9 1 Emergency Bleed Down 9 1 Pushing Towing 9 2 10 Stowing and Transporting Stowing 10 1 Transporting 10 2 Trailering 10 2 Securing to a Transport Vehicle 10 2 Towing 10 3 Lifting Lashing Down 10 3 Pu...

Страница 12: ...1 Minimum Safe Approach Distance The RT is not electrically insulated Death or serious injury can result from contact with or inadequate clearance from an energised conductor Do not go closer than the minimum safe approach distance as defined by ANSI ANSI publications define minimum distances that must be observed when working near bus bars and energised power lines Figure 1 and Table 1 are re pri...

Страница 13: ...may not be obvious to them Watch for soft terrain sloping surfaces drop offs etc where stability could be jeopardized Watch for bystanders and never allow anyone to be under or to reach through the booms while operating the aerial platform Pinch points may exist between moving components Death or serious injury can result from becoming trapped between components buildings structures or other obsta...

Страница 14: ...platform before attempts are made to free the platform using ground controls Under normal working conditions it is best not to transfer from the platform to another structure or vice versa unless that is the safest way to do the job Each situation must be judged separately taking the work environment into account The following guidelines apply 1 Where possible place the work platform over a roof o...

Страница 15: ... If the fuel cap is lost replace it with an approved cap from Snorkel Use of a non approved cap without proper venting may result in pressurization of the tank Never use fuel for cleaning purposes For diesel engines use the correct fuel grade for the operating season Batteries Charge batteries in a well ventilated area free of flame sparks or other hazards that might cause fire or explosion Batter...

Страница 16: ... and Decals Location SR3370 SR2770 13184A Rev A page 1 5 1 Safety LEFT HAND SIDE OF THE RT On Fuel Tank Inside Cabinet Outside Of Cabinet Door 0372061 TORQUE 90 100 Ft Lbs 122 135 N m Lug Bolts Nuts Check Every 30 Days ...

Страница 17: ...ts Nuts Check Every 30 Days EMERGENCY OPERATION 1 EMERGENCY LOWERING In the event of total power failure pull the emergency lowering handle mounted at the front of the chassis until the platform starts to descend Once the platform is lowered the handle can be released In order to push or tow the SR the following steps MUST be taken A runaway SR can cause Death or serious injury Do not proceed unle...

Страница 18: ...ight DO NOT use with improperly inflated or damaged tires or wheels DO NOT RAISE OR DRIVE AN ELEVATED PLATFORM ON SOFT OR UNEVEN SURFACES DO NOT RAISE OR DRIVE AN ELEVATED PLATFORM ON A SLOPE GO NO CLOSER THAN 4 feet 1 2m to ANY DROP OFF OR HOLE 4 FT 1 2M OK 1 3 2 TWO TONE ALARM MEANS TIPOVER DANGER LOWER PLATFORM IMMEDIATELY TO AVOID TIPOVER HAZARDS USE ON FLAT LEVEL AND SOLID SURFACES ONLY OK DO...

Страница 19: ...ORK LOAD MAIN DECK EXTENSION DECK MAIN DECK 990lb 120kg 264lb 330kg 726lb EXTENSION DECK RETRACTED EXTENSION DECK EXTENDED X27RT PLATFORM RATINGS UNIFORMLY DISTRIBUTED RATED NUMBER OF OCCUPANTS 5 PERSONS 11346 1 580kg RATED WORK LOAD RATED WORK LOAD MAIN DECK EXTENSION DECK MAIN DECK 1280lb 120kg 264lb 460kg 1015lb EXTENSION DECK RETRACTED EXTENSION DECK EXTENDED X33RT X27RT ...

Страница 20: ...utton in and the entire machine stops the engine turns off and nothing moves This switch must be out on to control the RT from the platform pull the switch and it will pop out At ground control box Figure 2 2 Ground Control Box Emergency Stop Switch Press the red EMERGENCY STOP switch cover down at any time under any conditions and the entire machine stops the engine turns off and nothing moves th...

Страница 21: ...ong the ground This alarm beeps half as fast as the DRIVE reverse alarm Guardrails Figure 2 4 Guardrails The guardrails help protect you from falling off the platform Be sure the guardrails are properly in stalled and that the gate is in place Figure 2 6 Swinging Gate page 2 2 Rev A SR3370 SR2770 13184A 2 Safety Devices The LOAD SENSING alarm also emits a high low warbling sound as does the alarm ...

Страница 22: ...used primarily to get the atten tion of people on the ground when you are working aloft For the horn to work the following switches on the ground control box must be set as indi cated MAIN POWER ON EMERGENCY STOP ON up SELECTOR PLATFORM Stabilisers Option Figure 2 10 Stabilisers The stabiliser controls are on the upper left side of the platform control box The stabilisers are used to level the RT ...

Страница 23: ...R S e h t e m i t y n a d n o c e s r e p h s a l f e n o t u o b a is running There is no ON OFF switch for the flash ing light it cannot be turned off while the RT is run ning Lanyard Anchor Points option m r o f t a l p e h t f o r o o l f e h t n o s r o h c n a r u o f e r a e r e h T one at the front of the roll out deck one at the back t a l p e h t f o e d i s h c a e n o e n o d n a m r o...

Страница 24: ...WS 32 or similar SR3370 SR2770 13184A Rev A page 3 1 SPECIFICATIONS X33RT Nominal working height 12 12m 39 2 Roll out deck size 1200mm 48 Drive speed below 2 4m 0 to 4 5kph 0 to 2 8mph Drive speed above 2 4m 0 to 0 35kph 0 to 0 22mph Safe working load Main deck Roll out deck not extended 450kg 990lbs Safe working load Main deck Roll out deck extended Roll out deck 330kg 120kg 726lbs 264lbs Platfor...

Страница 25: ... Safe working load Main deck Roll out deck extended Roll out deck 460kg 120kg 1015lbs 265lbs Platform size 2 73 x 1 65m 8 11 x 5 5 Stowed height 2 5m 8 2 Stowed height hand rails folded down 1 7m 5 8 Overall length 3 36m 11 0 Overall width 1 7m 5 8 Gradeability 35 Lift time 26 seconds Turning radius inner 2 83m 9 3 Turning radius outer 4 6m 15 1 Maximum wind speed 12 5m s 45km h 28mph Insulation r...

Страница 26: ...ber 44 For operating temp Below 32 o F 0 o C use winterized number 2 D Coolant 50 water 50 ethylene glycol Maximum temperature 110 o C Oil Capacity 3 7L Oil grade API Quality better than CD Oil weight See chart below Engine Data Ambient temperature Engine oil weight Above 77 o F 25 o C SAE30 or 10W30 32 o F to 77 o F 0 o C to 25 o C SAE20 or 10W30 0 o F to 32 o F 17 o C to 0 o C SAE10W or 10W30 DF...

Страница 27: ...rtment 4 Front end 5 Rear end 6 Guard rails 7 Steering front wheels 8 Rear Wheels 9 Scissor arms 10 Platform 11 Platform control box 12 Stabilisers outriggers Option 1 Base control panel 2 Serial number plate 3 Engine fuel compartments page 3 4 Rev A SR3370 SR2770 13184A 3 Specifications ...

Страница 28: ...asured with a dipstick Oil ca pacities given in the Specifications chapter 3 are approximate True values will vary from machine to machine due to slight variations or modifications during production The oil dipstick is the only way to accurately gauge if the engine oil level is correct Engine oil level should always be between the lines on the dipstick never above the top line or below the bottom ...

Страница 29: ...in fractions of a full tank see Figure 4 6 NOTE LPG fuel installations are usually fitted post production and may vary from machine to machine It is the operator s responsibility therefore to be aware of how the system is installed on their individual machine and know which gauge horizontal or vertical to read Bubble Level Figure 4 7 Bubble Level A bubble level is located on the platform side rail...

Страница 30: ...ine will restart with low pressure but it will only run a few seconds before it automatically shuts off again Platform height vs drive speed When the platform is over 1 7m 5 6 above the ground the drive speed is limited to its slowest speed and the engine revs are also automatically lowered Dynamic brakes When you drive an RT down a slope if the RT be gins to coast outrun the drive motors the hydr...

Страница 31: ...t breaker on a standard that is accessi ble to the operator Its purpose is to protect the electrical circuits from electrical over loads When the circuit breaker trips pops out push it back in then attempt to use the RT If the circuit breaker trips a second time take the RT out of service and refer the problem to a quali fied trained service technician for repair RCD ELCB outlet option Figure 5 5 ...

Страница 32: ...ocation Ground Position Figure 6 1 2 Control Box Location Platform Position Hydraulic Compartment Figure 6 2 Battery Switch 1 Battery Switch This must be ON for the engine to start When the battery switch is OFF the positive side of the RT battery is disconnected from the electrical system Lock this switch OFF when the RT is left unattended Ground Control Box Controls for operating an RT from the ...

Страница 33: ...nds to warm the inside top of each cylinder thus aiding combustion 5 Lift Indicator Light The platform can be raised only when this light is lit When this light is not lit the platform will not rise because the platform is not level or the stabilisers are not properly set 6 Platform Lift Lower Holding this switch up causes the platform to rise Pushing this switch down causes the platform to lower ...

Страница 34: ... the motion except lowering it occurs at one speed only NOTE Squeeze the SAFETY CONTROL anytime you use the JOYSTICK CONTROLLER 7 Steering The rocker switch on top of the JOYSTICK CONTROLLER turns the front wheels left or right depending upon which side of the switch you press NOTE The wheels do not return to straight ahead after a turn the way automobile wheels do You must use the STEERING switch...

Страница 35: ......

Страница 36: ...sses and connectors Visually inspect installation operation Battery terminals Visually inspect no corrosion Battery fluid level Visually inspect covers plates Hydraulic tank cap Visually inspect installation Hydraulic oil level Check fluid level at line on side of tank Hydraulic oil leaks Visually inspect hoses tubes Tires and wheels Visually inspect condition Bolts and fasteners Visually inspect ...

Страница 37: ...disconnect the fuel hose at the knurled ring Manually lift the tank out NOTE LPG fuel tank installations are usually fitted post production and may vary from machine to machine Fuel Filter diesel engines only Figure 7 3 Fuel Filter The D902 has in addition to the filter B a pre filter unit A Visually check to see that the pre filter is not full of contaminants and that there is no water in the bot...

Страница 38: ...W level see Figure 7 7 The coolant is half water and half ethylene glycol To add coolant Turn the engine OFF at the ground control box box KEY SWITCH Remove the cap see Figure 7 7 from the coolant reservoir Add coolant and replace cap Radiator Cap Figure 7 8 Radiator Cap Visually check to see that the cap is in place and tight Swinging Gate Figure 7 9 Swinging Gate Inspect the gate to see that it ...

Страница 39: ...w the bottom of the filler neck inside each hole Hydraulic Oil Tank Figure 7 13 Hydraulic Oil Tank Hydraulic tank cap Check to see that the cap is in place and is tight see Figure 7 13 Hydraulic oil level To check the hydraulic oil level Completely lower the platform The hydraulic oil level should be at the full level according to the gauge see Figure 7 13 If necessary add hy draulic oil at the Hy...

Страница 40: ...y open under some conditions Bolts and Fasteners Figure 7 16 Bolts and Fasteners Visually inspect all fasteners to see that none are missing or obviously loose Figure 7 17 Critical Pin Retainer Bolts Critical pin retainer bolts have lock tab washers fit ted they should all be present and not damaged in any way Figure 7 18 Wheel Nuts Pay particular attention to all of the wheel nuts None should be ...

Страница 41: ... that the swinging gate is in place and works properly Bubble Level Figure 7 22 Bubble Level Visually check to see that the bubble level is not damaged that it is full of fluid that the bubble does not exceed the diameter of the center black circle and the surface on which the bubble level is mounted is not deformed or bent out of level Guides rollers and slides Figure 7 23 Guides Rollers and Slid...

Страница 42: ...engine is running Platform Controls Figure 7 28 Platform Controls Check all of the lift drive steer and stabi liser functions from the platform control box to see that they cause the RT to move the way it should see Figure 7 28 for correct operating procedures see the Operation chapter Listen for the lowering alarm while the platform is going down Listen for the motion alarm while the RT is being ...

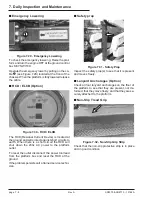
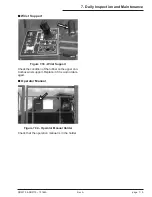
Страница 43: ...wn the 230v AC power to the platform outlet To reset the outlet disconnect the power tool lead from the platform box and reset the RCD at the ground If the problem persists call a trained service techni cian Safety prop Figure 7 31 Safety Prop Inspect the safety prop s to see that it is present and moves freely Lanyard Anchorages Option Check all four lanyard anchorages on the floor of the platfor...

Страница 44: ... of the rubber on the upper con trol box wrist support Replace it if it is worn or dam aged Operator Manual Figure 7 34 Operator Manual Holder Check that the operation manual is in the holder SR3370 SR2770 13184A Rev A page 7 9 7 Daily Inspection and Maintenance ...
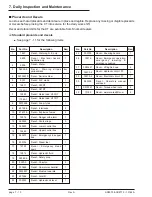
Страница 45: ...eed down 1 18 12814 Decal Hydraulic fluid 1 19 58365 6 Decal Safety prop 1 20 9223 3 Decal Chevron 4 21 300699 Decal Operators checklist 1 22 0323897 Decal Must not operate 1 23 621486 Decal Forklift 4 24 302950 Decal Hydraulic oil level 1 No Part No Description Req 25 300700 Decal Shearing hazard 1 26 12816 Decal Emergency operation emergency lowering emergency pushing 1 27 0083427 Decal Lifting ...

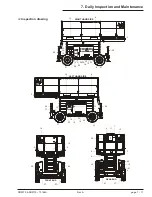
Страница 46: ...tion and Maintenance LEFT HAND SIDE 16 10 10 20 20 12 6 3 2 23 23 17 12 31 31 32 12 12 18 19 24 RIGHT HAND SIDE 3 6 9 20 20 23 26 22 25 23 29 28 31 31 32 14 3 3 20 20 27 12 FRONT END 27 REAR END 27 11 1 15 20 9 8 30 5 20 27 13 21 4 7 Inspection drawing ...

Страница 47: ......

Страница 48: ...r if there is an immediate danger of such contact NOTE See the Electrical Hazard section in this manual for a complete explanation of the hazards concerning electricity Emergency Stopping To stop an RT push either Emergency Stop switch at any time on either the ground control box or the platform control box and the entire machine stops and nothing moves Figure 8 1 Emergency Stop Switch at Ground C...

Страница 49: ...GASOLINE FUEL tank and one or more LP tanks the RT has a special gasoline engine set up to burn either gasoline or LP Once you have determined the type of engine in stalled and the type of fuel you will burn you should go to the corresponding subsection that explains how to start that type engine Read the Table Of Contents at the front of this manual to see how the different sections and subsectio...

Страница 50: ...7 Figure 8 8 2 Set the Emergency Stop switch to on up see Figure 8 8 3 Set the Ground Platform Selector switch to ground see Figure 8 8 4 Turn the key to on do not turn the key to start see Figure 8 8 5 If the engine is at ambient temperature momentarily press the Glow Plug switch This action will automatically turn the glow plugs in the engine on for 10 seconds A light will automatically come on ...

Страница 51: ...m control box a qualified operator must perform the Daily Inspection and Maintenance as de scribed in chapter of this manual Starting a gasoline LP only or dual fuel engine To start a gasoline LP only or dual fuel LP gas oline engine from the platform control box do the following Figure 8 10 1 Set the Battery switch to on see Figure 8 10 Figure 8 11 2 Set the Emergency Stop switch to on up see Fig...
Страница 52: ...mes first When the engine starts release both the start switch and the choke switch see Figure 8 14 If the engine does not start in 20 seconds release the start switch and release the Choke switch then wait 60 seconds before trying to start the engine again Starting a diesel engine To start a diesel engine from the platform control box do the following Figure 8 15 1 Set the Battery switch to on se...

Страница 53: ...ch to turtle slow see Figure 8 18 if you are going to be driving close to other objects or need to move the RT very slowly for other reasons NOTE Setting the SPEED to rabbit doubles the travel speed See the Specifications chapter for speeds of different models 3 Set the Lift Drive Selector switch to drive right see Figure 8 18 The RT is about to move If you have to make an emergency stop release t...

Страница 54: ...platform or push it forward to lower it The further you pull the Joystick Controller backward the faster the platform rises There is only one down speed Stabilisers If your machine is not fitted with stabilisers you do not need to read this section NOTE Using the stabilisers The platform must be fully lowered to enable the stabilisers to operate Once the platform is raised the stabilisers cannot b...

Страница 55: ...bubble level to determine which stabilisers must be further extended to level the platform see Figure 8 22 NOTE When the bubble in the bubble level is in the center of the ring the platform is level 4 Lower the appropriate stabilisers just enough to center the bubble see Figure 8 22 When the Lift Indicator Light see Figure 8 23 comes on the platform can be safely raised Figure 8 23 To raise the st...

Страница 56: ...the two operations Raising the stabilisers automatically 1 Completely lower the platform 2 Press and hold the switch up to the Auto Stow position The stabilisers will raise to the stowed position Extending The Multi Position Platform Figure 8 26 The MULTI position extendible platform see Fig ure 8 26 can be securely locked into different posi tions To move it from one position to the other do the ...

Страница 57: ......

Страница 58: ... turning the Main Power switch to off The Emergency Stop switches are designed to be easier to find and faster to use than key switches To reset the Emergency Stop switch at the plat form control box pull it and and it will pop out on To reset the Emergency Stop switch at the ground control box raise the red switch cover and push the switch up The RT engine can then be restarted in the normal way ...

Страница 59: ...own and the scissor arms will close Keep all body parts out of the scissor arms and out from under the platform Figure 9 6 Manual Bleed Down Control 6 If the platform will not lower the person on the ground will need to use the manual bleed down see Figure 9 6 located at the front of the chassis To lower the platform pull on the cable until the platform is fully lowered NOTE If the platform does n...

Страница 60: ... To release the brakes pump the hand pump 5 10 times see Figure 9 10 The brakes will now be released and the SR is ready to be pushed or towed The SR drive motors will be ruined if the SR is pushed or pulled faster than 2 mph 3 2 km hr Unless personnel safety considerations dictate otherwise do not push or pull faster than 2 mph 3 2 km hr Figure 10 11 5 Once the unit has been safely pushed towed p...

Страница 61: ......

Страница 62: ...n use the controls on either the ground control box or the platform control box to 1 Fully lower the platform 2 Use the stabiliser controls to completely raise all four of the stabilisers 3 Close the platform entry gate and close all the doors on the machine To lock an RT Figure 10 2 1 Push the Emergency Stop switch down OFF and set the Main Power switch to OFF then remove the key see Figure 10 2 ...

Страница 63: ...loading ramp with the steering wheels nearest the ramp 5 Visually check from the platform to be sure the RT is aligned with the ramp and the ramp is still aligned with the truck or trailer All should be in a straight line Death or serious injury can result from losing control of an RT during loading or unloading Always drive up or down a grade with the Speed switch set to turtle slow Figure 10 4 6...

Страница 64: ...ified service technician should perform lifting Pushing An RT can be safely pushed by hand on level firm surfaces The procedure for pushing is located in the Emergency Operation chapter Winching Procedure 1 Locate transport vehicle so that RT will not roll forward after being loaded 2 Fully lower platform and retract extension deck 3 Be sure the machine is centered with the loading ramps and carri...

Страница 65: ...8 Reset the hydraulic system by reversing these procedures page 10 4 Rev A SR3370 SR2770 13184A 10 Stowing and Transporting ...

Страница 66: ...r selecting the DC mode turn the ignition switch to the ON position the second position of the switch at the ground control box see Figure 11 3 Figure 11 3 Start Switch Ground When entering the platform turn the ignition switch to the ON position the second position of the switch at the platform control box see Figure 11 4 Figure 11 4 Start Switch Platform Once the DC mode is selected the motor wi...

Страница 67: ... to the batteries see Figure 11 7 Figure 11 7 DC Motor Batteries The cabinet lid must be open whilst charging to allow gasses to escape Lead acid batteries contain sulphuric acid which will damage eyes or skin on contact When working around batteries ALWAYS wear a face shield to avoid acid in the eyes If acid contacts eyes flush immediately with clear water and get medical attention Wear rubber gl...

Страница 68: ... Charging Fully recharge the batteries immediately after use One charging cycle per day is preferred Fully charged batteries perform best The deeper the discharge the fewer number of cycles a battery will deliver deep discharges deteriorate the battery quicker than shallow cycles An overly discharged battery may need to be cy cled a few times before it can fully recover If a bat tery begins to hea...

Страница 69: ...ntinuous duty power to run power tools of various sorts The power can come from either the optional ac gener ator discussed elsewhere in this chapter or from an electrical source outside the RT If you use an electrical source outside the RT be sure you dis connect it before you drive the RT away Non Marking Tyres These are tyres suited for using the RT in indoor situations Alternative Power Option...

Страница 70: ... Extinguishing media Dry chemical foam or CO2 Special fire fighting procedures Use positive pressure self contained breathing ap paratus Unusual fire and explosion hazards Hydrogen and oxygen gases are produced in the cells during normal battery operation Hydrogen gas is flammable and oxygen supports combustion These gases enter the air through the vent caps To avoid the chance of a fire or explos...

Страница 71: ...mer Product may melt after ignition to form flammable liquid Burning produces intense heat dense smoke and toxic gases such as carbon monoxide oxides of nitrogen and traces of hydrogen cyanide Spill or leak Pick up and handle as any other inert solid mate rial Waste disposal method Not considered a hazardous material Dispose of material according to any local state and federal regulations Gasoline...

Страница 72: ...s possible Dispose of non recyclable material as a RCRA hazardous waste by such methods as incineration complying with federal state and local regulations Liquefied Petroleum Gas UN 1075 Extinguishing media Water spray Class A B C or BC fire extinguishers Special fire fighting procedures Stop flow of gas Use water to keep fire exposed containers cool Use water spray to disperse unig nited gas or v...

Страница 73: ... smallest area possible Recover as much of the product itself as possible by such methods as vacuuming followed by soak ing up of residual fluids by use of absorbent materials Remove contaminated items including contami nated soil and place in proper containers for dis posal Avoid washing draining or directing material to storm or sanitary sewers Waste disposal method Recycle as much of the recove...

Страница 74: ...witch set to wrong location If you are trying to start from the ground control box set the Ground Platform selector to ground down If you are trying to start from the platform set the selector to platform up Circuit Breaker tripped Push the circuit breaker in Fuel switch not set correctly If you are trying to start a dual fuel engine be sure the fuel switch is set to the correct fuel Out of fuel D...

Страница 75: ...Controller forward to go up or pull it backward to go down RT is not level Lift Indicator light is not lit and the Level Sensor Alarm is sounding Use the stabilisers to level the RT The Stabilisers are not properly set Lift Indicator light is not lit If you are using the stabilisers one or more of them is not down quite far enough Lower each stabiliser a few inches more to be sure each is firmly i...

Страница 76: ...uit breaker that opens to stop electrical circuit flow if it senses a very small current leakage to ground Also called GFCI or RCD The GFCI RCD is used to protect personnel against a potential shock hazard from defective electrical tools or wiring guardrail system a vertical barrier around the platform to prevent personnel from falling hazardous location any location that contains or has the poten...

Страница 77: ... to be performed and the hazards involved rated work load the designed carrying capacity of the aerial platform as specified by the manufacturer stow to place a component such as the platform in its rest position turning radius the raidus of the circle created by the wheel during a 360O turn with the steering wheels turned to maximum inside turning radius is the wheel closest to the centre and out...

Страница 78: ... 6 2 6 3 Lift 6 3 Lift enable 6 2 Low oil pressure 6 3 Joystick 6 3 Steering 6 3 E Electrical Electrocution 8 1 Electrical Hazard Warning see Electrical Hazard page i Emergency Operation 9 1 Procedures Bleed down 9 1 Emergency stop 9 1 Pushing 9 2 Engine Coolant 3 3 Fuel 3 3 Fuel grade 3 3 Make 3 3 Model 3 3 Oil capacity 3 3 Oil grade 3 3 Oil weight 3 3 Operating temperature 3 3 Running time 3 3 E...

Страница 79: ... owners and users Introduction page iv A iv S Safe working load main deck 3 1 3 2 Safe working load roll out deck 3 1 3 2 Safety Batteries 1 4 Electrocution Hazard 1 1 Falling Hazard 1 3 Fuel Handling Precautions 1 3 General Safety Precautions 1 3 Hydraulic Systems 1 3 Pre start Inspection 1 1 Safe Operation 1 1 Safety Decals 1 4 Tipover Hazard 1 3 Work Place Inspection and Practices 1 1 Safety Al...

Страница 80: ...oting Chart 13 1 Platform will not drive when raised 13 2 Platform will not go up 13 2 RT will not drive 13 1 Turning radius inner 3 1 3 2 Turning radius outer 3 1 3 2 W Warranty Limited see inside front cover Weight 3 1 3 2 Work Place Inspection 1 1 Working height 3 1 3 2 SR3370 SR2770 13184A Index ...

Страница 81: ......

Страница 82: ...er Vertiebshändler Distributeur local El Distribuidor local Il Distributore locale Plaatselijke dealer USA TEL 1 559 443 6600 FAX 1 559 268 2433 Europa TEL 44 0 845 1550 058 FAX 44 0 195 2299 948 www upright com PN 508401 003 ...

Отзывы: