NOTE
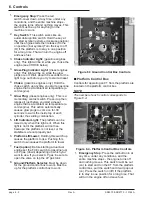
The EMERGENCY STOP switch on the ground
control box overrides the one on the platform
control box. If the one on the ground control box
is off the
RT
will not start or run, it does not make
any difference whether the one on the platform
control box is on or off.
2.
Start:
Turn and hold the switch to the right to
start the engine. As soon as the engine
starts, release the switch.
3.
Choke:
(gasoline engines only): Press and
hold the switch in anytime you start a
gasoline engine that is at ambient air
temperature (a cold engine).
3.
Glow-Plug:
(diesel engines only): This is a
momentary contact switch. Press it up then
release it just before you start a diesel
engine that is at ambient air temperature (a
cold engine). This action automatically
causes glow plugs to come on for 30
seconds to warm the inside top of each
cylinder, thus aiding combustion.
4.
Choke Indicator Light:
(gasoline engines
only): This light will be lit while you choke the
engine.
4.
Glow-Plug Indicator Light:
(diesel engines
only): This light will be on while the glow
plugs are on. Wait for the light to go out
before you try to start a diesel.
5.
Safety Control:
The SAFETY CONTROL
must be squeezed against the JOYSTICK
CONTROLLER to activate the joystick
controller. If the safety control is not
squeezed the joystick controller is
inoperative.
6.
Joystick Controller:
If the LIFT/DRIVE
SELECTOR is set to the left (lift function),
pulling the joystick controller backward
causes the platform to rise, pushing the
joystick controller forward causes the
platform to lower. If the LIFT/DRIVE
SELECTOR is set to the right (drive
function), pushing the joystick controller
forward causes the
RT
to move forward,
pulling the joystick controller backward
causes the
RT
to move backward. The
further you push or pull the controller the
faster the motion (except lowering-it occurs
at one speed only).
NOTE
Squeeze the SAFETY CONTROL anytime you
use the JOYSTICK CONTROLLER.
7.
Steering:
The rocker switch on top of the
JOYSTICK CONTROLLER turns the front
wheels left or right depending upon which
side of the switch you press.
NOTE
The wheels do not return to straight ahead, after
a turn, the way automobile wheels do. You must
use the STEERING switch to straighten the
wheels after a turn.
8.
Lift/Drive Selector:
When this switch is set
to the left the JOYSTICK CONTROLLER
becomes a lift/lower controller to raise or
lower the platform. When this switch is set to
the right the JOYSTICK CONTROLLER
becomes a drive controller to drive the
RT
forward or backward. The
RT
will not drive
and lift at the same time.
9.
Speed:
Set the switch to turtle (slow) when
you are working in close quarters or if you
are new to the machine. Setting the switch to
rabbit (fast) doubles the top speed of the
RT
.
10.
Lift Indicator Light:
The platform can be
raised only when this light is lit. When this
light is not lit the platform will not rise
because: the platform is not level, or the
stabilisers are not properly set.
11.
Drive Indicator Light:
The platform can be
driven when this light is lit. When it is not lit
the platform will not drive because with the
platform raised the base is not level or with
the platform raised the axle switches are not
set.
12.
Sta bi liser Man ual Switches:
Each switch
cor re sponds to one of the sta bi lis ers (if
sta bi lis ers are fit ted). Pull a switch back ward
to lower a sta bi liser, push it for ward to raise
the stabiliser.
13
Auto Level / Stow Switch:
Select either
auto level or auto stow, to raise or lower the
stabilisers automatically (if stabilisers are
fitted).
14
Horn Switch:
Press this switch to operate
the horn.
15.
Oil Pressure Warning Light:
This indicator
light should go off when the engine is
started. Stop the engine immediately if this
light comes on when the engine is running.
SR3370 & SR2770 – 13184A
Rev A
page 6 - 3
6. Controls


