Operation
Section
3-6
AB38 Work Platform
3.3 Pre-Operation Inspection
Carefully read, understand and follow all
safety rules and operating instructions.
Perform the following steps each day before
use. DO NOT perform service on Work
Platform with the platform elevated unless the
elevating assembly is properly supported.
1.
Remove module covers and inspect for
damage, oil leaks or missing parts.
2.
Check the level of the hydraulic oil with the
platform fully lowered and the Telescopic Boom
fully retracted. Oil should be visible on the filler
cap dip stick. If necessary top-up using ISO
No. 46 hydraulic oil.
3.
Check that the electrolyte level in the batteries
is correct. (Battery Maintenance, Section 4.3)
4.
Verify batteries are charged.
5.
Check that the A.C. extension cord has been
disconnected from charger.
6.
Carefully inspect the entire machine for
damage such as cracked welds or structural
members, loose or missing parts, oil leaks,
damaged cables or hoses, loose connections
and tyre damage.
7.
Move machine, if necessary, to unobstructed
area where machine can be fully elevated.
8.
Visually inspect the cylinders, hoses and cables
for damage. Check for missing or loose parts.
SYSTEM FUNCTION INSPECTION
9.
Turn both Chassis and Platform Emergency
Stop switches
ON
(rotate clockwise).
10.
Turn Keyswitch on the Upper Control box to
the
ON
position (anticlockwise position).
11.
Using the chassis control switches, fully
ELEVATE
Booms no. 1 & 2 and
EXTEND
the
Telescope.
12.
SLEW
the Elevating Assembly through 180
degrees in both directions.
13.
Visually inspect the elevating assembly and
cage mounting/structure, lift cylinders, cables
and hoses for leaks, damage or erratic
operation. Check for missing or loose parts
such as nuts, bolts and circlips.
14.
Test that the Emergency Lowering Valves on
each of the Lift Cylinders is operating correctly
as detailed in
Section 3.4
.
PUSH
the
Emergency Stop Button to identify that
functions will indeed cease when depressed.
15.
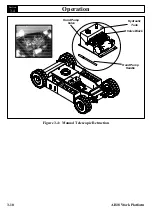
Operate the manual telescopic retraction
system using the Handpump to test that it will
work. (Not required on ANSI machines).
16.
LOWER
each boom until the Elevating
Assembly is fully stowed. Climb into the
Platform and check that the Platform is level. If
not adjust as shown in the Platform Levelling
Section of this manual. Repeat all the above
tests from the Platform Controls. Push the
Emergency Stop Button to identify that
functions will indeed cease when depressed.
Bring the machine back to the stowed position
and retract the Telescopic Cylinder.
17.
PRESS
the Service Horn to see that it is
operational. Select the
DRIVE
function. While
pressing the Joystick Interlock Switch slowly
PUSH
the Joystick to
DRIVE FORWARD
, and
then
PULL
to
DRIVE REVERSE
, to check for
speed and proportional control. The farther you
push or pull the Joystick the faster the machine
will travel.
18.
PUSH
the Steering Switch
RIGHT
and then
LEFT
to check for steering control.
19.
RAISE
the Elevating Assembly until the Boom
Rest Limit Switch is no longer activated and
then repeat the Drive Function test. Only low
speed (‘
CREEP SPEED
’) should be available.
The System Function Inspection is then complete.
If there are any concerns about the safe use
or operation of the AB38 following this
Pre-Operation Inspection
DO NOT USE
THE AB38 WORK PLATFORM
. Contact your
supplier or UpRight’s Product Support
Department.
3.3
WARNING
WARNING
Содержание AB38
Страница 2: ...ii AB38 Work Platform NOTES...
Страница 4: ...ii AB38 Work Platform NOTES...
Страница 6: ...iv AB38 Work Platform NOTES Foreword...
Страница 10: ...Contents Section IV AB38 Work Platform i NOTES...
Страница 14: ...Introduction Specifications Section 1 4 AB38 Work Platform NOTES 1 3...
Страница 17: ...Machine Preparation Section 2 3 AB38 Work Platform NOTES 2 7...
Страница 18: ...Machine Preparation Section 2 4 AB38 Work Platform 2 7 NOTES...
Страница 29: ...Operation Section 3 11 AB38 Work Platform NOTES 3 5...
Страница 30: ...Operation Section 3 12 AB38 Work Platform NOTES 3 5...
Страница 59: ...Maintenance Section 4 29 AB38 Work Platform NOTES 4 21...
Страница 60: ...Maintenance Section 4 30 AB38 Work Platform NOTES 4 21...
Страница 66: ...Troubleshooting Section 5 6 AB38 Work Platform 5 7 NOTES...
Страница 68: ...Schematics Section 6 2 AB38 Work Platform NOTES 6 0...
Страница 71: ...Schematics Section 6 5 AB38 Work Platform 6 1 6 1 Electrical Schematics J1 Harness Connections TOP VIEW...
Страница 72: ...Schematics Section 6 6 AB38 Work Platform 6 1 NOTES...
Страница 73: ...Electrical Schematic Schematics 6 7 AB38 Work Platform Section 6 1...
Страница 74: ...Electrical Schematic Schematics 6 8 AB38 Work Platform Section 6 1 TOP VIEW...
Страница 76: ...Schematics Section 6 10 AB38 Work Platform NOTES 6 2...
Страница 78: ...Section 6 2 6 12 AB38 Work Platform Schematics NOTES...
Страница 81: ...Illustrated Parts Breakdown Section 7 3 AB38 Work Platform 7 2...
Страница 83: ...Illustrated Parts Breakdown Section 7 5 AB38 Work Platform 7 2...
Страница 85: ...Illustrated Parts Breakdown Section 7 7 AB38 Work Platform 7 2...
Страница 87: ...Illustrated Parts Breakdown Section 7 9 AB38 Work Platform 7 2...
Страница 89: ...Illustrated Parts Breakdown Section 7 11 AB38 Work Platform 7 2 22...
Страница 91: ...Illustrated Parts Breakdown Section 7 13 AB38 Work Platform 7 2...
Страница 93: ...Illustrated Parts Breakdown Section 7 15 AB38 Work Platform 7 2...
Страница 95: ...Illustrated Parts Breakdown Section 7 17 AB38 Work Platform 7 2...
Страница 97: ...Illustrated Parts Breakdown Section 7 19 AB38 Work Platform 7 2...
Страница 99: ...Illustrated Parts Breakdown Section 7 21 AB38 Work Platform 7 2...
Страница 101: ...Illustrated Parts Breakdown Section 7 23 AB38 Work Platform 7 2...
Страница 103: ...Illustrated Parts Breakdown Section 7 25 AB38 Work Platform 7 2...
Страница 105: ...Illustrated Parts Breakdown Section 7 27 AB38 Work Platform 7 2...
Страница 107: ...Illustrated Parts Breakdown Section 7 29 AB38 Work Platform 7 2...
Страница 109: ...Illustrated Parts Breakdown Section 7 31 AB38 Work Platform 7 2...
Страница 111: ...Illustrated Parts Breakdown Section 7 33 AB38 Work Platform 7 2...
Страница 113: ...Illustrated Parts Breakdown Section 7 35 AB38 Work Platform 7 2...
Страница 115: ...Illustrated Parts Breakdown Section 7 37 AB38 Work Platform 7 2...
Страница 117: ...Illustrated Parts Breakdown Section 7 39 AB38 Work Platform 7 2...
Страница 119: ...Illustrated Parts Breakdown Section 7 41 AB38 Work Platform 7 2 8 9...
Страница 121: ...Illustrated Parts Breakdown Section 7 43 AB38 Work Platform 7 2...
Страница 123: ...Illustrated Parts Breakdown Section 7 45 AB38 Work Platform 7 2...
Страница 125: ...Illustrated Parts Breakdown Section 7 47 AB38 Work Platform 7 2...
Страница 127: ...Illustrated Parts Breakdown Section 7 49 AB38 Work Platform 7 2...
Страница 131: ...Illustrated Parts Breakdown Section 7 53 AB38 Work Platform 7 2 NOTES...
Страница 133: ...Technician s Print AB38 Work Platform Electrical Schematic...

