


4
You will perform two steps - “
ACTIVATION”
and “
PAIRING
”.
ACTIVATION
sets the Universal
Car Remote to function like the original remote for your vehicle.
PAIRING
sets the Universal
Car Remote to work with your vehicle. A video is available at www.UniversalCarRemote.com
with more details on how to do the
PAIRING
process.
It is important to follow these steps in order to successfully complete setup. If you skip a step,
the Universal Car Remote will not work properly, and you’ll have to repeat the setup process.
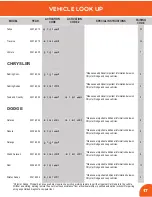
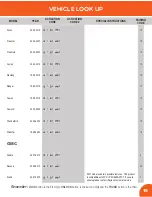
Before you begin, go to the
VEHICLE LOOK UP
list on pages 15-25. Write down both your
ACTIVATION
and
PAIRING
codes for your vehicle’s make, model and year. Some vehicles
have two
ACTIVATION CODES
7U\WKH¿UVWFRGHDQGLI\RXDUHXQVXFFHVVIXOZLWK
PAIRING
the Universal Car Remote to your vehicle, try the second.
ACTIVATION CODE
PAIRING CODE
STEP 1 (of 2)
Activating your Universal Car Remote
Before you begin, it is highly recommended you read through all the instructions to familiarize
yourself with the procedure.
1. Press
the
FUNCTION I
and
PANIC
buttons at the same time and release. The
STATUS LIGHT
will illuminate steady indicating you have entered “
ACTIVATION
MODE
”.
2.
Within 15 seconds, enter the three digit
ACTIVATION CODE
using the Universal Car
Remote’s
LOCK
EXWWRQIRUWKH¿UVWGLJLW
UNLOCK
button for the second digit, and
TRUNK
button for the third digit. For example, if your
ACTIVATION CODE
is
512
,
you’ll press the
LOCK
button
5
times, the
UNLOCK
button
1
time, and the
TRUNK
Let’s get started
NOTE:
Some vehicles require holding the
TRUNK
,
PANIC
, and/or
FUNCTION BUTTONS
for up to 3 seconds before the feature operates, while some vehicles require these buttons to
be pressed twice before the feature operates.


