background image

9

INSTALLATION

(D(."''1.-(F). 2)-1(&'"(
-.(

0  5+`Š  

1./ Z-

ney sweep or installer to determine its structural condition.

= X Z
     from the hearth. If outside combustion air is to be used, 
 Z
     plus 18 inches.

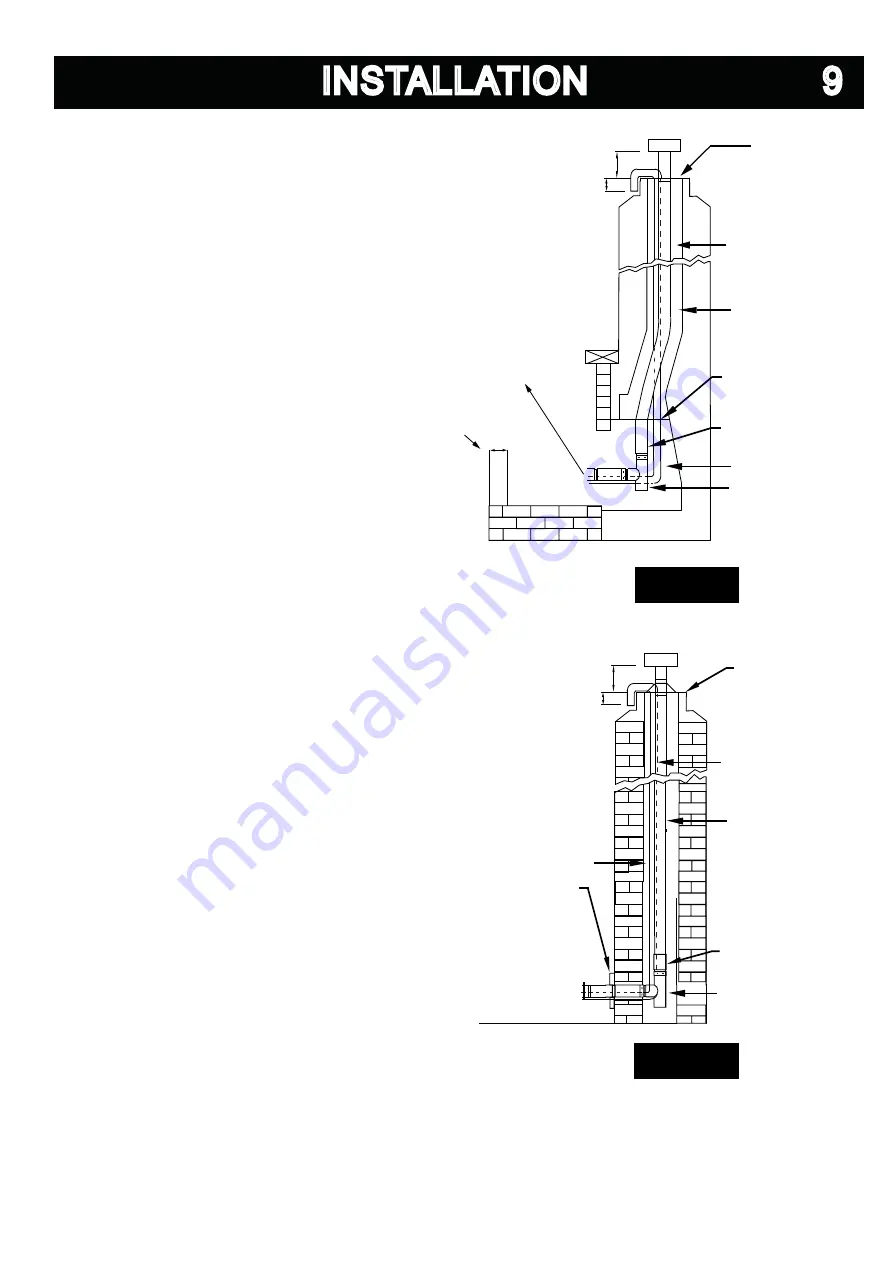
3.  Install a blanking plate and the chimney pipe, and if used
  0&= 

4.  Attach the L-Vent adapter, a section of pipe and clean 

out tee, making sure the clean out tee is centered in the 
Y -`-
 +!  
to ensure a tight seal.

'     0

1 & 2.

6.    Measure  and  build  chimney  top  plate.  Cut  out  holes  for    

chimney pipe, and if used the outside air pipe. Install and 
seal with non-hardening mastic to prevent water leakage. 
Install vent cap.

).''.-./-9 /)3(-2)-1"/2(1

-.(

0  5+`Š  

&     0
     1 & 2. Mark the center of the hole where the pipe is to 
     pierce the masonry chimney.

2.  It will be necessary to break out the masonry around the
     location of the pipe center mark. Use a 4-inch diameter
     hole for 3-inch pipe and 5-inch diameter hole for 4-inch
     pipe. 

3.  Measure and build chimney top plate. Cut out holes for
     chimney pipe, and if used the outside air pipe.
4.  Install the tee on the bottom of the vertical pipe system and
     lower it down the chimney until the center branch of the tee
     is level with the center of the hole in the masonry, as shown 
0&? 

5.  Install and seal the top plate from step 3 with non-hardening
     mastic. Slip the storm collar over the pipe, and while holding
     the pipe at the   K +
     mum of three ¼” stainless steel sheet metal screws. Seal all
!    

j 6  G   
     in the masonry and lining it up with the branch in the tee. 
     Push the pipe into the tee while twisting it to lock it into the 
     tee.

F A  G space
 +
     temperature grout.
< A  #!
      

HEARTH

           TOP PLATE
(SEAL TO CHIMNEY TOP
WITH NON-HARDENING
MASTIC)

EXTENSION TO CHIMNEY TOP 
REQUIRED. 

3 OR 4 INCH STAINLESS STEEL
SINGLE WALL PIPE OR FLEX PIPE.

BLANKING PLATE (SEAL WITH 
NON-HARDENING MASTIC).

3 OR 4 INCH STAINLESS STEEL
FLEX PIPE.

OPTIONAL OUTSIDE AIR

CLEAN-OUT-TEE (TYPE L)
OR 90 DEGREE ELBOW

TO
APPLIANCE

6”


FROM STOVE 

TO END OF HEARTH

NOTE:
FOLLOW METAL
CHIMNEY INSTALLATION
INSTRUCTIONS

6”

3”

FIGURE 12 

FIGURE 13 

           TOP PLATE
(SEAL TO CHIMNEY TOP
WITH NON-HARDENING
MASTIC)

EXTENSION TO CHIMNEY TOP
REQUIRED.

L-VENT OR OPTIONAL
3 OR 4 INCH STAINLESS STEEL
SINGLE WALL PIPE OR FLEX PIPE.

PIPE ADAPTER

CLEAN-OUT TEE (TYPE L)

TRIM COLLAR

OPTIONAL OUTSIDE AIR

NOTE:
FOLLOW METAL
CHIMNEY INSTALLATION
INSTRUCTIONS

6”

3”

All manuals and user guides at all-guides.com

all-guides.com

Содержание Economy Series

Страница 1: ...R S MANUAL 1 22 3 3 C S S U COMPANY U NITED STATES STOV E United States Stove Company 227 Industrial Park Road P O Box 151 South Pittsburg TN 37380 852010 All manuals and user guides at all guides com...

Страница 2: ...of coal see 9 Any blockage of the air supply to or from the stove will seriously degrade its performance and will be evidenced by a smok K 0 L K 75 eventually cut off the combustion air supply Commer...

Страница 3: ...ernative Heat Main Heat Source Decoration Cost Other _________________________ What was the determining factor for purchasing your new appliance _______ I have read the owner s manual that accompanies...

Страница 4: ...6 6 Fold Here United States Stove Company P O Box 151 South Pittsburg TN 37380 Fold Here PLACE STAMP HERE All manuals and user guides at all guides com...

Страница 5: ...t least twice a year for any build up of soot or creosote Never try to repair or replace any part of the stove unless instructions are given in this manual All other work should be done by a trained t...

Страница 6: ...f Stove Runs Out Of Pellets 13 Refueling 13 US Stove Maintenance Tool 13 Shutdown Procedure 13 0 Optional Thermostat 14 Thermostat Installation 14 7 8 Operating Safety Precautions 15 2 Ash Removal 16...

Страница 7: ...0588 8 6 A8EQ 0 by 28 deep The stove must be placed on a continuous grouted 7 Z Y A 5 9 8 68 AE 8 AEA AE 5 A AE 80 E8 Q Z to prevent the possibility of embers falling through to the combustible Y Y 6...

Страница 8: ...air is eas ily available to the air inlet A closeable outside air register can be used in tightly insulated homes A Y Y D X 5 G 9 6 Z instructions provided by the vent manufacturer especially when pa...

Страница 9: ...reduce the possibility of smoke spillage in the event of a loss of negative pressure 6 Attach cap and seal outside wall thimbles with non hardening waterproof mastic F ermination should not be located...

Страница 10: ...eal nail heads with non hardening water proof mastic 3 Apply non hardening waterproof mastic where the storm Y Y Mobile home installations must use a spark arrester 3 D 1 F 2 1 1 2 Adapters are availa...

Страница 11: ...the center branch of the tee is level with the center of the hole in the masonry as shown 0 5 Install and seal the top plate from step 3 with non hardening mastic Slip the storm collar over the pipe a...

Страница 12: ...should be Z cian Always route the electrical cord so that it will not come in contact with any hot part of the stove 2 2 X9 2 3 2 2 7 938 ZH 0 2 9 9 1 This unit must be grounded to the steel chassis...

Страница 13: ...ar graph A the A operating at setting 1 and watch the bar graph lowest setting approx 0 9 pounds per hour setting When the 1 4 lights are illuminated on the bar graph the low feed rate is at its highe...

Страница 14: ...more than 8 3 add pellets to the burnpot by hand 8 3 0 0 A dangerous condition could result 9 G 3 9 2 0 b Press Power button Make sure light is on c The damper should be completely closed or open no m...

Страница 15: ...wers will continue to oper K 1 9 X Z G 2 In case of a malfunctioning convection blower the high temperature thermodisc will automatically shut down the auger preventing the stove from overheating On s...

Страница 16: ...gs When warm enough it will switch to the 1 or low setting The room air blower will also slow to its lowest speed 5 initially set When the house cools below the thermostat setting the stove will switc...

Страница 17: ...rks to escape 9 m 3 n Do not abuse the door glass by striking slamming or similar trauma Do not operate the stove with the glass removed cracked or broken o If the stove is installed in a room without...

Страница 18: ...e sure the burnpot is level and pushed all the way in if the collar on the burnpot attached to the fresh air tube is not pushed back to meet the K D 992 9 If a vacuum is used to clean your unit we sug...

Страница 19: ...de panel The convection blower is on the left fac ing stove and the combustion blower is on the right When cleaning be careful not to dislodge balancing clip on convection blower or to bend fan blades...

Страница 20: ...e chimney detach the vent at the combustion blower transition where it is attached to the blower 22 3 3 2 39 Use this as a guide under average use conditions Gasket around door and door glass should b...

Страница 21: ...the Molex connector F 6 With the stove on check to see if the combustion blower is running If it is not you will need to check for power going to the combustion blower It should be a full cur rent If...

Страница 22: ...auger bushing Next remove the two nuts that hold the top auger biscuit in Then rotate the bottom end of the auger shaft up towards you until you can lift the shaft out of the stove After you have remo...

Страница 23: ...board is not sending power to the igniter Check the voltage going to the igniter during startup It should be a full current If the voltage is lower than full cur rent check the wiring If the wiring ch...

Страница 24: ...ee the auger shaft Gently lift the auger shaft straight up so that the end of the auger shaft comes up out of the bottom auger bushing Next remove the two nuts that hold the top auger biscuit in Then...

Страница 25: ...ake sure the times match the auger timing chart If the auger motor runs constantly the board is bad 8 Combustion blower is not spinning fast enough Test the RPM on the blower after the blades have bee...

Страница 26: ...ap proved for United States Stove Company pellet stoves If there are signs of other types of fuel being used stop using them immediately 4 Power surge or brown out situation A power surge spike or vo...

Страница 27: ...RED IGNITOR HOPPER SWITCH PURPLE AUGER MOTOR WHITE WHITE WHITE HIGH TEMP THERMODISC GROUND PURPLE BLACK WHITE ORANGE ORANGE BLUE PINK YELLOW RED GRAY GRAY WHITE WHITE COMBUSTION BLOWER CONVECTION BLO...

Страница 28: ...CONTROL PANEL A E 101 COMBUSTION BLOWER F CONVECTION BLOWER A E 033A 9 E8 C M 013 988 C G 050 DOOR GLASS C D 031 988 E95 C D 050 9 A 4 VA GOLD LEGS OPTIONAL A CLG 22 8 89 A EA C E IGN 8 A6 8 A 6 C E 9...

Отзывы: