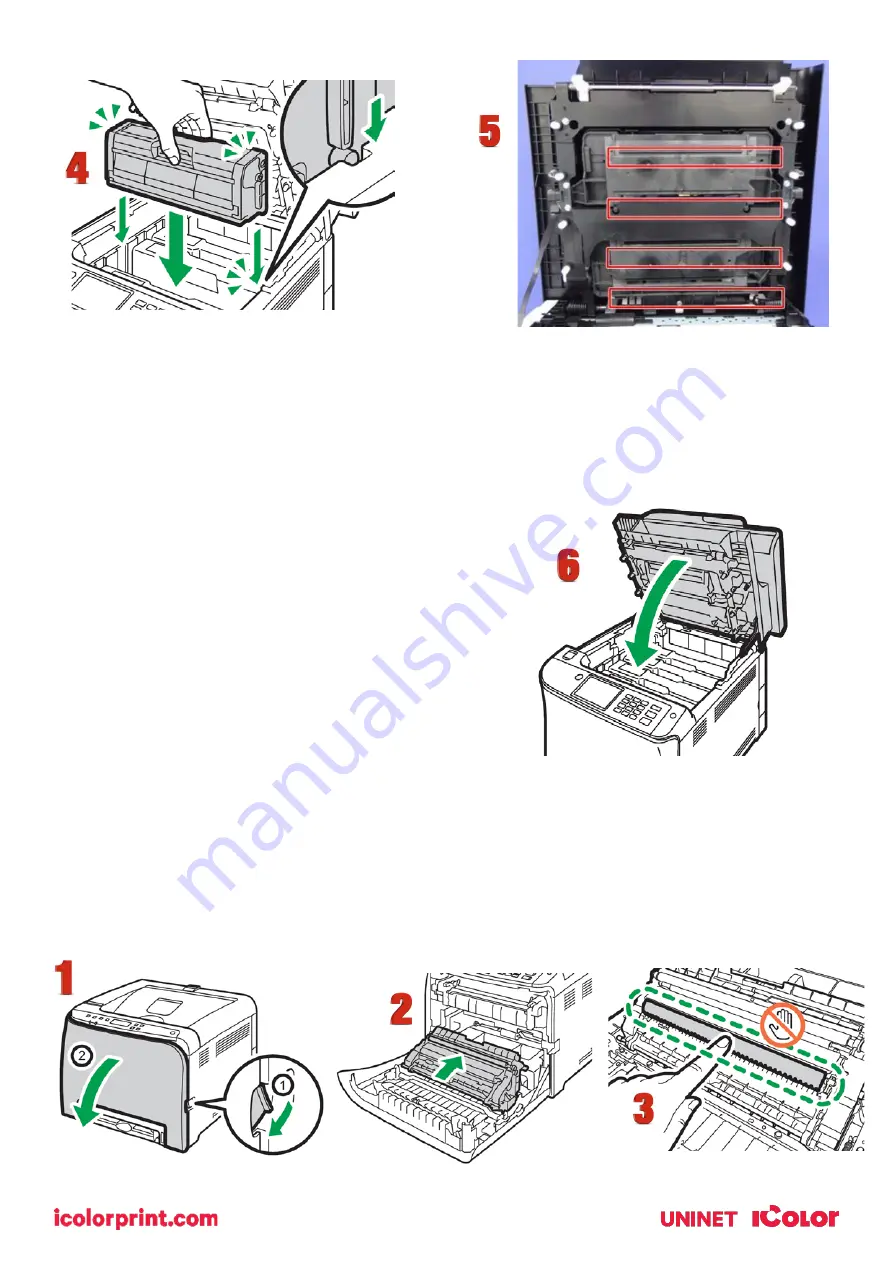
Uninet IColor 560 Скачать руководство пользователя страница 45


45 


4.


Carefully insert the print cartridge removed in Step 2 vertically.


5.


Clean each dust shield glass with a soft damp cloth, and then wipe the same area with a dry cloth to 

remove any remaining moisture.


6.


Using both hands, hold the center of the top cover and close the cover carefully. Be


careful not to trap 

your fingers.


Cleaning the Registration Roller 


The registration roller can become dirty with paper dust if you print to non-standard paper. 
 

Clean the registration roller if white dots appear on prints or if prints are smeared after a paper jam is 
cleared. 

• Do not use chemical cleaning fluids or organic solvents such as thinner or benzine. 


Содержание IColor 560

Страница 1: ...1 IColor 560 Digital Color White Transfer Media Printer User Manual ...

Страница 2: ...ge 44 45 Cleaning the Registration Roller Page 45 Cleaning the Paper Tray Friction Pad and Paper Feed Roller Page 46 Removing Paper Jams Page 46 48 Replacing the Fusing Unit Page 49 IColor 560 Printing Tips Page 50 Available transfer paper and media options Page 51 IColor 560 System Specifications Page 52 Important note about USB Drives shipped with your system Do not lose or break your RIP dongle...

Страница 3: ...s at any time Please note that vector and line art images including text are likely to produce the best results For exciting design ideas and suggestions for using the IColor 560 for maximum effect please visit our website at www icolorprint com IColor Transfer media has been optimized to provide quality results when used with the printer enabling the user to produce eye catching designs which may...

Страница 4: ...4 Machine Guide Exterior Front View ...

Страница 5: ...5 Exterior Rear View ...

Страница 6: ...6 Interior ...

Страница 7: ...7 Control Panel ...

Страница 8: ...8 ...

Страница 9: ...9 Unpacking and installing consumables 1 Remove security tape and packing material from around the printer 2 Open top lid ...

Страница 10: ...emove security tape and packing material from inside the printer 4 Remove the white toner cartridge from the front of the machine Place it on a flat solid surface and carefully remove the black security paper ...

Страница 11: ... loosen the toner that may be settled in the cartridge due to shipping 6 Reinstall the cartridges in the desired configuration in the above representation white or black can go into the first slot and close the lid Use white for transfer printing and black for normal CMYK printing The black cartridge is packed separately in the box for your convenience ...

Страница 12: ...aper cassette and push down the metal base This tray is referred to as Tray 1 Squeeze the clips on the paper guides and slide them to match paper size Do not move the paper guides forcefully Doing so may damage the tray Media is loaded with the print side facing up Ensure the paper stack does not exceed the upper limit mark inside the paper tray Excess stacking can cause paper jams Fan paper or me...

Страница 13: ...against and over the media or a jam can occur Close the paper tray When loading paper longer than 11 into tray 1 remove the lower rear cover using a coin Remove tray 1 with both hands and place on a flat surface Push the metal plate down until it clicks ...

Страница 14: ...rotrude out of the back of the printer This is normal To reinsert the extender you might have to push it with moderate force Maximum paper length is limited to 14 long Use of longer papers can lead to jams Remember to also set the side guides in accordance with the width of the paper used NOTE Do not extend this tray when loading A4 or letter size paper Otherwise a paper jam may occur Bypass Tray ...

Страница 15: ...ith both hands and insert it carefully until it stops The printer the tray will engage the paper by pulling it in about inch Curled paper may jam Straighten curled paper before loading Duplex printing is not possible Tray 1 is unavailable if paper is loaded in the bypass tray Pull up the retainer as shown below to prevent A4 or Letter size prints from falling off Pull up the retainer as shown belo...

Страница 16: ... time If you are connecting via Wi Fi it is not necessary to connect either the USB or Network cable Feed the cable through the cover and reinstall Insert power cord and power on the unit Wireless Setup Easy Setup Using the Wi Fi Setup Wizard From the control panel of this printer you can also configure the wireless LAN settings for the machine A router access point is necessary to set up a wirele...

Страница 17: ...ne 1 Check that the router access point is working correctly 2 Press the Menu key 3 Using the up down keys select Network Settings Wireless Wi Fi and then press the OK key If an admin password is required use admin 4 Press the up down keys to select Enable and then press the OK key 5 Press the Menu key to return to the Initial screen 6 Reboot the printer 7 Press the Menu key then use the up down k...

Страница 18: ...ing to the devices using the Open System or Shared Key authentication 13 Using the up down keys select the encryption method and then press the OK key The max number of characters that can be entered in the encryption key field depends on the encryption method settings Do not select None except in special circumstances If selected the security system will not work 14 Enter the encryption key using...

Страница 19: ...nt within two minutes 10 Check the result If connection has succeeded press the OK key and then the Menu key to return to the initial screen If connection has failed Press the OK key to return to the screen displayed in Step 5 Check the configuration for the router access point then try the connection again 11 Configuring the Wi Fi settings is complete 12 Once complete follow the steps for Network...

Страница 20: ...nter from any existing networks and or remove the network cable from the back of the machine 2 Disconnect your PC from any existing networks and or remove the network cable from the network 3 Press the Wi Fi Direct key 4 On your PC browse for available networks and select the SSID of the printer identifying itself as DIRECT XXXXXX and then click Connect 5 Enter the encryption key admin123 to conne...

Страница 21: ... be put down in layers Regular printer drivers only concern themselves with what the eye sees on the top layer the RIP allows you to separately control each layer thus giving you the ability to control not only what you see but what is behind that top layer typically the white layer The IColor ProRIP gives you the unique ability to use one machine to print images with white as an underprint or an ...

Страница 22: ...ridge is placed in the first slot of the IColor 560 printer and the cyan cartridge is placed in the last slot of the printer This configuration is for textile and hard surface transfer printing where white is needed as an overprint applied on top of all the other colors When the image is pressed to the garment the transfer sheet is flipped over and the white becomes the underprint This is especial...

Страница 23: ...afe programs list or issues with ProRIP software can result Windows Defender is the only program which to date has not affected the functionality of the ProRIP Plug in the included dongle into a free USB port on your PC This dongle contains all of the software manuals and documents for your printer and software and also serves are your license key Navigate to the RIP setup folder on the dongle and...

Страница 24: ...an look like either of the types represented below IMPORTANT This USB dongle is your license key Ensure that it is not lost or broken as UNINET cannot replace it without a charge You cannot use the software without it installed in your PC 4 Select either the 32 or 64 bit application dependent upon your version of windows Accept the terms of the license agreement and click Next ...

Страница 25: ... Choose Full install of IColor ProRIP and click Next Click Next again to accept the installation folder 6 Click Next to allow the creating of the IColor ProRIP Program Folder and the installation will begin ...

Страница 26: ...l minutes to complete ProRIP First Time Setup 1 Be sure the IColor ProRIP dongle is installed and you are connected to the internet From the Windows Start menu choose All Programs IColor ProRIP or double click on the desktop icon that was created upon installation Launch the program Create a shortcut if desired for quicker access later Confirm first time setup by setting your preferred unit of mea...

Страница 27: ...inter Click Next and then Install Printer 3 Select the appropriate printer from the support menu in this case we will choose the IColor 560 Click OK Then click Next to continue the installation Note that you may have already installed the printer driver in windows This installation is for RIP functionality only ...

Страница 28: ...t Printer_USB 001 The proper port will also have the printer name in the description All other ports will update automatically it is only necessary to do this for one queue 6 If connected via network once TCP IP is selected the software will poll your network for available printers Select the proper IColor printer Note that the IP address of the printer is displayed Be sure to set a static IP addr...

Страница 29: ...will reset when the queues are updated so you will have to do this from time to time 8 In the Port drop down menu choose the proper port If connected via network recommended choose TCP IP If connected by USB choose the printer as identified in the drop down All other ports will update automatically it is only necessary to do this for one queue ...

Страница 30: ...he IP address of the printer is displayed Be sure to set a static IP address for your printer so that the IP address does not change later If this happens you will have to repeat this step 10 Select the proper Print Queue for your project Then select the Print Mode otherwise known as media type and verify the size of that media before importing your graphic ...

Страница 31: ...are preloaded images that can used to print a test page Click Devices Print Test Page to see the choices It is suggested that you print a test page upon completion of the setup to confirm the printer has been properly installed Use Shift and Ctrl to click multiple pages and then click OK More about the uses of each page can be found in the Help Topics file within the ProRIP program as well as the ...

Страница 32: ... could yield undesirable results To alter the color settings click on Color Adjust and adjust as needed Coverage represents the amount of white clear toner overprint or underprint depending on which queue is being used The Vary hole size in areas of transparency option allows for rasterization of colors that fade into nothing and to retain partial transparency It is suggested that this option is l...

Страница 33: ... to resize to eliminate this bar before printing The Page tab offers the ability to print multiple copies and nest images You can also adjust the size of the image to fit your media here and in the Queue tab The Job tab allows you to lock the proportions of your image to maintain the aspect ratio Here you can also mirror rotate and invert the image as well as adjust the margins of the print if nec...

Страница 34: ...op of the screen When ready click the Print icon to print your graphic If you encounter any of these issues when printing from the RIP please refer page 29 step 7 to set the proper port in Queue Manager Port Failed to open Holding Prompt to save rather than print ...

Страница 35: ...ays If you wish to reprint that job drag and drop the job from the reserved section into the proper queue To lengthen the amount of time a job stays in reserve click Queue Properties Then click Job Reserve and set the Auto Clean Reserve time frame Unclick to keep jobs in reserve forever ...

Страница 36: ...eed to make any changes to the print job before printing you must open the job Otherwise just reprint as needed processing time is faster when already rendered For more detailed instructions for the IColor ProRIP software please consult the IColor ProRIP User Manual Visit www icolorprint com support for the most updated written and video instructions on the IColor ProRIP software ...

Страница 37: ...eue Configuration Supplies Replacement Guide Typically used for right side reading application such as printing on dark or clear media Printer Display Reads Replace with Cyan low out empty White Clear check which cartridge is installed Back of Printer Magenta low out empty Magenta Yellow low out empty Yellow Black low out empty Cyan Front of Printer It is recommended that you power down your print...

Страница 38: ...on instructions can be found at www icolorprint com support Printing with Dye Sublimation Toner Instantly transform your IColor printer into a dye sublimation printer The upgrade kit consists of 4 toner cartridges CMYK and are shipped in 4 separate boxes Simply remove and store the standard cartridges and swap with the dye sublimation kit to instantly print and sublimate on coated materials Operat...

Страница 39: ...nt consideration Most functions are automated to allow you to focus on finding the best starting point to split each job Final results can be used on virtually any printer White toner printers highly recommended SmartCUT supports many file types such as PNG JPG BMP GIF and TIFF files The program works as an integral part of a decorating system where the split pages are printed onto IColor Standard...

Страница 40: ...se pages may be lower Do not allow paper clips staples or other small objects to fall inside the machine Do not expose the print cartridge without its cover to direct sunlight for a long time Do not touch the print cartridge s photo conductor unit or the ID chip on the side of the print cartridge as indicated in the illustration below When removing print cartridges be careful not to touch the lase...

Страница 41: ...over 2 Carefully lift out the print cartridge vertically holding its center From the rear the print cartridges are installed in the order of cyan C magenta M yellow Y and white W or black K 3 Take the new print cartridge out of the box and then take it out of the plastic bag 4 Hold the print cartridge and shake it from side to side five or six times Even distribution of toner within the bottle imp...

Страница 42: ... following message appears on the screen Replace Required Soon Waste Toner Bottle Waste toner bottles cannot be reused When removing the waste toner bottle make sure not to tilt it Make sure the transfer unit is installed If the transfer unit is not installed install it before turning on the power Before removing the waste toner bottle from the machine spread paper or similar material around the a...

Страница 43: ...w in the illustration below do not lift the bottle while pulling it out 8 Close the bottle cap 9 Holding the center of the new waste toner bottle carefully insert it halfway into the machine body Leave the bottle cap open 10 To prevent the waste toner bottle from coming into contact with the intermediate transfer unit the position shown by the arrow in the illustration below do not lift the bottle...

Страница 44: ...it closes 15 When closing the front cover push the upper area of the cover firmly Cleaning the Toner Density Sensor and LD Unit Dust Shield Clean the toner density sensor when the following message appears on the control panel Density Sensor Require Cleaning 1 Pull up the lever on the top cover and then carefully raise the top cover 2 Remove the rearmost print cartridge 3 Slide the toner density s...

Страница 45: ... hold the center of the top cover and close the cover carefully Be careful not to trap your fingers Cleaning the Registration Roller The registration roller can become dirty with paper dust if you print to non standard paper Clean the registration roller if white dots appear on prints or if prints are smeared after a paper jam is cleared Do not use chemical cleaning fluids or organic solvents such...

Страница 46: ...r Feed Roller If the friction pad or paper feed roller is dirty a multi feed or misfeed might occur The paper tray can become dirty with paper dust if you print to non standard paper 1 Turn off the power and uplug the power cord Pull out Tray 1 carefully with both hands 2 Place the tray on a flat surface If there is paper in the tray remove it 3 Wipe the friction pads and the inside of the paper t...

Страница 47: ...tended options see the following illustrations Important Jammed paper may be covered in toner Be careful not to get toner on your hands or clothes Toner on prints made immediately after clearing a paper jam may be insufficiently fused and may smudge Make test prints until smudges no longer appear Do not forcefully remove jammed paper as it may tear Torn pieces remaining inside the machine will cau...

Страница 48: ...er jams inside a tray Pull out the jammed paper carefully Do not pull out the paper tray or touch the fusing unit 6 If paper has jammed inside the transfer unit Hold both sides of the paper pull the paper carefully forward 7 Then pull out 8 Once the jam is cleared using both hands carefully push up the front cover until it closes When closing the front cover push the upper area of the cover firmly...

Страница 49: ...an be very hot 1 Open the front cover 2 Release the top hook remove 3 screws and remove the left cover A 3 Carefully disconnect the two connectors 4 Remove 3 screws from around the fusing unit and carefully pull forward with both hands 5 To install a new fusing unit follow the above steps in reverse order ...

Страница 50: ...sses may also yield different results Type of image Photos or full color graphics may require a longer press time than vector images or text Type of garment or substrate Cotton Polyester and Spandex material all respond differently to heat as do hard surfaces like acrylic or wood All textile instructions are based on cotton garments Toner Coverage Halftones in image may cause undesired results Ton...

Страница 51: ... Paper for light colored garments IColor Presto 2 Step Transfer Paper for textiles and hard surfaces IColor Temporary Tattoo 2 Step Transfer Paper IColor Classic Premium Wood and Leather and Ceramic Hard Surface 1 Step Transfer Paper IColor AquaClear 1 Step Transfer Paper for candles and other substrates not resistant to heat IColor Label Sticker Paper Clear and White in Letter and Tabloid size IC...

Страница 52: ...rfaces 10 100 TX Ethernet High Speed USB v2 0 Wireless LAN IEEE 802 11 a b g n ac Bypass Tray One at a time Feed A4 A5 A6 B5 B6 Legal Letter HLT Paper Cassette 250 sheet A4 A5 A6 B4 B5 Legal Letter HLT Paper Sizes Min Max 3 x 5 to 8 5 x 14 Paper Weight Bypass Tray 60 163 g m Standard Tray 60 163 g m Power Consumption Maximum 1 300 watts Size WxDxH 15 7 x 17 7 x 13 1 400 x 450 x 334 mm Consumables ...

Отзывы: