background image

NOTE

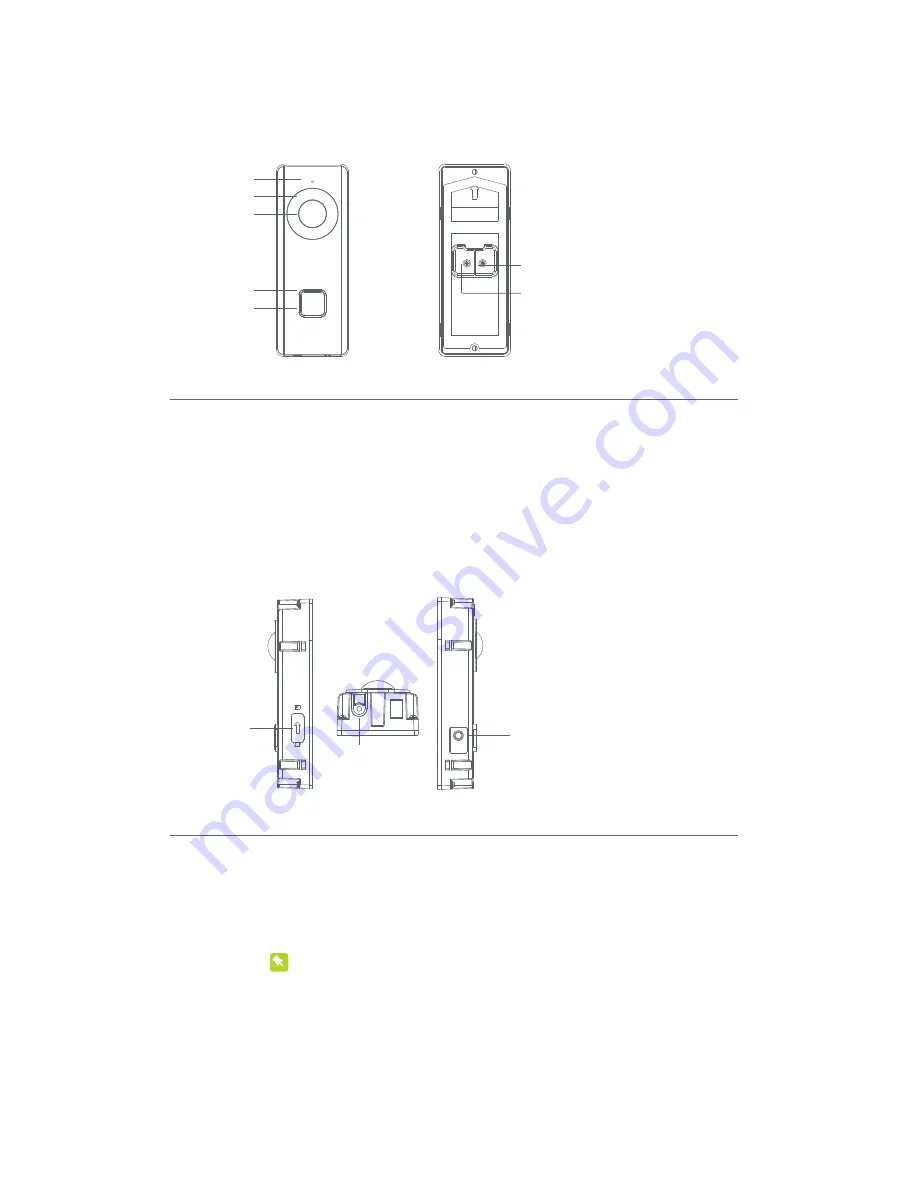
Appearance

Name

Description


IR Light


Auto light source for night vision. The lights are behind the panel.

Button


Solid blue

: The doorbell is starting up and running properly.

Backlight 

Cycling blue and red: 

WiFi is not connected.

Flashing red:

 The doorbell is upgrading.

Flashing blue:

 The doorbell is calling the App.

No backlight:

 The doorbell is speaking with the App.

Screw 1 & 2


These 2 screws are used to connect the power cables.

Name

Description


Memory


Use this slot for a memory card, video files will be stored on the memory card.

Card Slot 

RESET  

If the doorbell has not been activated, hold the button for 5 

Button


seconds to enter the WiFi connection mode. The call backlight 
cycles blue and red.

If you d

o not o

perate the device within 3 minutes the doorbell will exit the 

WiFi configuration automatically.

If the doorbell has been activated, hold the button for 15 seconds to 
restore the  factory settings.

IR Light

Screw 1

Screw 2

Lens

Button Backlight

Backlit Call Button

Mic

Memory Card Slot

RESET Button

Loudspeaker

4

Содержание U-Bell

Страница 1: ...Wireless Video Doorbell U Bell Quick Start Guide 1080p Full HD Two way Audio Motion Activated 180 Field of View Night Vision DB1 U Bell includes Lifetime Warranty...

Страница 2: ...ill not occur in a particular installation If this equipment does cause harmful interference to radio or television reception which can be determined by turning the equipment off and on the user is en...

Страница 3: ...the device or subject it to physical shock and do not expose it to high electromagnetic radiation Avoid the equipment installation on vibrations surface or places subject to shock Do not place the dev...

Страница 4: ...nnect the power cables Name Description Memory Use this slot for a memory card video files will be stored on the memory card Card Slot RESET If the doorbell has not been activated hold the button for...

Страница 5: ...nector Connect the power cables to the power connector included in the box content 4 Install the doorbell 1 Drill 2 holes on the wall according to the mounting template Insert the anchors into the dri...

Страница 6: ...code either by email or by text depending on what you used to register Enter the verification code to confirm your registration After registering you will see the Device page Setup Account 1 Open the...

Страница 7: ...On the device manager page click Home in the footer of the app then click Add Device At this point in the setup the doorbell button should be alternating flashing red blue 3 Scan the QR code with the...

Страница 8: ...r 5 seconds You will hear the doorbell say Start Configuring WiFi When you hear this press the Next button 2 Wait for the app to register your U Bell doorbell to the network 3 The app will ask you to...

Страница 9: ...upper right corner 1 When someone rings your Uniden U Bell The application will alert you by ringing on your phone Click the green receive button on the right and VOILA You are now talking using your...

Страница 10: ...oid devices Receive alerts via Email or Notification SYSTEM REQUIREMENTS Router with Internet access and iPhone iPad iPod touch or Android device uniden com Need Help Contact Us URL www unidensupport...

Отзывы: