background image


7


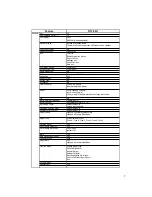
DTL-8R-1

Handset

Key

29

Programmable Key (API)

12

LCD Display

2 x 24
(10&16 digit mode adjustable)

Standby Display

Depend on Interface Board.
There are no Display timeout and LED timeout on the Handset

Line Status Display

No

Display Language

Only English

Icon

Talk Icon
Battery Status Icon (3level)
Ringer Off Icon
Message Icon
Hands Free Icon
Mute Icon

LCD Back Light LED

Yes (White)

Key Back Light LED

Yes (Orange)

New Message LED

No

LED

Function key LED×8 (Red)

Hands Free

Yes

Power Off  Key

No

Keypad Lock

No

Phonebook

No

One Touch Dial

Yes, up to 4 (option)
(Number 24digits/No Name)

Redial

Yes (Depend on I/F Board)
(Local mode, 32digits)
F8 key is redial if Interface board does not have this function.

CID

No

Bell in AutoTalk (charge off)

Yes(Always On)

Any Key Answer

Yes((Always On, Dial 0-9, *, #)

Ear Volume Control

6 steps (default: 4)
hearing aid compatible

Handsfree Volume Control

6 steps (default: 4)

Headset Volume Control

6 steps (default: 4)

Ringer Volume

High/Low/Off(Vibrate) (default:High)
changed  in Standby & Bell Mode

Ringer Tone

6Kinds (default:Tone A)
 Tone A,  Tone B, Tone C, Tone D, Tone E, Tone F

Vibrating Ringer

Yes

Out of Range Detection

Yes

Out of Range Alarm Tone

Yes (On/Off)
(default:On)

Mute

Yes

Auto Standby (Charge On)

Yes

Channel Change

Auto

Ringer Mute

Yes
changed  in Standby & Bell Mode

On Hook Menu

Change Ringer Type
End of Range Alarm
Register(Option)
Deregister(Option)
Base Registration PIN (Option)
One Touch Dial Settings (Option)
Exit

Off Hook Menu

-

Headset Jack

Yes

Feature

Содержание DTL-8R-1

Страница 1: ...User Operation Specification Cordless Phone for PBX DTZ 8R 1 Ver 0 02 APRVD CHECKED E CHECKED S CHECKED M ISSUED Copyright 2014 Uniden All rights reserved...

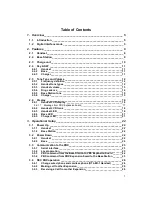
Страница 2: ...Handset LCD display __________________________________________16 2 6 1 1 Message from PBX Expansion board________________________________ 17 2 6 2 Handset LCD Icons ___________________________________...

Страница 3: ..._______________ 40 3 16 1 Menu Top ____________________________________________________40 3 16 2 Contacts List ________________________________________________41 3 16 3 Contacts show one by one ______...

Страница 4: ..._______________________________ 56 3 19 Base Key Option Option T B D ________________________________ 56 3 20 Speed Dial Settings Option T B D _____________________________ 57 4 Appendix _____________...

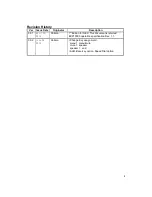
Страница 5: ...cription 0 01 April 30 2014 Shitara 1st Edition for NEC This document is referred EXP10000 operation specification Rev 1 1 0 02 June 06 2014 Shitara Change Key assignment menu menu mute mute speaker s...

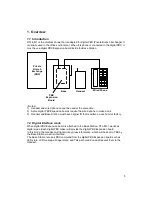
Страница 6: ...ansion boards require the wired phone to make a call 3 Handset and Base Station must have original ID that is written on each unit at factory 1 2 Digital interface mode When digital PBX Expansion boar...

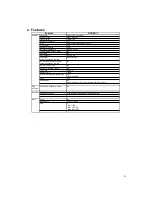
Страница 7: ...om Monitor at same expansion number No HS HS Transfer Call at same extension number No Direct Link Walkie Talkie No Talk Time 16 hours Standby Time 7 days Remote Base Separate Charger Yes Wall Mountab...

Страница 8: ...ey is redial if Interface board does not have this function CID No Bell in AutoTalk charge off Yes Always On Any Key Answer Yes Always On Dial 0 9 Ear Volume Control 6 steps default 4 hearing aid comp...

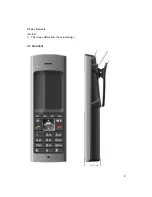
Страница 9: ...8 Display Elements Notes 1 This image differs from the actual design 2 1 Handset...

Страница 10: ...9 2 2 Base Station...

Страница 11: ...10 2 3 Charge unit...

Страница 12: ...y Softkey 1 4 key Notes 1 If redial option is enable Softkey4 key is used for redial key in Talk state 2 If base key option enable Softkey1 key is used for Base Left key in Function key state 3 If bas...

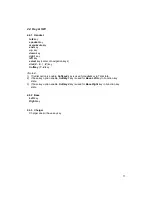
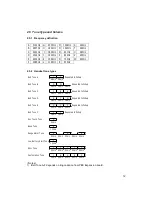
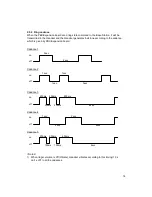
Страница 13: ...xpansion board Bell Tone A K D Repeated Infinitely 48ms 48ms Bell Tone B O M Repeated Infinitely 24ms 24ms 24ms Bell Tone C F B A Repeated Infinitely 48ms 48ms 48ms Bell Tone D N J G Repeated Infinite...

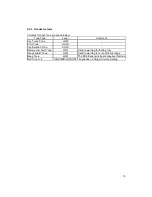
Страница 14: ...h Tone LOW Error Tone HIGH Confirmation Tone HIGH Battery Low Alert Tone LOW Used to warning for battery low Range Alarm Tone LOW Used to warning for out of RF link range Beep Tone LOW The PBX Expansi...

Страница 15: ...to the cadence which is given by PBX Expansion board Cadence 1 2sec 4sec off on Cadence 2 1sec 1sec off on 1sec 3sec Cadence 3 400ms off on 800ms 4sec 200ms 400ms 200ms Cadence 4 1sec 2sec off on 2se...

Страница 16: ...15 2 5 5 Base Station tone The Base Station doesn t have any tone features 2 5 6 Charger The charger doesn t have any tone features...

Страница 17: ...16 2 6 Display 2 6 1 Handset LCD display 240 x 320 QVGA LCD Character code set ISO IEC 8859 1 Latin 1...

Страница 18: ...igits 32digits or 20digits 3 If Handset can not show word wrapping digits on one page because of word wrapping then message shall be divided into 2 pages 4 If message is shown on 2 pages each page sha...

Страница 19: ...the charger with battery full battery status icon shows battery full Antenna Level Icon l Antenna Level Level 0 1 2 3 4 5 6 Ringer mute icon l Ringer mute is on l Ringer mute is off off Message icon...

Страница 20: ...set each LED to one of cadences bellow OFF Always off ON Always on Blinking 1 500ms 500ms Repeated Infinitely off on Blinking 2 50ms 50ms Repeated Infinitely off on Blinking 3 50ms Repeated Infinitely...

Страница 21: ...on 3 If the user presses any key include no valid key or the user pick up the Handset from cradle or the user puts the Handset on cradle LCD Key Back Light is turned on LCD Key Back Light will be turn...

Страница 22: ...l Base is powered on on l Base is powered off off l Registration mode blink Base Left LED Controlled by the PBX Expansion board Base Right LED Controlled by the PBX Expansion board 2 6 5 Charger LED...

Страница 23: ...stall the AC adapter into rear of the Base Station At the very beginning the Base Station reads ID from EEPROM and will use it for RF communication between it and the Handset 3 2 Power Down 3 2 1 Hand...

Страница 24: ...rd control It is performed by the DTL 8R 1 itself 1 Key press detection and emit key touch tone 2 RF link establishment 3 Show ACQUIRING LINK 4 Ringer volume setting 5 Switching Ear speaker and Hands...

Страница 25: ...it from training mode Press talk button during training mode 86 EEPROM data 32bytes Contents of Base Station EEPROM The Data from EEPROM when PBX requests to read 87 Base sw1 press Base Left key is pr...

Страница 26: ...ring state The Handset change ring state 88 Read EEPROM Read EEPROM request from PBX Expansion board 89 Data 32bytes Write EEPROM Write EEPROM request from PBX Expansion board 8A Clear all state Clea...

Страница 27: ...fication 3 4 1 Change wired phone and cordless phone DTZ 8R 1 Handset Press Base Left key to change to cordless phone DTZ 8R 1 Handset and press Base Right key to change to wired phone The LCD shows t...

Страница 28: ...and Talk icon is turned on and shows current volume Talk key Speaker key Step 3 If the user enters dial 1 2 3 then LCD shows the dial number pressed as dial echo Talk Speaker Step 4 The LCD shows this...

Страница 29: ...ker Notes 1 When Base Station is not connected to PBX Handset shows message DISCONNECT 2 When Handset cannot connect to Base Station error tone will be emitted and Out of Range message is shown for 5...

Страница 30: ...user presses talk key or dial key 0 9 or the user picks up the Handset from cradle Handset tries to connect Base Station and shows ACQUIRING LINK message appeared If RF connection is established quick...

Страница 31: ...h RF connection with the Base Station LCD is not changed Step 2 When RF connection is established the Handset goes to Talk Mode and Talk icon is turned on and current volume is shown on the LCD And F1...

Страница 32: ...1 LED is blinking Step 2 If the user presses talk key or dial key 0 9 or the user picks up the Handset from cradle Handset tries to connect Base Station and shows Acquiring Link message appeared If RF...

Страница 33: ...p 3 When RF connection is established The Handset goes to Talk mode and turns on talk icon and shows current volume 3 4 6 Finish Talk Mode The Handset keeps RF link for about 1 second after finish Tal...

Страница 34: ...ALK F2 F2 TALK F3 F3 TALK F4 F4 TALK F5 F5 TALK F6 F6 TALK F7 F7 TALK F8 F8 TALK OFF HOOK RING F1 3 4 9 Training mode Func Softkey2 key change each item setting To change item setting press Func key I...

Страница 35: ...l key the last number dialed will be shown and these dials will be sent to the Base Station Notes 1 Error tone will be emitted when redial is empty 2 Dial limit is 32 digits so redial will store up to...

Страница 36: ...ode At this time confirmation tone is emitted l Ringer volume setting l Menu setting l Talk mode l Trying to connect to the Base Station 3 8 PBX No Service Talk or speaker key is pressed when the Base...

Страница 37: ...ot establish RF Link with the Base Station Handset will sound error tone and shows message Out of Range Talk Speaker Back to Searching screen after 5sec elapsed While Talking If the Handset cannot rec...

Страница 38: ...n and voice sound from Microphone will be muted partner can not hear voice from the user Pressing menu mute key again will cancel mute condition and Mute icon will be turned off Finishing Talk mode ca...

Страница 39: ...hen Headset is connected 3 14 Volume setting There are 3 volume settings Talk mode Hands Free Talk Mode and Headset condition have each volume During each mode if the user presses up or down key the L...

Страница 40: ...dset goes to Ringer volume setting mode and shows current setting The Ring volume will be changed as following Up Down Notes 1 The Handset keeps ringer volume setting mode for 2 seconds without key op...

Страница 41: ...without key operation The Handset cancel menu setting and goes to Standby mode with Error tone 3 Press menu mute key in each menu setting mode menu returns upper list 3 16 1 Menu Top Step 1 Press the...

Страница 42: ...key Add key softkey 2 To Edit contents of pointed Contact List Number If the contents of pointed Contact List is empty Softkey indicates Add To Dial from Contact List Talk Speaker key To Dial Contact...

Страница 43: ...ored in each contact In this screen following keys are available Back Key Back to previous screen Next Key Go to Number edit screen 123 abc key toggle 123 To numeric input abc To alphabetical input De...

Страница 44: ...er 16digits number displayed in 2nd line In this screen following keys are available Back Key Back to previous screen Next Key Go to Number edit screen Delete Key Delete number of cursor position Save...

Страница 45: ...ent timeout value Default value is 30seconds In this screen following keys are available up down key Pointer moves select key Store each value with confirmation tone And return to previous setting lis...

Страница 46: ...on 3 Handset charge on off In this screen following keys are available up down key Pointer moves select key Select each value with confirmation tone And return to previous setting list screen 3 16 10...

Страница 47: ...tion In this screen following keys are available up down key Pointer moves select key Select each value with confirmation tone And return to previous setting list screen 3 16 12 Sounds List Step 1 Pre...

Страница 48: ...le ringer tone for 2 seconds select key Select each value with confirmation tone And return to previous setting list screen 3 16 14 Sounds Vibrate Step 1 Select Vibrate and press select key Then the L...

Страница 49: ...own key Pointer moves select key Select each value with confirmation tone And return to previous setting list screen 3 16 16 Sounds Key Tone Step 1 Select Key Tone and press select key Then the LCD sh...

Страница 50: ...ish French Spanish available In this screen following keys are available up down key Pointer moves select key Select new display language and returns to Menu Top 3 16 18 Administrator Setting List Ste...

Страница 51: ...keys are available cancel key Exit from registration mode Step 3 Handset find Base Station Enter Registration PIN In this screen following keys are available Default Value is 1234 delete key Delete 1...

Страница 52: ...1 only As for Operating Handset display Using next of Handset In this screen following keys are available up down key Pointer moves If the other handset registered select key Select pointed handset a...

Страница 53: ...hange PIN code Step 1 Select Change PIN Code and press select key Then the LCD shows Change PIN Code screen When enter this setting the handset start communicating with Base Station and get current PI...

Страница 54: ...r slot and number of Base Station Sync key Start Sync Display mode Step 2 To Start scanning RF condition press Scan key Start scanning and collect information for about 30 seconds Step 3 Finish Scanni...

Страница 55: ...FPI Base RF ID H O Hand Over Enable Disable Lost Lost counter L status Locked Unlock 3 16 24 Function Key Label Step 1 Press the menu mute key in standby mode Then the LCD shows menu list mode Step 2...

Страница 56: ...c To alphabetical input Delete Key Delete character of cursor position Save Key Store new function key label Alphabetical input Dial Keys Refer in Edit Contact list name Right Left Key alphabetical In...

Страница 57: ...ile incoming calling 3 18 Virtual Function Key In standby or Incoming call Talk Enter Virtual Function key mode by pressing the select key In this screen following keys are available up down Right Lef...

Страница 58: ...setting option is On In Virtual Function key screen following keys are available Dial1 0 key Dialing from Contact list if it registered Dial 1 Contact List 01 Dial 2 Contact List 02 Dial 0 Contact Lis...

Страница 59: ...lizer Normal N A Menu Timeout 30seconds N A Key Lock OFF N A Out Of Range Alert ON N A Redial Option Enable N A Speed Dial Option Disable N A Base Key Option Disable N A Word Wrapping 24 2line 48digit...

Страница 60: ...not occur in a particular installation If this equipment does cause harmful interference to radio or television reception which can be determined by turning the equipment off and on the user is encou...

Отзывы: