background image

21

For printing it is very important that the first layer is nicely squished into the glass plate and sticks well. If the distance 
between the nozzle and build plate is too big, your print will not stick properly to the glass plate. On the other hand, if 
the nozzle is too close to the build plate, it can prevent the filament from extruding from the nozzle. To get the correct 
distance between the build plate and the nozzle, you need to level the build plate. You must do that before using the 
Ulitmaker 2+ for the first time and then periodically.
Always re-level the build plate when you notice that the plastic is not equally placed on the glass plate. After 
transportation of your Ultimaker 2+, it is also advised to re-level the build plate to ensure your 3D prints stick well to  
the build plate. 

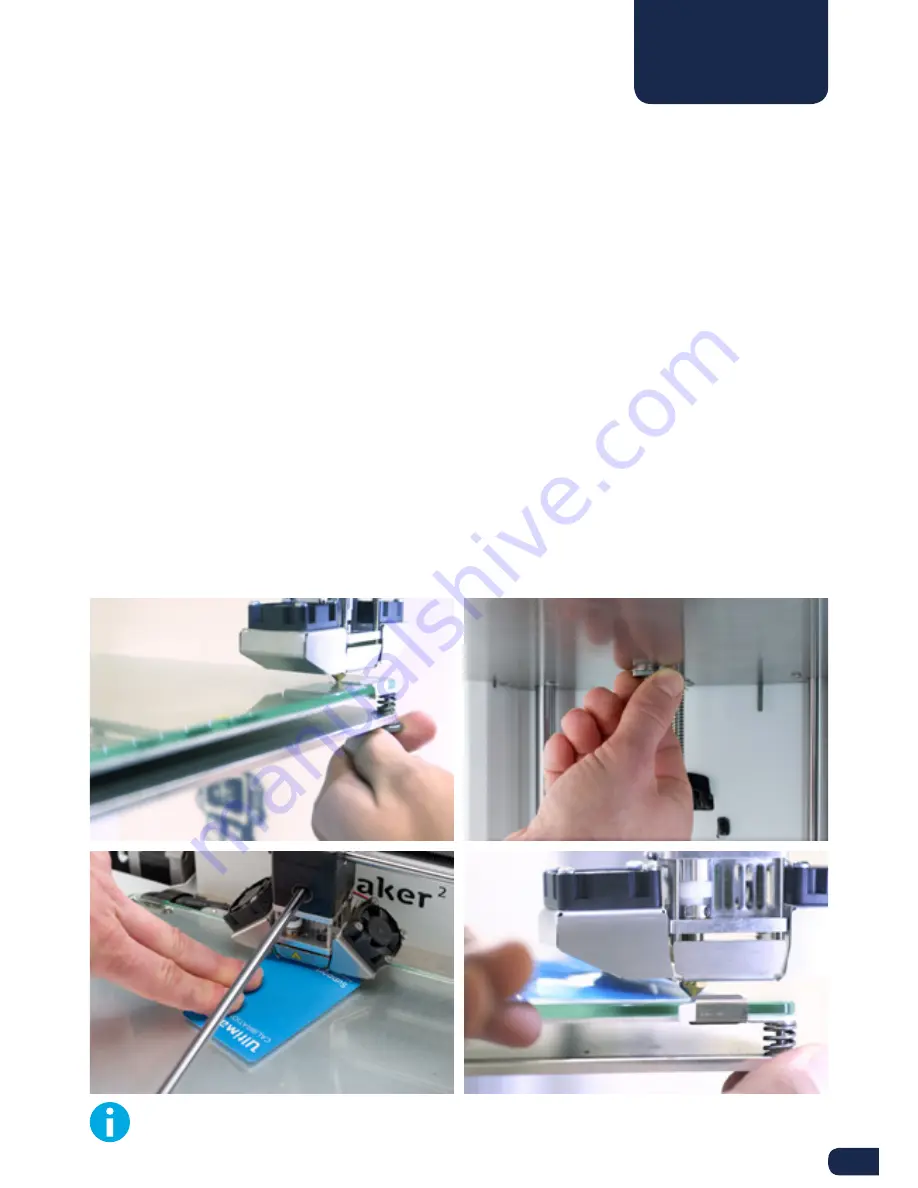
To level the build plate:
1.  Go to “Maintenance” > “Build plate” to start the bed leveling process. (When using the Ultimaker 2+ for the first 

time, you can skip this step).

2.  Wait for the Ultimaker 2+ to do its homing procedure and continue when the print head is in the center at the back 

of the build plate.

3.  Rotate the button at the front until there is approximately 1 mm distance between the nozzle and the build plate.  

Make sure that the nozzle is close to the build plate without touching it.

4.  Adjust the front left and front right build plate screw to roughly level the build plate at the front side. Again there 

should be a distance of approximately 1 mm between the nozzle and build plate.

5.  Place the calibration card in between the nozzle and build plate.
6.  Adjust the build plate screws on the front left side, front right side and the middle of the back until you feel slight 

friction when moving the card.

7.  Press “Continue”. The print head moves to the second point
8.  Repeat step 4 “place the calibration card” and step 5 “adjust the build plate”.
9.  Press “Continue” again. The print head moves to the third point. 
10.  Repeat step 4 “place the calibration card” and step 5 “adjust the build plate”.

Do not push on the build plate while fine-tuning with the calibration card. This will lead to inaccuracies.

BED LEVELING

Содержание 2 Extended

Страница 1: ...INSTALLATION AND USER MANUAL Original manual V1 0 2015 Ultimaker2 OUR MOST ADVANCED 3D PRINTER JUST GOT EVEN BETTER...

Страница 2: ...ponsibility and expressly disclaim liability for loss injuries damage or expense arising out of or in any way connected with the assembly handling storage use or disposal of the product The informatio...

Страница 3: ...boxing 14 Installation 16 4 OPERATION 18 Display and controller 19 First use 20 Bed leveling 21 Loading and changing filament 22 Starting a print 23 Cura software 24 Using glue 25 Changing nozzles 26...

Страница 4: ...sures that you will obtain great quality prints and that possible accidents and injuries will be prevented Make sure that everyone who uses the Ultimaker 2 has access to this manual Every effort has b...

Страница 5: ...mpliance with the essential requirements of the Machinery Directive 2006 42 EC Electromagnetic Compatibility Directive 2004 108 EC WEEE 2002 96 EC RoHS 2002 95 EC RoHS II 2011 65 EU and Reach 1907 200...

Страница 6: ...AFETY AND COMPLIANCE It is very important to work safely with your Ultimaker 2 This chapter is about safety and hazards Please read all information carefully to prevent possible accidents and injuries...

Страница 7: ...he front or the power switch at the back Allow the Ultimaker 2 to cool down for 5 minutes before reaching inside Do not change or adjust anything on the Ultimaker 2 unless the change is authorised by...

Страница 8: ...red Still it is advised to only reach in the machine when it is turned off RISK OF BURNS There is a potential risk of burns as the print head can reach temperatures of up to 260 C and the heated bed c...

Страница 9: ...9 INTRODUCTION Meet your Ultimaker 2 the 3D printer that produces high quality 3D prints 2...

Страница 10: ...10 7 6 8 9 5 1 2 3 4 ULTIMAKER 2 AT A GLANCE 1 Build plate 4 Print head cable 7 Display 2 Print head 5 Build plate clamps 8 SD card slot 3 Bowden tube 6 Push rotate button 9 Build plate screws...

Страница 11: ...11 1 Bowden tube 4 Power switch 7 Spool holder 2 Print head cable 5 USB connector 3 Feeder 6 Power connector 6 5 4 3 1 2 7...

Страница 12: ...S or CPE Print technology Print head Build volume Filament diameter Layer resolution X Y Z accuracy Print head travel speed Extrusion speed Build plate Supported materials Nozzle diameter Nozzle tempe...

Страница 13: ...13 UNPACKING AND INSTALLATION Carefully unpack your Ultimaker 2 and set it up according to the instructions in this chapter 3...

Страница 14: ...x 2 Loosen the belt and take out the accessory box 3 Take the spool with PLA filament and a test print done on your Ultimaker 2 out of the foam 4 Remove the foam packaging 5 Place the Ultimaker 2 on a...

Страница 15: ...se 7 Calibration card 8 Hex wrenches 1 5 mm 2 mm 2 5 mm 9 Test print 10 Glass plate 11 Nozzle kit THIS IS INCLUDED The Ultimaker 2 is supplied with an SD card in the 3D printer and several other acces...

Страница 16: ...Push the spool holder down until it snaps into place PLACING GLASS PLATE 1 Open up the two build plate clamps at the front of the build plate 2 Gently slide the glass plate onto the build plate and ma...

Страница 17: ...the power cable into a wall socket and connect the other side of the power supply to the Ultimaker 2 The flat side of the cable needs to point upwards Before connecting make sure the power switch is...

Страница 18: ...lation it s time to turn on your Ultimaker 2 and start printing This chapter provides information about the display first use how to level the bed how to load and change the filament the Cura software...

Страница 19: ...ings These are the options LED settings Change the settings of the LED lights in your Ultimaker 2 Heatup nozzle Set custom temperature to manually heat up the nozzle Heatup buildplate Set a custom tem...

Страница 20: ...he instructions shown in the display The Ultimaker 2 will do the homing first This means that it will move the print head to the left back corner and the build plate towards the bottom in order to set...

Страница 21: ...s step 2 Wait for the Ultimaker 2 to do its homing procedure and continue when the print head is in the center at the back of the build plate 3 Rotate the button at the front until there is approximat...

Страница 22: ...the switch button on the right side of the feeder is in the middle Then the tension on the feeder is set correctly Don t be surprised if the filament that initially comes out of the nozzle is not the...

Страница 23: ...se note that this can take up to 5 minutes While printing the display will show the progress of the print and the remaining time for completion When the print has finished wait for the build plate to...

Страница 24: ...y save the file to the SD card 4 Remove the SD card from your computer make sure to remove it safely and insert it into your Ultimaker 2 to start printing When using Cura for the first time you will s...

Страница 25: ...ou will need glue to prevent it from warping PLA on the other hand has a much lower shrinkage and thus less warping Because of this it s often possible to print PLA directly on the glass plate without...

Страница 26: ...eans out that nozzle prior to storage ensuring that no filament residue remains in the nozzle that may affect future prints See ATOMIC METHOD on page 31 3 Leave the temperature set to the last tempera...

Страница 27: ...r to have a smoothly working Ultimaker 2 it is important to maintain it correctly This chapter describes the most important maintenance tips Read them carefully in order to achieve the best results wi...

Страница 28: ...2 Open up the build plate clamps at the front side 3 Slide the glass plate to the front of the build plate until you can take it out of the Ultimaker 2 4 Remove any excess glue with some warm water a...

Страница 29: ...er into the bowden tube and print head it is important that the tension on the feeder is set correctly If the tension is too high it means that the knurled wheel of the feeder will dig into the filame...

Страница 30: ...ly Sewing machine oil is not included in the Ultimaker 2 package but we highly recommend using only this to lubricate the X and Y axes Z TRAPEZOIDAL LEADSCREW Once every 6 months the Z trapezoidal lea...

Страница 31: ...ature in order to make sure any residue from the previous filament is removed REMOVING THE FILAMENT 1 Go to Material Change in order to remove the filament Instead of inserting new material select Can...

Страница 32: ...of the tip of the filament the goal is to have a clean cone shaped tip 4 Repeat heating up and preparing and removing the new filament until the filament comes out without any residue and has a cone...

Страница 33: ...ues that could occur while using your Ultimaker 2 If you run into one of these issues you can troubleshoot the issue yourself with help of the information on the next pages Of course we also have loca...

Страница 34: ...at the TFM coupler A deformed TFM coupler can be recognized by a small brim on the inside at the bottom CANNOT CONNECT TO CURA If Cura does not recognize your Ultimaker 2 when you want to upload firmw...

Страница 35: ...ers incorrect values and due to safety reasons it will prevent the heated bed from heating up The most likely reason for this is connection problem which could happen due to a bad connection on the he...

Страница 36: ...olving issues on your own and getting more experienced with 3D printing We also have a very active online community with experienced users who are willing to share tips and solutions and can help you...

Страница 37: ...www ultimaker com...

Отзывы: