Ugolini ARCTIC Compact 1/12 Скачать руководство пользователя страница 11

11

7. 3. 1  DISASSEMBLY

1

Remove cover from the bowl.
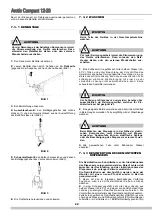
2

Remove the empty bowl by lifting the pulling lever (1) and

its 

front side (faucet side)

 up and off the bowl gasket (see

figure 1).

figure 1

3

Remove the bowl gasket.

4

Remove the pump impeller from its location.
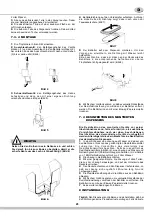
5

Pinch tube faucet

: push the dispensing handle (1) and

take the pinch tube off from its seat (2) (see figure 2).

figure 2

6

Gravity faucet:

 extract the piston and then remove the

dispensing handle (see figure 3).

figure 3

7

Slide drip tray out and empty it.

7. 3. 2  CLEANING

1

Prepare at least two gallons of a mild cleaning solution of

warm (45-60 °C 120-140 °F) potable water and dishwashing

detergent. Do not use an abrasive detergent.

Important: if present, follow label directions, as a too strong

solution can cause parts damage, while a too mild solution will
not provide adequate cleaning.

2

Using a brush, suitable for the purpose, thoroughly clean all

disassembled parts in the cleaning solution.

3

Do not immerse the lighted top covers in liquid. Wash them

apart with the cleaning solution. Carefully clean their undersi-

des. 

4

In the same manner clean the evaporator plates using a

soft bristle brush.

5

Rinse all cleaned parts with cool clean water.

7. 3. 3  SANITIZING

Sanitizing should be performed immediately prior to

starting the machine. Do not allow the unit to sit for

extended periods of time after sanitization.
Sanitization must be performed whenever the distributor is

put back into operation with a new product.

1

Wash hands with a suitable antibacterial soap.

2

Prepare at least two gallons of a warm (45-60 °C 120-

140 °F) sanitizing solution (100 PPM available chlorine concen-

tration or 1 spoon of sodium hypoclorite diluted with two litres of

water) according to your local Health Codes and manufactu-

rer’s specifications.

3

Place the parts in the sanitizing solution for five minutes.

4

Do not immerse the lighted top covers in liquid. Carefully

wash their undersides with the sanitizing solution.

5

Place the sanitized parts on a clean dry surface to air dry.

6

Wipe clean all exterior surfaces of the unit. Do not use an

abrasive cleaner.

ATTENTION

Before any disassembly and/or cleaning procedure make

sure that the dispenser is disconnected from its power

source by unplugging it.

IMPORTANT

Do not attempt to wash any machine components in a

dishwasher.

ATTENTION

Before any disassembly and/or cleaning procedure make

sure that the dispenser is disconnected from its power

source.

IMPORTANT

In order to prevent any damages to the dispenser use

only a detergent suitable with plastic parts.

ATTENTION

When cleaning the machine, do not allow excessive

amounts of water around the electrically operated com-

ponents of the unit. Electrical shock or damage to the

machine may result.

Содержание ARCTIC Compact 1/12

Страница 1: ...ARCTIC Compact 12L 20L MANUALE D ISTRUZIONE OPERATOR S MANUAL CARNET D INSTRUCTIONS GEBRAUCHSANWEISUNG MANUAL DE INSTRUCCIONES...

Страница 2: ...LINI S p A Modell ARCTIC COMPACT 1 12 2 12 3 12 4 12 1 20 2 20 3 20 4 20 230V 50Hz mit den folgenden Normen bereinstimmen Gem den EWG Richtlinien 2014 30 CE 2014 35 CE 2006 42 CE DECLARACI N DE CONFOR...

Страница 3: ...iatura Lo smaltimento abusivo del prodotto da parte del detentore comporta l applicazione delle sanzioni amministrative previste dalla normativa vigente We declare compliance with EU legislation on Re...

Страница 4: ...nte deve essere compresa tra 5 e 32 C 3 Utilizzare l apparecchio esclusivamente per il raffredda mento dei liquidi indicati 4 Non introdurre sostanze o liquidi pericolosi o tossici all interno dell ap...

Страница 5: ...e con i coperchi mon tati al fine di prevenire un eventuale contaminazione del pro dotto 7 Il distributore deve funzionare ininterrottamente il gruppo frigorifero si arrester automaticamente quando il...

Страница 6: ...che que sto rimanga inattivo per lungo tempo dopo la sanitizzazio ne La sanitizzazione deve essere eseguita ogni qualvolta ven ga rimesso in funzione il distributore con nuovo prodotto 1 Prima di ini...

Страница 7: ...ato descritta in precedenza ma mai in sostituzione di essa 1 Preparare in una bacinella una soluzione di acqua e pro dotto sanitizzante approvato dalle autorit del vostro paese rispettando le specific...

Страница 8: ...legare elettricamente il distributore sfilando la spina dalla presa Fare attenzione alle alette del condensatore in quanto taglienti IMPORTANTE Per la manutenzione del prodotto il personale tecnico de...

Страница 9: ...ctly room temperature must be between 5 and 32 C 3 Use the appliance to cool the indicated liquids only 4 Do not introduce dangerous or toxic liquids to the appliance 3 TECHNICAL CHARACTERISTICS Speci...

Страница 10: ...IPTION OF CONTROLS 6 The dispenser must always run with the covers installed to prevent a possible contamination of the product 7 Always leave the dispenser on as the refrigeration stops automatically...

Страница 11: ...starting the machine Do not allow the unit to sit for extended periods of time after sanitization Sanitization must be performed whenever the distributor is put back into operation with a new product...

Страница 12: ...litres of water according to your local Health Codes and manufacturer s speci fications 2 Pour the solution into the bowl s 3 Using a brush suitable for the purpose wipe the solution on all surfaces...

Страница 13: ...1 Cet appareil est destin tre utilis dans le cadre d applications domestiques ou similaires 2 Pour garantir son bon fonctionnement la temp rature ambiante doit tre comprise entre 5 et 32 C 3 Utiliser...

Страница 14: ...eurs voir chapitre 7 1 DESCRIPTION DES COMMANDES 6 Le distributeur doit toujours fonctionner avec les couvercles mont s afin d viter une ventuelle contamination du produit 7 Le distributeur doit fonct...

Страница 15: ...m diatement avant de mettre le distributeur en fonction Il faut viter que celui ci ne fonctionne pas pour une longue p riode apr s avoir t d sinfect La d sinfection doit tre effectu e chaque fois que...

Страница 16: ...suppl mentaire en plus de la d sinfection de l appareil d mont d crite pr c demment Elle ne peut jamais la remplacer 1 Pr parer dans une bassine une solution d eau et de produit d sinfectant approuv p...

Страница 17: ...der cette op ration d brancher lectriquement le distributeur en enlevant la fiche de la prise Faire attention aux ailettes du condenseur car elles sont affil es IMPORTANT Pour l entretien du produit...

Страница 18: ...2 F r seinen korrekten Betrieb muss die Umgebungstemperatur zwischen 5 und 32 C liegen 3 Das Ger t ausschlie lich zum K hlen der angegebenen Fl ssigkeiten verwenden 4 Keine gef hrlichen oder giftigen...

Страница 19: ...DER BETRIEBSSCHALTER 6 Der Dispenser mu immer mit montierten Deckeln betrieben werden um der eventuellen Verschmutzung des Produkts vorzubeugen 7 Der Dispenser mu ununterbrochen funktionieren Das K hl...

Страница 20: ...en da zwischen der Desinfektion und der Inbetriebnahme des Dispensers kein zu langer Zeitraum verstreicht Die Desinfektion muss durchgef hrt werden wenn der H ndler mit einem neuen Produkt wieder in B...

Страница 21: ...infektion des montierten Ger ts vor seiner Inbetriebnahme kann falls erforderlich als zus tzliche Vorsichtsma nahme nach der oben beschriebenen Desinfektion des demontierten Ger ts durchgef hrt werden...

Страница 22: ...Den auf dem Kondensatorfilter angesammelten Staub entfernen Vor jeder Reinigungsarbeit immer die Stromversorgung des Ger ts unterbrechen Dazu den Netzstecker ziehen Anschlie end von Hand die plastik...

Страница 23: ...a su correcto funcionamiento la temperatura ambiente debe estar comprendida entre 5 y 32 C 3 Utilice el aparato exclusivamente para enfriar los l quidos indicados 4 No introduzca sustancias o l quidos...

Страница 24: ...idor debe funcionar ininterrumpidamente el grupo frigor fico se parar autom ticamente cuando el producto est listo para ser distribuido Los dispositivos mezcladores seguir n funcionando 8 Para la buen...

Страница 25: ...da vez que el distribuidor vuelva a funcionar con un nuevo producto 1 Antes de empezar los procedimientos descritos a continuaci n lavarse las manos con un jab n antibact rico 2 Poner en una palangana...

Страница 26: ...nte pero no debe sustituir jam s a la efectuada con el aparato desmontado 1 Poner en una palangana una soluci n de agua o producto para higienizar aprobado por las autoridades de vuestro pa s respetan...

Страница 27: ...iente Prestar atenci n a las aletas del condensador porque tienen filo IMPORTANTE Para el mantenimiento del producto el personal t cnico tiene que utilizar guantes que dispongan por lo menos de un gra...

Страница 28: ...02405 00099 R4 7 20C18...

Отзывы: