


18
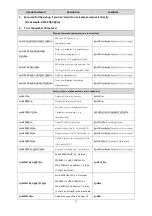
GCodeCommand
Description
Feedback
1.
#
n
is used for the debug, if you don’t want to use it please remove it directly.
(For Example: G2202 N
0
V
90
\n)
2.
‘\n’ is the symbol of line feed.
Moving Command (parameters are in underline)
#
n
G0 X
100
Y
100
Z
100
F
1000
\n
Move to XYZ(mm), F is
speed(mm/min)
$
n
OK \n
or
$
n
E
x
\n
(refer to Err output)
#
n
G2201 S
100
R
90
H
80
F
1000
\n
Polar coordinates,S is stretch(mm),
R is rotation(degree),H is
height(mm), F is speed(mm/min)
$
n
OK \n
or
$
n
E
x
\n
(refer to Err output)
#
n
G2202 N
0
V
90
\n
Move the motorto the position ,Nis
ID of joints(0~3),V is angle(0~180)
$
n
OK \n
or
$
n
E
x
\n
(refer to Err output)
#
n
G2204 X
10
Y
10
Z
10
F
1000
\n
Relative displacement
$
n
OK \n
or
$
n
E
x
\n
(refer to Err output)
#
n
G2205 S
10
R
10
H
10
F
1000
\n
Polar coordinates for relative
displacement
$
n
OK \n
or
$
n
E
x
\n
(refer to Err output)
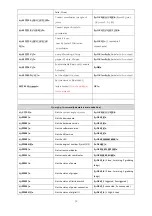
Setting Command
(parameters are in underline)
#
n
M17\n
Attach all the joint motors
$
n
OK \n
#
n
M2019\n
Detach all the joint motors
$
n
OK \n
#
n
M2120 V
0.2
\n
Set time cycle of feedback, return
Cartesian coordinates, V is
time(seconds)
@3 X
154.714
Y
194.915
Z
10.217
\n
#
n
M2200\n
Check if uArm is moving
$
n
OK V
1
\n
(1moving,0 stop)
#
n
M2201 N
0
\n
attach motor, Nis ID of joints(0~3)
$
n
OK \n
or
$
n
E
x
\n
(refer to Err output)
#
n
M2202 N
0
\n
Detach motor, Nis ID of joints(0~3)
$
n
OK \n
or
$
n
E
x
\n
(refer to Err output)
#
n
M2203 N
0
\n
Check if the motor is attached, Nis
ID of joints(0~3)
$
n
OK V
1
\n
(1 attached,0 detached)
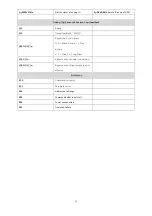
#
n
M2210 F
1000
T
200
\n
buzzer,F is frequency, Tis time (ms)
$
n
OK \n
or
$
n
E
x
\n
(refer to Err output)
#
n
M2211 N
0
A
200
T
1
\n
Read EEPROM N(0~2,0 is internal
EEPROM,1 is USR_E2PROM, 2 is
SYS_E2PROM), Ais address, T is type
(1 char,2 int,4 float)
$
n
OK V
10
\n
#
n
M2212 N
0
A
200
T
1
V
10
\n
Write EEPROM N(0~2,0 is internal
EEPROM,1 is USR_E2PROM, 2 is
SYS_E2PROM), Ais address, T is type
(1 char,2 int,4 float)V is the input data
$
n
OK\n
#
n
M2213 V
0
\n
Default function of base buttons (0
$
n
OK\n
Содержание uArm Swift
Страница 1: ......
Страница 4: ...4 Product Overview 1 Reference Frame...
Страница 5: ...5 2 Buttons Indicator Lights 3 Extension Description...
Страница 7: ...7 Note Before unplugging the wire press the locker of connector and then unplug it...
Страница 8: ...8 2 Swift Gripper Step 1 Fix the gripper to the front mounting block...