Ubiquiti LiteStation2 Скачать руководство пользователя страница 16

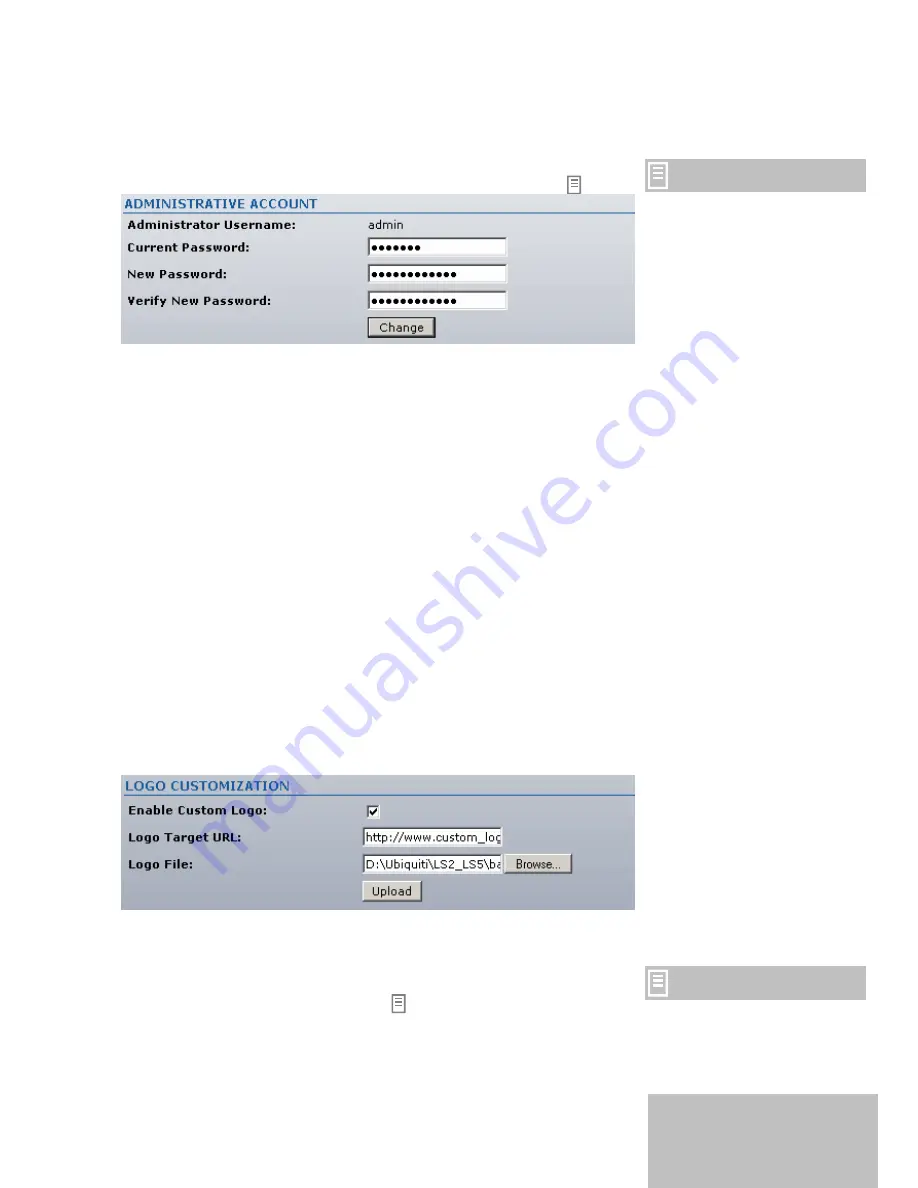
Administrative Account 

In this section you can choose and modify the administrator password 
to protect your LiteStation2 from unauthorized configuration.  


The default administrator 
settings are:  

ƒ

 Username 

– 

admin 

ƒ


Password – admin01 


Figure 16 - Change Administrator Settings 

Administrator Username:

 displays name of the system user. The 

username is not configurable parameter, so it cannot be changed. 

Current Password:

 enter a current password value. 

New Password:

 enter a new password value used for administrator 

authentication. 

Verify Password:

 re-enter the new password to verify its accuracy 

Change:

 click to change the login details of administrator. 

Logo Customization 

Use this section to enable and upload your custom logo on the 
LiteStation2 user interface. The logo must conform to these 
limitations: 

ƒ

  The limit of logo size is 50Kb. 

ƒ

  The maximum height of logo should be 70 pixels. 

ƒ

  Only .gif format images are accepted. 

To upload your custom logo, enable logo customization and specify 
the location of logo file: 


Figure 17 – Custom Logo Upload 

Enable Custom Logo:

 click to enable logo customization. 

Deselecting this option the custom logo will be removed and the 
default Ubiquiti logo will be set back. 


Resetting the device to factory 
defaults, custom logo will be set 
back to default Ubiquiti logo. 

Logo Target URL:

 specify the target URL of custom logo. 


16

Содержание LiteStation2

Страница 1: ...LiteStation2 User s Guide...

Страница 2: ...ngs 8 Link Setup 9 Basic Wireless Settings 9 Wireless Security 10 Network Settings 12 Advanced Link Setup 12 Advanced Wireless Settings 12 802 11e QoS WMM Settings 13 Antennas 14 System 14 Firmware 14...

Страница 3: ...r interface Step 1 Login to the web management Open the web browser and type the default IP address of the LiteStation2 device http 192 168 2 66 into the browser address field You will be prompted to...

Страница 4: ...for detailed information Step 4 Specify the IEEE 802 11 mode Specify the 802 11 wireless network mode by which the subscriber station will communicate with the wireless device Be sure that chosen IEEE...

Страница 5: ...the network Shared Authentication allows communication only with other devices with identical WEP settings WEP Key Length select the Key length here either 64 bits or 128 bits Key Index specify the In...

Страница 6: ...w password to verify its accuracy Change click to change the login details of administrator Step7 Apply changes After each configuration change the informational message suggesting you to apply change...

Страница 7: ...er station Link Setup prepares the subscriber station for use in a wireless network controls how a subscriber station associates to an access point authenticates to the wireless network and encrypts a...

Страница 8: ...as associated Signal Strength dBm displays the wireless signal between the access point and the LiteStation2 The represented value coincides with the graphical bar TX Rate displays the current data tr...

Страница 9: ...eless Settings The general wireless settings such as wireless device ESSID country code output power 802 11 mode and data rates can be configured on this section Figure 3 Basic Wireless Settings ESSID...

Страница 10: ...to 802 11b networks B G Mixed allows connection to 802 11b and 802 11g networks G only allows connection to 802 11g networks G Dynamic Turbo connect to the wireless network that supports 802 11g Dynam...

Страница 11: ...r 64 bits or 128 bits Key Index specify the Index of WEP Key WEP Key enter the encryption key to be used to encrypt and decrypt wireless traffic For 64 bits specify pre shared key as 5 HEX 0 9 A F and...

Страница 12: ...ynamic IP address and gateway address by the local DHCP server Be sure that the DHCP server is running on your network Static choose to assign a static IP address for the LiteStation2 IP Address enter...

Страница 13: ...the subscriber station will wait to hear a response from the wireless device If the timeout is set too short or too long it will timeout and have trouble connecting Changing the ACK Timeout value will...

Страница 14: ...ing current value of the signal strength Figure 12 Antenna alignment Tool Close this window click to close Antenna Alignment window System This page enables administrator to reboot the subscriber stat...

Страница 15: ...ad button Close this window cancel the upload process The new firmware image is uploaded on the system use Upgrade button to upgrade a new system firmware Do not switch off and do not disconnect the L...

Страница 16: ...its accuracy Change click to change the login details of administrator Logo Customization Use this section to enable and upload your custom logo on the LiteStation2 user interface The logo must confor...

Страница 17: ...nce Use this section to reboot subscriber section or reset station parameters to factory default values Figure 18 Device Maintenance Settings Reboot click to reboot device in the current configuration...

Отзывы: