background image

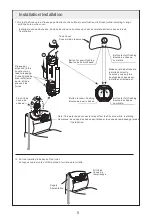
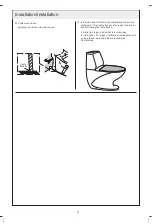
Important Information

Informations importantes
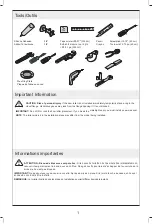
Tools

/

Outils

1

CAUTION

:

Risk of personal injury

.

If the new toilet is not installed immediately

,

temporarily place a rag in the

flange opening if it is not blocked

.

IMPORTANT

!

Do not lift or rock the bowl after placement

.

If you break the

you must install a new wax seal

.

NOTE

:

The toilet pictured in the installation steps may differ from the model being installed

.

watertight seal

,

closet flange

.

Hazardous gases may leak from the

Silicone


Adhesive

Adh

é

sif

 à 

la


silicone

3/8

Pencil

Tape


or


ruler

>

39.37" (100 cm)

Screwdriver


15.75" (40 cm)

Wax


Ring


Plate

Plaque


de


l

'

anneau


en


cire

3m

Crayon

Ruban à mesurer ou règle

39,37 po (100 cm)

>

Tournevis15,75 po (40 cm)

3/8

ATTENTION: Risque de blessures corporelles.

 Si 


recouvrir temporairement la bride avec un chiffon. Des gaz nocifs pourraient s

'

échapper de l

'

ouverture de la 

bride si elle n

'

est pas bloquée. 

la nouvelle toilette n'est pas installée immédiatement,

IMPORTANT! 

Ne pas soulever ou secouer la cuvette. Après sa mise en place.Si le joint étanche se casse,

un nouvel 

anneau de cire devra être installé

.

REMARQUE:

 La toilette illustré  dans les étapes d

installation pourrait différer dumodèle installé

.

e

Содержание TC-3502

Страница 1: ...Rona sku 75225002 Model Mod le TC 3502 Installation and Care Guide Guide d installation et d entretien...

Страница 2: ...sive Adh sif la silicone 3 8 Pencil Tape or ruler 39 37 100 cm Screwdriver 15 75 40 cm Wax Ring Plate Plaque de l anneau en cire 3m Crayon Ruban mesurer ou r gle 39 37 po 100 cm Tournevis15 75 po 40 c...

Страница 3: ...plate Positionner le gabarit a c Align Placez la toilette l endroit requis en faisant correspondre les lignes transversales de la toilette et du plancher the crossed lines and put the toilet on the gr...

Страница 4: ...entation 6 Position brackets as shown on the template and install Positionner les supports tel qu illustr sur le gabarit et installer 7 8 Raccordez la vanne de et le joint chasse Align outlet and care...

Страница 5: ...e the flush valve and pay attention to the buckle 2 Unscrew and remove the fill valve Unscrew Fill Valve Valve de remplissage Flush Valve Valve de chasse 3 Screw Vis Tighten water tank screws with a 1...

Страница 6: ...he buttons are installed correctly Assurez vous que les boutons de chasse sont install s correctement Button for full flushing Bouton de chasse compl te Button for full flushing Bouton de chasse compl...

Страница 7: ...uger apr s avoir Le joint d tanch it pourrait plac la toilette fuir Connect supply and turn on the water Connecter l alimentation et ouvrir l eau 3 8 Supply Alimentation de 3 8 Flush several times and...

Страница 8: ...21 Install the seat Refer to the Installation Instruction of the seat Periodically check for leaks for several days following the installation Installer le si ge V rifier p riodiquement s il y a des...

Страница 9: ...des normes de haute qualit tr s strictes et est garanti contre tout d faut de fabrication pour une p riode de 5 ans porcelaine ou 1 an pi ces de plomberie suivant la date d achat Cette garantie n affe...

Страница 10: ...the enter of flush valve and lock the nut counter clockwise Ajustez l crou de la barre en tournant dans le sens horaire ou antihoraire afin que la barre soit niveau avec la vfanne de chasse Serrez l c...

Страница 11: ...ew Vis Water supply hose Tuyau d alimentation d eau A0021 Floor Mounting Kit Kit de fixation au sol A0032 R0002 Wax Ring Plate Plaque d anneau en cire 02006 Toilet Seat Si ge de toilette 02004 Cover o...

Страница 12: ...Toilette double chasse Dual Flush Toilet...

Отзывы: