background image

:

6

IF YOU WOULD LIKE TO ORDER 

REPLACEMENT OR MISSING PARTS 

PLEASE VISIT US AT:

WWW.THEMDBFAMILY.COM

OR YOU CAN CONTACT US BY MAIL:

MDB FAMILY

855 WASHINGTON BLVD.

MONTEBELLO, CA 90640

We will replace any missing parts at the time 

of  purchase  or  any  defective  item  within 

a  one  year  period  from  the  date  of  original 

purchase.  Please  keep  your  receipt  so  that 

we may process your warranty request. This 

warranty only covers new units with original 

packaging  and  ownership,  and  is  not  trans-

ferable. It does not cover any used, second-

hand or demo models. 

This warranty does not cover any damaged 

or defective parts that result from installation 

and assembly, normal wear and tear, abuse, 

negligence, improper use or alteration to the 

finish,  design,  and  hardware.  The  specific 

legal  rights  of  this  warranty  may  vary  from 

state to state. Some states do not allow any 

exclusion or limitation of incidental damages. 

Some  states  do  not  allow  limitation  on  how 

long an implied warranty lasts.  


ONE YEAR LIMITED WARRANTY:

Registering your product is even easier than 

before. You can register your product on our 

website at: www.themdbfamily.com

Содержание U4004

Страница 1: ...Junior Bed Conversion Kit Product Code U4004 Pod revised 250413 ...

Страница 2: ... capacity to convert into a junior bed and adapt with your growing child During the design and production of this product we have selected materials that are either recyclable or derived from sustainable practices Contents Contents Hardware 3 Care Maintenance 5 A Disassemble the crib 7 B Bed rail assembly 8 C Mattress base position 10 D Finished assembly 11 ...

Страница 3: ...Hardware PARTS REQUIRED FROM CRIB 9 x 60mm bolt 2 x Locking Cam 2 x Connector Pin 4 x 20mm bolt 2 x Support Pin ...

Страница 4: ...ovided must be used to avoid the formation of a gap between the mattress and the bed that could cause an entrapment DO NOT place bed near windows where cords from blinds or drapes may strangle a child DO NOT place items with a string cord or ribbon around a child s neck such as a hood strings or pacifier cords DO NOT suspend strings over a toddler bed for any reason The intended user s minimum age...

Страница 5: ...re and prolonged direct exposure to harsh sunlight can discolor the finish Be careful not to place your furniture in direct sunlight for extended periods of time As with all your fine furniture blot up spills immediately Do not scratch or chip the finish Do not use abrasive chemicals for cleaning Clean with mild soap on a soft rag Rinse and dry thoroughly If you ever refinish this furniture be sure ...

Страница 6: ...ownership and is not trans ferable It does not cover any used second hand or demo models This warranty does not cover any damaged or defective parts that result from installation and assembly normal wear and tear abuse negligence improper use or alteration to the finish design and hardware The specific legal rights of this warranty may vary from state to state Some states do not allow any exclusion ...

Страница 7: ...s base from crib Step 2 Select one curved end Remove connector pins and cam locks at acrylic side panels Unscrew 55mm bolts 2 and 60mm bolt 2 from the bottom Remove curved end Step 3 Unscrew 55mm bolts 6 at the bottom of acrylic side panels Remove both acrylic side panels ...

Страница 8: ...o install the other side of Junior Bed Rail Step 7 Insert connecting pins 2 into ends of Junior Bed End using a screwdriver Step 8 Insert locking cams 2 to Junior Bed Side Rails Step 9 Horizontally slide Junior Bed End along Plastic Base edge until Connecting Pins insert into both Junior Bed Side Rails Step 10 Start with center insert 60mm bolts 3 on Junior Bed End and finger tighten Step 11 Make ...

Страница 9: ...0mm bolt 2 x Locking Cam Fig B1 Insert the Locking Cam nut Use screwdriver to turn Locking Cam nuts clockwise until tight 12 1 12 2 12 3 Make sure connecting pin passes through the Locking Cam 2 x Support Pin ...

Страница 10: ... to lower base into position It will rest on inside edge of Plastic Base Step 2 Select 20mm bolts 4 Step 3 Align Mattress Base with both holes and attach one bolt at each end Finger tighten Step 4 Install two remaining bolts then tighten all 4 bolts with Allen Key ...

Страница 11: ...11 KEEP THIS MANUAL IN A SAFE PLACE FOR FUTURE REFERENCE Recheck all bolts to be sure they are fastened securely Do not overtighten D ...

Страница 12: ...Made in China 12 ...

Страница 13: ...Kit de conversión a cama júnior Código de producto U4004 Pod INSTRUCCIONES revisado 250413 13 ...

Страница 14: ... materiales reciclables o producidos mediante un proceso sostenible Cama júnior para niños de uso doméstico Manual de instrucciones PERSONAS REQUERIDAS HERRAMIENTAS REQUERIDAS DESTORNILLADOR TIPO PHILLIPS LLAVE ALLEN INCLUIDA Contenido Contenido y herramientas 15 Advertencias cuidado y mantenimiento 16 A Desarmado de la cuna 19 B Ensamblaje de la barandilla de la cama 20 C Colocación de la base de...

Страница 15: ...60 mm 2 válvulas de cierre 2 pines de conexión Contenido 1 extremo de la cama júnior 2 barandillas laterales de la cama júnior 1 base de plástico 1 base del colchón 1 extremo inferior con curva 2 patas 1 llave allen 15 4 tornillos de 20 mm 2 pines de soporte ...

Страница 16: ...so la muerte NUNCA use la cama con bebés que tengan menos de 15 meses de edad NUNCA coloque la cama cerca de ventanas donde haya cordones de persianas o cortinas que puedan estrangular a un niño Si se usa la barandilla de protección como medio de conten ción del colchón la barandilla de protección que se proporciona debe usarse para evitar la formación de espacios vacíos entre el colchón y la cama...

Страница 17: ...esfavorableparalosmueblesdemaderasólida yaquela exposicióndirectayprolongadaalaluzdelsol particularmente cuandolaluzde solesmuyfuerte puedeocasionarquesedescoloreelacabado Nocoloquesu muebledirectamentefrentealaluzsolarporperíodosprolongados Aligualque contodossusmueblesfinos limpiedeinmediatocualquierderrameohumedad Norayeodañeelacabado Noutiliceproductosquímicosabrasivosparalimpiar elmueble Limp...

Страница 18: ... y ensamblaje incorrectos uso y desgaste nor mal abuso negligencia uso inadecuado o alteración del acabado diseño o piezas del producto Los derechos legales específicos de esta garantía pueden variar dependiendo del estado Algunos estados no permiten la exclusión o limitación de los daños inciden tales Otros estados no permiten que se limite la duración de la garantía implícita GARANTÍA LIMITADA D...

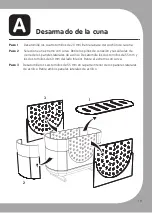
Страница 19: ...a Retire los pines de conexión y las válvulas de cierre de los paneles laterales de acrílico Desatornille los dos tornillos de 55 mm y los dos tornillos de 60 mm del lado inferior Retire el extremo con curva Paso 3 Desatornille los seis tornillos de 55 mm en la parte inferior de los paneles laterales de acrílico Retire ambos paneles laterales de acrílico ...

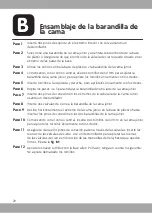
Страница 20: ... júnior Inserte dos pines de conexión en los extremos de la cabecera de la Cama Júnior usando un destornillador Inserte dos válvulas de cierre a la barandilla de la cama júnior Deslice horizontalmente el extremo de la cama júnior en la base de plástico hasta insertar los pines de conexión en las dos barandillas de la cama júnior Comenzando con el orificio central inserte tres tornillos de 60 mm en...

Страница 21: ...screwdriver to turn Locking Cam nuts clockwise until tight 12 1 12 2 12 3 Asegúrese de que los pines de conexión pasen a través de las válvulas Inserte la tuerca de la válvula de cierre Use un destornillador para apretar las tuercas de las válvulas de cierre en dirección de las manecillas del reloj hasta que queden firmes ...

Страница 22: ...erior de la base de plástico Paso 2 Seleccione cuatro tornillos de 20 mm Paso 3 Alinee la base del colchón con ambos orificios e inserte un tornillo en cada extremo Apriételos únicamente con los dedos Paso 4 Inserte los dos tornillos restantes y apriete los cuatro tornillos con la llave allen Colocación de la base del colchón ...

Страница 23: ...UGAR SEGU RO PARA CONSULTARLO EN EL FUTURO Verifique que todos los tornillos estén apretados con firmeza No apriete demasiado los tornillos D Finalización del ensamblaje Paso 1 Limpie todas las superficies Paso 2 Coloque el colchón ...

Страница 24: ...Hecho en China ...

Отзывы: