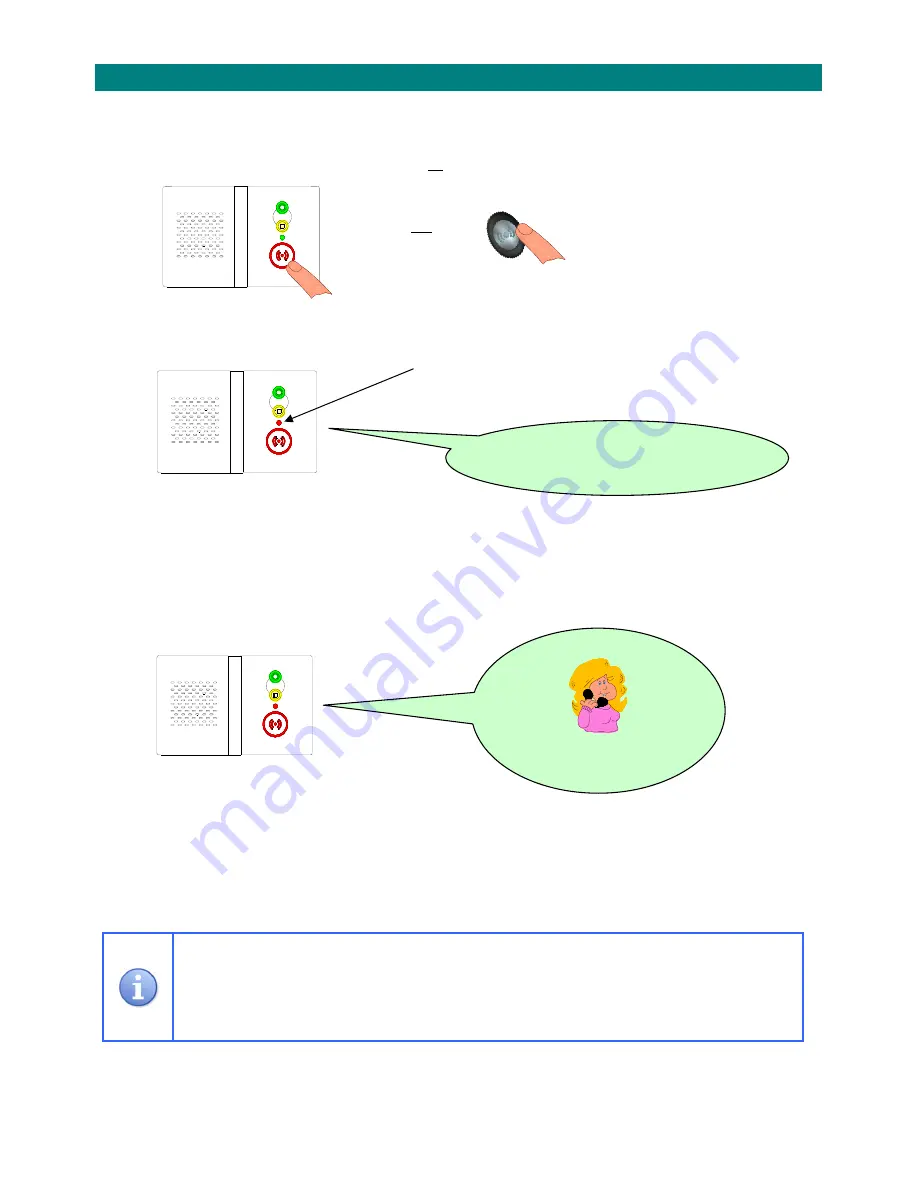
background image

‐ 

8

 ‐ 

1.9


MAKING


AN


EMERGENCY


CALL


An


emergency


call


can


be


made


at


any


time


of


the


day


or


night.


1.


Press


the


RED


((

))


button


on


the


Reach


unit


or


press


the


Touch


pendant...


The


pendant


button


will


OR


FLASH


RED


((

))


for


several


seconds


after


the


button


is


pressed.


2.


The


Reach


will


start


to


make


an


emergency


call…


The


front


light


will


go


STEADY


RED


and


the


unit


will


announce…


This


message


will


repeat


for


a


few


seconds


before


the


unit


starts


to


dial.


3.


The


call


will


be


answered


by


the


control


centre


and


an


operator


will


speak…


4.


A


two


way


conversation


can


be


held


with


the


resident.


5.


The


operator


will


cancel


the


call


and


the


front


light


will


return


to


STEADY


GREEN

.


If


the


operator


cannot


hear


the


caller


they


will


still


know


where


the


call


is


coming


from.


The


Touch


pendant


does


NOT


pick


up


voice,


the


microphone


is


in


the


Reach

unit


and


is


very


sensitive

but


it


will


not


work


if


the


caller


is


outside


their


home.


The


control


centre


can


increase


the


volume


if


the


caller


has


difficulty


hearing.


Alarm


type


Please


wait,


dialling


for


assistance


You’re


through


to


Care


Line,


how


can


I


help


you?


Содержание Reach

Страница 1: ...Touch Personal Pendant USER INSTALLATION GUIDE www tynetec co uk Reach At Home Alarm Unit ...

Страница 2: ...Guide 15 2 2 Programming Mode 16 2 2 1 Programming the Unit ID Number 16 2 2 2 Programming the Telephone Number 17 2 2 3 Programming the Protocol Type 17 2 2 4 Exit Programming Mode 17 2 3 Programming Parameters List 18 2 3 1 Load Defaults Parameter Check 19 2 3 2 Audio Settings 19 2 3 3 Hardwired Inputs 20 2 3 4 Identity Settings 20 2 3 5 Telephone Numbers 21 2 3 6 Activity Monitoring 21 2 3 7 Pe...

Страница 3: ...nit Once complete a test call should be raised from each trigger device to the Alarm Receiving Centre to ensure it is received and the trigger device is correctly identified Avoid using harsh abrasive or corrosive cleaning agents or detergents e g scouring powders bleaches polishes etc when cleaning the Reach or Touch Pendant You can dust the Reach or Touch Pendant with a soft cloth or soft brush ...

Страница 4: ...ty break device in place Push the Belt Clip through the 2 slots in the rubber boot ensure the 2 arrows on the clip and boot align for correct fit The suction cup can be used with the clip option to stick the Touch pendant to a tiled wall when in the bath or shower Push the Wrist Strap through the 2 slots in the rubber boot and adjust the strap to fit Additional pendants and rubber boots are availa...

Страница 5: ...originally plugged in 3 Connect the Power Lead between the Reach SUPPLY socket and the mains supply 4 The DATA socket is only used for firmware upgrades or for the connection of hardwired inputs such as ceiling pullcords see section 2 3 3 for more details 5 Choose the connector cover if the unit is being placed flat on the table or the stand if it is being placed in the upright position It can als...

Страница 6: ...L socket This method of connection ensures that an alarm call on the Reach unit will always disconnect any other equipment that might cause connection difficulties 1 6 REACH AND BROADBAND Broadband Service Providers will supply a filter module to plug into the telephone line to allow connection of a computer and a normal telephone Only one filter module is required to connect the computer telephon...

Страница 7: ...HOME ALARM OFF The Reach At Home Alarm uses very little power and should always be left switched ON If it is necessary to switch the unit OFF follow the procedure below 1 Turn the mains supply off and wait for the unit to announce 2 Press and HOLD the GREEN button until the unit beeps once 3 RELEASE the GREEN button and the unit will announce 4 The Reach is now switched off The telephone plugged i...

Страница 8: ... The call will be answered by the control centre and an operator will speak 4 A two way conversation can be held with the resident 5 The operator will cancel the call and the front light will return to STEADY GREEN If the operator cannot hear the caller they will still know where the call is coming from The Touch pendant does NOT pick up voice the microphone is in the Reach unit and is very sensit...

Страница 9: ...ll when the control centre answers they just need to say the call was made accidently The staff will be pleased that they have talked and they will cancel the call in the normal way 1 11 ANSWERING AN INCOMING TELEPHONE CALL The Reach can also be used to answer a normal incoming telephone call The front light will FLASH RED when the telephone is ringing RING To answer a telephone call RING Press th...

Страница 10: ...ssage When the message is finished press the star key You can now have a conversation with the caller Speak to the caller stop speaking to listen If there s too much noise for the voice switching to work Press the 7 key to SPEAK Press the 9 key to LISTEN Press the 4 key to revert to VOICE SWITCHED mode If the volume needs adjusting Press the 1 key to INCREASE VOLUME Press the 2 key to REDUCE VOLUM...

Страница 11: ...YELLOW button and the unit will announce The front light will FLASH GREEN The unit is now in Away Mode and their activity monitoring is turned off When the resident returns home they must remember to turn their activity monitoring back on Press the YELLOW button and the unit will announce The front light will go STEADY GREEN The unit is now back in Normal Mode and their activity monitoring will be...

Страница 12: ...the double beep will stop and intruder mode is set The front light will go STEADY AMBER When they return home and activate a PIR movement detector the entry time will start You now have 30 seconds to disable the intruder mode 5 To DISABLE intruder mode press the GREEN button first followed by the TOUCH PENDANT within 20 seconds then The front light will go STEADY GREEN and the unit will announce F...

Страница 13: ...will continue to operate on its batteries for up to 24 hours 1 16 TELEPHONE LINE FAILURE ALERT The Reach will make the resident aware if their telephone line has a fault or if the telecom lead has been accidently unplugged The front light will FLASH AMBER and the unit will announce The message will repeat 3 times every 4 hours until the telephone line is restored To silence the message and prevent...

Страница 14: ...nge to visit and replace the battery In normal use the battery should not need replacing for between 3 to 5 years The replacement battery must be identical to that originally fitted and should only be changed by a competent person Replacement battery Tynetec Part No F00141 1 18 ON OFF SWITCH The Reach can be switched off if it is not going to be used for a prolonged period Remove the stand if fitt...

Страница 15: ...ming the Unit ID Number 1 Enter 0 2 4 and the unit will announce Unit ID 2 Enter the unit ID number followed by the key 3 The unit will announce Ready Programming the Telephone Number 1 Enter 0 2 6 and the unit will announce Telephone Number 1 2 Enter the control centre telephone number followed by the key 3 The unit will announce Ready Note up to 4 different telephone numbers can be entered using...

Страница 16: ...from the list in section 2 3 See below for the minimum information you will need to program 2 2 1 PROGRAMMING THE UNIT ID NUMBER The unit ID is a unique number issued by the control centre to identify the resident max 12 digits Press 0 2 4 and the unit will announce Enter the unit ID number then press If the unit ID was entered correctly you will hear the Ready prompt After the Ready prompt it s O...

Страница 17: ...ntre telephone numbers can be programmed using codes 027 028 029 2 2 3 PROGRAMMING THE PROTOCOL TYPE The control centre will confirm which protocol type they use TT or BS8521 Press 0 2 2 and the unit will announce Enter 0 for TT or 1 for BS8521 If the protocol type was entered correctly you will hear the Ready prompt 2 2 4 EXIT PROGRAMMING MODE When all parameters are programmed press the key The ...

Страница 18: ... 3 032 None Tel No 8 PR 4 033 None Activity Monitoring Enable Disable 034 0 Disable or 1 Enable Disabled 2 3 6 12 or 24 Hour Period and Threshold Count 035 1 st digit 0 12Hr 1 24Hr 2 nd digit threshold 0 to 9 then 12 Hour Threshold 1 Periodic Test Interval 01 99 days Enable Disable 0 Hours or 12 Hours 036 1 st 2 digits interval in days 3 rd digit 0 Disable 1 Enable 4 th digit 0 0Hrs 1 12Hrs then D...

Страница 19: ...volume to from the control centre can be set between 0 off and 5 highest Enter 006 the unit will announce Audio Volume press 0 to 5 followed by Ring Volume the volume of the internally generated ring tone this is only used if there is no telephone connected to the TEL socket can be set between 0 off and 5 highest Enter 007 the unit will announce Ring Volume press 0 to 5 followed by Audio Mode allo...

Страница 20: ...ation 12 Living Room 2 24 Kitchen Area 36 Laundry Room 2 48 Shed 01 Local Unit 13 Living Area 25 Utility Room 1 37 Office 49 Outbuilding Shed 02 Hallway Down 14 Dining Room 1 26 Utility Room 2 38 Study 50 Garden Front 03 Hallway Up 15 Dining Room 2 27 Entrance Lobby 39 Games Room 51 Garden Rear 04 Stairs 1 16 Dining Area 28 Front Door 1 40 Common Room 1 52 Garden Other 05 Stairs 2 17 Bathroom 1 29...

Страница 21: ...rdwired or radio must be fitted if activity monitoring is being enabled Enter 034 the unit will announce Activity Monitoring press 0 to Disable or 1 to Enable followed by 12 24 Hours Threshold set the activity monitoring period as 12 or 24 hours and the threshold count 0 to 9 Enter 035 the unit will announce Activity Monitoring Period enter a 2 digit number the first digit being 0 for 12 hours or ...

Страница 22: ...0 the unit will announce Learn Radio Device and Enter Location Code After the beep activate the radio device The unit will announce the Device Type followed by Enter Location Code Enter the 2 digit code from the table below the unit will beep activate another radio device to be learned or press to end 00 No Location 12 Living Room 2 24 Kitchen Area 36 Laundry Room 2 48 Shed 01 Local Unit 13 Living...

Страница 23: ...eing enabled Enter 063 the unit will announce Intruder Mode press 0 to Disable or 1 to Enable followed by 2 3 12 PUSHBUTTON SETTINGS The 3 pushbuttons on the front of the Reach unit can be individually enabled or disabled Enter the relevant code 064 RED emergency button 065 YELLOW function button or 066 GREEN cancel button and the unit will announce Program Button press 0 to Disable or 1 to Enable...

Страница 24: ...control centre will answer the call and speak to you 6 The default unit ID of the Reach will be 995 7 Advise the operator of the user s name address and telephone number etc 8 You will hear a series of tones when the new data is being programmed 9 The operator will speak to you again to confirm when programming is complete 10 Advise the operator that you will make a final test call and ask for the...

Страница 25: ...al pendant press the button once The button will FLASH RED for several seconds and the Reach will announce Pendant If the unit emits a single low tone the device has already been learned Activate any other radio devices that need to be learned the Reach will announce each device type 3 Press the GREEN button to exit radio device learn mode The front light will go STEADY GREEN and the unit is back ...

Страница 26: ...AST GREEN release the button and the unit will announce 2 Go to all extremes of the dwelling and activate the pendant the Reach will beep each time a radio signal is received OK Repeat the test for all radio devices 3 Press the GREEN button to exit radio device test mode The front light will go STEADY GREEN and the unit is back in normal operating mode Radio Device Test mode will exit automaticall...

Страница 27: ...call programmable 0 99 days Mains Fail Report Audible alarm random dial out between 1 4 hours Line Fault Report Audible alarm Activity Mode 12 or 24 hour activity monitoring period with 0 9 threshold count Away Mode Temporarily disables activity monitoring mode Intruder Mode 30 second entry exit time PIR required PIR Option For activity monitoring or intruder modes Radio Devices Compatible with 16...

Страница 28: ... Flashing Green Away Mode Flashing Fast Green Program Mode Steady Red Emergency Call Flashing Red Telephone Call Steady Amber Intruder Mode Flashing Amber Fault NEED MORE HELP OR ADVICE Please contact Tynetec s Telecare Helpline on 01670 369934 Lines open Monday to Friday from 9AM to 5PM excluding Bank Holidays Tynetec a business unit of Legrand Electric Ltd Unit 10 Cowley Road Blyth Riverside Bus...

Отзывы: