background image


TwinTAB-T7283GD1 User Guide


35 | 


P a g e


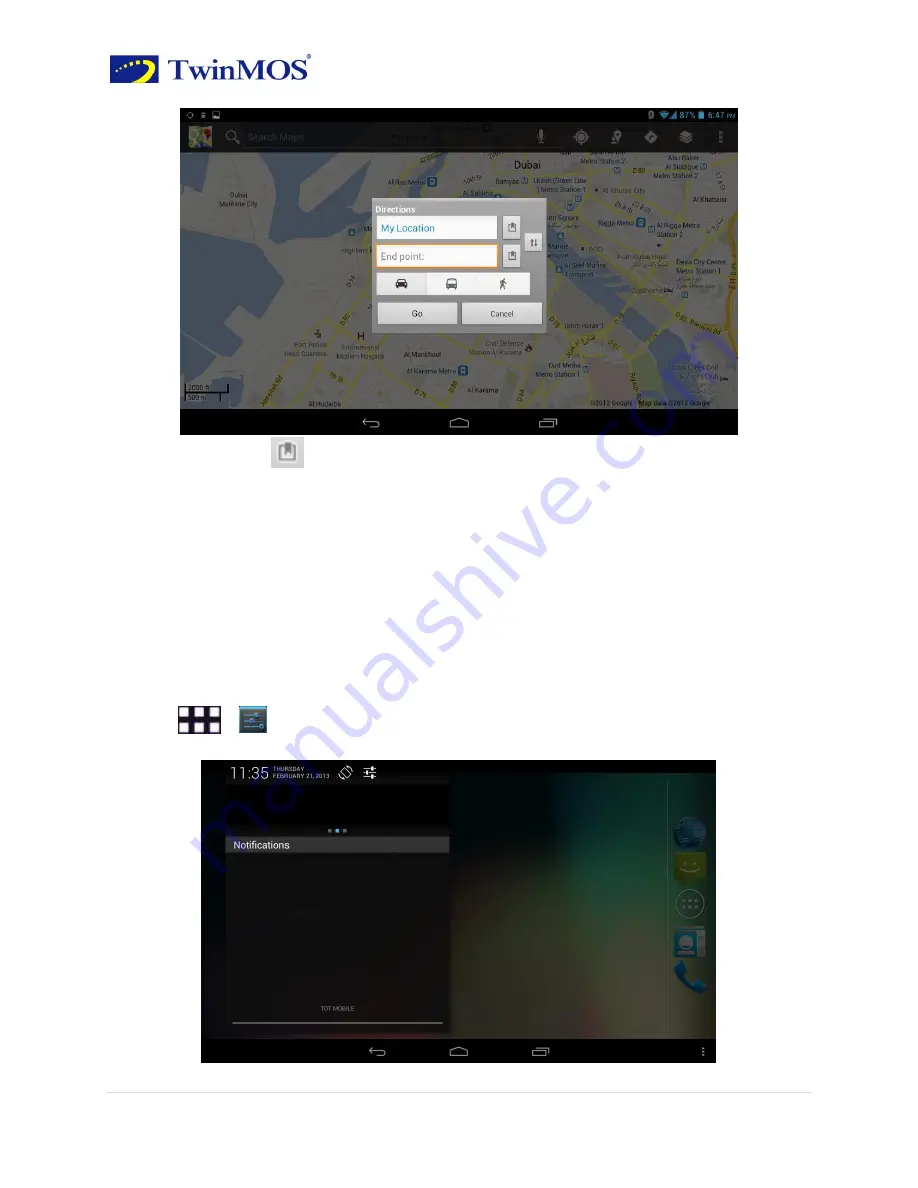
You can also click

 to


open the list of position

and then select the starting point and 

destination address. 

3.


Select the way you travel

By car, bus or on foot. 

4.  Click  “Go”,  wait  a  little  longer,  it  will  be  a  list  showing  the  routes  to  go  to  your 

destination.


Click on the route guidance on a map showing the route. 

5. Complete view or finished using the routes, presses the Menu key, then click empty 

the results, you can reset the map. Your destination will be automatically saved in the map 
records. 


Chapter 10: 

Settings


10.1 Device Settings 

You can use the following methods to open the settings interface


·Click

 >

Settings. 

·Click the status bar of the main screen, then you can see the pop-up menu. 


Содержание TwinTAB-T7283GD1

Страница 1: ...User Guide June 2013 Copyright TwinMOS Technologies ME All Rights Reserved...

Страница 2: ...een 7 2 3 Volumes 7 Set the volumes 7 Set vibrate 7 Call Volumes 8 2 4 People 8 New contact 8 Edit contacts Delete contacts 8 Backup contacts 9 Import contacts 10 Favorite contacts 10 3 1 Phone 10 Mak...

Страница 3: ...ent 19 7 1 Music 19 Play music 19 7 2 Camera 20 Photo Options 21 View image 23 Slideshow 23 Share pictures 24 Edit photos 24 7 3 Camcorder 25 Video options 26 View the video 27 Manage video 27 Share v...

Страница 4: ...ve Touch Screen 3G Supporting WCDMA Bluetooth connectivity Supporting Phone Call over 2G network Supporting Video Call over 3G network Dual Camera Front camera 0 3 Megapixel backside camera 2 Megapixe...

Страница 5: ...de Video 16 9 support most video type Audio 3 5 mm OMTP MP3 OGG AAC etc LRC lyrics synchronizing Photo Album Stereo speaker Business Support WORD EXCEL POWERPOINT PDF TXT office software Arabic keyboa...

Страница 6: ...that the bottom right corner show red icons When the device in the format or ongoing upload and download file please don t suddenly disconnect this could cause application error For those who because...

Страница 7: ...r USB interface and then you can charge The first two times charging please keep about 6 hours after that you just need 4 hours to charge Remark This tablet using Built in type polymer battery Charge...

Страница 8: ...hen locate the SIM card slot and then insert the SIM card with its gold contacts facing down and its cut off corner facing out the card slot remove SIM card Before remove the SIM card please turning o...

Страница 9: ...r key Pop up Device Options menu Click Shut Down Select OK in the pop up menu 1 6 Standby 1 If you do not unlock within a long time about 10 seconds device will automatic dark screen This option may c...

Страница 10: ...to turn off the status bar Icon Explain Icon Explain No SIM card Signal strength 3G signal GSM signal EDGE Airplane mode Charging Low power Full power Silent mode Vibration mode Alarm GPS open WiFi i...

Страница 11: ...are ICONS long press the icons 3 second after the icons will bigger then you can drag anywhere in the interface Delete icons long press the icons 3 second drag the icons to the Recycle Bin icon once i...

Страница 12: ...screen Click to open the application menu then click Or sliding screen to the left into the widgets page long press any widget drag it to the screen Adding a widget to Home screen A wide selection of...

Страница 13: ...On some screens such as web pages you can also scroll side to side 4 Zoom when you view page you can double click the screen to zoom in or out the page 2 3 Volumes Media volumes Set the volumes of mus...

Страница 14: ...ontacts phone numbers and e mail and other related contents New contact Steps People new contact 1 Enter your contact s information 2 Click DONE to save the contact Edit contacts Delete contacts Edit...

Страница 15: ...pop up menu choose Delete 3 Check the contacts you want to delete click OK to delete the checked contacts Backup contacts You can export your contact data to the SD card Steps 1 Click open the contact...

Страница 16: ...contacts and special contacts to your collection in order to find and use Steps Select a contact in your contact list and then click the star icon to make it turn blue Chapter 3 Use the device 3 1 Ph...

Страница 17: ...Bluetooth headset to make and receive calls Mute During a call you can make the other side cannot hear your voice Press the mute turn on or turn off mute Telephone conference 1 Phone 2 Press the numbe...

Страница 18: ...as hear the person you re talking to You can make a video call to someone through 3G network Note Not all mobile phone networks support Video calling Contact your wireless service provider for details...

Страница 19: ...nter the text you want to send 2 Click send the message Write MMS Steps Messaging new message Enter the message receiver you can also press Find a receiver Next in the following ways you can make a SM...

Страница 20: ...e account Recover your Google account s password If you have forgotten your Google account s password you can perform the following steps to obtain the password 1 On tn the computer open a browser and...

Страница 21: ...E mail address of the recipient 3 Enter a subject 4 Write the message content 5 Click to send the E mail View and save e mail Receiving e mail messages stored in the network service provider s mail se...

Страница 22: ...s WIRELESS NETWORKS 2 Open the WLAN your device will automatically list the networks If you select an open network you can directly connect to the network If you select an encrypted network you must e...

Страница 23: ...th your network service provider for how to connect Note The network connection type depending on your network service provider Uses a different type of connection your network connection costs are di...

Страница 24: ...ou can also enter the URL you want to access directly in the address bar Zoom pages Double click the web page to zoom the page Drag up and down the page you can quickly browse the Web Set your browser...

Страница 25: ...Bluetooth and equipment Click the device name which you want to disconnect in the list and then click Unpair to disconnect Chapter 7 Multimedia 7 1 Music Play music Steps Click Music Your device will...

Страница 26: ...the music continues to play 3 Click can stop the music 7 2 Camera Steps Click Camera Screen display framing the landscape of the region Can switch between camera and camcorder Photo shoot button Drag...

Страница 27: ...21 P a g e Touch the thumbnail of the photo you can open the media library to view the pictures Click Options on the screen you can operate the pictures Photo Options Click can enter the set interface...

Страница 28: ...TwinTAB T7283GD1 User Guide 22 P a g e White balance Color effect...

Страница 29: ...you want to see You can also drag the screen left or right to view the next or previous picture Slideshow You can slide show in the following two methods 1 Click you can start slideshow 2 Click the pi...

Страница 30: ...ures 1 Click the picture you want to share enter the picture browsing interface and then click 2 Choose ways of sharing SMS Bluetooth e mail Edit photos Enter the picture browsing interface then click...

Страница 31: ...s Click Camcorder Screen display framing the landscape of the region Can switch between camera and camcorder Icon to record video Drag the ring to adjust the focal length of the camera Can switch betw...

Страница 32: ...TwinTAB T7283GD1 User Guide 26 P a g e Video options Click can enter the set interface You can set the following Time lapse interval Color effect White balance Camera settings...

Страница 33: ...l you can open the media library view to the video Click the play button on the screen you can view the video You can also choose other buttons you want to do Manage video Play video Steps Click Video...

Страница 34: ...audio you just recorded Chapter 8 USB SD card 8 1 USB connection You can use the USB data cable to connect the device to the computer in order to transfer pictures videos music and more between SD ca...

Страница 35: ...s video music and other files on your computer to the device memory card folder 7 Click to turn off USB storage devices to safely disconnect the device from the computer 8 2 SD card In the Storage fun...

Страница 36: ...ck Add alarm Steps Click Clock alarm set Add alarm set the alarm information then click Done 9 2 Calendar Use the calendar you can arrange and manage your schedule Note To use the calendar you must lo...

Страница 37: ...er Guide 31 P a g e Setps Click Calendar New event Click to set new event enter the event option click Done to save the event Edit the event Edit Select an Event and into the activities interface clic...

Страница 38: ...RS or Wi Fi to use the map or else you have to purchase Standalone offline Navigation software to use the navigation Maps application does not cover all countries and cities Open the location service...

Страница 39: ...u want to go 1 in the map interface click Search Maps 2 Enter the name of the place you want to search you can choose to enter an address city or the building name for example The Oriental Pearl Note...

Страница 40: ...updates will display a different color lines on the road each color represents a different traffic movement speed Satellite Use the same satellite data as Google Earth However satellite imagery is no...

Страница 41: ...utes to go to your destination Click on the route guidance on a map showing the route 5 Complete view or finished using the routes presses the Menu key then click empty the results you can reset the m...

Страница 42: ...ge devices etc PERSONAL Set up location equipment safety language and backup ACCOUNTS Set up accounts SYSTEM Set the time and date accessibility You can also view the legal information of the software...

Страница 43: ...e zone and then select your time zone in the list Click Set time adjust the hours and minutes You can check or uncheck the Use 24 hour format switch between 12 hours or 24 hours format Click Select da...

Страница 44: ...e 38 P a g e 10 4 Display Set the screen brightness Steps Click Settings Display Brightness Click Brightness adjust the brightness in the pop up box Sleep Steps Click Settings Display Sleep Set the sc...

Страница 45: ...one Note This operation will clear the following data in your device Your account System and application s data and settings Application Does not clear the following data System software and bundled a...

Страница 46: ...he device This password will be provided with the service provider s SIM card Click on an emergency call and then enter the following sequence 05 PUK New PIN New PIN For example If your PUK is 888888...

Страница 47: ...will enter Action interface You can lock the screen or request to draw the screen unlock pattern every time you start the device Screen lock It can protect the screen does not be touched when the devi...

Страница 48: ...pattern click Continue 5 Draw the unlock pattern again and then click Confirm Note 1 If you do not want to unlock pattern appears on the screen un check Make the passwords visible 2 To change the scre...

Страница 49: ...ic if the file have damaged may lead to serious noise or hop sounds Can t copy file or play music and so on 1 Please check between computer and device is correct connection 2 Check the memory storage...

Отзывы: