background image


17


17


CHAP.4    DVR Operation

CHAP.4    DVR Operation

CHAP.4    DVR Operation

CHAP.4    DVR Operation    


4

4

4

4-

-

-

-1. 

1. 

1. 

1. Mouse Control

Mouse Control

Mouse Control

Mouse Control    


※NOTE

NOTE

NOTE

NOTE : 

1. Some of the items displayed in setting menus are merely listed as indication, which users are unable to select or 

adjust by the cursor. 

2. The background color of a selectable or adjustable item will turn white when a user moves the cursor onto it. A 

user can interact with it using the buttons or the wheel of a mouse. 


4

4

4

4-

-

-

-2

2

2

2. 

. DVR

DVR

DVR

DVR Log

 Log

 Log

 Log-

-

-

-in

in

in

in (Open Main Menu)

 (Open Main Menu)

 (Open Main Menu)

 (Open Main Menu)    

 
(1) Move the cursor to the lower right corner on the display.   

Then, click

  to log into MAIN MENU.

 ( 


→    DVR LOG-IN 

→MAIN MENU)

(2) The message of “DVR LOG-IN” shows as the 

right figure. Log in as an administrator (ADMIN), and input the 
password (PW) composed of up to 8 digits. 
 

(3) To exit, click EXIT.    
      (

      (

      (

      (※As for MAIN MENU, refer to the page 23.)    
    
※NOTE

NOTE

NOTE

NOTE : 

1. The USER ID is unchangeable and fixed as an administrator (ADMIN). 
2. The password default is none. When logging in for the first time, please straightly click ENTER. 
3. If the inputted password matches the one you already set, you will be allowed to enter the MAIN MENU. Contrarily, 

if an incorrect password is inputted, a message of “PW IS NOT CORRECT” will show on the display. 
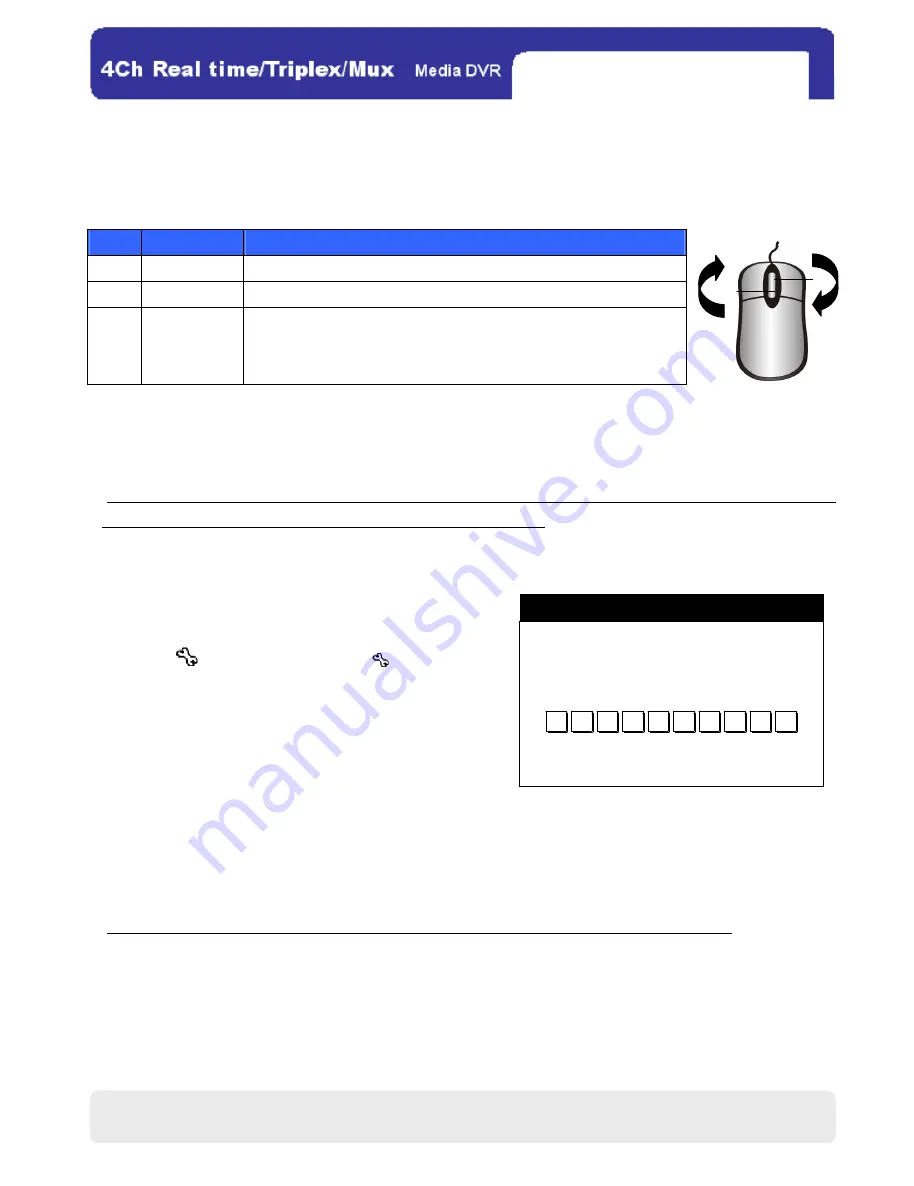


No.  Mouse Control 

Functions 

Left Button 

(1) Executes. (2) Confirms. (3) Enters. (4) Increases setting values. 

Right Button  (1) Cancels. (2) Recovers. (3) Decreases setting values. 

Wheel 

(1) Increases/Decreases setting values. 
(2) Speeds up/down playback. 
(3) Zooms in/out in a PTZ mode. 


USER ID                                                            ADMIN

USER ID                                                            ADMIN

USER ID                                                            ADMIN

USER ID                                                            ADMIN    

US

US

US

USER PW                                         

ER PW                                         

ER PW                                         

ER PW                                          -

--

-    -

--

-    -

--

-    -

--

-    -

--

-    -

--

-    -

--

-    -

--

-    


ENTER                        EXIT

ENTER                        EXIT

ENTER                        EXIT

ENTER                        EXIT


DVR LOG

DVR LOG

DVR LOG

DVR LOG-

--

-IN

IN

IN

IN    

0

1

2

3

4

5

6

7

8

9

CHAP.4    DVR Operation 

All manuals and user guides at all-guides.com

Содержание LR-804J01

Страница 1: ...8 8 8 TFT 4CH MJPEG Media DVR TFT 4CH MJPEG Media DVR TFT 4CH MJPEG Media DVR TFT 4CH MJPEG Media DVR User Manual Ver 0 93 User Manual All manuals and user guides at all guides com a l l g u i d e s...

Страница 2: ...91 V0 91 2007 3 23 2007 3 23 2007 3 23 2007 3 23 Primary Release Primary Release Primary Release Primary Release Jason Jason Jason Jason V0 92 V0 92 V0 92 V0 92 2007 5 25 2007 5 25 2007 5 25 2007 5 25...

Страница 3: ...be located in an area where it is likely to be subjected to mechanical shocks Before You Start Before You Start Before You Start Before You Start 1 Ensure the power switch is off before starting to o...

Страница 4: ...ning flash with arrow head within a triangle is intended to inform the user that parts inside the product are a risk of electric shock The exclamation point within a triangle is intended to tell the u...

Страница 5: ...4 4 4 4 1 M 1 M 1 M 1 MOUSE OUSE OUSE OUSE C C C CONTROL ONTROL ONTROL ONTROL 17 17 17 17 4 4 4 4 2 DVR L 2 DVR L 2 DVR L 2 DVR LOG OG OG OG IN IN IN IN O O O OPEN PEN PEN PEN M M M MAIN AIN AIN AIN M...

Страница 6: ...AGE 32 32 32 32 CHAP 5 NETWORK SETU CHAP 5 NETWORK SETU CHAP 5 NETWORK SETU CHAP 5 NETWORK SETUP P P P 33 33 33 33 5 5 5 5 1 DVR N 1 DVR N 1 DVR N 1 DVR NETWORK ETWORK ETWORK ETWORK C C C CONFIGURATIO...

Страница 7: ...60 60 60 60 3 VIEWING PHOTOS SLIDESHOW 3 VIEWING PHOTOS SLIDESHOW 3 VIEWING PHOTOS SLIDESHOW 3 VIEWING PHOTOS SLIDESHOW 61 61 61 61 SLID SLID SLID SLIDESHOW ESHOW ESHOW ESHOW 62 62 62 62 4 VIEWING MO...

Страница 8: ...rches using the remote viewer via the network Playback Playback Playback Playback To search and replay by the percent date time or events of the recorded video data Multiple forward playback speeds X...

Страница 9: ...to operate the Media DVR 5 Software CD Contains 1 manuals English Chinese 2 quick guide English 3 software tools 4 README 6 Mouse Controls all functions of the Media DVR 7 Remote Controller IR Remote...

Страница 10: ...ignals out of the remote controller 4 Power LED Gives red light when the power is on 5 Control Buttons Control the OSD menu of the LCD 5 1 DISPLAY LCD Power Switch On Off 5 2 SOURCE Video Source Switc...

Страница 11: ...mera connection CH 1 4 NTSC PAL 7 Ethernet Interface RJ45 For Ethernet device connection 8 HDD Drawer A drawer for HDD combination The HDD is expandable to 500 GB RS 485 Connects a PTZ camera external...

Страница 12: ...Items Function 1 CD Drive Backups recorded images Reads a software CD 2 SD Card Slot Reads an SD Card for media player only 3 CF Card Slot Reads a CF Card for media player only CHAP 2 Outlook 1 2 3 A...

Страница 13: ...lation CHAP 3 Installation CHAP 3 Installation 3 3 3 3 1 Installation Configuratio 1 Installation Configuratio 1 Installation Configuratio 1 Installation Configuration n n n CHAP 3 Installation All ma...

Страница 14: ...TE NOTE 1 Please refer to the list of all supported HDDs in the appendix on the page 73 for information of HDDs compatible with this DVR 2 To know the maximal recording time for various HDDs please us...

Страница 15: ...f the DVR with a video input of a main monitor 4 4 4 4 P P P POWER OWER OWER OWER Connect the DC plug of the power adapter into the DC input jack of the DVR VIDEO A IN OUT VIDEO C IN OUT VIDEO B IN OU...

Страница 16: ...nction Pin 3 5 Relay output for devices such as sirens ALARM GROUND Function Pin 6 ALARM GROUND Function Pin 6 ALARM GROUND Function Pin 6 ALARM GROUND Function Pin 6 Connects the ground wires of the...

Страница 17: ...input the password PW composed of up to 8 digits 3 To exit click EXIT As for MAIN MENU refer to the page 23 NOTE NOTE NOTE NOTE 1 The USER ID is unchangeable and fixed as an administrator ADMIN 2 The...

Страница 18: ...VR is operated for the first time please set the time and date in TIME DATE SETUP MAIN MENU CONFIGURATION TIME DATE SETUP to accord with the time zone of your location HDD MANAGEMENT CAMERA SETUP MOTI...

Страница 19: ...de Mode Mode Mode PTZ HDD Status HDD Status HDD Status HDD Status Playback Mode Playback Mode Playback Mode Playback Mode Amount of Displayed Data PlaybackToolbar PlaybackToolbar PlaybackToolbar Playb...

Страница 20: ...earches via the event list that covers all events of motion detection alarm input and video loss The DVR will replay the targeted event from when it occurred NOTE NOTE NOTE NOTE Recorded images in dif...

Страница 21: ...Picture Click in the full screen mode and you will see a small window in the lower right position When one of the four channels is displayed on the main screen others will switch sequentially in this...

Страница 22: ...ges with overwriting off 2 A user is backuping recorded images via the USB slot 3 A user is updating a firmware via the USB slot 4 HDD MANAGEMENT is being opened 8 8 8 8 F F F FULL ULL ULL ULL 4 4 4 4...

Страница 23: ...on of the main screen horizontally BORDER ENABLE Enable or disable the borders for the 4 split screens BORDER WIDTH Adjust the border width BORDER COLOR Change the border color NOTE NOTE NOTE NOTE In...

Страница 24: ...rameters of the 4 channels on the menu to the factory default 2 For more transmitted images and longer recording time via IP network set the resolution as 352x240 and the quality as LOW or NORMAL 3 Tr...

Страница 25: ...once receiving alarm signals or detecting motion ALL Set the entire grid 24 hours a day 7 days a week as the designated recording mode in TYPE DATE Click a day on the menu to set 24 hours of that day...

Страница 26: ...e between the DVR and the HDD OVERWRITE Enable or disable overwriting the HDD when it is stuffed with recorded images If it is enabled the original recorded data will be replaced by new images Opposit...

Страница 27: ...recording time after a camera detects any motion DETECT CELL NUMBER Determine the minimal cells blocks in the grid that activate a motion event MOTION DETECTION GRID Determine the coverage of motion d...

Страница 28: ...dow can be switched in this menu SEQUENCE SCREEN Set the switching interval of channel sequence in the live full screen PIP SCREEN Set the switching interval of channel sequence in the PIP window EVEN...

Страница 29: ...ER PW NEW PW CONFIRM first to activate the corresponding input space Then input a password via the number bar and click ENTER to affirm it 2 The password default is none For security reasons changing...

Страница 30: ...DDNS ENABLE Enable or disable the DDNS function DNS SERVER Set the IP address of the DNS server INTERVAL Set the connection time between the DVR and the DDNS server D Days H Hours M Minutes DDNS STAT...

Страница 31: ...OT monitor ALARM POPUP With this function on once receiving alarm signals from any channel the DVR will enable the SPOT monitor to cease channel sequence and display the live images of this channel MO...

Страница 32: ...Click it to launch burning 6 6 6 6 F F F FIRMWARE UPGRADE IRMWARE UPGRADE IRMWARE UPGRADE IRMWARE UPGRADE CURRENT VER Depicts the current firmware version of the DVR UPGRADE VER Depicts the upgrade fi...

Страница 33: ...UST have a router installed and follow instructions in 5 4 Dynamic IP of PPPoE DSL on the page 36 for DVR setup and access 2 Please verify the Internet access after installing any new equipment a rout...

Страница 34: ...the DVR after confirmation 3 Go to IP SETUP of the DVR and set DHCP MODE as MANUAL 4 Verify if MAC ADDRESS starts from 00 0A A2 5 Set IP ADDRESS assigned from the ISP 6 Set IP PORT 50000 is recommende...

Страница 35: ...cable to the DVR after confirmation 3 Turn off and on the modem router the ISP provides to reset clients of MAC from the ISP Users need to wait for 30 seconds after turning on 4 Verify MAC ADDRESS sta...

Страница 36: ...outer to a DSL modem as the flow chart shown below 3 Set the Internet connection of the router Refer to the router manual 4 Verify the router s network sub group is correct 5 Connect the DVR to the ro...

Страница 37: ...o connect the DVR via the Internet registration to the DDNS web server is necessary Please access www j2kip com first In this homepage click Member Register to create a member ID After filling up the...

Страница 38: ...m after filling out this form shown as below 4 Now some information of the DVR is listed on the DDNS web server short of the IP address and the port number CHAP 6 DVR Program Setup All manuals and use...

Страница 39: ...dress will be automatically assigned to DNS SERVER from the DHCP server After that click REGISTER to renew the IP registered in DDNS SERVER MAC ADDRESS 00 0A A2 00 00 00 DHCP MODE AUTOMATIC IP DETECT...

Страница 40: ...tically fetch your DVR s IP address and port number NOTE NOTE NOTE NOTE Prior to using the Web Viewer please add www j2kip com into Trusted Sites first as illustrated below Tools Internet Options Secu...

Страница 41: ...41 41 CHAP 6 DVR Program Setup All manuals and user guides at all guides com a l l g u i d e s c o m...

Страница 42: ...execute DVR WEB VIEWER as following illustration NOTE NOTE NOTE NOTE 1 If ActiveX control installation is required in the first access please click Yes 2 Users can also execute this program by clickin...

Страница 43: ...43 43 3 The live images are displayed as below CHAP 6 DVR Program Setup All manuals and user guides at all guides com...

Страница 44: ...k shown as below NOTE NOTE NOTE NOTE 1 If ActiveX control installation is required in the first access please click Yes 2 Users can also execute this program by clicking the file named WebPlayer html...

Страница 45: ...45 45 4 You can see the recorded images shown as below CHAP 6 DVR Program Setup All manuals and user guides at all guides com...

Страница 46: ...IE 1 Go to www j2kip com and click DVR Web Backup on the left NOTE NOTE NOTE NOTE Users can also execute this program by clicking the file named WEB_BACKUP html in the software CD 2 To execute backup...

Страница 47: ...Connect Test will show Then click Lock to set backup time 4 Now please set well Recorded Start Time Recorded End Time Save File Path and Maximum Save File Size Right after that click Apply CHAP 6 DVR...

Страница 48: ...5 Next click Start Backup to start recording images Finally you can review the backup files via the path you have already determined CHAP 6 DVR Program Setup All manuals and user guides at all guides...

Страница 49: ...ighted C C C CHANNEL HANNEL HANNEL HANNEL Select a channel if connected that you want to see in the full screen mode S S S STATUS WINDOW TATUS WINDOW TATUS WINDOW TATUS WINDOW Displays the current tim...

Страница 50: ...IP address set in the DVR PORT PORT PORT PORT Input the port set in the DVR USER USER USER USER ID ID ID ID Input the ID set in the DVR Please input admin a fixed parameter P P P PASSWORD ASSWORD ASSW...

Страница 51: ...mber ID and the name Load Load Load Load Search for a member ID name saved in the Remote Viewer User ID User ID User ID User ID Input the ID set in the DVR Please input admin a fixed parameter Passwor...

Страница 52: ...camera type connected to the DVR PTZ Baud PTZ Baud PTZ Baud PTZ Baudr r r rate ate ate ate Enter the baud rate of your PTZ camera Set Path to Save Downloaded image Set Path to Save Downloaded image Se...

Страница 53: ...w images in the 4 split mode Time Time Time Time Indicates the recording time of the image being replayed Channel selection Channel selection Channel selection Channel selection Select a camera to be...

Страница 54: ...this button to download playback images transmitted from the DVR to a PC Press it button light blue red and the program will start to record images Then press again to save the images during the reco...

Страница 55: ...a these buttons a Move the slide bar to the start position b Play backward fast in a preset speed c Play backward at a normal speed d Pause e Play forward fast in a preset speed f Move the slide bar t...

Страница 56: ...f an image b Brightness Plus Make an image brighter c Sharpness Make an image more sharp edged d Contrast Minus Reduce light and shade of an image e Brightness Minus Make an image darker f Blur Soften...

Страница 57: ...Range Range Range Range of the Remote Controller of the Remote Controller of the Remote Controller of the Remote Controller The remote controller operates the Media Player via infrared transmission To...

Страница 58: ...selected photo 90 clockwise in slideshow only ZOOM Zoom in the selected photo x2 x3 x4 REPEAT Alter the repeating mode for music in MUSIC LIBRARY only SLIDESHOW Launch stop slideshow REW Rewind 1 movi...

Страница 59: ...e signal source to MEDIA Refer to the page 10 4 When both SD card and CF card are inserted and detected the card selection menu will show as the upper figure on right Select an item to enter the media...

Страница 60: ...OTE NOTE NOTE NOTE You can also press the MUSIC button on the remote controller to open this folder 2 Then the MUSIC LIBRARY menu shows as the lower figure and the Media Player starts to play MP3 file...

Страница 61: ...ess the PHOTO button on the remote controller to open this folder 2 Then the photo thumbnail menu shows as the lower figure listing many thumbnails small scale photos for you to select NOTE NOTE NOTE...

Страница 62: ...ress the SLIDESHOW button and you can open a slideshow with background music To stop the musical slideshow and return to the photo thumbnail menu press the SLIDWSHOW button or 1 Press the SLIDE INTERV...

Страница 63: ...troller to open this folder 2 Then the movie thumbnail menu shows as the lower figure listing many thumbnails or small scale movies for you to select NOTE NOTE NOTE NOTE These thumbnails might be allo...

Страница 64: ...n on the remote controller to open this folder 2 Then the FILE LIBRARY menu shows as the lower figure containing all folders in the memory card 3 Press or to choose 4 Move to a folder and press to ent...

Страница 65: ...elow to use this menu 1 Press the SETUP button and the SETUP MENU opens 2 Press and to move through the options Press to approach another menu 3 To return to SETUP MENU move to MAIN PAGE and press 4 T...

Страница 66: ...the small scale photos in the thumbnail mode allowing normal scale photos to be played faster in slideshow OFF Disable this function letting the media player to play normal scale photos slower in sli...

Страница 67: ...On this menu you can change the repeating mode of music playing SETUP MENU MUSIC SETUP REPEAT MODE ONE Repeat the selected song ALL Repeat all songs in the memory card OFF Turn of the repeating mode C...

Страница 68: ...u can change the repeating mode of movie playing SETUP MENU MOVIE SETUP d SINGLE Turn off the repeat mode ONE LOOP Play the selected movie continuously CONDINUOUS Play all movies in the memory card co...

Страница 69: ...n mode between slides FULL SCREN Images appear in a full screen mode TOP BOTTOM Images roll from top to bottom BOTTOM TOP Images roll form bottom to top T B CENTER Images roll from top bottom to cente...

Страница 70: ...ge OSD MESSAGE ON Turn on OSD messages OFF Turn off OSD messages SETUP VALUES DEFAULT Set all setting values as default NOTE NOTE NOTE NOTE To Enable PREFERENCE as selectable users must stop playing a...

Страница 71: ...west Low Normal High Highest Playback Mode Playback Mode Playback Mode Playback Mode Time and day Event Search Percent Slider bar Playback Playback Playback Playback Playback Speed Playback Speed Play...

Страница 72: ...Video Output Video Output Video Output Video Output BNCx2 Monitor Spot Media Video Storage Media Video Storage Media Video Storage Media Video Storage SD Card Optional CF Card Optional Media Display M...

Страница 73: ...D Supported HDD Supported HDD Supported HDD Type Type Type Type Capacity GB Capacity GB Capacity GB Capacity GB Model Number Model Number Model Number Model Number 160 ST3160812A 200 ST3200822A 250 ST...

Страница 74: ...38 323 00 280 58 3 0 758 96 690 99 625 63 538 33 467 64 2 0 1138 43 1036 48 938 44 807 49 701 46 NTSC NTSC NTSC NTSC 704x240 704x240 704x240 704x240 1 0 2276 87 2072 97 1876 88 1614 99 1402 92 Record...

Страница 75: ...1218 32 1102 29 964 51 826 72 2 0 2042 48 1827 49 1653 44 1446 76 1240 08 NTSC NTSC NTSC NTSC 352x240 352x240 352x240 352x240 1 0 4084 97 3654 97 3306 88 2893 52 2480 16 Recorded Images Quality Recor...

Страница 76: ...Y TOP OSD OFFSET 10 9 1 DISPLAY SETUP OSD SETUP BOTTOM OSD OFFSET 10 9 1 CHANNEL CH1 4 RESOLUTION 352X240 704X240 NTSC 360x288 720x288 PAL QUALITY LOWEST LOW NORMAL HIGH HIGHEST RECORDE SETUP FRAME RA...

Страница 77: ...PW 8 digits PASSWORD SETUP CONFIRM 8 digits KEY TONE ON OFF VIDEO LOSS ON OFF ALARM ACTIVE ON OFF CONFIGURATIION BUZZER SETUP MOTION DETECT ON OFF MAC ADDRESS Indication DHCP MODE MANUAL AUTOMATIC IP...

Страница 78: ...SPEED 0 7 1 PAN TILT SETUP SPEED SETUP ZOOM SPEED 0 7 1 SWITCHING INTERVAL 01 99 SEC 1 ALARM POPUP ON OFF MOTION POPUP ON OFF EXTERNAL DEVICE SPOT SETUP EVENT POPUP DURATION 01 99 SEC 1 START Indicat...

Отзывы: