background image

9

03

Installation

Manual 4804   Rev C   p/n 004804 0000

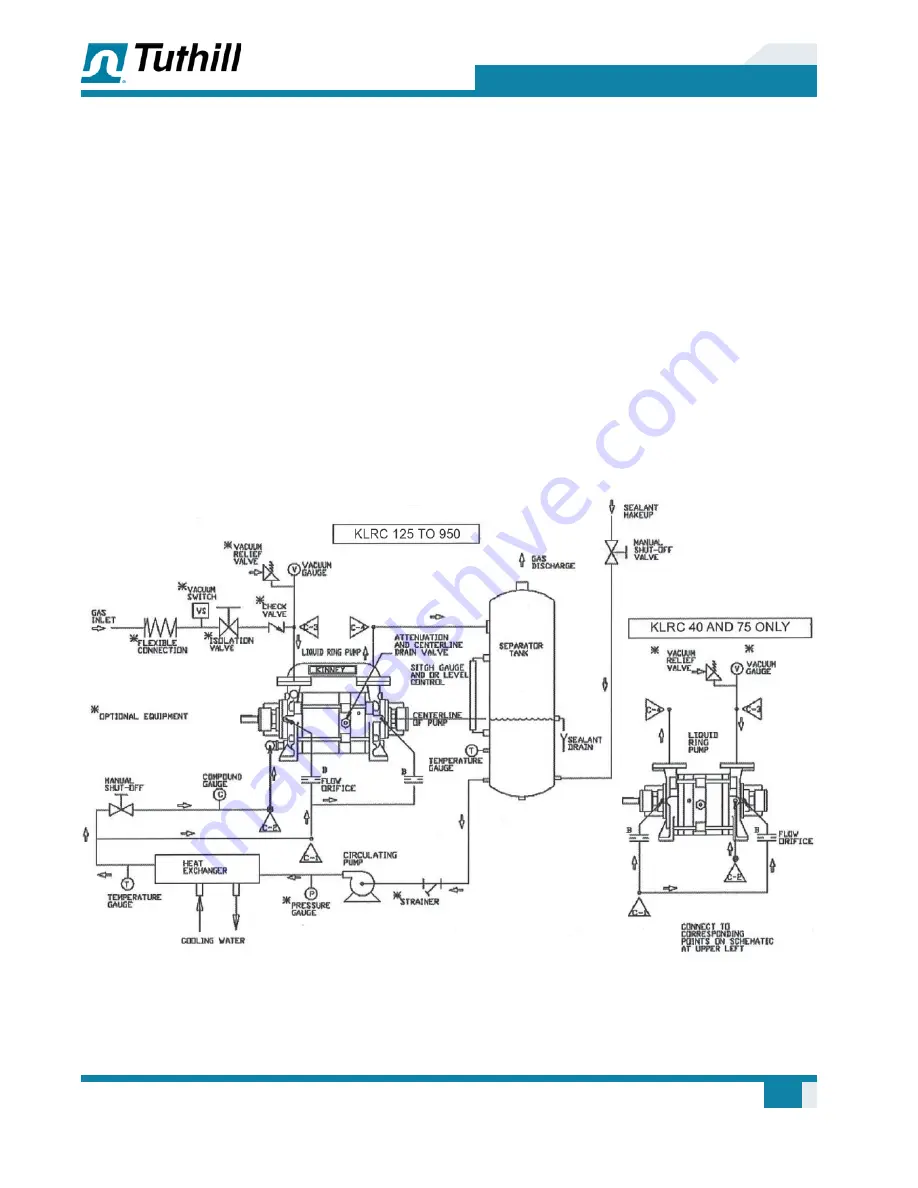
FULL SEALANT RECOVERY (FSR)

A full sealant recovery system is a closed-
loop sealing con

¿

 guration that employs a heat 

exchanger (water- or air-cooled) to maintain proper 
sealing 

À

 uid temperature. 

See Figure 3-3

 for piping 

arrangement. This arrangement is not suitable 
for prolonged operation at pressure above 400 
Torr (533.28 mbar) unless a circulating pump is 
installed.

Full liquid recovery systems often operate under 
conditions where condensation would cause the 
liquid level to rise, making it necessary to drain 
liquid from the unit in order to maintain the liquid 
level. The opposite condition can exist whereby 
liquid evaporation makes it necessary to add 
makeup liquid to maintain the liquid level. If there 
are extensive piping 

¿

 ttings and valves and other 

restrictive devices in the sealant line on a full 
recovery system that does not use a circulation 
pump, the sealant liquid is induced into the 
pump under pump suction entirely. For sustained 
operation above 400 Torr (533.28 mbar), on rapid 
cycling of pump-down from the atmosphere, a 
circulation pump may be required. A circulation 
pump, when added to a full recovery system, 
maintains proper sealant 

À

 ow at all inlet pressure 

conditions.

The pressure on the sealant gauge will vary 
depending upon the inlet pressure, from several 
inches of vacuum to a slightly positive pressure. 
Normally, a common supply line is used for both 
seal liquid and mechanical seal cooling.

The optional system components are described 

on 

page 12

.

Figure 3-3 –  Piping Schematic: Full Sealant Recovery System with Circulating Pump

Содержание KLRC Series

Страница 1: ...L Tuthill Vacuum Blower Systems tuthillvacuumblower com 800 825 6937 WARNING Do Not Operate Before Reading Manual Operator s Manual Tuthill KLRC Two Stage Liquid Ring Vacuum Pump Copyright 2018 Tuthill Vacuum Blower Systems All rights reserved Product information and speci cations subject to change Manual 4804 Rev C p n 004804 0000 ...

Страница 2: ...inney vacuum pumps and M D PneumaticsTM blowers and vacuum boosters in Springfield Missouri USA We bring 100 years of engineering experience and solid hands on care to help customers keep their processes running Your satisfaction is important to us so please take time to provide your Tuthill sales representative with performance feedback We love to hear from our customers Tuthill is a family owned...

Страница 3: ...mp 2 Theory of Operation 2 Properties of Sealants 3 Sealant Temperature 3 Safety 4 Graphic Conventions Used in this Manual 4 Safety Instruction Tag 4 Safety Precautions for Liquid Ring Pumps 4 Installation 6 General 6 Direct Coupled Drive 6 V Belt Drive 6 Sealant Recovery Systems 7 Once Through Recovery 7 Partial Sealant Recovery PSR 8 Full Sealant Recovery FSR 9 ...

Страница 4: ...Operation 14 Starting the Pump 14 Pre Start Checks 14 Initial Start Up 15 Procedure for Minimum Sealant Flow Rate 15 Stopping the Pump 16 Maintenance 17 General 17 Shaft Bearings 17 Scale or Rust Accumulation 17 Mechanical Shaft Seals 17 Preparation for Storage 18 Spare Parts 18 Speci cations 19 Disassembly 20 General 20 Disassembly Procedure 20 NDE Shaft Seal 20 NDE Stage 20 DE Shaft Seal 21 DE S...

Страница 5: ...oubleshooting 29 Parts Lists and Assembly Drawings 32 Cross Section KLRC 40 and KLRC 75 32 Parts List Cast Iron 40 and 75 KLRC Assembly 33 Cross Section KLRC 40CD and KLRC 75CD Stainless 34 Parts List Stainless Steel 40 and 75 KLRC Gasketed Assembly 35 Cross Section KLRC 125 to KLRC 525 36 Parts List Cast Iron 125 525 KLRC Assembly 37 Cross Section KLRC 125 to KLRC 525 Stainless 38 Parts List Stai...

Страница 6: ...iv Table of Contents Manual 4804 Rev C p n 004804 0000 ...

Страница 7: ...epairing this machine without first reading the service manual and taking adequate safety precautions OTE N Record the pump model and serial numbers in the OPERATING DATA form on the inside back cover of this manual Use this identi cation on any replacement part orders or if service or application assistance is required MODELS COVERED BY THIS MANUAL This manual contains installation operation and ...

Страница 8: ...hould only be lifted from the base or by attaching to the base Lifting the unit by attaching to the pump or motor could disturb the alignment The crossover manifolding on the KLRC Series pumps should never be used as an attaching area for lifting THEORY OF OPERATION When the pump is operating a continuous Àow of sealant liquid is entering the pump and forms a seal between the impeller and the casi...

Страница 9: ... content requires pH7 or higher Water that has a pH less than 5 should be treated or the pump should have special construction materials If internal scaling affects performance consult a water treatment specialist Tuthill Vacuum Blower Systems recommends that sealants and sealant systems be carefully evaluated Consult your Tuthill Vacuum Blower Systems sales professional or our application enginee...

Страница 10: ...ed in order for the equipment to function in the manner intended SAFETY INSTRUCTION TAG CAUTION Do not valve or restrict pump discharge opening Use oil mist eliminator when operating pump and ensure adequate ventilation when discharging indoors Refer to manual safety instructions SAFETY PRECAUTIONS FOR LIQUID RING PUMPS Please read the following safety information before operating the vacuum pump ...

Страница 11: ...ances may pertain to your local area regarding discharge of vapor to atmosphere Check local laws and ordinances prior to operation of the pump with discharge to outside atmosphere Venting of the discharge of an oil mist eliminator to outside atmosphere is highly recommended Do not restrict the pump discharge in any way or place valves in the discharge line The vacuum pump is a compressor and will ...

Страница 12: ...positioned on the shafts to be parallel to each other within 0 030 of an inch maximum when measured around the periphery of the coupling halves V BELT DRIVE Before attempting to tension any V belt drive make sure the sheaves are properly aligned Replace V belts in sets and the position the sheaves to allow the belts to be placed in the grooves without rolling them onto the sheaves The tensioning p...

Страница 13: ...through recovery system takes water directly from the water supply through the pump and discharges it directly through a gas liquid separator tank to an approved drain This arrangement is most common on small pumps in installations where water conservation is not a factor or where contamination of sealant is not a factor Optional valving arrangement is designed to conserve sealant Àow and power an...

Страница 14: ...taining the water Some water is disposed of through an overÀow and the remainder is retained in the separator tank for recirculation Makeup water is added in a quantity necessary to maintain proper sealing water temperature This is the most commonly used arrangement where sealing liquid conservation is required The optional system components are described on page 12 Figure 3 2 Piping Schematic Par...

Страница 15: ...to add makeup liquid to maintain the liquid level If there are extensive piping ttings and valves and other restrictive devices in the sealant line on a full recovery system that does not use a circulation pump the sealant liquid is induced into the pump under pump suction entirely For sustained operation above 400 Torr 533 28 mbar on rapid cycling of pump down from the atmosphere a circulation pu...

Страница 16: ...c solenoid valve normally closed is convenient for this use The pump may be manually drained to shaft level by use of the attenuation valve As the pump creates its own vacuum it will draw in the required amount of sealant so that the sealant need not be under pressure when pumping below 400 Torr 533 28 mbar From 400 to 760 Torr 533 28 to 933 25 mbar if the pump should operate for an extended perio...

Страница 17: ... sealant Àow when water temperatures are low This will reduce sealant consumption below normal partial recovery Àow rates Fresh sealant Àow may also be increased to achieve desired cooling and improve pump performance In order to reduce sealant water consumption in once through and partial recovery systems a solenoid valve may be tted to the sealant supply line This valve will be integral with pum...

Страница 18: ...and the power supply After the motor starter and disconnect switch have been installed turn the pump by hand to determine that the impeller s is free to rotate Check the rotation by jogging the motor An arrow on the drive end casing indicates the direction that the pump must rotate If after wiring the motor the pump turns in the wrong direction reverse any two of the power leads to the motor SYSTE...

Страница 19: ...lar to that of a water eductor except that ambient air or recirculated discharge gas is used to provide the motive force for compressing the process gas from system pressure to the liquid ring pump inlet pressure The liquid ring pump handles both the process gas and the motive gas With an air ejector a suction pressure as low as 3 Torr 3 99 mbar can be achieved Using an air ejector the pumping cap...

Страница 20: ... should be increased to about 7 PSIG It is generally not recommended to run a liquid pump with the suction open to atmosphere for any period of time as the pump will heat up due to the inability to draw in sealant to dissipate the heat STARTING THE PUMP If the pump has been idle for an extended period of time turn the pump by hand prior to energizing the motor to determine that the impeller is fre...

Страница 21: ...d KLRC 75 liquid ring pumps rotate counterclockwise All other models rotate clockwise INITIAL START UP 1 Turn on the main power by closing the external fusible disconnect switch or circuit breaker 2 Check that all isolation and discharge valves if tted are in the proper position 3 Push the START button The liquid ring pump should start immediately 4 Turn on the sealant water 5 Adjust the anti cavi...

Страница 22: ...s noise will commonly occur when the pressure is low and the air or non condensable gas Àow is slight Cavitation should be reduced or eliminated by bleeding air into the pump through the attenuation valve If enough air cannot be bled into the pump to satisfactorily quiet the pump an air bleed valve should be installed Non condensable gas may be recirculated by adding a return line from the dischar...

Страница 23: ...ATION If scale or rust accumulates and hampers the ef ciency of the pump remove the scale or rust by circulating an inhibitor selected according to the nature of the buildup MECHANICAL SHAFT SEALS If the mechanical seals are leaking replace or recondition them Some mechanical shaft seal manufacturers have a seal reconditioning program which we recommend where available When replacing the mechanica...

Страница 24: ... the pump to 1 3 to 1 4 full using Shell Oil Company VSI SAE 25 SAE 33 or SAE 37 can be used or antifreeze Rotate the pump by hand to coat the interior of the pump with oil Table 5 1 Disassembly Assembly NDE Shaft seal replacement NDE Stage only 1 1 2 7 6 7 DE Shaft seal replacement DE Stage only 3 3 4 4 2 3 Total Disassembly 1 5 1 8 SPARE PARTS The assembly drawings and parts lists beginning on p...

Страница 25: ...PM 5 5 10 15 25 50 50 52 52 L min 19 19 28 57 95 190 190 197 197 Sealant Liquid Connections NPT 1 2 1 2 3 4 1 1 1 1 4 1 1 4 1 1 2 1 1 2 Inlet Outlet Flange ANSI 150 Class 1 1 2 1 1 2 1 1 2 2 2 3 3 4 4 Overall Length in 22 6 24 1 28 1 29 7 33 6 41 41 56 5 56 5 mm 573 613 713 754 852 1041 1041 1435 1435 Overall Height in 12 6 12 6 16 19 1 19 1 23 5 23 5 30 56 30 56 mm 321 321 406 486 486 597 597 776...

Страница 26: ...teps DISASSEMBLY PROCEDURE Remove pump from installation and drive coupling with drive key from pump shaft Drain sealant Àuid from pump by removing all 1 4 NPT drain plugs NDE Shaft Seal 1 Position pump vertically on support stand NDE up 2 Remove NDE bearing housing cap 3 Remove bearing housing Àange screws and use two in threaded holes to push off bearing housing 4 Remove the loose elastomer Àing...

Страница 27: ...t seal seat the double row ball bearing and bearing spacer from the bearing housing 5 Remove shaft seal as described in step 5 in NDE Shaft Seal on page 20 OTE N For DE shaft seal replacement only see DE Shaft Seal and Bearing Housing on page 24 For disassembly of DE stage or complete disassembly see DE Stage on page 21 DE Stage 1 Remove the crossover pipe at connecting Àanges if not already remov...

Страница 28: ... listed thinner to maintain original Àuid consistency Assembly should proceed without interruption until tie rods for the pump are half tightened to prevent early setting of sealant The following torque values ft lbs apply for fasteners Always replace the end plate screws Use new stainless steel cap screws with nylon locking inserts DO NOT REUSE THE OLD SCREWS For installation with multiple pumps ...

Страница 29: ... A dummy bearing is helpful for an easy t at this step 3 Apply sealing compound to the male end of the NDE impeller housing For 40 and 75 models with two male ends check the cross sectional drawing for correct end Install it aligning the cast in index marks on top of housing and end casing Tap it with a soft hammer for proper sealing Then apply sealing compound to the top end face Note For stainle...

Страница 30: ...d install both on shaft and against end housing ensuring proper seating The shaft seal spring compression will give some resistance Install bolts with lock washers 5 Install bearing spacer washer on shaft Washer thickness is stamped on the front of the DE bearing housing For example 57 would indicate 0 057 thick bearing washer Install the double row ball bearing on shaft and into housing using pro...

Страница 31: ...e Àange outside diameters as best as possible Clearance Check and Adjustment If replacement of casings or housings end center or bearing occurs during the repair of a KLRC pump recheck shim thickness Included in the KLRC repair kits is one shim of the largest size This can be ground to the dimension to achieve the same result Dummy bearings will be required to accomplish this task The dummy bearin...

Страница 32: ...12 1 4 1 14 12 3 8 1 16 16 1 2 1 7 SCHEDULE 40 PIPE STEEL 8 SCHEDULE 40 PIPE STEEL 12 SCHEDULE 40 PIPE STEEL HRS LOW CARBON PLATE HRS LOW CARBON PLATE HRS LOW CARBON PLATE 8 SCH 40 Pipe SLOT S CUTOUT S 50 Ø6 00 THRU 11 50 2X 75 4X 6 50 6 75 6 09 03 12 18 02 4X1 50 2X 50 20 00 10 00 20 00 2 00 1 00 NOTES UNLESS OTHERWISE SPECIFIED WELDED CONSTRUCTION 1 REMOVE BURRS AND SHARP EDGES 2 FRAME MATERIAL ...

Страница 33: ...27 08 Reassembly Manual 4804 Rev C p n 004804 0000 Figure 8 2 Bearing Driver Tool ...

Страница 34: ...28 08 Reassembly Manual 4804 Rev C p n 004804 0000 Figure 8 3 Foot Alignment Tool ...

Страница 35: ...ional speed too low Check supply voltage Vacuum leak Locate and repair High sealant temperature Check coolant Àow and temperature Check heat exchanger cleanliness Incorrect sealant Àow rate See Procedure for Minimum Sealant Flow Rate on page 15 Excessive noise Defective bearing Replace Too much sealant liquid Decrease Àow rate Coupling misaligned Align Cavitation de ned in Procedure for Minimum Se...

Страница 36: ...erloaded Excessive back pressure Reduce height of pump discharge Too much sealant liquid See Table 3 1 on page 11 for proper Àow rate Misalignment Realign motor and pump Defective bearing Replace bearing Abnormal bearing wear Misaligned pump assembly Impeller binding or will not turn Accumulation of rust or scale See Operation on page 14 and Maintenance on page 17 Foreign object in pump Dismantle ...

Страница 37: ...31 09 Troubleshooting Manual 4804 Rev C p n 004804 0000 NOTES ...

Страница 38: ...32 Parts Lists and Assembly Drawings Manual 4804 Rev C p n 004804 0000 CROSS SECTION KLRC 40 AND KLRC 75 ...

Страница 39: ... Nut RH 1 210 Flinger 2 220 Bearing Spacer 1 230 Shaft Seal Spacer 1 240 Shaft Seal LR 2 250 Attenuation Valve 1 4 NPT 1 260 Viton O Ring 2 270 Ball Bearing Double Row 1 280 Ball Bearing Single Row 1 290 Locknut Bearing 1 300 DE Impeller Key 1 310 NDE Impeller Key 1 320 Drive Shaft Key 1 330 Bearing Housing Hex Head Cap Screw 8 340 Bearing Housing Cap Hex Head Cap Screw 6 ITEM NO PART DESCRIPTION ...

Страница 40: ...34 Parts Lists and Assembly Drawings Manual 4804 Rev C p n 004804 0000 CROSS SECTION KLRC 40CD AND KLRC 75CD STAINLESS ...

Страница 41: ...200 NDE Impeller Nut RH 1 205 NDE Impeller Lock Nut RH 1 220 Flinger 1 230 Bearing Spacer 2 240 Shaft Seal LR 2 250 Attenuation Valve 1 4 NPT 1 260 Viton O Ring 2 270 Ball Bearing Double Row 1 280 Ball Bearing Single Row 1 290 Locknut Bearing 1 300 DE Impeller Key 1 310 NDE Impeller Key 1 320 Drive Shaft Key 1 330 Bearing Housing Hex Head Cap Screw 8 340 Bearing Housing Cap Hex Head Cap Screw 6 IT...

Страница 42: ...36 Parts Lists and Assembly Drawings Manual 4804 Rev C p n 004804 0000 CROSS SECTION KLRC 125 TO KLRC 525 ...

Страница 43: ...er 2 230 Bearing Spacer 2 240 Shaft Seal Spacer 2 250 Crossover Flange Gasket 2 260 Shaft Seal LR 2 270 Attenuation Valve 1 280 Bearing Housing O Ring 2 290 Bearing Double Row Angular Contact 1 300 Bearing Single Row Conrad 1 310 Locknut Bearing 1 320 DE Impeller Key 1 330 NDE Impeller Key 1 340 Drive Shaft Key 1 350 Crossover Stud 8 ITEM NO PART DESCRIPTION QTY 360 Bearing Housing Hex Head Cap Sc...

Страница 44: ...38 Parts Lists and Assembly Drawings Manual 4804 Rev C p n 004804 0000 CROSS SECTION KLRC 125 TO KLRC 525 STAINLESS ...

Страница 45: ...aded 1 230 Flinger 2 240 Bearing Spacer 1 250 Crossover Gasket Flange 2 260 Shaft Seal LR 1 270 Attenuation Valve 1 280 Bearing Housing O Ring 2 290 Bearing Double Row Angular Contact 1 300 Bearing Single Row Conrad 1 310 Locknut Bearing 1 320 DE Impeller Key 1 330 NDE Impeller Key 1 340 Drive Shaft Key 1 350 Crossover Stud 8 ITEM NO PART DESCRIPTION QTY 360 Bearing Housing Hex Head Cap Screw 8 37...

Страница 46: ...OSS SECTION KLRC 950 10 30 40 50 60 70 80 90 100 110 120 140 150 160 170 180 190 200 210 220 230 240 250 260 270 280 290 300 310 320 330 340 350 110 370 380 390 400 420 100 400 350 480 490 500 440 460 10 30 60 310 120 290 350 400 340 390 110 380 370 440 410 440 20 Detail A A ...

Страница 47: ... Nut RH M80 x 1 5 1 220 Impeller Nut RH Threaded 1 230 Flinger 2 240 Bearing Spacer 1 250 Ring Gasket 4 2 260 Mechanical Seal 2 270 Ball Valve 0 75 1 280 O Ring 2 290 Bearing 2 300 Locknut Bearing 1 310 Impeller Key 2 320 Square Key 0 5 x 3 25 1 330 Hex Bolt 0 625 11 x 2 5 16 340 Hex Bolt 0 625 11 x 2 8 350 Hex Bolt 0 375 16 x 1 25 8 ITEM NO PART DESCRIPTION QTY 360 Hex Socket Cap Screw 0 375 16 x...

Страница 48: ... shall void warranty Installation and transportation costs are not included and defective items must be held for Seller s inspection and returned to Seller s Ex works point upon request THEREARE NO WARRANTIES EXPRESSED IMPLIED OR STATUTORY WHICH EXTEND BEYOND THE DESCRIPTION ON THE FACE HEREOF INCLUDING WITHOUT LIMITATION THE IMPLIED WARRANTIES OF MERCHANTABILITY AND FITNESS OF PURPOSE After Buyer...

Страница 49: ...ze Length Serial No Type of Lubrication Start up Date Pump RPM Operating Vacuum Pump Sheave Diameter Any Other Special Accessories Supplied or in Use Motor Sheave Diameter Motor RPM HP NOTES IMPORTANT All blowers manufactured by Tuthill Vacuum Blower Systems are date coded at time of shipment In order to assure you of the full benefits of the product warranty please complete tear out and return th...

Страница 50: ...5 8715 800 825 6937 F 417 865 2950 tuthillvacuumblower com Technical Support 1 877 955 TECH 8324 Service Repair or Product Sales I N T ERNATIONAL QUALITY STAND A R D REGISTERED VACUUM BLOWER SYSTEMS TUTHILL CORPORATION Copyright 2018 Tuthill Vacuum Blower Systems All rights reserved Product information and speci cations subject to change ...

Отзывы: