background image

Trust ISDN USB Modem & Phone System

9


GB 

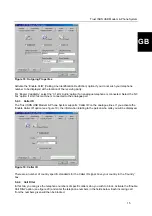
6.  Give the location as [D:\Win2000] and click on 'OK' (see figure 10).

Figure 10: Specifying the file location

7.  The driver will be found at the location given. Click on 'Next'.

8.  Windows 2000 will display a message saying that the Trust ISDN Modem & Phone System has not been

digitally signed by Microsoft. Click on 'Yes' to accept and continue with the installation.

9.  Windows 2000 will display a message saying that the driver for the Trust NDIS WAN Miniport Adapter

has not been digitally signed by Microsoft. Click on 'Yes' to accept and continue with the installation.

10.  Click on ‘Finish’ to complete the installation.

You have now completed the installation of the driver. Continue to the following chapter for instructions on
how to install the necessary applications.

Содержание ISDN

Страница 1: ...Trust ISDN USB Modem Phone System GB TRUST ISDN USB MODEM PHONE SYSTEM Instruction Manual Version 1 0 ...

Страница 2: ...age and retrieval systems for any purpose other than the purchaser s own personal use without prior written permission from the manufacturer Disclaimer statement The manufacturer specifically disclaims all warranties either express or implied including but not limited to implied warranties for the marketability and suitability for a particular purpose with respect to the software the accompanying ...

Страница 3: ...ling the applications 10 4 1 Trust ISDN Utility 10 4 2 Trust ISDN Phone 11 4 3 RVS COM application software optional 11 5 Instructions for use 12 5 1 Indicators 12 5 2 Internet 13 5 3 Diagnostic program 13 5 4 Configuration program 14 5 4 1 Incoming Properties MSN 14 5 4 2 Outgoing Properties 14 5 4 3 Caller ID 15 5 4 4 Call Filter 15 5 4 5 Authority 16 5 4 6 Speed Dialling 16 5 4 7 Ring Pattern 1...

Страница 4: ...Trust ISDN USB Modem Phone System 2 5 7 Using the telephone functions 26 6 Uninstalling the modem 27 7 Troubleshooting 28 8 Maintenance 29 9 Specifications 29 10 Trust Customer Care Centers 30 ...

Страница 5: ... g File used in the figure referred to Extra information will be shown as follows NOTE The ISDN USB Modem Phone System only works in Windows 98 Windows ME and Windows 2000 The examples assume that the letter D has been assigned to your CD ROM drive If your system uses a different letter for your CD ROM drive for example E you should replace D by E 1 2 Contents of the box Check the contents of the ...

Страница 6: ...The wire or the plug is damaged or has become worn b Fluid has entered the device c The device has been dropped and or the casing has been damaged 4 Position the device so that the cables cannot be damaged 2 2 ISDN 1 The ISDN modem is designed to be connected to a digital ISDN network Therefore do not connect it to a normal analogue telephone system This may cause damage and is dangerous 2 During ...

Страница 7: ...ue telephone and or fax machine to the connections D and E on the modem 6 Insert the USB cable provided into connection B at the rear of the modem 7 Insert the other end of the USB cable into a free USB port on your computer NOTE The power adapter does not have to be connected if you do not use the analogue telephone outputs D and E and only use the ISDN line C for the Internet NOTE If you connect...

Страница 8: ...a location for the driver 6 Click on Next The driver for the ISDN Modem Phone System will be found at the location given 7 Click on Next again The driver will now be installed 8 Click on Finish to complete the installation 9 Restart your computer You have now completed the installation of the driver Continue to chapter 4 for instructions on how to install the necessary applications 3 3 Installatio...

Страница 9: ... 6 Specifying a location for the driver 6 Click on Next The driver for the ISDN Modem Phone System will be found at the location given 7 Click on Next again The driver will now be installed 8 Click on Finish to complete the installation 9 Restart your computer You have now completed the installation of the driver Continue to chapter 4 for instructions on how to install the necessary applications 3...

Страница 10: ...g the drivers into your CD ROM drive Click on Next 4 Select the option for Windows to search for a suitable driver and click on Next see figure 8 Figure 8 Searching for a suitable driver 5 Select the option to search a specific location and click on Next see figure 9 Figure 9 Specifying a location ...

Страница 11: ...ot been digitally signed by Microsoft Click on Yes to accept and continue with the installation 9 Windows 2000 will display a message saying that the driver for the Trust NDIS WAN Miniport Adapter has not been digitally signed by Microsoft Click on Yes to accept and continue with the installation 10 Click on Finish to complete the installation You have now completed the installation of the driver ...

Страница 12: ...N network The ISDN Utility also contains a configuration program which can be used to program the modem s various switchboard functions The software is installed as follows 1 Start Windows 2 Insert the CD ROM containing the drivers and applications into your CD ROM drive 3 Click on Start and select Run 4 In the commend line type D Setup exe and click on OK to start the Trust Software Installer see...

Страница 13: ...ller see figure 11 2 Click on the TRUST ISDN PHONE button to start the installation of this program 3 Click on Next to continue with the installation see figure 13 Figure 13 Installing the Trust ISDN Phone 4 Click on Next again ISDN Phone will now be installed at the location indicated 5 Click on Finish to complete the installation You have now completed the installation of the software for the Tr...

Страница 14: ...he table below for the description of the functions of these LED indicators Figure 14 Indicators LED Description Function A PWR Is lit if when the power adapter is connected B RUN Flashes to indicate that the ISDN USB Modem Phone System works correctly C USB Is lit when the USB port is connected to your computer Flashes when the USB is in the download status D ISDN Is lit when the ISDN modem is co...

Страница 15: ...a connection or if the modem does not react it is recommended to start the diagnostic software provided If this has not already been installed follow the instructions given in chapter 4 1 The diagnosis program is stated as follows 1 Go to Start Programs Trust ISDN Utility and select Diagnostic Program from the list see figure 15 Figure 15 Diagnostic Test program 2 In the space available for Own IS...

Страница 16: ... 17 you can subscribe more than one telephone number to each line Figure 17 Incoming Properties MSN For each line you can also indicate whether all telephone numbers are redirected Listen all MSNs or whether only the numbers specified are redirected Listen the specified MSNs You can select Do not disturb if you do not wish to redirect any incoming calls Activate the Enable Call Waiting option if y...

Страница 17: ...ler ID The Trust ISDN USB Modem Phone System supports Caller ID on the analogue lines If you activate the Enable Caller ID option see figure 19 the information relating to the person who calls you will be displayed Figure 19 Caller ID There are a number of country specific standards for the Caller ID signal Give your country in the Country box 5 4 4 Call Filter In this tab you can give the telepho...

Страница 18: ... to a maximum length of 4 figures Each dialled telephone number that begins with the numbers specified will be blocked Figure 21 Authority Example If you specify the numbers 00 international access code then it will not be possible to make international calls using the connected analogue telephones 5 4 6 Speed Dialling In this tab see figure 22 give the telephone numbers that you dial regularly Th...

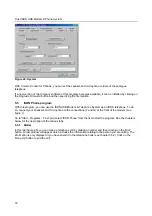
Страница 19: ...ear immediately which number is being called You can also assign a ring pattern to a telephone call which is placed on hold Figure 23 Ring Pattern 5 4 8 System In this tab see figure 24 you can specify a password to protect your settings Activate the Password Enable option and then click on Change Password to specify a password Note A password cannot be longer than 4 figures It is not possible to ...

Страница 20: ...SDN telephone To do so connect your speakers and microphone to the connections F and G at the front of the modem see figure 1 Go to Start Programs Trust and select ISDN Phone from the list to start the program See the chapters below for the description of the various tabs 5 5 1 Dialler In this tab figure 25 you can make a telephone call by dialling a number and then clicking on the Dial button A n...

Страница 21: ...ngle arrowhead to add this to the right hand window Next click on OK to assign the selected name to the speed dial button Figure 26 Assigning speed dial buttons The name of the person from the telephone book is displayed on the speed dial button If you now click on the speed dial button this number will be dialled automatically 5 5 2 Phone Book In this tab see figure 27 you can save the telephone ...

Страница 22: ... the telephone book Note A printer must be connected to your system in order to be able to use the Print option Click on the Edit icon if you wish to alter the personal information of the person selected in the telephone book Click on the Dial icon to call the person selected in the telephone book Click on the Delete icon if you wish to delete the person selected from the telephone book 5 5 3 Call...

Страница 23: ...our ISDN speaker telephone This number will then also be displayed at the location of the person you call Place a tick in the CLIR check box if you do not wish your number to be displayed at the location of the person you call 5 5 5 Other Options In this tab see figure 30 you can alter the different settings of your ISDN speaker telephone Figure 30 Other Options Select the Listen for all MSNs opti...

Страница 24: ...e a tick in the Distinct ring pattern check box and then click on the Setting button if you wish to change the ring pattern of the ISDN speaker telephone Place a tick in the Enable Call Forwarding check box and then click on the Setting button to redirect your ISDN speaker telephone to a different telephone Place a tick in the Enable Answering Machine check box and then click on the Setting button...

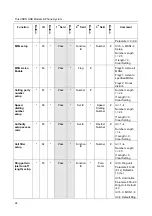
Страница 25: ...ar 2 short beeps If incorrectly programmed you will hear more than 6 short beeps Function Button ID Button 1 st field Button 2 nd field Button 3 rd field Button Comment Password setup 98 Old pass New pass Password enabling 97 Pass Flag Flag 0 disable password Flag 1 enable password Factory default 96 Pass Id Id 0 default setting Special function setup 95 Pass Function Id Flag Fun Id 1 PCM Law Flag...

Страница 26: ...ss Number Number Length 24 If Length 0 Clear Setting Speed dialling number setup 86 Pass Set Id Speed Dialling Number Id 1 4 Number Length 24 If Length 0 Clear Setting Authority setup access code 85 Pass Set Id Restrict Number Id 1 4 Number Length 4 If Length 0 Clear Setting Call filter setup 84 Pass Function Id Number Id 1 4 Number Length 20 If Length 0 Clear Setting Ring pattern alert on off len...

Страница 27: ...ring off Default is x1 1 x2 4 Function enabling 82 Pass Function Id Flag Id 1 CLIR Flag 0 Disable Flag 1 Enable on time Flag 2 Enable always Id 2 No Call Waiting Id 3 Authority Setup Id 4 Call Filter Id 5 Internal Call Forwarding Flag 0 Disable Flag 1 Enable Volume control setup 81 Pass Function Id Flag Id 1 Mic Volume Flag 0 low 5 high Id 2 Speaker Volume Flag 0 low 4 high ...

Страница 28: ... code again to carry on the call Call waiting If you are making a call and the Call Waiting option is turned on you will hear 2 beeps when a second call is received You can switch between the 2 calls using the Hold Retrieve function Suspend Resume If you have two or more ISDN devices connected to your ISDN line for example the ISDN USB Modem Phone System and an ISDN telephone you can suspend a cal...

Страница 29: ...ostic program has been installed Follow the steps given in chapter 4 1 to install this program 1 Disconnect the ISDN USB Modem Phone System from the USB port on your computer 2 Go to Start Programs Trust ISDN Utility and select Uninstall DRV UTL from the list Figure 31 Uninstalling the ISDN Modem 3 Place a tick in both check boxes and click on OK see figure 31 4 Click on Yes to confirm the uninsta...

Страница 30: ...whether all the communication settings speed data stop and parity bits have been set correctly and are the same on both sides of the connection The modem makes a connection but no information is displayed on the monitor The system is waiting for you Press the ENTER button several times The system may be waiting at a distance until it receives data from you before sending it The wrong number is dia...

Страница 31: ...ion available The article number This is 12220 12221 for UK version Your hardware information Your operating system and version number A good description of what does not work A good description of when the problem occurs 8 Maintenance The ISDN USB Modem Phone System does not require any special maintenance If necessary clean the modem using a soft damp cloth Do not use alcohol or any other aggres...

Страница 32: ... fr trust com Fax 33 0 1 48174918 Tel 33 0 803 083080 Inhabitants of Germany should contact From 9 00 a m 5 00 p m German Office Internet www trust com E mail customercare de trust com Fax 02821 58873 Tel 0800 00TRUST 0800 0087878 Inhabitants of Spain should contact From 9 00 a m 5 00 p m Spanish Office Internet www trust com E mail customercare es trust com Fax 31 78 6543299 Tel 31 902 160937 Inh...

Отзывы: