background image

............ www.truemfg.com ............

True Food Service Equipment, Inc.

14

14

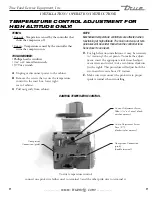
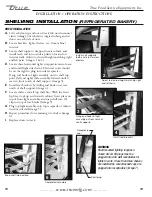
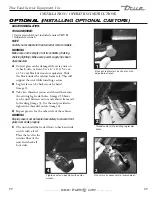
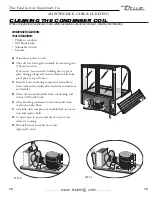
MAINTENANCE, CARE & CLEANING

LIGHT BULB REPLACEMENT

SHELF MOUNTED BULB REPLACEMENT:
WARNING

When replacing a light bulb make sure power to the unit 

is either turned off or unplugged.

A.

  Unplug the light assembly from the receptacle 

on the interior side wall. Remove shelf and light 

assembly from cabinet. 

B.

  Remove the lampshield by gently squeezing the 

sides together and rotating out (image 1).

C.

  Remove bulb from the corded end of assembly 

by holding the bulb and gently pulling up on 

spring loaded lampholder which will allow enough 

clearance to remove bulb (image 2).

NOTE

All spring loaded lampholders are located on the left side 

of the cabinet as you face the front.

NOTE

Please be aware of your local ordinances for disposal of 

old florescent bulbs. These bulbs should be disposed of in 

a safe and proper manner.

D.

  Install new bulb using spring loaded lampholder.

E.

   Reinstall light assembly and shelf. Plug cord into 

side wall receptacle.

INTERIOR TOP BULB REPLACEMENT:
WARNING

When replacing a light bulb make sure power to the unit 

is either turned off or unplugged.

A.

  Remove the lampshield by gently squeezing the 

sides together and rotating out (image 3).

B.

  Remove bulb by gently pushing bulb back into 

spring loaded lampholder which will allow enough 

clearance to remove bulb (image 4).

C.

  Install new bulb using spring loaded lampholder.

D.

  Reinstall light lampshield by sliding rear "U" 

channel of lampshield over metal bracket and 

gently squeezing lampshield to fit front "U" 

channel over front metal bracket (images 5-6).

E.  

Image 7 shows assembly properly installed.

Squeeze lampshield and 
rotate out.

Remove bulb by gen-
tly pulling up on spring 
loaded lampholder.

Squeeze lampshield and 
rotate out.

Remove bulb by gently pushing 
bulb into spring loaded lam-
pholder.

Squeeze lampshield "U" 
channel into position over 
metal bracket.

lampshield "U" channel 
in position over metal 
bracket.

Interior top light assembly 
properly installed.

1

2

3

5

6

7

4

Содержание TCGDZ-50

Страница 1: ...Safety Information Safety Precautions 1 Proper Disposal 2 Connecting Electricity 3 Adapter Plugs 3 Installation Operation Instructions Ownership 4 Required Tools 4 Uncrating 4 Locating 5 Leveling Cabi...

Страница 2: ...oilage Of Products In Your Refrigerator Freezer Is NOT Covered By Warranty In Addition To Following Recommended Installation Procedures You Must Run The Refrigerator Freezer 24 Hours Prior To Usage Tr...

Страница 3: ...ommend that any servicing be preformed by a qualified individual Unplug the refrigerator before cleaning and making repairs switch power off at breaker for hard wired models Setting temperature contro...

Страница 4: ...are getting rid of your old display case please follow the instructions below to help prevent accidents Before You Throw Away Your Old Display Case Take off the doors Leave the shelves in place so tha...

Страница 5: ...it replaced with the properly grounded wall outlet The display case should always be plugged into it s own individual electrical circuit which has a voltage rating that matches the rating plate This...

Страница 6: ...g by pulling tri wall nails from skid Remove 4 cardboard corner pads and dust cover B Inspect for concealed damage Again immediately file a claim with the freight carrier if there is damage C Move you...

Страница 7: ...may want to install an exhaust fan WARNING Warranty is void if ventilation is insufficient B Proper leveling of your TRUE unit is critical to operating success for non mobile models Effective condens...

Страница 8: ...s noted correct immediately B Models equipped with a power cord must be powered at proper operating voltage at all times Refer to cabinet data plate for voltage TRUE requires that a sole use circuit b...

Страница 9: ...8 6 6 6 6 5 4 4 3 35 10 10 8 6 6 6 5 5 4 4 3 2 40 10 8 8 6 6 5 5 4 4 3 2 2 45 10 8 6 6 6 5 4 4 3 3 2 1 50 10 8 6 6 5 4 4 3 3 2 1 1 Wire Gauge for 2 Voltage Drop in Supply Circuits 230 Volt Distance In...

Страница 10: ...he toggle switch is located lower right corer at the rear NOTE If the unit is disconnected or shut off wait five minutes before starting again RECOMMENDATION Before loading product we recommend you ru...

Страница 11: ...at high altitude The Cut in and cut out tem peratures will be colder than when the controller func tions closer to sea level D For high elevation installations it may be necessary to warm up the set...

Страница 12: ...front notch of shelf support image 3 E Install rear brackets by sliding end hooks over rear notch of shelf support image 4 F Locate shelves install top shelf first With the front lip tray stop up and...

Страница 13: ...t the unit while installing castors B Leg levelers can be backed out by hand image 1 C Take two threaded castors and thread them into the existing leg leveler holes image 2 Shims can be used between c...

Страница 14: ...they each can be used for left or right of the cabinet Slide panel up into black plastic tracks on the top side panel of each end of cabinet images 1 3 NOTE After installing the bottom end pieces the...

Страница 15: ...ires TRUE recommends either of the following methods A Using a vinyl cove base trim as produced by Armstrong Johnson or Kentile available at floor covering suppliers or Using mastics available at hard...

Страница 16: ...pring loaded lampholder E Reinstall light assembly and shelf Plug cord into side wall receptacle INTERIOR TOP BULB REPLACEMENT WARNING When replacing a light bulb make sure power to the unit is either...

Страница 17: ...ws holding the top pivot pins Swing grill up and remove frame hooks from pivot pins at top of louver C Remove bolts anchoring compressor assembly to frame rails and carefully slide out tube connection...

Страница 18: ...ion service company The Condenser looks like a group of vertical fins You need to be able to see through the condenser for the unit to function at maximum capacity THE CLEANING OF THE CONDENSER IS NOT...

Страница 19: ...ring pad or soft cloth when you cannot see the grain 3 Use alkaline alkaline chlorinated or non chloride containing cleaners While many traditional cleaners are loaded with chlorides the industry is p...

Страница 20: ...lied by rubbing in the direction of the polished lines for stubbornstains and discoloring D Easy off and De Grease It oven aid are excellent for removals on all finishes for grease fatty acids blood a...

Страница 21: ...em 500 microns or lower must be obtained WARRANTY CLAIMS All claims for labor or parts must be made directly through TRUE All claims should include model number of the unit the serial number of the ca...

Отзывы: