background image

8

MAINTENANCE AND REPAIR INSTRUCTIONS

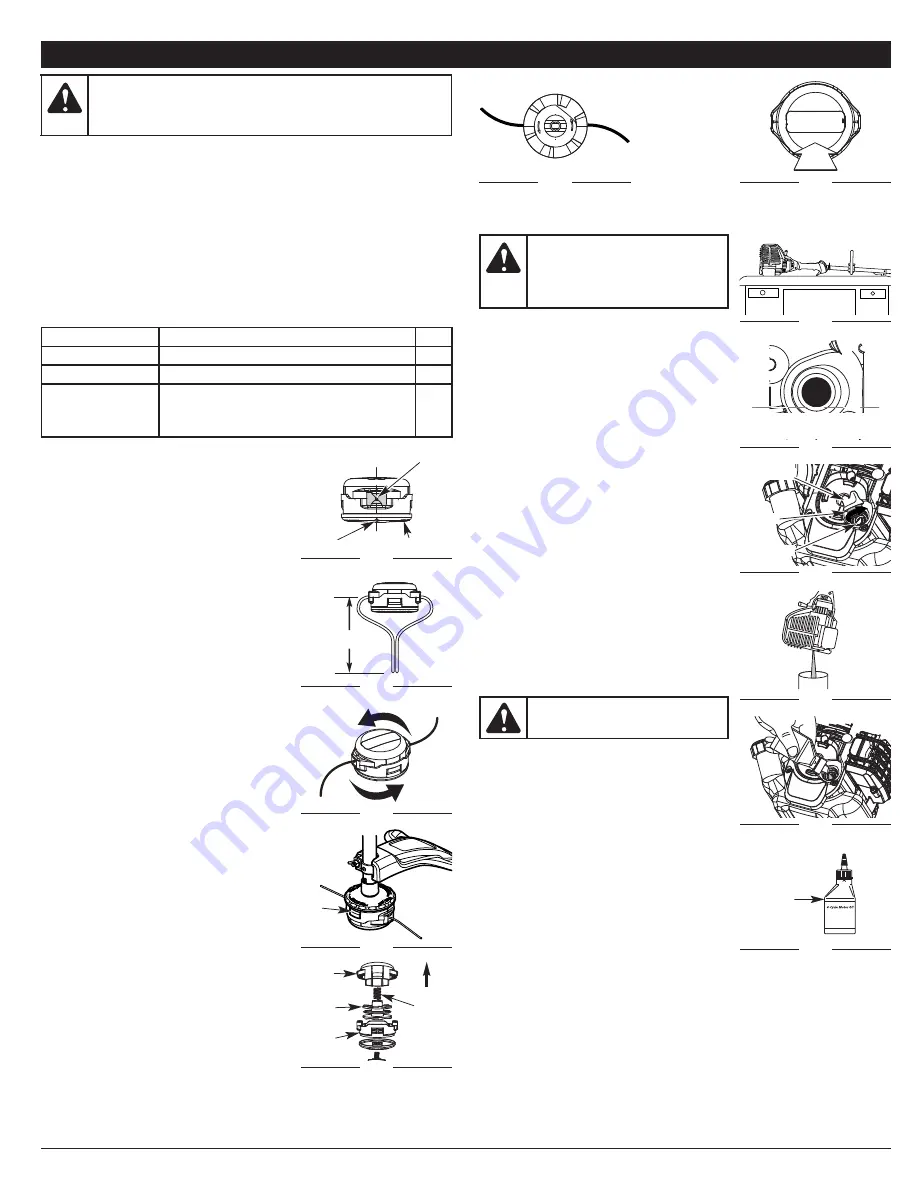
CHECKING THE OIL LEVEL

The importance of checking and maintaining the
proper oil level in the crankcase cannot be
overemphasized. Check oil before each use:
1. Stop the engine and allow oil to drain into

the crankcase.

2. Place the engine on a flat, level surface with

the cutting head shield hanging off a work
bench or table to get a proper oil level
reading (Fig. 23).

3. Keep dirt, grass clippings and other debris

out of the engine. Clean the area around the
dipstick before removing it.

4. Remove the oil fill plug (Fig. 25).
5. Look into the oil fill hole, use a flashlight if

needed. The oil should be just touching the
inner most thread (Fig. 24).

6. If the oil level is not touching the inner most

thread on the oil fill hole, add a small
amount of oil to the oil fill hole and recheck
(Fig. 24). Repeat this procedure until the oil
level reaches the inner most thread on the
oil fill hole.

NOTE:

Do not overfill the unit.

NOTE:

Make sure the O-ring is in place on the

oil fill plug when checking and changing the
oil (Fig. 25).

CHANGING THE OIL

Change the oil while the engine is still warm. The
oil will flow freely and carry away more impurities.
1. Unplug spark plug boot to prevent

accidental starting.

2. Remove the oil fill plug.
3. Pour the oil out of the oil fill hole and into a

container by tipping the unit to a vertical
position (Fig. 26). Allow ample time for
complete drainage.

4. Wipe up any oil residue on the unit and

clean up any oil that may have spilled.
Dispose of the oil according to federal, state
and local regulations.

5. Refill the crankcase with 3.04 fluid ounce

(90 ml) of SAE 30 SF, SG, SH oil (Fig. 28). 

NOTE:

Use the bottle and spout saved from

initial use to measure the correct amount of oil. The top of the label on
the bottle measures approximately 3.04 ounces (90 ml) (Fig. 29). Check
the level, See 

Checking the Oil Level

. If the level is low, add a small

amount of oil and recheck. Do not overfill (Fig. 24).

6. Replace the oil fill plug.
7. Reconnect the spark plug boot. 

MAINTENANCE SCHEDULE

Perform these required maintenance procedures at the frequency stated in
the table. These procedures should also be a part of any seasonal tune-up.

NOTE:

Some maintenance procedures may require special tools or skills. If

you are unsure about these procedures take your unit to any non-road
engine repair establishment, individual or authorized service dealer. 

NOTE:

Maintenance, replacement, or repair of the emission control devices

and system may be performed by any non-road engine repair
establishment, individual or authorized service dealer.

NOTE:

Please read the California/EPA statement that came with the unit for

a complete listing of terms and coverage for the emissions control
devices, such as the spark arrestor, muffler, carburetor, etc.

FREQUENCY

MAINTENANCE REQUIRED

SEE

Every 10 hours

Clean and oil air filter

p. 9

After 1st 10 hours

Change oil

p. 8

Every 25 hours

Change oil
Check rocker arm to valve clearance and adjust
Check spark plug condition and gap

p. 8
p. 9
p. 9

WARNING:

To prevent serious injury, never perform

maintenance or repairs with unit running. Always service and
repair a cool unit. Disconnect the spark plug wire to ensure that
the unit cannot start.

LINE INSTALLATION

Always use original equipment manufacturer
0.095 in. (2.41 mm) replacement line. Other types
of line may make the engine overheat or fail.

NOTE:

There may be a need to remove the old

line prior to installing new line. If so, please
refer to 

Removing the old line or obstructions

.

NOTE:

Line installation DOES NOT require

removal or disassembly of the cutting head.

1. Align the arrows on the cutting head knob

with the outer spool eyelets, if they are not
already. (Fig. 16)

2. Using 10.5 ft. (3.2 m) of 0.095 in. (2.41 mm)

replacement line push an end of the line
through one of the eyelets until it protrudes
through the opposite side. Continue pushing or
pulling the line until the line is evenly distributed,
so approximately 5 ft. (1.5 m) is visible from
both sides of the cutting head. (Fig. 17)

3. Hold the cutting head knob and turn the

cutting head counterclockwise to wind the
line around the spool until 5 in. (12.7 cm) is
protruding from each side of the cutting
head. (Fig. 18)

NOTE:

If winding the line from a large spool of

line, cut the line from the spool so that it
measures 5” from the eyelet.

4. Start the unit and bump the cutting head on

the ground until the desired cutting length is
achieved.

REMOVING THE OLD LINE OR OBSTRUCTIONS
NOTE:

There should only be a need to remove

the bump cap if the old line gets jammed or
an obstruction preventing the new line from
being installed properly.

1. Firmly press in on the tabs that are on each

side of the cutting head. (Fig. 19)

NOTE:

It may be easier to press in and then up

on one tab at a time.

2. Remove the cap either by letting it pop off

or a slight wiggle of the cap may be required
and pull it off the outer spool (Fig. 20).

3. Remove any old line from the inner reel or

obstructions from the outer spool. (Fig. 21)

4.  Place the inner reel back into the outer

spool (Fig. 20).

5. Replace the bump cap by aligning the tabs of the bump cap with the tab

lock windows of the outer spool and press down firmly until both tabs
snap back into place. (Fig. 22)

To install new line, please refer to the 

Line Installation

section.

WARNING:

To prevent extensive

engine wear and damage to the
unit, always maintain the proper oil
level in the crankcase. Never
operate the unit with a low oil level.

CAUTION:

Wear gloves to prevent

injury when handling the unit.

Fig. 17

Fig. 18

Fig. 19

Fig. 20

Bump

Cap

Inner

Reel

Spring

Outer
Spool

UP

Fig. 21

Fig. 22

Fig. 23

Fig. 24

PRESS

Max Oil Fill Line

Fig. 25

Fig. 26

Fig. 27

Fig. 28

Oil Fill Plug

O-Ring

Oil Fill Hole

Fill Line

Fig. 16

Cutting Head Knob

Arrow

Eyelet

Align

5 Feet

Tab

Содержание TB525

Страница 1: ... notice Copyright 2011 MTD SOUTHWEST INC All Rights Reserved DO NOT RETURN THIS UNIT TO THE RETAILER PROOF OF PURCHASE WILL BE REQUIRED FOR WARRANTY SERVICE For assistance regarding the assembly controls operation or maintenance of the unit please call the Customer Support Department at 1 800 828 5500 in the United States or 1 800 668 1238 in Canada Additional information about the unit can be fou...

Страница 2: ...er to provide the best grip Be sure the cutting attachment is not in contact with anything before starting the unit Use the unit only in daylight or good artificial light Avoid accidental starting Be in the starting position whenever pulling the starter rope The operator and unit must be in a stable position while starting Refer to Starting and Stopping Instructions Use the right tool Only use thi...

Страница 3: ...nd free from debris Clean after each use see Cleaning and Storage instructions Keep these instructions Refer to them often and use them to instruct other users If you loan someone this unit also loan them these instructions SAVE THESE INSTRUCTIONS SAFETY AND INTERNATIONAL SYMBOLS This operator s manual describes safety and international symbols and pictographs that may appear on this product Read ...

Страница 4: ...ut onto the bolt and tighten ADJUSTING THE D HANDLE 1 Loosen the bolt on the handle just enough to move it Fig 2 2 While holding the unit in the operating position Fig 14 move the D handle to the location that provides the best grip 3 Tighten the bolt until the D handle is secure Fig 2 Throttle Control EZ Link D Handle Air Filter Cover Spark Plug Muffler On Off Stop Control Shaft Grip Fuel Cap Cut...

Страница 5: ...lended fuel absorbs water As little as 1 water in the fuel can make fuel and oil separate or form acids when stored Use fresh fuel less than 30 days old when using alcohol blended fuel Using Blended Fuels If you choose to use a blended fuel or its use is unavoidable follow recommended precautions Always use fresh unleaded gasoline Use the fuel additive STA BIL or an equivalent Drain tank and run t...

Страница 6: ...e oil level in the crankcase Refer to Checking the Oil Level 2 Fill the fuel tank with fresh clean unleaded gasoline Refer to Fueling the Unit NOTE There is no need to turn the unit on The On Off Stop Control is in the ON I position at all times Fig 7 3 Fully press and release the primer bulb 10 times slowly Some amount of fuel should be visible in the primer bulb Fig 8 If fuel cannot be seen in t...

Страница 7: ...es more difficult as the cutting line becomes shorter NOTE Do not rest the Bump Head on the ground while the unit is running Some line breakage will occur from Entanglement with foreign matter Normal line fatigue Attempting to cut thick stalky weeds Forcing the line into objects such as walls or fence posts TIPS FOR BEST TRIMMING RESULTS For best trimming results operate unit at full throttle Keep...

Страница 8: ...REQUENCY MAINTENANCE REQUIRED SEE Every 10 hours Clean and oil air filter p 9 After 1st 10 hours Change oil p 8 Every 25 hours Change oil Check rocker arm to valve clearance and adjust Check spark plug condition and gap p 8 p 9 p 9 WARNING To prevent serious injury never perform maintenance or repairs with unit running Always service and repair a cool unit Disconnect the spark plug wire to ensure ...

Страница 9: ... Apply enough clean SAE 30 motor oil to lightly coat the filter 5 Squeeze the filter to spread and remove excess oil 6 Replace the filter Fig 30 NOTE If the unit is operated without the air filter you will VOID the warranty 7 Reinstall the air filter cover Position the slots on the top of the air filter cover onto the tabs at the top of the back plate Fig 29 8 Swing the cover down until the tab on...

Страница 10: ...STARTER AND POWER START BIT FEATURES This unit is designed to be started with an optional electric starter or Power Start Bit which are sold separately If choosing to start the unit using one of these features or have questions please contact your local retailer or call 1 800 828 5500 in the U S 1 800 668 1238 in Canada for more information and purchasing You may also go to www troybilt com or www...

Страница 11: ...THWEST INC Todos los derechos reservados NO DEVUELVA ESTA UNIDAD AL VENDEDOR PARA SOLICITAR SERVICIO POR GARANTÍA DEBERÁ PRESENTAR EL COMPROBANTE DE COMPRA Para solicitar asistencia en relación con el ensamblaje los controles la operación o el mantenimiento de la unidad llame al Departamento de Atención al Cliente al 1 800 828 5500 en Estados Unidos o el 1 800 668 1238 en Canadá Puede encontrar má...

Страница 12: ...star siempre colocada en su lugar mientras opere la unidad No opere la unidad con las dos líneas de corte extendidas y la línea correcta instalada No extienda la línea de corte más allá de la longitud de la protección Esta unidad cuenta con un embrague El accesorio de corte permanece estacionario cuando el motor está en marcha lenta Si no lo hace haga ajustar la unidad por un técnico de servicio a...

Страница 13: ... OTRAS ADVERTENCIAS DE SEGURIDAD No guarde nunca la unidad con combustible en el tanque en un edificio donde los gases puedan llegar a una llama abierta o a una chispa Espere que el motor se enfríe antes de guardar o transportar la unidad Asegúrese de que la unidad esté segura al transportarla Guarde la unidad bajo llave en un lugar adecuado y seco para evitar que sea usada por personas no autoriz...

Страница 14: ... cuadrado a través del orificio hasta que el extremo con roscas sobresalga a través del soporte de montaje de la guardera 3 Ponga la arandela en el perno y después atornille la tuerca de mariposa y apriétela La Figura 2 muestra el proceso de instalación desde un ángulo por debajo de la unidad ADJUSTE DE LA MANIJA EN D 1 Afloje el perno que está en la manija lo suficiente para moverla Fig 2 2 Mient...

Страница 15: ...siguientes precauciones Use siempre una mezcla fresca de combustible según lo indica su manual del operador Use el aditivo especial de combustible STA BIL o uno similar Drene el tanque y haga funcionar el motor en seco antes de guardar la unidad INFORMACION DEL ACEITE Y DEL COMBUSTIBLE ADVERTENCIA EL LLENAR DEMA SIADO EL CÁRTER PUEDE CAUSAR LESIONES PERSONALES GRAVES No podemos exagerar la importa...

Страница 16: ...nga a funcionar la unidad de 2 a 5 minutos La unidad se puede usar en este momento Luego mueva la palanca del obturador a la Posición 3 NSTRUCCIONES DE APAGADO 1 Saque la mano del control del regulador Deje enfriar el motor en marcha en vacío 2 Oprima y mantenga oprimido el control de encendido y apagado en la posición de APAGADO O hasta que el motor se detenga por completo Fig 7 INSTRUCCIONES DE ...

Страница 17: ...DECORATIVO El recorte decorativo se realiza eliminando toda la vegetación de alrededor de los árboles postes cercos etc Gire toda la unidad a modo de que el accesorio de corte se ubique a un ángulo de 30 con el suelo Fig 15 OPERACION DEL SISTEMA EZ LINK El sistema EZ Link le permite el uso de estos accesorios optativos Recortador AF720 Recortador de setos AH720 Cortamalezas BC720 Cultivador GC720 ...

Страница 18: ... línea quede distribuida uniformemente de manera que se vea aproximadamente 5 pies 1 5 m desde ambos lados del cabezal de corte Fig 17 3 Sujete la perilla del cabezal de corte y haga girar el cabezal de corte en sentido antihorario para enrollar la línea en la bobina hasta que salga 5 pulgadas 12 7 cm por cada lado del cabezal de corte Fig 18 NOTA Si enrosca la línea desde una bobina de línea gran...

Страница 19: ...a boquilla que guardó del uso inicial para medir la cantidad correcta El nivel de 90 ml 3 04 onzas está aproximadamente en la parte superior de la etiqueta de la botella Fig 29 Mida el nivel con la varilla de medición Si el nivel está bajo agregue una pequeña cantidad de aceite y vuelva a medir Fig 24 No lo llene demasiado 6 Vuelva a colocar el tapón de relleno de aceite varilla de medición 7 Vuel...

Страница 20: ...OTA No use gasolina que haya estado guardada durante más de 30 días Elimine la gasolina vieja de acuerdo con las normas federales estatales y locales 2 Arranque el motor y déjelo funcionar hasta que se ahogue Esto asegura que toda la gasolina se haya drenado del carburador 3 Deje enfriar el motor Saque la bujía de encendido y coloque 5 gotas de aceite de motor de buena calidad en el cilindro Tire ...

Страница 21: ...amente de 10 veces Combustible viejo más de 30 días Vacíe el tanque de gasolina y añada combustible fresco La bujía de encendido está arruinada Cambie o limpie la bujía de encendido El filtro de aire está obstruido Cambie o limpie el filtro de aire Combustible viejo más de 30 días Vacíe el tanque de gasolina y añada combustible fresco Velocidad de marcha en vacío inadecuada Haga el ajuste de acuer...

Страница 22: ...NOTES 22 ...

Страница 23: ...NOTES 23 ...

Страница 24: ...rreglará o substituirá sin costo alguno cualquier pieza cuyo material o mano de obra se considere defectuoso Esta garantía limitada se deberá aplicar únicamente si este producto ha sido manejado y mantenido de acuerdo al Manual del Operario incluido con el producto y si no ha sido sometido a mal uso abuso uso comercial negligencia accidente mantenimiento inapropiado alteración vandalismo hurto fue...

Отзывы: