


EN
19
cordless portable circular saw PCSS 10-20V
Sawing wood:
•
Before sawing wood, chipboards, building materials etc.,
check the above for foreign objects, e.g. nails, screws or
similar. If required, remove the foreign objects or use a
suitable, sharp saw blade.
•
The choice of the saw blade depends on the type of
application (longitudinal or cross cuts) as well as the type
and quality of wood.
•
If the saw blade gets jammed in the workpiece, switch off
the power tool immediately. The sawing gap should be
slightly widened with a suitable tool so that you can pull
out the power tool.
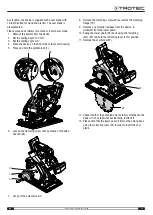
•
Switch on the power tool and guide it towards the
workpiece to be processed. Place the guide shoe on the
surface of the workpiece. Process the workpiece with an
even forward motion and contact pressure. After
completing the sawing operation, switch off the power
tool.
Sawing non-ferrous metals:
•
Metal dusts can be harmful to health. Wear a protective
mask.
•
Only use a sharp saw blade suitable for non-ferrous
metals. This guarantees a clean cut and prevents the saw
blade from getting jammed.
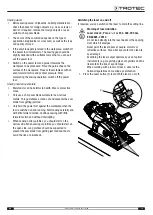
•
Only hold the power tool against the workpiece when the
tool is switched on and running. Start sawing carefully and
with little forward motion. Continue sawing with little
forward motion and without interrupting.
•
When sawing narrow profiles, you should start on the
narrow side. When sawing U-profiles, you should start on
the open side. Long profiles should be supported to
prevent the saw blade from getting jammed and thus to
avoid the risk of a kickback.
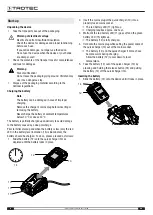
Switching the laser on and off
If required, you can switch on the laser to mark the cutting line.
Warning of laser radiation
Laser class 2, P max.: < 1 mW, λ: 400-700 nm,
EN 60825-1:2014
Do not look directly into the laser beam or the opening
from which it emerges.
Never point the laser beam at people, animals or
reflective surfaces. Even brief eye contact can lead to
eye damage.
Examining the laser output aperture by use of optical
instruments (e.g. magnifying glass, magnifiers and the
like) entails the risk of eye damage.
When working with a laser of class 2, observe the
national regulations on wearing eye protection.
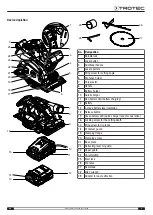
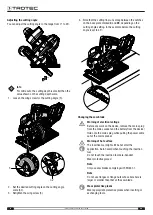
1. Press the Laser button (
2
) to switch the laser on or off.
2
4