background image

54 


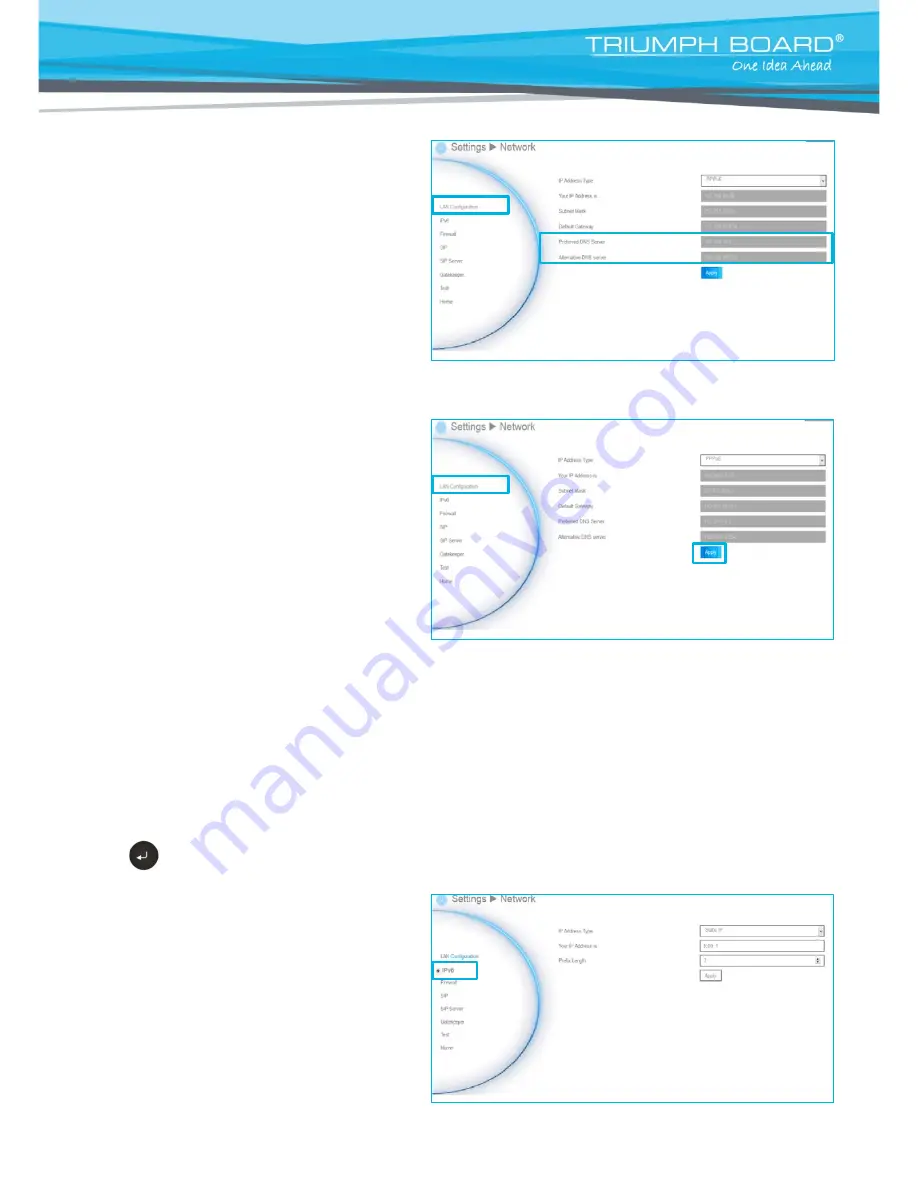
Preferred/Alternate DNS Server 


Domain Name System (DNS) servers convert 
human friendly names (for example: 
www.example.com) to IP addresses 
(218.77.272.166) that let machines be found 
on the network. The preferred DNS server is 
the one your computer asks first. The alternate 
is a backup. Enter the Preferred and 
Alternated DNS Server address. 


After finishing all settings, select 

“Apply” 

to 

active the changed settings. 


LAN CONFIGURATION (IPV6) 


IPv6 is an evolutionary upgrade to the Internet Protocol. IPv6 will coexist with the older IPv4 for some 
time. IPv6 addresses are 128-bit IP address written in hexadecimal and separated by colons. An 
example IPv6 address could be written like this: 300E:1389:3030:72EB:1D71:414B:1079:6AF3. 
Some types of addresses contain long sequences of zeroes that can be compressed (the address 
of fc00:0000:0000:0000:0000: 0000:0000:0001 can be compressed to fc00::1. 


Select Network

LAN Configuration (IPv6) and 

press 


Configure the following relative items to setup 
the LAN Configuration (IPv6). 

Содержание VC1

Страница 1: ...TRIUMPH BOARD Videoconferencing System VC1 User s Manual ...

Страница 2: ... VGAIN 11 CONNECTINGTHEAUDIO AUDIOIN OUT 12 USBSTORAGE USBPORTS 13 BEFORE INSTALLATION 13 Using the Camera 13 Infrared Sensor IR 13 Positioning the MIC 14 TRIUMPH BOARD VIDEO CONFERENCING SYSTEM VC1 WIZARD SETUP 15 START 15 LANGUAGE 15 SITENAME 16 NETWORKSETTING 16 PUBLICIPCONFIGURATION OUTSIDEOFFIREWALL 16 PRIVATEIPCONFIGURATION BEHINDFIREWALLPORTFORWARDING 19 SIPSETTING 21 SIPSERVERREGISTRATION ...

Страница 3: ...0 ADMINISTRATOR 41 DATEANDTIME 45 RESETSYSTEM 47 Video Audio 48 CAMERA 48 MICROPHONE 50 VIDEO AUDIOCODECS 51 Network 52 LANCONFIGURATION 52 LANCONFIGURATION IPV6 54 FIREWALL 56 SIP 57 SIPSERVER 60 GATEKEEPER 63 WEB CONFIGURATIONS 65 Using the WebTool 65 Managing Phonebook 67 EDITANDSAVE 67 DOWNLOADPHONEBOOKENTRIES 68 UPLOADPHONEBOOKENTRIES 68 Update System 69 MAKING A CALL 70 Using the Phonebook 7...

Страница 4: ...all Traversal 76 SPECIFICATIONS 78 TROUBLESHOOTING 82 Audio 82 Video Display 82 Network 83 OTHERS 84 REMOTE CONTROL BATTERY SAFETY INFORMATION 84 LIMITED WARRANTY 85 Limitations of Warranty 85 Disclaimer of Warranty 85 Governing Law and Your Rights 86 FEDERAL COMMUNICATIONS COMMISSION STATEMENT 86 Class A ITE 86 CE Class A EMC 87 COPYRIGHT 87 Trademarks 87 Disclaimer 87 ...

Страница 5: ...om VGA or IP Dual monitor support via HDMI and VGA Support CIF 352x240 up to Full HD 1920x1080 30fps video call eCam Focus is 88 degree super wide angle Pan Tilt camera with 2Mp low lux sensor Include one microphone array much better audio pick up than competitor offering 10 100 and Gigabit Ethernet video bandwidth from 64Kbps to 4Mbps Support IPv4 IPv6 and Wake on LAN WOL User friendly on screen ...

Страница 6: ...re using 1 2 3 4 5 6 7 8 9 10 11 12 13 14 15 1 Main System 2 Camera 8 Mini Din 8 pin MIC Cable 5m 9 HDMI Cable 3 Microphone 10 Camera Cable 3m 4 Remote Control 11 RJ 45 Cable 3m 5 Power Adapter 12 Warranty Card 6 Power Cords US UK EU 13 Quick Installation Guide 7 VGA Cable 14 AAA Batteries 15 White Panel Label ...

Страница 7: ...ction is successfully 2 Solid Red LAN connection is fail 3 Flash Green Data transmission is processing through the LAN connection 2 POWER Button Press this button to turn on off main system Red power off Blue power on 3 USB Port Use to connect the USB storage for system log saving and FW upgrade Back Panel Name Function 1 POWER Port Connect the power supply cord and adapter to the power port locat...

Страница 8: ...both audio and video signals over a single cable HDMI cable In dual screen configuration the output screen connected to this port will be set up to primary screen automatically 7 VGA IN port Connect the VGA cable to the VGA IN port located on the back panel and connect the other end of VGA cable to a VGA input sources ex Document camera Laptop or Desktop to input video signal 8 AUDIO IN port Recei...

Страница 9: ...ntrol for system operation Amber light blinks when it detects key pressing event from remote 2 CAMERA OUT port Connect the camera cable to the CAMERA OUT port located on the back of camera and CAMERA IN port located on the back panel of main system for a video transmission ...

Страница 10: ...call statistics information 4 Numeric Pad Use to enter numeric numbers 5 Call Start a call 6 Home Bring up the main screen 7 Hang up End the call 8 TB Point Specified for some special functions For example on the Phonebook configuration screen of VC1 application press this button to create a new Group TB Point to be developed 9 Preset a Press and hold for 3 sec to set the position of the camera to...

Страница 11: ...ll appear on the screen to indicate which site s camera you are controlling The cam ctrl icon will disappear after press the Far Near key 5 sec 17 Back Return to previous OSD menu 18 Zoom Increase decrease the camera zoom or the captured image magnifications 19 Vol Increase decrease the speaker volume 20 Mute Mute Unmute the MIC The mute icon will appear when the MIC is muted The mute icon will be...

Страница 12: ...are the content that comes from either the VGA IN port source or the latest captured image The present icon will appear on the screen when the presentation function is enabled The icon will disappear after 5 sec 26 Layout Change the screen layout ...

Страница 13: ...ces are powered off Refer to the illustrated connections below and also to the user manual of the device you are connecting to the TRIUMPH BOARD Video Conferencing System VC1 Make sure all connections have been connected successfully before powering on the system ...

Страница 14: ...IUMPH BOARD Video Conferencing System VC1 with the supplied VGA HDMI cable You can configure the VGA OUT and HDMI OUT ports at the same time upon a dual screen configuration CONNECTING THE CAMERA CAMERA IN Locate the port on the back of the camera and connect it to the CAMERA IN port of the Video Conferencing System VC1 with the supplied camera cable ...

Страница 15: ...end of the MIC cable with the blue tag to MIC OUT port Press the button on the top of TRIUMPH BOARD Video Conferencing VC1 MIC to mute un mute the MIC CONNECTING THE LAN RJ 45 Connect the LAN port of TRIUMPH BOARD Video Conferencing VC1 to a RJ 45 wall jack or Ethernet hub with the supplied RJ 45 cable It is requires an IP based network before beginning LAN connection ...

Страница 16: ...system are connected successfully before connecting the power cable and turning on the power 2 Make sure to use the supplied available power adapter CONNECTING PC VGA IN Locate the VGA output port of the Laptop or Desktop and connect it to VGA IN port of Video Conferencing System VC1 with the supplied VGA cable for an image display To share the video signal from the computer press PRESENT and sele...

Страница 17: ...esktop and connect it to AUDIO IN port of TRIUMPH BOARD Video Conferencing System VC1 with the supplied 3 5mm Audio cable AUDIO OUT Locate the AUDIO in port of the LCD TV speaker or normal speaker and connect them to AUDIO OUT port of TRIUMPH BOARD Video Conferencing System VC1 with a RCA cable ...

Страница 18: ... in a conference room Using the Camera TRIUMPH BOARD Video Conferencing System VC1 includes a detached camera that can pan 100 deg range tilt 25 deg range and zoom 4X digital by using the and zoom buttons on remote controller Avoid physically turn camera while system is powered on to prevent permanent damaging the motors and gears and void the warranty Always use the remote control to pan and tilt...

Страница 19: ...14 Positioning the MIC The best distance for Video Conferencing System VC1 MIC to receive audio signal is within 3m Single Microphone Two Microphones ...

Страница 20: ...To expand the drop down list make confirm the selection Move the cursor up or down Move the cursor to right or on Next button Move the cursor to left or on Back button START Please follow the below description to complete the wizard setup Connected the Video Conferencing System VC1 well and turn on the power After Video Conferencing System VC1 starting user will see the Installation Wizard screen ...

Страница 21: ...press to confirm the selection Note User can refer to chapter of Scenarios For LAN Connection for the description of network environment After selecting the network setting option user need to configure the network parameters Follow the below description to setup the network settings PUBLIC IP CONFIGURATION OUTSIDE OF FIREWALL Your Video Conferencing System VC1 is connecting directly to the intern...

Страница 22: ...ly obtain the subnet mask 3 Default Gateway A gateway is a network point that acts as an entrance to another network Enter the gateway address when the system does not automatically obtain the gateway 4 Preferred DNS Server Domain Name System DNS servers convert human friendly names for example www example com to IP addresses 218 77 272 166 that let machines be found on the network The preferred D...

Страница 23: ...nd prefix length in following 2 Your IP Address is Enter your IP address manually 3 Prefix Length Prefix Length allows you to place as many IPv6 devices as the underlying network medium allows PRIVATE IP CONFIGURATION BEHIND FIREWALL PORT FORWARDING Your Video Conferencing System VC1 is connecting to the internet through a firewall Please make sure you have set the following ports in port forwardi...

Страница 24: ...eferred DNS server is the one your computer asks first The alternate is a backup Enter the Preferred and Alternated DNS Server address 5 Alternate DNS Server Enter another Domain Name server for second choice IPv6 IPv6 is an evolutionary upgrade to the Internet Protocol IPv6 will coexist with the older IPv4 for some time IPv6 addresses are 128 bit IP address written in hexadecimal and separated by...

Страница 25: ...tocol type from the drop down list for using There are two types of Internet Protocol IP traffic They are Transmission Control Protocol TCP and User Datagram Protocol UDP To ensure proper connection verify if both calling parties are using the same transport protocol By default it is set to UDP 1 TCP TCP is connection oriented Once a connection is established data can be sent bidirectional 2 UDP U...

Страница 26: ...to go next step 1 Terminal Name Enter the terminal server name 2 Terminal Password Enter the password of terminal server 3 Registration Server Registrar Server accepts registrations from users and places these registrations which is essentially location information in a database known as a location service Enter the Registrar Server name that you want to use 4 Proxy Server Proxy Server is computin...

Страница 27: ...ork machine clocks on the same time Enter the NTP Server name that you want to follow 2 Time Zone Timezone allows you to adjust the time when you are in a different country or area so that you can keep the same time with your original area Most of the time zones on land are offset from Coordinated Universal Time UTC by a whole number of hours UTC 12 to UTC 14 MANUALLY SETTING Enter the present yea...

Страница 28: ... the selection on the remote controller Apply Make the changed value to take effect For TRIUMPH BOARD Video Conferencing System VC1 Application Save Accept the created value and save it to the system Cancel Cancel the changed value and exit the present screen Home Screen There are 4 selections on the Home screen Dial Phonebook Call History and Setting Simply use the navigation buttons to move betw...

Страница 29: ...e If the MIC connection is ok is on the upper left corner of your home screen Otherwise is displayed indicating microphone is mute Try pressing the mute button on microphone or remote controller to unmute it LED indicator on microphone turns blue WAN ADDRESS On the lower left corner of your home screen you can find current WAN IP address REAL TIME CLOCK On the lower right corner of your home scree...

Страница 30: ...rt you want to call TRIUMPH BOARD remote controller supports alpha numeric operation press numeric key multiple times to select the alphabet or symbol Call Type TRIUMPH BOARD Video Conferencing System VC1 supports H 323 and SIP calls H 323 is commonly used to communication to other videoconferencing room systems SIP is commonly used to communicate with other VoIP devices Use the button to select w...

Страница 31: ...th effectively we suggest using H 264 video codec and G 722 1c audio codec when the SIP connection is at 64kpbs Select the Call on the Dial configuration screen then press to make a call Make sure the network jack is plugged in and network is working properly before making a call otherwise the Network Jack Unplugged information will appear Click OK to reconfirm the network connection ...

Страница 32: ...the WebTool to edit or import the phonebook entries too GROUP Select Phonebook and press Select Group and press If you have lots of contacts it is better to categorize them to groups such as client vendor company branch etc to make the lookup easier Create a New Group In the Group configuration screen Press Red button on the remote controller to pop up the Enter Group Name dialogue box Enter the g...

Страница 33: ... box The new group name will be saved and displayed in the group list Search a Created Group Press Yellow button on the remote controller and enter the group name that you want to search If the name you enter has not been created the system will show you No Group Available please search again ...

Страница 34: ... Phonebook Group and press Select the name you want to modify in the group list Select Edit Group and press Modify the group name and select Save to save the revised group name The revised group name will be saved and displayed in the group list If the revised name is the same as the saved name the revised name will be ignored ...

Страница 35: ...add to Contacts List Select Edit Group and press Confirm the Group Name what your want to add to the contracts list and then select Contacts List In the Group Site list select the item that you want to add to the contracts list and then press Red button on the remote controller to save the selection ...

Страница 36: ...l be added into the contacts list Delete Group Select Phonebook Group and press Select the name you want to remove in the group list Select Delete Group and press Select Yes to remove the selected group name and Cancel to cancel group name deletion The selected group name will disappear in the group list when deleted ...

Страница 37: ...Phonebook New Site and press Select the Group name if you don t want to add the entry into a group please select Non Group item Select Site Name box Enter the site name with the remote controller and press Enter the used call type information either H 323 or SIP Select the desired call quality value in the drop down list ...

Страница 38: ...he contact you want to modify and press Select Edit Site and press In the Edit Site screen you many change the Group name Site Name H 323 SIP and Call Quality After making the changes select Save to apply the new changes or Cancel to reserve the original settings The saved changes will be shown in the Group Site list ...

Страница 39: ...cts List and press Select the contact you want to delete and press Select Delete Site and press Select Yes to remove the selected contact and No to cancel contact deletion The selected contact will disappear in the Group Site list when deleted ...

Страница 40: ...you want If the Group Site over one page you can also press Green button or Blue button to Page Up or Page Down FAVORITE TRIUMPH BOARD Video Conferencing System VC1 allows you save up to 10 most used contacts in the favorite list Select Phonebook Favourite and press Select which line 0 9 do you want to save the favorite contact and press Select the contact from the pop up Group Site list and press...

Страница 41: ... The Call History will show you the IP address or the Site name with call type Call Date Time and Call status Refer to the table below to check the call status Call Status Answered Failed IN OUT Make a Call From the Call History Select Call History and press Use the and buttons to move the selection and scroll up and down in the call history list Press and select Call to make a call The call will ...

Страница 42: ... the and buttons to move the selection and scroll up and down in the call history list Press and select Save to pop up contact editing form All relative information has filled in the contact form already based on the selected call entry from the Call History Confirm the Group selection then select Save to save the call entry into your contact ...

Страница 43: ...ar on the screen during the call session for the other party to identify you Set the system to enable disable auto answer set the default call quality and enable disable Advanced Encryption Standard which ciphers the data to protect against unauthorized data access Auto Answer Select General Setting Call Settings and press Select Auto Answer and press In the Auto Answer drop down list select OFF t...

Страница 44: ...t unauthorized data access Encrypted data can only be read with the device that also supports the AES standard All parties on the call must support AES to use this feature or else the data will not be encrypted Select General Setting Call Settings and press Select the Enable AES check box to active this function This function may be restricted and unavailable in some countries Enable Disable QoS Q...

Страница 45: ...stem VC1 system supports up to 4Mb SYSTEM SETTINGS System Settings allows you to set Language the time for Auto Power off and enable disable Keypad Tone function for your main system Language Select General Setting System Settings and press Video Conferencing System VC1 main system supports up to 27 languages for your selection Select the language from the drop down list directly and the language ...

Страница 46: ...etely turn off the system once you have set the auto power off time To turn on the system you need to press the Power button on the man unit again Keypad Tone Keypad Tone allows you to enable disable tone sounds when you are dialing a number using the remote controller Select General Setting System Settings and press Select the Keypad Tone check box to enable the tone sounds By default this functi...

Страница 47: ...tem Either on the front panel or back panel Select Run located next to Save System Log to save the system log into your USB Flash drive After the file is saved select OK Remove the USB Flash drive and insert it into your computer s USB port Located the file message tar gz and send it to the TRIUMPH BOARD technical support team Firmware Update Notice Select this function check box to enable firmwar...

Страница 48: ...x to enable the far site to control your camera By default this function is enabled Wake On LAN WOL Wake on LAN is an Ethernet computer networking standard that allows your computer to be turned on or awakened by a network message By default this function is disabled ...

Страница 49: ...Ratio Audio 4 3 16 9 that you want from the drop down list and press If you want the system to detect the right setting automatically please select Auto Select the Screen Saver time OFF 10 Minutes 20Minutes 30Minutes 60Minutes from the drop down list and press You can select OFF to disable this function or define a standby mode time The screen will turn black when the system is in standby mode Pre...

Страница 50: ... Date Format yyyy mm dd mm dd yyyy dd mm yyyy you prefer from the drop down list Time Format Select General Setting Date and Time and press Select the Time Format 24 hour 12 hour you prefer from the drop down list Enable NTP Network Time Protocol NTP is a protocol that is used to synchronize computer clock times in a network of computers Select the Enable NTP check box to make your computer time t...

Страница 51: ...ezone Timezone allows you to adjust the time when you are in a different country or area so that you can keep the same time with your original area Most of the time zones on land are offset from Coordinated Universal Time UTC by a whole number of hours UTC 12 to UTC 14 Year and Hour Enter the date and time including year month day hour and minute that you want to show on the present system Select ...

Страница 52: ...ting Reset LAN configuration video audio codec selection call settings and so on will be reset Click Yes to reset your system to factory default values Clear Phonebook All the phonebook entries saved in the system will be deleted Click Yes to clear all content of your phonebook Clear Call History All the incoming and outgoing call records will be deleted Click Yes to delete all calling information...

Страница 53: ...efault to automatic white balance It makes white objects bright white and alter all the other colors to match Cloudy You can use the Cloudy white balance setting instead of auto on a cloudy day This allows the camera to compensate for blueness in the shadows warming up the scene to better match what your eye would see Daylight You can use Daylight settings only when shooting in very bright sunligh...

Страница 54: ...own list Sharpness Sharpness is the crispness or blur of boundaries between zones of different tones or colors Boundaries in a sharp image are crisp steps On the other hand image with low sharpness give blurred gradually changing boundaries Select the Sharpness level among High Medium Low that best fits your preference or simply turn off the Sharpness option Camera Upside down When camera is hande...

Страница 55: ...o improve audio reception on the microphone s MIC Gain Level Select Video Audio Microphone and press Adjust the MIC Gain Level form the drop down list MIC Input Source Select the source of the MIC from the MIC in or Audio in If you connect a MIC in AUDIO IN port we recommend selecting Audio in selection to avoid the echo issue ...

Страница 56: ...figuration and press Select the Video Audio Codecs to specify the codecs you want to support While the TRIUMPH BOARD Video Conferencing System VC1 supports the H 323 standard coding algorithm each codec has unique properties and performs best given a certain set of circumstances For Video H 264 H 263 H 263 For Audio G 728 G 722 1C G 722 1 G 722 G 711 Please contact system administrator if you have...

Страница 57: ...IPv4 is the most widely deployed internet protocol used to connect devices to the internet IPv4 uses a 32 bit address scheme written in decimal as four numbers separated by periods Each number can be zero to 255 For example 192 168 0 1 could be an IP address Select Network LAN Configuration and press Configure the following relative items to setup the LAN Configuration IP Address Type DHCP Configu...

Страница 58: ...et Mask Show the designated IP address routing prefix enter the subnet mask address when the system does not automatically obtain the subnet mask Default Gateway A gateway is a network point that acts as an entrance to another network Enter the gateway address when the system does not automatically obtain the gateway ...

Страница 59: ...settings LAN CONFIGURATION IPV6 IPv6 is an evolutionary upgrade to the Internet Protocol IPv6 will coexist with the older IPv4 for some time IPv6 addresses are 128 bit IP address written in hexadecimal and separated by colons An example IPv6 address could be written like this 300E 1389 3030 72EB 1D71 414B 1079 6AF3 Some types of addresses contain long sequences of zeroes that can be compressed the...

Страница 60: ...o Obtain the dynamic IP address automatically Your IP Address is Show the current IP address enter into when you need to configure your IP address manually Prefix Length Prefix Length allows you to place as many IPv6 devices as the underlying network medium allows After finishing all settings select Apply to active the changed settings ...

Страница 61: ...tes through TCP UDP ports in the range from 30000 to 30019 You can specify the range for your specific network environment You must configure your firewall to allow inbound outbound traffic through TCP ports 1720 1719 for H 323 call setup NAT Configuration TRIUMPH BOARD Video Conferencing System VC1 supports NAT systems that use the internal IP addresses to communicate with other devices outside t...

Страница 62: ...tion Protocol SIP allows you around the world to communicate using your supported devices over the Internet Select Network SIP and press Configure the following relative items to setup the SIP SIP Site Name Enter the SIP site name for others to identify The SIP site name may be the same or different then the domain for Web activity ...

Страница 63: ... and User Datagram Protocol UDP To ensure proper connection verify if both calling parties are using the same transport protocol By default it is set to UDP TCP TCP is connection oriented Once a connection is established data can be sent bidirectional UDP UDP is a simpler connectionless Internet protocol Multiple messages are sent as packets in chunks using UDP SIP Port Change this value only if y...

Страница 64: ...IP STUN Server STUN Session Traversal Utilities for NAT is a standardized set of methods and a network protocol to allow an end host to discover its public IP address if it is located behind a NAT Enter IP address of SIP NTA traversal server STUN Port Enter port number of STUN server ...

Страница 65: ...equesting a session with a SIP server After the request is received the SIP server returns a response to the user indicating the availability of the session Select Network SIP Server and press Configure the following relative items to setup the Server User Name Select Terminal Name and press to enter user name ...

Страница 66: ... Select Password and press to enter using password Registration Server Registration Server accepts registrations from users and places these registrations which is essentially location information in a database known as a location service Enter the Registrar Server name that you want to use ...

Страница 67: ...between data processing devices and others within a communications network These devices may be located on the same local area network or an external network Enter the used Proxy Server name Account Active Select Use Registrar check box and press to activate deactivated using Registrar ...

Страница 68: ... 323 network Select Network Gatekeeper and press Configure the following relative items to setup the Gatekeeper H 323 Name Specify the name that gatekeepers and gateways can use to identify this system Enter the name the gatekeeper will use this name for identification H 323 Extension Enter a numeric value for the gatekeeper to identify your system further ...

Страница 69: ...Make sure to setup the Gatekeeper before setting up the Firewall Enable H 460 Firewall Traversal If you want to enable the H 460 Firewall Traversal please set the following ports in port forwarding in your firewall before start installing your Video Conferencing System VC1 Make sure your gatekeeper supports H 460 Firewall Traversal before enabling it ...

Страница 70: ...re your previous settings For web configurations your TRIUMPH BOARD Video Conferencing System VC1 default IP address is 192 68 0 1 Please change your Video Conferencing System VC1 s IP address at the start Using the WebTool Enter your Video Conferencing System VC1 s IP address in the URL field Enable Web Admin setting must be activated and your will need to enter admin password to long in In WebTo...

Страница 71: ...d see the video screen of local site In the WebTool page you can access the following 1 Phonebook 2 Dial 3 Call History 4 Video Audio 5 General Setting 6 Network You can use the mouse to click the specified icon for a selection ...

Страница 72: ...deo Conferencing System VC1 Application One different is the Upload Download EDIT AND SAVE 1 Locate and open the file using MS Excel and select Office XML Handler to create a schema based on the XML source data 2 Edit the file 3 Make sure to save the file as XML Data so it can be uploaded back to the system ...

Страница 73: ...allows you to upload the data that you have edited or added from your WebTool to your TRIUMPH BOARD Video Conferencing System VC1 1 Click Phonebook Upload Download 2 Click Upload Phonebook to upload edited or added contents to your TRIUMPH BOARD VC1 system directly 3 You can also click Browser to open the Phonebook file xml saved in your PC to upload it to your TRIUMPH BOARD Video Conferencing Sys...

Страница 74: ... from TRIUMPH BOARD Video Conferencing System VC1 WebTool 1 Click General Setting System Update 2 Click System Update 3 Click Select to browse and locate the downloaded firmware file dat 4 Click Submit to begin the system update or Cancel to stop this operation WARNING Please do not perform any operations during the updating process ...

Страница 75: ... site contact in the Phonebook list dialing the IP address or select a previous call in the Call History list Using the Phonebook Select Phonebook Contacts List and press Select the site contact in the Group Site list and press to make a call The call will be connected ...

Страница 76: ...71 Using Dial Select Dial Dial and press Use the remote controller to enter an IP address and select Call to make a call The call will be connected ...

Страница 77: ...istory and press Select the site you want to call in the call history and press The call will be connected If the call fails the IP address may have been entered incorrectly the far site is set to Do not Disturb mode or the far site hung up the call ...

Страница 78: ...he remote press Home Setting 2 Press Network 3 Press LAN Configuration 4 And In the drop down list IP Address Type choose Static IP 5 Manually input the IP address Subnet Mask and Default Gateway 6 Select Apply and press Enter 7 Press Home on the remote to return to the home menu 8 Press the Call button on the remote and you are ready to make your first call ...

Страница 79: ...l Port Function Type 1719 Gatekeeper UDP 1720 H 323 Call setup TCP 30000 30019 Signalling and control for audio call video and data FECC TCP and UDP 80 HTTP Interface WebTool TCP 24 Telnet TCP 5060 SIP TCP and UDP Your Video Conferencing System VC1 is connecting to the internet through a firewall 1 From the remote press Home Setting 2 Press Network ...

Страница 80: ...7 Press Back on the remote to return to previous menu If you have H 323 ALG enabled skip to step 10 8 In the same page go to Firewall and press Enter 9 Select ON in the NAT check box and enter the IP address in the NAT Public WAN address field 10 Press the Home button on the remote to return the home menu 11 Press the Call button on the remote and you are ready to make your first call ...

Страница 81: ...you have a Gatekeeper outside the firewall 1 From the remote press Home Setting 2 Press Network 3 Press LAN Configuration IPv4 4 And In the drop down list IP address Type choose Static IP 5 Manually input the IP address Subnet Mask and Default Gateway 6 Select Apply and press Enter 7 In the same page go to Gatekeeper and press Enter ...

Страница 82: ...r in the Gatekeeper IP Address field and enable the Connect to Gatekeeper check box 10 Enable the Enable H 460 firewall Traversal option 11 Press the Home button on the remote to return the home menu 12 Press the Call button on the remote and you are ready to make your first call ...

Страница 83: ... Power AC 100V 240V 50 60Hz Consumption EIAJ 12V 4A Housing White Aluminum Dimensions L x W x H Main System codec 260 x 158 7 x 33 mm Camera 122 6 x 122 6 x 127 8 mm Video Conferencing System VC1 Microphone Array 131 9 x 118 6 x 25 5 mm Package 330 x 230 x265 mm Package Weight 3 7kg 8 15lbs Video Video Inputs HD camera VGA Video Outputs HDMI VGA Resolutions People HD1080p 1920 x1080 HD720p 1280 x ...

Страница 84: ...dards Video H 264 H 263 H 263 H 261 H 239 dual video streams Audio G 711 G 722 G 722 1 G 722 1C G 728 Others H 224 H 281 H 225 H 245 H 323 Annex Q Control Information Program Control Web Server User Interface Remote Control Remote Controller Ethernet Protocol HTTP DHCP TCP IP ICMP ping Web Server LAN RJ 45 10 100 1000 Environment Operation Temperature 0 40o C Humidity 20 80 Storage Temperature 20 ...

Страница 85: ...There is a routing issue if you installed two TRIUMPH BOARD Video Conferencing Systems VC1 sharing one public IP address 2 Unable to connect to other Video Conferencing systems Check to see if you dial the correct IP address Ensure the power status of the device from the other sited is on Verify if the firewall blocks the inbound traffics from the other site Verify if the other site rejected your ...

Страница 86: ...e LAN please change your IP address at the start 2 Cannot open WebTool by IE9 and IE10 3 Click General Setting icon in IE 4 Select F12 developer tools 5 Change Document Mode to Internet Explorer 9 standards 1 6 Disable intranet sites in Compatibility View Go to Tools Compatibility view settings 7 Unclick the checkbox Display intranet sites in Compatibility View and then click Close ...

Страница 87: ...ear Camera 4 TRIUMPH BOARD Video Conferencing System VC1 cannot detect the USB device Unplug and plug the USB flash drive again and wait for 10 to 15 seconds for the system to re detect the new USB device We do not recommend using an external HDD it may cause system errors or recording failures 5 Cannot see user interface while connecting with VGA Hold down the Dual key in the remote control for a...

Страница 88: ... failure to follow instructions included with the Product b misapplication of service by someone other than the manufacturer s representative c any shipment damages such claims must be made with the carrier or d any other causes that do not relate to a Product defect The Warranty Period of any repaired or replaced Product shall be the longer of a the original Warranty Period or b thirty 30 days fr...

Страница 89: ...rovide reasonable protection against harmful interference in a residential installation This equipment generates uses and can radiate radio frequency energy and if not installed and used in accordance with the instructions may cause harmful interference to radio communications However there is no guarantee that interference will not occur in a particular installation If this equipment does cause h...

Страница 90: ...oint for the recycling of waste electrical and electronic equipment For more information about where to drop off your waste equipment for recycling please contact your household waste disposal service or the shop where you purchased the product Trademarks TRIUMPH BOARD is registered trademarks of TRIUMPH BOARD a s Other trademarks used herein for description purpose only belong to each of their co...

Отзывы: