background image

5-12

Troubleshooting

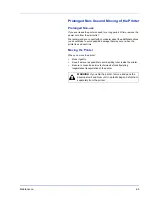
General Considerations for Clearing Jams

Bear in mind the following considerations when attempting paper jam 
removal:

If paper jams occur frequently, try using a different type of paper, 
replace the paper with paper from another ream, or flip the paper 
stack over. The printer may have problems if paper jams recur after 
the paper is replaced.

Whether or not the jammed pages are reproduced normally after 
printing is resumed, depends on the location of the paper jam.

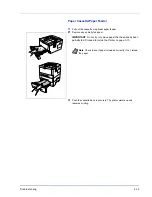
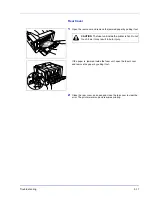
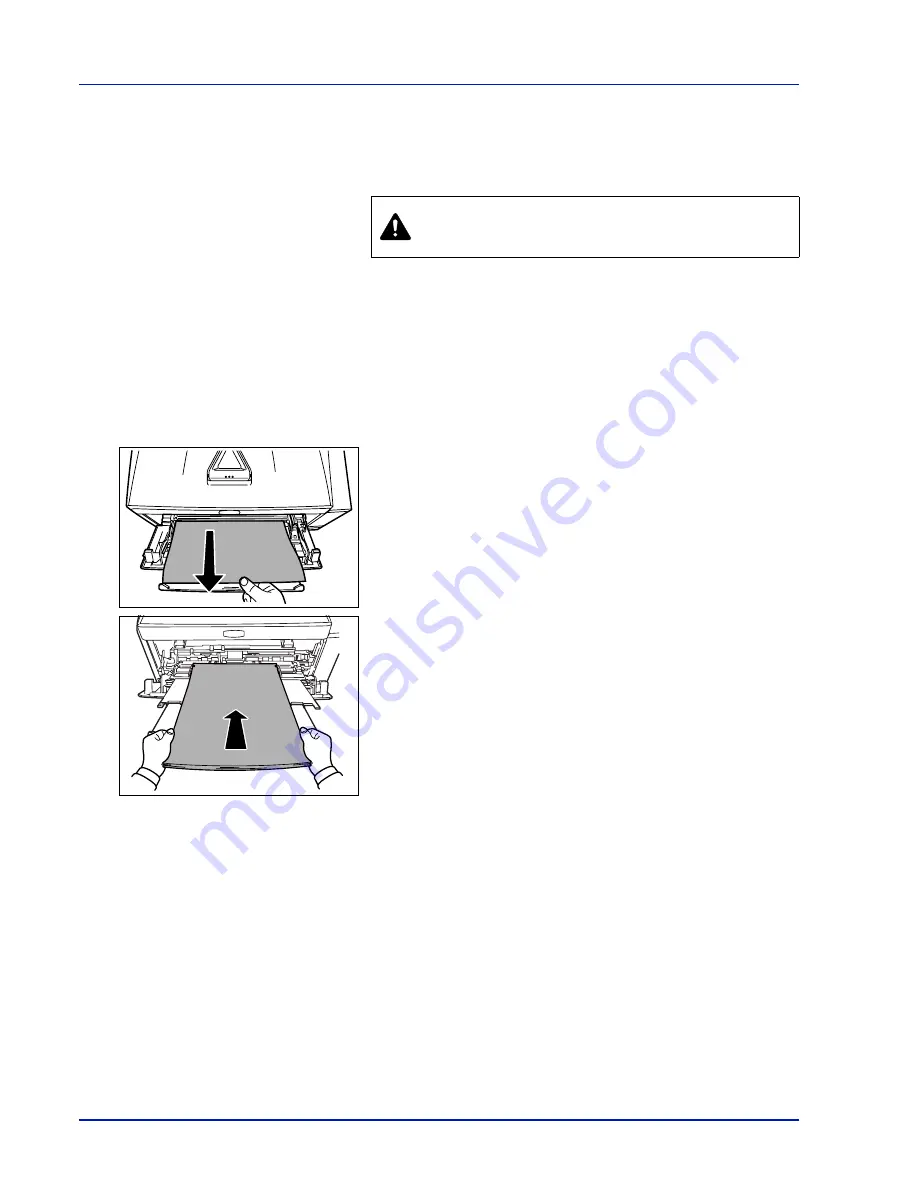
MP Tray

1

Remove the paper jammed at the MP tray.

2

Reload the MP tray. Open and close the top cover to clear the error 
and the printer warms up and resumes printing.

CAUTION  

When pulling the paper, pull it gently so as not 

to tear it. Torn pieces of paper are difficult to remove and 
may be easily overlooked, deterring the paper jam recovery.

IMPORTANT

Do not try to remove paper that has already been 

partially fed. Proceed to 

Inside the Printer 

on page

5-15

.

Содержание LP 4130

Страница 1: ...Instruction Handbook LP 4130 4135 Laser Printer b w ...

Страница 2: ...le for any damage caused by the use of third party supplies in this machine Note This Operation Guide contains information that corresponds to using both the inch and metric versions of these machines The inch versions of these machines are shown in the screens in this guide If you are using the metric version use the messages provided for the inch version as reference only In the body text only t...

Страница 3: ... 10 Configuration Tool 3 14 Uninstalling Software Windows PC 3 18 4 Maintenance 4 1 General Information 4 2 Toner Container Replacement 4 2 Maintenance Kit Replacement 4 5 Cleaning the Printer 4 6 Prolonged Non Use and Moving of the Printer 4 9 5 Troubleshooting 5 1 General Guidelines 5 2 Print Quality Problems 5 3 Understanding Indicators 5 5 Cleaning Paper Jams 5 11 6 Option 6 1 General Informat...

Страница 4: ...ii ...

Страница 5: ... using your machine This chapter provides information on the following topics Legal Information iv License Agreements v Safety Information ix Symbols xiii Installation Precautions xiv Precautions for Use xvi About the Operation Guide xviii Conventions in This Guide xix ...

Страница 6: ...pies made of all or part of this guide or any copyrightable subject must contain the same copyright notice as the material from which the copying is done Regarding Tradenames PRESCRIBE is a registered trademark of Kyocera Corporation KPDL is trademark of Kyocera Corporation Hewlett Packard PCL and PJL are registered trademarks of Hewlett Packard Company Adobe Acrobat Flash and PostScript are regis...

Страница 7: ...ights in the Programs 1 License Under this license you may use the Programs only with the device on which they are installed and transfer possession of the Programs and the device to another party If you transfer the Programs you must transfer a copy of this license and any other documentation to the other party Your license is then terminated The other party agrees to these terms and conditions b...

Страница 8: ...this license is governed by the laws of the State of New York If you acquired the Program in Canada this license is governed by the laws of the Province of Ontario Otherwise this license is governed by the laws of the country in which you acquired the Program Typeface Trademark Acknowledgement All resident fonts in this printer are licensed from Monotype Imaging Inc Helvetica Palatino and Times ar...

Страница 9: ... and omissions 8 THE PARTIES AGREE THAT ALL OTHER WARRANTIES EXPRESSED OR IMPLIED INCLUDING WARRANTIES OF FITNESS FOR A PARTICULAR PURPOSE AND MERCHANTABILITY ARE EXCLUDED 9 Your exclusive remedy and the sole liability of Monotype Imaging in connection with the Software and Typefaces is repair or replacement of defective parts upon their return to Monotype Imaging 10 IN NO EVENT WILL MONOTYPE IMAG...

Страница 10: ... try to correct the interference by one or more of the following measures Reorient or relocate the receiving antenna Increase the separation between the equipment and receiver Connect the equipment into an outlet on a circuit different from that to which the receiver is connected Consult the dealer or an experienced radio TV technician for help The use of a non shielded interface cable with the re...

Страница 11: ...er products and elsewhere is certified as a Class I laser product conforming to the requirements of IEC 825 Radio Frequency Transmitter This machine contains a transmitter module We the manufacturer TA Triumph Adler AG hereby declare that this equipment page printer model LP 4130 and LP 4135 are in compliance with the essential requirements and other relevant provisions of Directive 1999 5 EC Radi...

Страница 12: ...tes A label indicating compliance with the CDRH regulations must be attached to laser products marketed in the United States Ozone Concentration These printers generate ozone gas O3 which may concentrate in the place of installation and cause an unpleasant smell To minimize the concentration of ozone gas to less than 0 1ppm we recommend you not to install the printer in a confined area where venti...

Страница 13: ...u Canada EN ISO 7779 Maschinenlärminformations Verordnung 3 GPSGV 06 01 2004 Der höchste Schalldruckpegel beträgt 70 dB A oder weniger gemäß EN ISO 7779 EK1 ITB 2000 Das Gerät ist nicht für die Benutzung im unmittelbaren Gesichtsfeld am Bildschirmarbeitsplatz vorgesehen Um störende Reflexionen am Bildschirmarbeitsplatz zu vermeiden darf dieses Produkt nicht im unmittelbaren Gesichtsfeld platziert ...

Страница 14: ...ount of time Sleep Mode This printer automatically enters Sleep Mode when approximately 15 minutes have passed since the printer was last used The amount of time of no activity that must pass before Sleep Mode is activated may be lengthened Duplex Printing This printer includes duplex printing as a standard function For example by printing two single sided originals onto a single sheet of paper as...

Страница 15: ...ction are indicated inside the symbol Please contact your service representative to order a replacement if the safety warnings in this Operation Guide are illegible or if the guide itself is missing fee required DANGER Indicates that serious injury or even death will very possibly result from insufficient attention to or incorrect compliance with the related points WARNING Indicates that serious i...

Страница 16: ...Other Precautions Adverse environmental conditions may affect the safe operation and performance of the machine Install in an air conditioned room recommended room temperature around 23 C 73 4 F humidity around 60 RH and avoid the following locations when selecting a site for the machine Avoid locations near a window or with exposure to direct sunlight Avoid locations with vibrations Avoid locatio...

Страница 17: ...e to an outlet with a ground connection to avoid the danger of fire or electrical shock in case of an electric short If an earth connection is not possible contact your service representative Other precautions Connect the power plug to the closest outlet possible to the machine The power supply cord is used as the main disconnect device Ensure that the socket outlet is located installed near the e...

Страница 18: ...t your service representative If anything harmful paper clips water other fluids etc falls into the machine turn the main power switch off immediately Next be absolutely certain to remove the power plug from the outlet to avoid the danger of fire or electrical shock Then contact your service representative Do not remove or connect the power plug with wet hands as there is a danger of electrical sh...

Страница 19: ...ation exposure Cautions when Handling Consumables Caution Do not attempt to incinerate the Toner Container Dangerous sparks may cause burns Keep the Toner Container out of the reach of children If toner happens to spill from the Toner Container avoid inhalation and ingestion as well as contact with your eyes and skin If you do happen to inhale toner move to a place with fresh air and gargle thorou...

Страница 20: ...ting This chapter explains how to install the printer driver print from your PC and use the application software included in the CD ROM 4 Maintenance This chapter explains how to replace the toner container and how to care for your printer 5 Troubleshooting This chapter explains how to handle printer problems that may occur such as paper jams 6 Options This chapter explains the options for this pr...

Страница 21: ...t remove the toner container from the carton until you are ready to install it in the printer Important Used to provide important information IMPORTANT Take care not to touch the transfer roller black during cleaning Caution Cautions are statements that suggest mechanical damage as a result of an action CAUTION When pulling the paper pull it gently so as not to tear it Torn pieces of paper are dif...

Страница 22: ...xx ...

Страница 23: ... 1 Machine Parts This chapter identifies machine parts indicators and operation panel keys Components at the Front of the Printer 1 2 Components at the Rear of the Printer 1 3 Operation Panel 1 4 Indicators 1 5 Keys 1 6 ...

Страница 24: ...1 2 Machine Parts Components at the Front of the Printer 1 Top Cover 2 Paper Stopper 3 Top Tray 4 Operation Panel 5 Right Cover 6 Paper Cassette 7 Front Cover 8 MP Tray 9 Subtray 1 2 3 4 5 6 7 8 9 ...

Страница 25: ...Machine Parts 1 3 Components at the Rear of the Printer 10 Optional Interface Slot Cover 11 USB Interface Connector 12 Rear Cover 13 Power Cord Connector 14 Power Switch 10 13 11 14 12 ...

Страница 26: ...1 4 Machine Parts Operation Panel 1 Ready Indicator 2 Attention Indicator 3 Toner Indicator 4 Data Indicator 5 Paper Indicator 6 Jam Indicator 7 Cancel Key 8 GO Key 2 1 3 4 5 6 7 8 ...

Страница 27: ...e is not inserted properly Off The printer status is normal Paper Amber Lit The paper has run out when printing Fast Flashing The specified cassette or paper feeder has no paper at Ready status The cassette is not inserted properly Off The printer status is normal Attention Amber Lit An error has occurred because the top printer cover is open While an optional paper feeder PF 100 is installed and ...

Страница 28: ...for 1 second or more Cancels the data from the PC GO At Ready Press momentarily Switches On line Off line Press for 3 to 9 seconds Prints the status page Press for 10 seconds or more Prints the service status page At Error Press momentarily Clears the error Paper Empty Press momentarily Resumes printing by switching automatically to an available paper source ...

Страница 29: ...per specifications for this printer and how to load paper into the cassette or MP tray General Guidelines 2 2 Selecting the Right Paper 2 4 Paper Type 2 10 Preparing the Paper 2 11 Loading Paper into Cassette 2 11 Loading Paper into MP Multi Purpose Tray 2 14 ...

Страница 30: ...ich the paper is cut The higher the grade of paper you use the less risk there will be of paper jams and other problems and the higher the level of quality your printed output will reflect Differences between paper from different suppliers can also affect the machine s performance A high quality printer cannot produce high quality results when the wrong paper is used Low priced paper is not econom...

Страница 31: ...ray must be used 105mm 4 1 8 inches 216mm 8 1 2 inches 356mm 14 inches Minimum Paper Size Maximum Paper Size Paper cassette 70mm 2 3 4 inches 148mm 5 13 16 inches Minimum Paper Size Maximum Paper Size MP tray 216mm 8 1 2 inches 148mm 5 13 16 inches 356mm 14 inches Note The minimum paper size of the optional paper feeder PF 100 is 148 x 210 mm 5 13 16 x 8 5 16 inches ...

Страница 32: ... must be 90 0 2 MP Tray Envelope Monarch Envelope 10 Envelope 9 Envelope 6 Envelope C5 Envelope DL Legal Letter Statement Oficio II Executive ISO A4 ISO A5 ISO A6 Folio ISO B5 JIS B5 JIS B6 Hagaki Ofuku Hagaki Youkei 2 Youkei 4 16 kai Custom 70 148 to 216 356mm 2 13 16 5 13 16 to 8 1 2 14 inches Cassette Legal Letter Statement Oficio II Executive ISO A4 ISO A5 A6 only for machine s paper cassette ...

Страница 33: ...c grams per square meter g m The shaded part indicates the standard weight Thickness The paper used with the machine should be neither extremely thick nor extremely thin If you are having problems with paper jams multiple feeds and faint printing the paper you are using may be too thin If you are having problems with paper jams and blurred printing the paper may be too thick The correct thickness ...

Страница 34: ...short grain Short grain paper can cause feeding problems in the machine All paper used in the machine should be long grain Other Paper Properties Porosity Indicates the density of paper fiber Stiffness Limp paper may buckle in the machine resulting in paper jams Curl Most paper naturally tends to curl one way if left unpacked When paper passes through the fixing unit it curls upward a little To pr...

Страница 35: ... fusing during the printing process Transparencies must be placed on the MP tray with the long edge towards the printer Labels Labels must be fed to the MP Tray One label can be loaded at a time The basic rule for printing on adhesive labels is that the adhesive must never come into contact with any part of the machine Adhesive paper sticking to the drum or rollers will damage the machine Label pa...

Страница 36: ...more complex than that of ordinary paper it is not always possible to ensure consistent printing quality over the entire envelope surface Normally envelopes have a diagonal grain direction Refer to Paper Grain on page 2 6 This direction can easily cause wrinkles and creases when envelopes pass through the printer Before purchasing envelopes make a test print to check whether the printer accepts th...

Страница 37: ... 392 F Preprinted Paper Preprinted paper should satisfy the same conditions as white bond paper Refer to Paper Specifications on page 2 2 The preprinted ink must be able to withstand the heat of fusing during the printing process and must not be affected by silicone oil Do not use paper with any kind of surface treatment such as the type of paper commonly used for calendars Recycled paper Select r...

Страница 38: ...ce MP tray Paper Cassette Duplex path MP tray available only in Cassette mode Plain Yes Yes Yes Transparency Yes No No Preprinted Yes Yes Yes Labels Yes No No Bond Yes Yes Yes Recycled Yes Yes Yes Vellum Yes No No Rough Yes Yes Yes Letterhead Yes Yes No Color Yes Yes Yes Prepunched Yes Yes Yes Envelope Yes No No Cardstock Yes No No Thick Yes No No High quality Yes Yes Yes Custom 1 to 8 Yes Yes Yes...

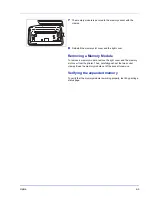
Страница 39: ... loading Failure to do so may result in a paper jam Loading Paper into Cassette 250 sheets of 11 8 1 2 or A4 paper 80 g m may be loaded into the Cassette 1 Pull the cassette completely out of the printer 2 Press the bottom plate down until it locks IMPORTANT Ensure paper is not stapled and clips are removed IMPORTANT When pulling the cassette out of the printer ensure it is supported and does not ...

Страница 40: ...red 4 Adjust the paper length guide to the paper size required If you are going to use paper that is longer than A4 pull out the extension paper cassette by pushing the release lever one by one and adjust it to the desired paper size 5 Load the paper in the cassette Ensure the side to be printed is facing down and the paper is not folded curled or damaged Note Paper sizes are marked on the cassett...

Страница 41: ... of the front of the paper cassette to indicate the remaining paper supply When paper is exhausted the pointer will go down to the level of empty 7 Specify the paper size and type for the cassette using Configuration Tool For more information refer to Configuration Tool on page 3 14 Note Do not load paper above the triangle mark located on the width guide ...

Страница 42: ... of the paper guides on the MP tray Standard paper sizes are marked on the MP tray For standard paper sizes slide the paper guides to the corresponding mark 3 Pull out the subtray 4 Align the paper with the paper guides and insert as far as it will go IMPORTANT When pulling the cassette out of the printer ensure it is supported and does not fall out Note Do not load more paper than exceeds the tab...

Страница 43: ...type for MP tray using Configuration Tool For more information refer to Configuration Tool on page 3 14 Paper Stopper Open the paper stopper shown in the figure Note If the paper is considerably curled in one direction for example if the paper is already printed on one side try to roll the paper in the opposite direction to counteract the curl Printed sheets will then come out flat Correct Incorre...

Страница 44: ...2 16 Loading Paper ...

Страница 45: ...apter explains how to start up the printer print from your PC and use the application software included in the CD ROM Connections 3 2 Installing the Printer Driver 3 3 Printing 3 9 Status Monitor 3 10 Configuration Tool 3 14 Uninstalling Software Windows PC 3 18 ...

Страница 46: ...Connector at the rear of the printer 2 Connect the other end of the power cord to a power outlet 3 Press the Power Switch to On The printer begins to warm up Note Use a USB cable with a rectangular Type A plug and a square Type B plug The USB cable should be shielded and no longer than 5 meters 16 feet long Note Ensure the printer s power switch is off Only use the power cord supplied with the pri...

Страница 47: ...ows If the Welcome to the Found New Hardware Wizard dialog box displays select Cancel 2 Insert the CD ROM supplied with the printer into the optical drive of the PC In Windows 7 Windows Server 2008 and Windows Vista the user account control window may appear Click Allow The installation program launches 3 Click View License Agreement and read the License Agreement Click Accept 4 Click Install soft...

Страница 48: ...n click Install 5 A message appears saying that the printer has been installed successfully Click Finish to exit the printer installation wizard and return the CD ROM main menu If the device setup dialog box appears after you click Finish you can specify the settings for items such as optional features installed in the print system You can also specify the device settings after you exit the instal...

Страница 49: ...he install wizard window select the software packages to be installed and the specify the port etc For details refer to Custom Installation in the printer driver operation manual on the CD ROM Installation on a Macintosh This section explains how to install the printer driver in Mac OS 1 Turn on the printer and the Macintosh 2 Insert the included CD ROM Product Library into the CD ROM drive 3 Doub...

Страница 50: ...on Next specify the print settings If an IP AppleTalk or Bonjour connection is used the settings below are required If a USB connection is used the printer is automatically recognized and connected 8 Open System Preferences and click Print Fax Note In addition to Easy Install the Installation Type options include Custom Install which allows you to specify the components to be installed IMPORTANT I...

Страница 51: ...the IP address and printer name When you click the AppleTalk icon for an AppleTalk connection enter the printer name For a Bonjour connection click the default icon and select the printer for which Bonjour appears in Connection 11Select the installed printer driver and click Add 12Select the options available for the printer and click Continue ...

Страница 52: ...3 8 Connecting and Printing 13The selected printer is added This completes the printer setup procedure ...

Страница 53: ...that can be accessed quickly and easily Basic Use this tab to select the page size and orientation The paper source and duplex printing are also selected Layout Use to create multiple pages on a single sheet of paper Also contains the scaling option Imaging Select this tab to change the print quality and the font or graphic settings Publishing Use to add covers or page inserts to your output You c...

Страница 54: ...tus Monitor is installed automatically during KX Driver installation Accessing the Status Monitor Use either of the methods listed below to launch the Status Monitor Launch when printing starts When you specify a printer and start a print job one Status Monitor is launched for each printer name If Status Monitor startup is requested from multiple printers Status Monitors are launched for each prin...

Страница 55: ...whether to show or hide the 3D view from the menu displayed when you right click the Status Monitor icon If an information notification event occurs the 3D view and an alert sound are used to notify you For information on the sound notification settings refer to Status Monitor Settings on page 3 12 Status Monitor icon The Status Monitor icon is displayed in the taskbar notification area when the S...

Страница 56: ...this check box to enter text you would like to hear played for events Although a sound file is unnecessary this function is applicable for Windows XP or later To use this function follow these steps 1 Select Enable Event Notification 2 Select an event to use with the text to speech function in Available events 3 Click Browse to notify the event by sound file Select Use Text to speech to speech the...

Страница 57: ... Appearance tab is contains the following items Enlarge window Doubles the size of the Status Monitor window Always on top Positions the Status Monitor in front of other active windows Transparency Displays the Status Monitor as a transparent window ...

Страница 58: ... listed below to exit the Configuration Tool Exit using the Close button Click in the top right corner of the Configuration Tool window Exit using the OK or Cancel button Clicking OK exits the Configuration Tool after applying the modified printer settings Clicking Cancel exits the Configuration Tool without applying the modified printer settings Note The contents of the Properties dialog box will...

Страница 59: ...umber total memory and number of printed pages Input Tab The Input tab displays information about the paper feeder attached to the machine such as the current paper level and the maximum paper capacity Media Tab The Media tab displays and lets you select the weight and density for each media type It also enables or disables duplex printing for the each media type ...

Страница 60: ...JPEG files Connection Tab You can use the Connection tab to set the emulation You can also use this tab to change the buffer memory size and buffer mode of the printer for communication processing to the host Data Tab The Data tab fetches and lists the data stored in the CF card or RAM disk Select a data type and click View to fetch and display a list of the target data from the printer The inform...

Страница 61: ...coFuser Select On to reduce the power consumption to a minimum by turning off the heater of the fixing unit at Sleep Mode The default setting is On Panel lock Locks or unlocks the operation panel Locking the operation panel disables key operations from the panel RAM disk Enables or disables RAM disk mode Enabling the RAM disk allows you to use it as a temporary storage area for data such as font f...

Страница 62: ...stall The uninstaller starts 6 When Uninstall complete screen appears click Finish 7 If Restart Your System screen appears select whether you restart your computer or not and click Finish Start the uninstaller by clicking start All Programs TA Uninstall TA Product Library and uninstall the software IMPORTANT On Macintosh computers because the printer settings are specified using a PPD PostScript P...

Страница 63: ... chapter explains how to replace the toner container and clean the printer General Information 4 2 Toner Container Replacement 4 2 Maintenance Kit Replacement 4 5 Cleaning the Printer 4 6 Prolonged Non Use and Moving of the Printer 4 9 ...

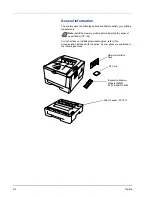
Страница 64: ... replacing approximately once every 7 200 pages LP 4135 or 2 500 pages LP 4130 Starter Toner Container The toner container packed with the new printer is a starter toner container The starter toner container lasts an average of 2 300 pages LP 4135 or 1 000 pages LP 4130 Toner Kits For best results we recommend that you only use genuine TA Triumph Adler Parts and Supplies A new toner kit contains t...

Страница 65: ...riumph Adler is not liable against any damages or problems arising from the use of toner containers other than those designated as original TA Triumph Adler toner containers For optimum performance it is also recommended to use only the TA Triumph Adler toner containers which are specifically intended for use in your country or region If the toner container for another destinations is installed th...

Страница 66: ...tainer at least 5 times as shown in the figure in order to distribute the toner evenly inside the container 4 Remove the label from the toner container 5 Install the new toner container in the printer Push firmly on the top of the container at the positions marked PUSH until you hear a click ...

Страница 67: ...pages a message is printed indicating that the maintenance kit should be replaced The maintenance kit must then be replaced immediately To replace the maintenance kit contact your service technician IMPORTANT When the waste toner in the drum unit is almost full Attention indicator and Toner indicator are flashing Replace the maintenance kit ...

Страница 68: ... replacement 1 Open the top cover and front cover 2 Lift the developer unit together with the toner container out of the printer 3 Remove the drum unit from the printer by holding the green levers with both hands Developer Unit Drum Unit Note The drum unit is sensitive to light Never expose the drum unit to light for more than five minutes ...

Страница 69: ...lean the charger wire then return it to its original position CLEANER HOME POSITION 7 When cleaning is complete return the drum unit to the original position IMPORTANT Do not place the drum unit on end IMPORTANT Take care not to touch the transfer roller black during cleaning IMPORTANT Remove the fixing tape on the charger cleaner before cleaning for the first time After cleaning make sure you res...

Страница 70: ...4 8 Maintenance 8 Return the developer unit to its position aligning the guides at both ends with the slots in the printer Then close the front cover and top cover ...

Страница 71: ... should take to avoid possible damage that may occur when the printer is used next time Moving the Printer When you move the printer Move it gently Keep it as level as possible to avoid spilling toner inside the printer Be sure to consult a service technician before attempting longdistance transportation of the printer WARNING If you ship the printer remove and pack the developer unit and drum uni...

Страница 72: ...4 10 Maintenance ...

Страница 73: ...oubleshooting This chapter explains how to handle printer problems understand indicator combinations and clean paper jams General Guidelines 5 2 Print Quality Problems 5 3 Understanding Indicators 5 5 Cleaning Paper Jams 5 11 ...

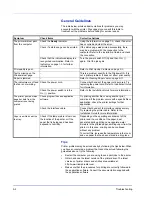
Страница 74: ...t the job again Print quality is poor Refer to Print Quality Problems on page 5 3 Text is missing on the Windows test page This is a problem specific to the Windows OS It is not a printer problem It does not affect print quality Paper is jammed Refer to Cleaning Paper Jams on page 5 11 The indicators are off and the fan is not working Check the power cord Connect both ends of the power cord secure...

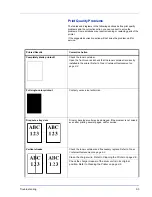
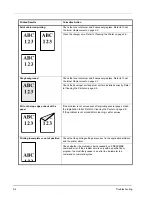
Страница 75: ...the front cover and check that the toner container is correctly installed in the printer Refer to Toner Container Replacement on page 4 2 Full single color printout Contact your service technician Dropouts stray dots Drum or developer unit may be damaged If the problem is not solved even after printing several pages call for service Vertical streaks Check the toner container and if necessary repla...

Страница 76: ...page 4 6 Dirt on the top edge or back of the paper If the problem is not solved even after printing several pages clean the registration roller Refer to Cleaning the Printer on page 4 6 If the problem is not solved after cleaning call for service Printing incomplete or out of position Check that the printing settings are correct in the application software and the printer driver Check whether the ...

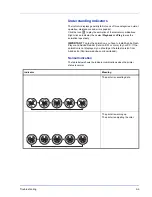
Страница 77: ...lay to play the animation repeatedly Normal Indication The table below shows the indicator combinations when the printer status is normal IMPORTANT To play the animation you have to install Adobe Flash Player and Adobe Reader Version 6 01 or more to your PC If the animation is not displayed you should get the latest version from Adobe site http www adobe com downloads Indicator Meaning The printer...

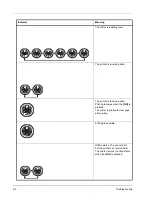
Страница 78: ...he printer is receiving data Printing resumes when the GO is pressed The printer is printing the last page after waiting Printing is possible Offline status You cannot print but the printer can receive data The printer returns to online status when the GO is pressed Indicator Meaning ...

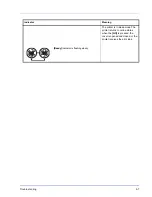
Страница 79: ... 5 7 The printer is in sleep mode The printer returns to online status when the GO is pressed the cover is opened and closed or the printer receives the print jobs Indicator Meaning Ready indicator is flashing slowly ...

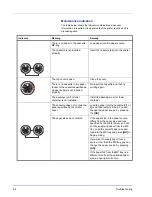
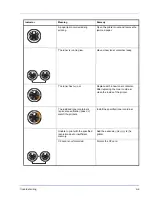
Страница 80: ... developer unit or toner container is not installed Install the developer unit or toner container The cassette does not contain the paper specified by the printer driver Load the paper into the cassette 1 or 2 and then restart printing You can change the paper source by pressing the GO The paper sizes do not match If the paper size in the paper source differs from the paper size and type specified...

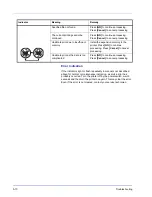
Страница 81: ...with a new toner container After replacing the toner container clean the inside of the printer The installed toner container s regional specification does not match the printer s Install the specified toner container Unable to print with the specified resolution due to insufficient memory Add the expansion memory to the printer CF card is not formatted Format the CF card Indicator Meaning Remedy ...

Страница 82: ... cleared contact your service technician Specified file not found Press GO to continue processing Press Cancel to cancel processing The current printing cannot be continued Press GO to continue processing Press Cancel to cancel processing Unable to print due to insufficient memory Install the expansion memory in the printer Press GO to continue processing Press Cancel to cancel processing Unable t...

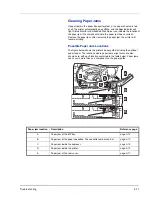
Страница 83: ...resume printing Possible Paper Jam Locations The figure below shows the printer s paper paths including the optional paper feeder The locations where paper jams might occur are also shown here with each location explained in the table below Paper jams can occur in more than one component on the paper paths Paper jam location Description Reference page A Paper jam at the MP tray page 5 12 B Paper j...

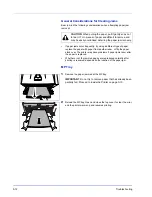
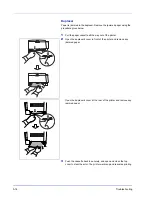
Страница 84: ...or not the jammed pages are reproduced normally after printing is resumed depends on the location of the paper jam MP Tray 1 Remove the paper jammed at the MP tray 2 Reload the MP tray Open and close the top cover to clear the error and the printer warms up and resumes printing CAUTION When pulling the paper pull it gently so as not to tear it Torn pieces of paper are difficult to remove and may b...

Страница 85: ... 2 Remove any partially fed paper 3 Push the cassette back in securely The printer warms up and resumes printing IMPORTANT Do not try to remove paper that has already been partially fed Proceed to Inside the Printer on page 5 15 Note Check to see if paper is loaded correctly If not reload the paper ...

Страница 86: ...er cassette all the way out of the printer 2 Open the duplexer s cover in front of the printer and remove any jammed paper Open the duplexer s cover at the rear of the printer and remove any jammed paper 3 Push the cassette back in securely and open and close the top cover to clear the error The printer warms up and resumes printing ...

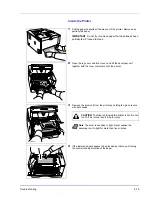
Страница 87: ...nit from the printer by holding the green levers with both hands 4 If the jammed paper appears to be pinched by rollers pull it along the normal running direction of the paper IMPORTANT Do not try to remove paper that has already been partially fed Proceed to step 2 CAUTION The fuser unit inside the printer is hot Do not touch it as it may result in burn injury Note The drum is sensitive to light ...

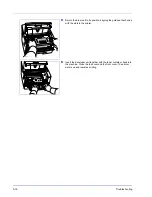
Страница 88: ... to its position aligning the guides at both ends with the slots in the printer 6 Insert the developer unit together with the toner container back into the machine Close the top cover and the front cover The printer warms up and resumes printing ...

Страница 89: ...aper is jammed inside the fuser unit open the fuser cover and remove the paper by pulling it out 2 Close the rear cover and open and close the top cover to clear the error The printer warms up and resumes printing CAUTION The fuser unit inside the printer is hot Do not touch it as it may result in burn injury ...

Страница 90: ...5 18 Troubleshooting ...

Страница 91: ...er explains the options for this printer General Information 6 2 Expansion Memory Modules 6 3 Removing a Memory Module 6 5 Verifying the expanded memory 6 5 Paper Feeder PF 100 6 6 Network Interface Card 6 7 CompactFlash CF Card 6 8 ...

Страница 92: ...tructions on installing individual options refer to the documentation included with the option Some options are explained in the following sections Note Install the memory module before installing the optional paper feeder PF 100 Expansion Memory Module DIMM 64 128 256 512 MB Paper Feeder PF 100 CF Card Network Interface Card ...

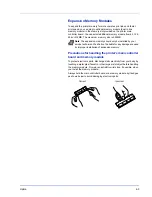
Страница 93: ... controller board and memory module To protect electronic parts discharge static electricity from your body by touching a water pipe faucet or other large metal object before handling the memory module Or wear an antistatic wrist strap if possible when you install the memory module Always hold the main controller board or a memory module by its edges as shown below to avoid damaging electronic par...

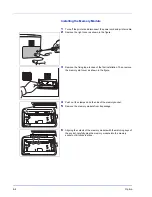
Страница 94: ... the fixing tape in case of the first installation Then remove the memory slot cover as shown in the figure 4 Push out the clamps on both ends of the memory socket 5 Remove the memory module from its package 6 Aligning the cutouts of the memory module with the matching keys of the socket carefully plug the memory module into the memory socket until it clicks in place ...

Страница 95: ...r Removing a Memory Module To remove a memory module remove the right cover and the memory slot cover from the printer Then carefully push out the two socket clamps Ease the memory module out of the socket to remove Verifying the expanded memory To verify that the memory module is working properly test it by printing a status page ...

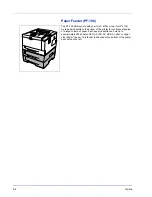
Страница 96: ...35 more paper cassette to the bottom of the printer for continuous feeding of a large volume of paper Each paper cassette can hold up to approximately 250 sheets of ISO A4 ISO A5 JIS B5 Letter or Legal size 80g m2 paper This feeder is attached at the bottom of the printer as shown on the left ...

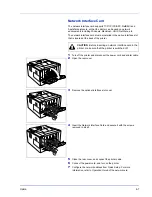
Страница 97: ...rn off the printer and disconnect the power cord and printer cable 2 Open the rear cover 3 Remove the optional interface slot cover 4 Insert the Network Interface Card and secure it with the screws removed in step 3 5 Close the rear cover and connect the printer cable 6 Connect the power cord and turn on the printer 7 Configure the network address from Quick Setup For more information refer to Ope...

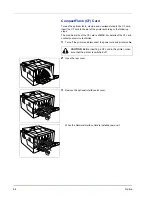
Страница 98: ...he maximum size of the CF card is 256MB For details of the CF card contact your service technician 1 Turn off the printer and disconnect the power cord and printer cable 2 Open the rear cover 3 Remove the optional interface slot cover When the Network Interface Card is installed remove it CAUTION Before inserting a CF card in the printer make sure that the printer is switched off ...

Страница 99: ...Option 6 9 4 Insert the CF Card 5 Secure it with the screws removed in step 3 6 Connect the power cord and printer cable and turn on the printer ...

Страница 100: ...6 10 Option ...

Страница 101: ...Appendix 7 1 7 Appendix This section lists the following information of this printer Specifications 7 2 Environmental Standard Requirements 7 4 ...

Страница 102: ... JIS B5 A5 Follio Legal Letter Oficio II Statement Executive A6 B6 ISO B5 Envelope C5 Envelope 10 Envelope 9 Envelope 6 3 4 Envelope Monarch Envelope DL Hagaki Ofuku Hagaki 16K Yokei 2 Yokei 4 Custom 70 148 to 216 356mm 2 13 16 5 13 16 to 8 1 2 14 inches Magnification ratio 25 to 400 1 increments Printing Speed Simplex A4 Letter 30 ppm 32 ppm A4 Letter 35 ppm 37 ppm A5 17 ppm Duplex A4 Letter 15 p...

Страница 103: ...r Consumption Maximum 911 W U S A Canada 976 W European countries 917 W U S A Canada 981 W European countries During printing 555 1 W U S A Canada 524 1 W European countries 573 9 W U S A Canada 543 6 W European countries During standby 6 6 W U S A Canada 7 3 W European countries when EcoFuser is On 6 5 W U S A Canada 7 2 W European countries when EcoFuser is On 79 8 W U S A Canada 82 0 W European...

Страница 104: ... the following environmental standard requirements Time for switching to Sleep mode default 15 minutes Duplex Printing Standard Equipment Durable paper for feeding Paper made of 100 recycled paper NOTE Contact your Dealer or Service Representative for recommended paper types ...

Страница 105: ... jams 5 15 maintenance 4 6 DIMM 6 2 Drum unit clearing paper jams 5 15 maintenance 4 6 Duplexer clearing paper jams 5 14 E Energy Star program xii Envelope 2 8 Environmental standard requirements 7 4 Error indication indicators 5 10 Expansion memory module option 6 2 Express mode installation method 3 4 F Front cover components 1 2 Fuser unit clearing paper jams 5 17 G General problems troubleshoo...

Страница 106: ...nents 1 2 minimum and maximum page sizes 2 3 paper type 2 10 Paper feeder 6 6 clearing paper jams 5 13 option 6 2 Paper gauge 2 13 Paper guides 2 14 Paper indicator operation panel 1 4 Paper length guide 2 12 Paper stopper components 1 2 Paper weight 2 5 PF 100 6 2 6 6 Possible paper jam locations 5 11 Postcard 2 8 Power cord connection 3 2 Power cord connector components 1 3 Power switch componen...

Страница 107: ...e bag installation guide 4 2 Top cover components 1 2 Top tray components 1 2 Transparency 2 7 Troubleshooting 5 1 general problems 5 2 print quality problems 5 3 Turning on the power 3 2 U Understanding indicators 5 5 USB cable connection 3 2 USB interface connector components 1 3 V Verifying expanded memory 6 5 ...

Страница 108: ...Index 4 ...

Страница 109: ...A1 ...

Страница 110: ...UTAX GmbH Ohechaussee 235 22848 Norderstedt Germany ...

Отзывы: