


4
6. Control Panel
The following sections cover the Control Panel as it’s seen in the Windows client.
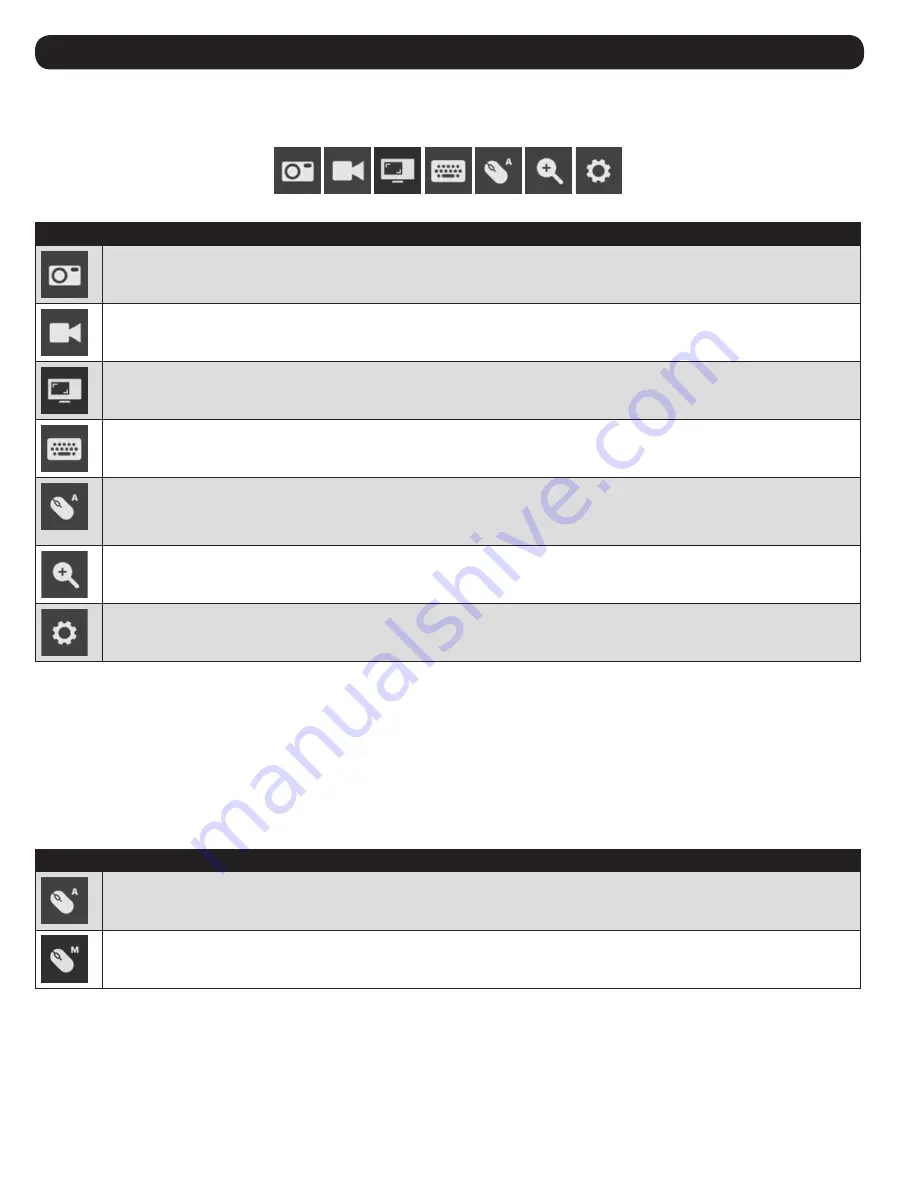
Icon
Description
Capture
– Click to take a snapshot of the remote display. The snapshot image is saved in a directory selected in the Configure Panel screen
of the Control Panel’s Settings menu. See
Section 6.2.7: Configure Panel
for details.
Record
– Click to take a video of the remote display. The video file is saved in the same directory as the snapshot images taken with the
Capture function. See
Section 6.2.7: Configure Panel
for details. For details on viewing video files, see
Section 7: VSR Viewer
.
Video Sync
– Click to perform a Video Sync on the remote screen. It detects the vertical and horizontal offset values of the remote screen
and synchronizes them with the local screen.
On-Screen Keyboard
– Click to display the On-Screen Keyboard. See
Section 6.2.5: On-Screen Keyboard
for details on its use.
Mouse Sync Modes
– Click to toggle between Automatic and Manual mouse sync. When Automatic syncing is selected, an “A” will appear
on the mouse icon. When manual, an “M” will appear. Automatic Mouse Sync automatically locks in and syncs the local and remote
mouse pointers for you, eliminating the need for any manual resyncing. For Manual Mouse Sync, see
Section 6.1.2: Manual Mouse
Synchronization
for details.
Zoom
– Click to zoom in or out on the remote screen. Options are 25%, 50%, 75%, 100%, 1:1 and Full Screen. See
Section 6.2.3: Zoom
for details.
Control Panel Settings
– Click to open a menu that includes some of the same functions as the control panel (e.g. Video Sync and Zoom),
as well as additional settings and functions for controlling the remote session and maintenance of the unit. See
Section 6.2: Control Panel
Settings
for details.
6.1 Mouse Sync Modes
Synchronization of the local and remote mouse pointers is accomplished either automatically or manually.
6.1.1 Automatic Mouse Synchronization
Automatic Mouse Sync provides automatic locked-in syncing of the remote and local mouse pointers, eliminating the need to constantly resync the
two movements.
The icon on the Control Panel indicates the synchronization mode status:
Icon
Description
The "A" on this icon indicates Automatic Mouse Sync is available and enabled. This is the default setting when Mouse Sync is available.
The "M" on this icon indicates Automatic Mouse Sync is available but not enabled.
When Automatic Mouse Sync is available, clicking the icon toggles its status between enabled and disabled. If you choose to disable Automatic Mouse
Sync mode, you must use the manual synching procedures described in the following
Manual Mouse Synchronization
section.
1
2
3
4
5
6
7
Содержание B032-VU1
Страница 66: ...66 6 6 2 1 Macro Hotkeys User Macros 6 2 1 1 Hotkeys 1 Set Hotkey 2 Edit Hotkey Cancel Clear 3 Save Reset...
Страница 68: ...68 6 2 3 Set Macro Record 4 A a A Pause Resume Minimize Show Detail Cancel Stop OK...
Страница 69: ...69 6 5 Macros Set Macro 6 Set Hotkey 7...
Страница 73: ...73 6 2 ISO 3 USB Disable High Speed USB Operation Mode USB 4 2 3 Mount 5 Read Write EnableWrite...
Страница 74: ...74 6 6 7 Mount Virtual Media 8 9 Virtual Media 6 2 5 B032 VU1...
Страница 75: ...75 6 6 2 5 1 6 2 5 2 Sun PC 6 2 5 3...


