background image

Version 3.2 

Page: 63 


More Tips for fine tuning your amp 

 
Reprinted with permission from Aron from diystompboxes.com 

These are very simplistic modifications you can do to your amp, let your ears be your guide: 


Change coupling caps; changing to smaller values reduces bass, changing to larger values adds 
more bass. Reducing the value of coupling caps can help eliminate "flabby" bass syndrome.  


Change cathode bypass caps. Adding a cathode bypass cap to a stage that doesn't have one will 
let  the  stage  have  more  gain.  Just  like  coupling  caps,  making  the  value  larger  adds  bass  - 

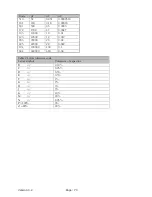
generally  25uF  allows  almost  all  bass  through,  .68uF  are  used  in  some  Marshalls  for  a  more 
midrange boost and 1uF and 5uF are used in some high end fusion type amps. Again, smaller 

values can help reduce "flabby" bass.  


Change cathode resistors - larger values reduce gain, smaller values give more gain. A "trick" is 

to connect a 5K+pot wired as a variable resistor instead of the standard cathode resistor - now 
you can turn the pot and dial in the perfect tone. After dialing the sound, remove the resistor 

and pot and measure it. Substitute the nearest standard value resistor in place of the pot plus a 
resistor.  


Add grid stopping resistors to help tame oscillation. If you have oscillation with your amp, you 
can sometimes help it by installing grid stopping resistors. The grid stoppers can also subtly roll 

off high end as well.  


Add high frequency roll off caps in parallel with the plate resistor. This is sometimes used to 

"mellow" out a stage (reduces highs).  


Adjust the grid leak resistor. Reduce the value to attenuate the signal into the stage to control 

the gain.  


Use a shielded cable from your input jack to the first gain stage. This can reduce RF, buzz and 

general reduce noise.  


Replace all plate resistors with metal film types. This can help reduce hiss..  


Содержание Trinity Tweed Amp

Страница 1: ...The Trinity Tweed Amp Builder s Guide USAGE STRICTLY RESERVED FOR TRINITY AMPS CUSTOMERS ONLY DO NOT DISTRIBUTE Version 3 2 Parts Trinity Amps 2005 2018 www trinityamps com ...

Страница 2: ...Version 3 2 Page 2 ...

Страница 3: ...s and wire 26 Physical layout 26 Grounding 26 Insulated jacks 27 Minimizing transformer interference 27 Wiring 27 Assembling the amp 27 Before You Begin 27 Tools 27 Soldering 28 Tube Pin Numbering 28 Assembly Steps Summary 29 Mounting Hardware Locations 30 Install Hardware 30 Wiring 32 Install Power Transformer 34 Wiring the Tweed Rectifier Socket 35 Trinity Tweed Grounding Scheme 35 Mains Power C...

Страница 4: ...lanced or not ground referenced filament winding 57 Defective input jack 58 Poor AC grounding 58 Induced hum 58 Poor internal wire routing 58 Poor AC Chassis Ground at Power Transformer 58 Defective internal grounding 59 Hiss 59 Metal Film Resistor Substitutions 59 Squealing Feedback 59 Radio Interference 60 Scratchy Sounds on Potentiometer s 60 Amp Buzz or Rattle When Installed in Cabinet 60 Tone...

Страница 5: ...m Fender forum The Fender Amp Field Guide is a terrific resource for all amps Fender Email We can t help with every problem but if you can not get your problem resolved email us and we ll do our best to help Phone Call If your problem can t be solved email for a phone appointment Acknowledgements Much of the content in this document is original Rather than reinvent content some parts are based on ...

Страница 6: ... BY BUILDING THEM Seek help from a competent technician before building any unfamiliar electronics circuit While efforts are made to ensure accuracy of these circuits no guarantee is provided of any kind USE AT YOUR OWN RISK TRINITY AMPS EXPRESSLY DISCLAIM ALL LIABILITY FOR INJURY OR PROPERTY DAMAGE RESULTING FROM THIS INFORMATION ALL INFORMATION IS PROVIDED AS IS AND WITHOUT WARRANTY OF ANY KIND ...

Страница 7: ...al PI resistor clarifications mad input jack theory added 2 7 15Jan16 Updated BOM to reflect IEC socket Impedance switch 2 8 6Feb16 Updated for IEC socket wiring 2 9 8Mar16 Updated for IEC and Impedance Switch additions 2 91 28AJul16 Updated layout for Mods section to show correct orientation of input jacks 2 92 23Apr17 Updated BOM 2 93 19Dec17 Updated eyelet board layout added power transformer t...

Страница 8: ... amplification and there are many reasons why tube and solid state amplifiers behave differently Quite simply if players prefer the sound of tubes they will continue to buy and use them Here are some fundamentals Input Impedance Typically 1M 500K minimum humbucking pickup guitars have volume pots up to 500K single coil pickup guitars typically of 250K Tone Controls Magnetic guitar pickups are indu...

Страница 9: ...ite different Although a generalization Fender s market and consequently the power output stage are geared towards provided clean and chunky tones at clean and early overdrive levels Marshall amps are best at low middley and crunchy rock tones played at medium to high overdrive levels Here is a simple comparison of Marshall and Fender response with what might loosely be called typical settings of ...

Страница 10: ...s tone controls allow high mids to pass with the treble response and add little bass boost for the sparkling and tight sounds they re famous for Here are charts each of the Fender controls In all cases the other two controls are left at 5 For example the treble chart shows he effect of varying Treble from 0 to 10 with Bass and Middle both at 5 Notice that all controls have a wide range of adjustme...

Страница 11: ...the same charts for Marshall tone controls As mentioned already the main points to note are the smaller range of adjustment the higher frequency for the middle cut control and the higher overall signal level The smaller adjustment range and higher level are both caused by the use of the 33K resistor in place of Fender s 100K The also gives the tone stack a lower input impedance requiring it to be ...

Страница 12: ...tive feedback in the power amplifier section to provide a small amount of boost at frequencies above the treble control Interactive Volume Controls Fender Tweed Amps The Tweed has what s referred to as interactive volume controls This is also a characteristic of the Tweed Bassman Twin Super Bandmaster etc ...

Страница 13: ...urning the unused volume control you are fine tuning the grid load resistor to the next stage of the amp An optimum best sounding value is not all the way up but somewhere near the middle the lesson Tubes are NOT linear or mathematical devices they do not respond to exact mathematical figures and have hills and valleys in their response maximum performance can not be calculated directly you have t...

Страница 14: ... like the chime like clean sounds and blues players were quick to discover the classic way it breaks up when pushed hard At really high overdrive though the sound becomes quite dirty with bass in particular sounding flabby Marshall designs started as Fender copies but soon switched to EL34 output tubes possibly for local supply reasons Anyway the rest is history These tubes exhibit a softer overdr...

Страница 15: ...use two cabinets hooked directly into the amp be sure to set the amp at half the impedance of the cabinets For example if your cabinets are 8 ohms each set the impedance selector to 4 ohms Durability Most musical styles will require the amplifier to be overdriven for extended periods of time and the amplifier must be designed to provide this without duress on any components Common non guitar desig...

Страница 16: ......

Страница 17: ...re gain The Grid is where the signal enters the tube The Cathode is usually connected to a cathode resistor which usually goes to ground The cathode resistor along with the Plate resistor control the gain of the tube stage Typical values are anywhere from 100 ohms to 10K Smaller values more gain It is common to see a cathode bypass cap connected in parallel with the cathode resistor By altering th...

Страница 18: ...smaller values roll off more bass larger values retain more bass between stages Another modification you may see is a Grid Stopper Resistor this can also control gain between stages and also interacts with the tube to roll off highs Values can be 1 5K 100K Larger values roll off more highs and reduce gain between stages The Grid Stopper Resistor works best when mounted directly or as close as poss...

Страница 19: ... to adhere to Check the datasheet for the tube you are using to see the typical value of the grid leak resistor This particular circuit is called cathode bias which you can read about here In summary the cathode resistor plate resistor and grid resistor determine the biasing of the tube stage The cathode bypass cap controls the degree of bass reduction generally 25uF passes all frequencies commonl...

Страница 20: ...Version 3 2 Page 20 Input Jack Theory from 18watt com ...

Страница 21: ... 0Ω high frequencies are shunted to ground When the pot is at 1MΩ the high frequencies are passed through and the frequencies below the 3dB point of the filter are taken to ground This single tone control acts a treble roll off as it is rotated counter clockwise and a high treble boost similar to a bright switch as it gets towards it s most clockwise position The 0047 uF cap is the treble cut cap ...

Страница 22: ...ls flow into a lead on the primary of the center tapped output transformer The transformer steps down the high voltage and steps up the low magnitude current An 8 ohm speaker is connected to the transformer secondary to output the sound Original Circuit with outlined stages ...

Страница 23: ...ilot Lamp Bright Volume Normal Volume Tone Bright Input X2 Normal Input X2 Knobs Black pointer Cabinet 55 Narrow panel 16 5 x 18 x 8 75 41 9 x 45 7 x 22 2 cm 55 60 16 75 x 20 x 9 5 42 5 x 50 8 x 24 1 cm Cab Covering Diagonal tweed Cab Hardware Leather Handle glides Grille Dark brown linen 55 or brown grille cloth Weight 25 lbs 11 3 Kg Speakers Load 1 x 12 8 ohms Speaker Model Recommended Tone Tubb...

Страница 24: ... Favorites are the early tweed Deluxe and the AB763 versions of all the amps Each era of Fender amps produced many very useful guitar amps The most heavily cloned amps are the 5E3 Fender Deluxe of course the tweed champ 5F1 and the mother of all guitar amps the 1959 tweed Bassman 5F6A The AB763 is the most heavily cloned topology for clean channels in many guitar amps made today This circuit first...

Страница 25: ...Version 3 2 Page 25 ...

Страница 26: ...the layout provided with your Trinity Amp It has been tested and has proven reliable If you choose to deviate consider the following information Amps traditionally use the chassis for signal ground This is not the best choice since it can create ground loops and bad ground connections may develop over time It is better to use star grounding in which all of the local grounds are collected at a sing...

Страница 27: ... The traditional method of constructing amps involved mounting the components on tag board or fiberboard This is the technique that is used for Trinity Amplifiers and is the recommended approach for service and reliability Assembling the amp Before You Begin When you first receive your kit remove all of the parts from the shipping box and place them on a well lit clean surface Check all of the par...

Страница 28: ...n Touch the solder to the leads The solder should flow onto the leads Avoid breathing the fumes Remove the soldering iron and allow the solder joint to cool Note Do not apply the tip of the soldering iron to the eyelet board any longer than it takes for the solder to flow The solder joint should be clean and shiny If it is dull looking it may be a cold solder joint which is not a good electrical c...

Страница 29: ...sis 2 Wire up the heater wires connect to the pilot light 3 Install Power Transformer and wire the Power Supply 4 Install the Output Transformer and Wire to the B output tube sockets and jacks 5 Assemble the eyelet board 6 Install the eyelet board 7 Connect the eyelet board wires to power sockets and controls 8 Wire and install input jacks Connect to board 9 Check components wiring and connections...

Страница 30: ...all Hardware Install all the hardware on the chassis to make sure it all fits properly Don t install the transformers yet The classic Fender layout was followed with some changes We use 1 2 stand offs for mounting the circuit board to the chassis and also two ground connections power per amp We also insulate the input jacks from the chassis ...

Страница 31: ...h the chassis from a choke or output transformer Ensure the potentiometers are located in the correct positions according their values and the layout Cut off the locating tabs on the potentiometers in order to flush mount them For the jacks you will need to use fibre washers to isolate them from the chassis More on that later Trinity Tweed Front View When you mount the fuse holder switch and pilot...

Страница 32: ... star grounding is used and the mains ground is bolted to the chassis We run the individual pre amp grounds directly to a separate star instead of bussing them as on the original This was done to reduce the background noise Here is a guideline for wiring the kits with the supplied wire Use 22 gauge 600V solid for hook up to tubes Use 22 gauge 600V solid stranded for hook up to pots front panel Use...

Страница 33: ... substitute smaller gauge heater wires The wires need to be big enough to carry the current back to ground and keep hum low One wire comes from the indicator socket to the first 6V6 Power Tube to pin 7 the other wire to same 6V6 Power Tube but pin 2 Then these go to pins 7 and 2 respectively of the second Power Tube From there the wires daisy chain across the preamp tubes Run the heater wires for ...

Страница 34: ...the 4 8 bolts studs holding the transformer plates and bell covers together Put the transformer in place and hold in place with the 8 nuts with washers as supplied Tighten up the nuts Note Leave the original nuts in place so as to provide a gap between the transformer and chassis This provides some heat and electrical isolation to the chassis ...

Страница 35: ...onnect the Red high voltage wires to pins 4 and 6 of the 5Y3 Connect the Red Yellow center tap of the high voltage from the transformer and ground it at the power ground point Trinity Tweed Grounding Scheme Our amps use a two point grounding scheme where the power side of the amp is connected to a single common ground point and the pre amp part is connected to another point on the chassis that is ...

Страница 36: ...oint Power Amp Side Ground Pre Amp Side Ground Mains Power Connection Wire up the rest of the main power supply Start at the mains IEC Socket Attach the ground lug to the chassis immediately beside the socket and ensure it is grounded well Tighten as much as possible with the 8 KEPS lock nut ...

Страница 37: ...ption of being On in either Up or Down position From the other side of the switch connect to the transformer Black Red White Red pair 120V input The other side of the IEC is connected to the Black White pair Common side of the power transformer Tie off any unused taps that are not required for the Tweed build Tie it off by cutting off the exposed wire and then put heat shrink over the end and then...

Страница 38: ...ansformer Connection Schematic 120V use the primary in parallel hooking Black Red to White Red and Black to White Connect 120 mains to Black Red and White 240V use the primary in series hooking Black to White Red Connect 240 mains to Black Red and White ...

Страница 39: ...ade The switch may have the option of being On in either Up or Down position From the other side of the switch connect to the transformer Black Red lead 240V input The other side of the IEC is connected to the White lead Common side of the power transformer Connect the Black and White Red solder and insulate with some shrink tubing Tie off the unused taps 110V that are not required for the Tweed b...

Страница 40: ... wired correctly for your Mains Voltage DO NOT INSERT ANY TUBES Carefully apply power to the circuit use Variac if possible or current limiting light bulb and check that the AC voltages are within range of the spec Note that they will be higher with NO tubes plugged in Carefully measure the AC MAINS VOLTAGE Carefully measure the AC VOLTAGE across the INDICATOR lugs You should measure around 6 3VAC...

Страница 41: ...aided and both fed through the two chassis grommets Cut a wire long enough to route from the Impedance switch center pole terminals to the closest output jack Hook a wire into the two center poles of the switch and solder it in place Solder the other end two the closest output jack Connect the other output jack with another piece of wire making sure they re connected to the same jack terminals In ...

Страница 42: ...on 3 2 Page 42 TWEED 8 4 OHM OUTPUT TRANSFORMER Brown 4K Red CT Blue 4K 8K impedance connection 8 ohm speaker impedance Yellow 8 ohm Black common Green 4 ohm 4 ohm speaker impedance TWEED 8 4 OHM CONNECTION ...

Страница 43: ...e to transpose the layout if you prefer this technique Trinity Tweed Board Underside Layout Jumpers Only Install the Eyelet Board Components Align the board according to the layout diagram and follow the diagram closely as you build the board Carefully identify all the board components and their values Measure those that you can to confirm the values See the section on how to read Resistor and Cap...

Страница 44: ...separated slightly as this resistor emits some heat Install flying leads and solder in place Move on to the 3 16uF 500V filter capacitors and power supply resistors Continue with the remaining parts following the layout provided Note For multiple component leads that must fit into one eyelet or eyelet insert them first and solder once when they are all in place Bend each component lead at 90 degre...

Страница 45: ... centre tap to the B on the board optionally route it back to the stand by switch 3 Connect and solder the ground wire from the ground side of the 250 ohm 25uF power tube cathode resistor pair to the Power Ground 4 Connect and solder the ground wire from the ground side of the 820 ohm 25uF preamp tube cathode resistor pair to the Pre Amp Ground Then start at one end of the board and work your way ...

Страница 46: ...nsure it does not touch the other tone capacitor Solder it in place with the ground on the volume pot Co Axial Cable to Volume Control This is an improvement to reduce noise To prepare the co axial cable for connections 1 Cut back the outside plastic covering at both ends by about 5 8 to reveal the braided shield 2 At one end pull back the shield and cut it off at the 5 8 mark Put some heat shrink...

Страница 47: ...about 6 to reach the board from each jack The ground wire and insulated jacks are another improvement over the original design Use wire from the input jacks to the eyelet board Install the Switchcraft switched input jacks Use the supplied black shoulder washers to insulate the jack from the chassis This is an improvement in design for noise reduction Refer to the diagram and install the washers wi...

Страница 48: ...to ensure there is no chance the shield will connect to ground or touch the tube pins Solder the shielded cable centre conductor to each 68K resistor on each tag On the input jack end connect the 2 shields together and connect them to the ground point on the jacks Do not connect the shields at both ends or you will induce hum Final checkout When you finish assembling the amp double check the wirin...

Страница 49: ...Version 3 2 Page 49 ...

Страница 50: ...this for the work anyway Leave the jumper in place while you do your work Remember to remove it when you finish your work You can also permanently install a 220K 2W resistor on the B line to chassis ground to do this Test Take your multimeter and ground the negative black lead to the chassis With the positive red lead probe the high voltage cap terminals or leads and be sure the voltage across the...

Страница 51: ...range on the meter you may set the meter to a lower range while the circuit is on When doing this touch ONLY the meter with ONE hand and be careful to only lower the meter one range allow the readings to stabilize 2 or 3 seconds before proceeding further Note Accidentally setting the meter to a current or resistance range can damage the meter and the circuit it is connected to If the circuit has s...

Страница 52: ...hematic because there is no load provided by the tubes It will be in excess of 400 Volts DC 7 If everything is okay power off the amp install the 12AX7 AY7 and two power tubes 6V6 connect a speaker and power on again 8 Measure the DC voltages from tube pin to chassis ground and compare to the layout schematic or Trinity Tweed Voltage Chart Tube Plate Pin s Cathode Pin s Heater pins V1 12AX7 V2 12A...

Страница 53: ...mp and you may have to get some very expensive repairs done Never ignore a red glow other than the small orange ends of the filaments A red glow over a large part of the internal plates of the output tubes means they re about to melt If you notice this shut it down and get a tech to help you find out what it wrong Some DOs Add another speaker into the external speaker jack a mismatched speaker loa...

Страница 54: ...nstalled 400 VDC WITH SOVTEK 5Y3 367 VDC WITH JJ 5Y3 in brackets 12AX7 12AY7 6V6 TUBE Pin 1 Pin 2 Pin 3 Pin 4 Pin 5 Pin 6 Pin 7 Pin 8 Pin 9 V1 12AY7 130 120 2 0 1 8 133 120 2 0 1 3 V2 12AX7 158 148 1 4 1 3 204 191 18 17 50 45 V3 6V6 380 356 348 326 22 20 V4 6V6 380 356 348 326 22 20 THE ABOVE DC VOLTAGES ARE MEASURED FROM TUBE PIN TO CHASSIS GROUND ...

Страница 55: ...n There are voltages in this area in excess of 400 VDC WARNING Please Read this Information Carefully The projects described in these pages utilize POTENTIALLY FATAL HIGH VOLTAGES If you are in any way unfamiliar with high voltage circuits or are uncomfortable working around high voltages PLEASE DO NOT RISK YOUR LIFE BY BUILDING THEM Seek help from a competent technician before building any unfami...

Страница 56: ... can use an 8 ohm 15 watt power resistor as a dummy load in place of a speaker Hum Hum is the most common problem and is usually caused by AC line noise leaking into the filament wiring or input stages and getting amplified Here we provide a comprehensive step by step troubleshooting guide First measure the resistance from each parts ground connection to the chassis All readings should be less tha...

Страница 57: ...ad pulling current not a faulty capacitor Always check all of the power filter capacitors while you re in there If one is bad consider replacing them all If there is no obvious mechanical problem and the resistance seems high enough temporarily solder a new known good capacitor of at least as high a capacitance and voltage across the suspected capacitor or section then plug in and try the amplifie...

Страница 58: ...he ground reverse switch and or capacitor can cause hum A leaky power transformer can also cause this Induced hum Placement of the amplifier near other equipment can sometimes cause it to pick up radiated hum from other equipment Suspect this if the hum changes loudness or tone when you move or turn the amp There is usually nothing you can do about this except move the amp to where the hum is less...

Страница 59: ...cally too low Substitute them on the Cathode resistors They typically only have a few volts across them and they re often decoupled with a capacitor both of which would minimize the carbon composition resistor distortion AKA Mojo The best place to use CC s is where there s big signal plate resistors and ideally the stage just before the phase inverter The phase inverter would otherwise be ideal wi...

Страница 60: ... Put a 100pf across the V1 Plate and cathode pins 1 3 Scratchy Sounds on Potentiometer s If you are hearing scratch sounds on a pot when you rotate it measure the voltage from that pots terminals to ground If you have DC voltage a leaky coupling capacitor or tone stack can cause this to happen Amp Buzz or Rattle When Installed in Cabinet If you get a buzz in an amp when it s installed in a cabinet...

Страница 61: ... hard against cabinet Tighten Use Rubber gasket neoprene 3 8 X 1 8 window door sealer around where the chassis touches the cabinet Is there a gap between panels chassis cabinet Tighten it up use rubber gasket where the faceplate meets cabinet Rubber gasket neoprene 3 8 X 1 8 window door sealer between panel and cabinet Is the Chassis vibrating around backboard Remove the backboard and listen Use a...

Страница 62: ...rainy sounds sometimes heard in amps using the Tweed cathodyne kind of phase inverter Make sure the resistor goes right on the pin as it is acting as a grid stopper Use the same Volume and Tone circuit as the 6G3 Brownface Deluxe Rewire the pots to mix the 2 channels with a pair of 220K resistors The reason for installing this mod is that the standard Tweed ramps up fast and breaks up very soon wi...

Страница 63: ... larger values reduce gain smaller values give more gain A trick is to connect a 5K pot wired as a variable resistor instead of the standard cathode resistor now you can turn the pot and dial in the perfect tone After dialing the sound remove the resistor and pot and measure it Substitute the nearest standard value resistor in place of the pot plus a resistor Add grid stopping resistors to help ta...

Страница 64: ... 4 Install a 470R 3W screen resistor on pin 4 anchor on unused pin 1 5 Connect the leads from the 2nd 16uF filter cap to pins 1 on V3 V4 This mod will deliver about 25 watts output power and the amp will be noticeably louder while retaining the Classic Tweed tone NOTE Our stock Tweed Output Transformer is NOT guaranteed with this modification Do not use the stock OT in this configuration You shoul...

Страница 65: ...Version 3 2 Page 65 HEYBOER OT for TWEED 6L6GT CONVERSION ...

Страница 66: ...Version 3 2 Page 66 ...

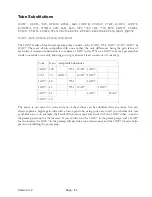
Страница 67: ...at tends to overdrive too easily allowing you to get a better clean sound out of your amp Tube Gain Acceptable Substitutes 12AX7 100 5751 12AT7 12AY7 5751 70 12AX7 12AT7 12AY7 12AT7 60 5751 12AY7 12AY7 45 5751 12AT7 12AV7 12AV7 41 12AY7 12AU7 12AU7 19 The above is not carved in stone and any of these tubes can be substituted for any other You can always replace a higher gain tube with a lower gain...

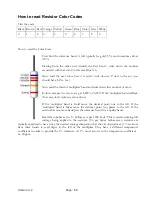
Страница 68: ... we get 6200 or 6 200 If the multiplier band is Black for zero don t write any zeros down If the multiplier band is Gold move the decimal point one to the left If the multiplier band is Silver move the decimal point two places to the left If the resistor has one more band past the tolerance band it is a quality band Read the number as the Failure rate per 1000 hour This is rated assuming full watt...

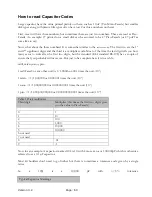
Страница 69: ...he standard EIA standard RS 198 has a couple of curves that you probably will never see But just to be complete here it is in a table milli micro nano pico 1 mili Farad or any other unit is 1 1 000th or 001 times the unit 10 3 1 micro 1 1 000 000 or 0 000 001 times the unit 10 6 1 nano 1 1 000 000 000 or 0 000 000 001 times the unit 10 9 1 pico 1 1 000 000 000 000 or 0 000 000 000 001 times the un...

Страница 70: ... 0 5 0 0005 472 4700 4 7 0 0047 103 10000 10 0 01 123 12000 12 0 012 203 20000 20 0 02 223 22000 22 0 022 104 100000 100 0 1 684 680000 680 0 68 Table 2 Letter tolerance code Letter symbol Tolerance of capacitor B 0 10 C 0 25 D 0 5 E 0 5 F 1 G 2 H 3 J 5 K 10 M 20 N 0 05 P 100 0 Z 80 20 ...

Страница 71: ...auge stranded 600v for power supply hook up to transformers rectifier standby etc Tip Re use cut offs from the transformers for power supply hook up Q What should I use for the jumper wires on the back of the eyelet board A Use the provided solid 22 ga or the stranded supplied for jumpers it is not critical Q For the input jacks a I should be using the shielded wire which is the thick gray black w...

Страница 72: ...click on them to download if you want print in large colour format Schematic trinityamps com Forum Index Resources Trinity Tweed Deluxe Docs TIP Flatten or remove the locating tabs on the pots so that they tighten properly on the chassis TIP Sometimes carbon comp resistors are hard to decode the colours It is a good idea to check the resistances of these parts before assembly TIP Use insulation tu...

Страница 73: ...CAP 1 8 CHASSIS LUGS 1 1 uF 600 ORANGE DROP STYLE CAP 4 MED 10 X 1 1 4 MACHINE SCREW 2 16uF 450V ELECTROLYTIC CAPACITOR 3 10 HEX KEPS NUT 2 25 uF 50V AXIAL ELECTROLYTIC CAPACITOR 3 10 WASHER 2 MED 1M AUDIO POT 3 8 3 LARGE 22 GAUGE SOLID WIRE VARIOUS COLOURS FEET 10 CHICKEN HEAD KNOB BLACK 3 SHIELDED CABLE FEET 1 LARGE 9 IEC CHASSIS SOCKET 1 18 GA STRANDED WHITE INCHES 18 PANEL MOUNTED BAYONET FUSE...

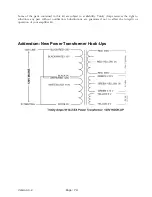
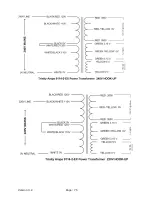
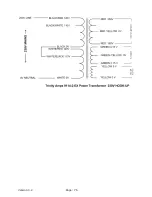
Страница 74: ... in this kit are subject to availability Trinity Amps reserves the right to substitute any part without notification Substitutions are guaranteed not to affect the integrity or operation of your amplifier kit Addendum New Power Transformer Hook Ups ...

Страница 75: ...Version 3 2 Page 75 ...

Страница 76: ...Version 3 2 Page 76 ...

Страница 77: ...Version 3 2 Page 77 Trinity Amps Schematics and Layouts ...

Отзывы: