“LIVELINK INSTALL” APP / ROOM ADMINISTRATION / ROOM SETUP: USE CASE
Page 33 / 77
ROOM SETUP: USE CASE
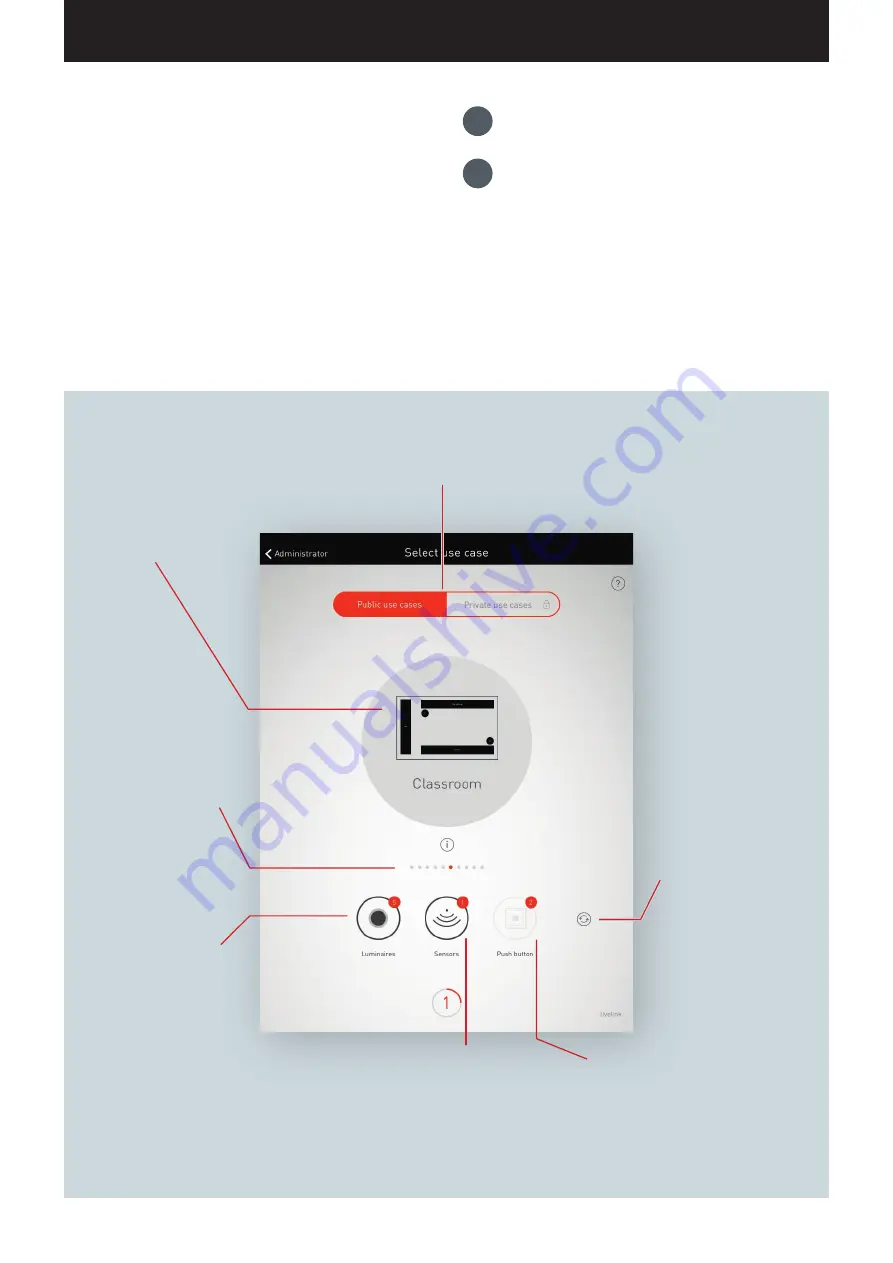
In this view, a matching Use Case is selected and assigned to the room.
Represented in a simplified room schematic - a Use Case does
contain a placement of luminaire groups and sensors as well as
preconfigured light scenes.
For typical room situations, multiple “public Use Cases” are available.
For special applications, individualised “private Use Cases” can be
called up.
The view does, furthermore, provide an overview of the connected
luminaires, sensors, and push-buttons as well as the option to iden-
tify these devices.
Choice between public and private Use Cases.
Public Use Cases contain a pre-configuration for typical building situa-
tions. Private Use Cases can be created in cooperation with TRILUX light
planners and can subsequently be called up from the myTRILUX portal.
Designation and schematic
of the selected Use Case.
The Use Case can be se-
lected via swiping. A tap on
this schematic confirms the
selection and leads to the
next step.
The dots serve for navigating
through the Use Cases. One
dot corresponds to one Use
Case. The currently selected
Use Case is displayed in white.
The number indicates the number of
push-button couplers connected plus the
allowed push-button on the control device.
Push-buttons connected to a coupler are not
included in the count at this point.
After tapping the refresh
button, a choice of “Start
new search run” and
“Search for new devices” is
available.
A status display indicates an
active search.
Caution: A “search run”
impedes the functionality of
the system; see explanation
on the following pages.
The number indicates the number of sensors
connected. After tapping this icon, the status
lights of the sensors light up for identification.
While this is happening, the icon is shown
in red. The identification is ended by tapping
again.
The number indicates the
number of luminaires
connected. After tapping this
icon, the luminaires blink for
identification. While this is
happening, the icon is shown
in red. The identification is
ended by tapping again.
1.
Identifying luminaires and sensors
2.
Select and confirm Use Case
Содержание LiveLink
Страница 1: ...LIVELINK SYSTEM MANUAL ...
Страница 76: ...FAQ Page 76 77 ...


