background image

“LIVELINK INSTALL” APP / ROOM ADMINISTRATION / ROOM SETUP: ASSIGNMENT

Page 37 / 77

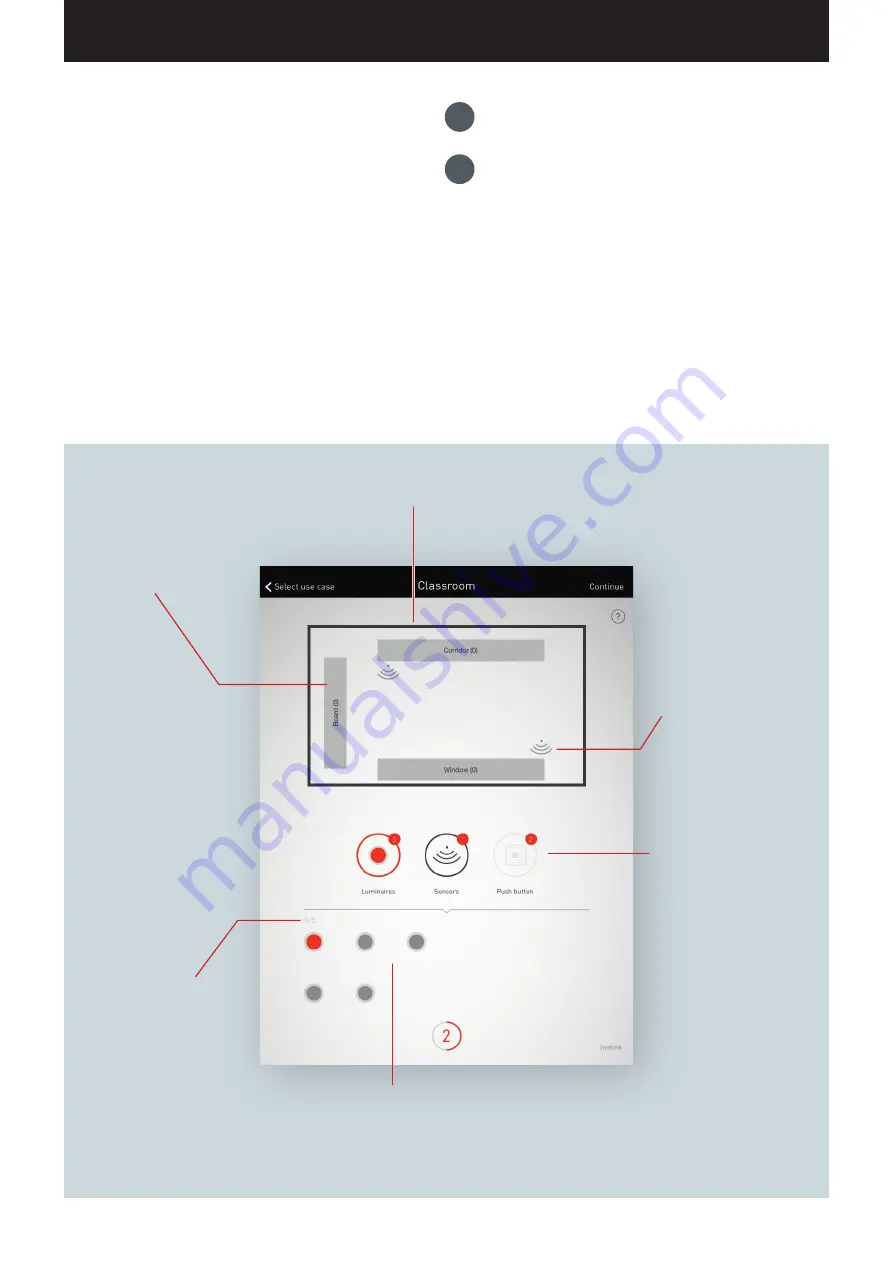
The room schematic shows all luminaire 

groups and sensor locations. 

Predefined luminaire 

groups are included in each 

room. The available lumi-

naires can be assigned via 

drag and drop. The number 

at the right edge indicates 

how many luminaires are in 

the group.

Predefined sensor The availa-

ble sensors can be assigned 

via drag and drop. 

Subsequent to a long tap, 

additional functions can be 

reached. 

Switching between the 

assignment of luminaires and 

sensors. The respective active 

are is shown in red.

Additionally, the number of 

push-button couplers (plus 

push-button on the control 

device) available is displayed 

for informational purposes.

The push-button assignment 

is performed in a later step

Symbolic depiction of the available lumi-

naires and/or sensors. As soon as a device is 

selected, it is displayed in colour and can then 

be assigned.

Overview of the luminaires 

and/or sensors already as-

signed in comparison to those 

available.

1.

  Group assignment of luminaires

2.

  Sensor assignment

ROOM SETUP: ASSIGNMENT

In this view, the luminaires and sensors are assigned. 

The individual luminaires and sensors can be identified and 

assigned to the luminaire groups and/or sensor locations.

A simplified schematic serves for orientation in the room and 

provides for a comfortable assignment of the devices this way. The 

number and positions of the luminaire groups and sensors origi-

nate from the Use Case. The schematic cannot be modified but can 

be utilised in a custom fashion. As such, not all luminaire groups 

and sensor locations have to be utilised, for example.

Содержание LiveLink

Страница 1: ...LIVELINK SYSTEM MANUAL ...

Страница 2: ...se Cases 28 Administrating private Use Cases 29 Room administration 30 Room setup 31 Room setup Use Case 33 Room setup Assignment 37 Room setup Assigning push buttons 44 Concluding the room setup 48 Room setup Option Rename room 49 Room setup Option Administrate scenes 51 Room setup Option Setting up scenes 54 Room administration 59 Settings 60 Settings DALI fade time 61 Settings Reset LiveLink an...

Страница 3: ...n existing network structure is possible Available for setup are Use Cases which contain a pre configuration of luminaire groups and light scenes Through further configuration each room can be individually attuned to the respective needs SAFETY INSTRUCTIONS Work on electric devices may only be carried out while disconnected from electric power Applicable safety and accident prevention regulations ...

Страница 4: ...trol device which is equipped with a WLAN of its own access point for this purpose But as an alternative the LiveLink control device can also be integrated into the network structure of the building The controlling of the lighting can be performed in two ways 1 The activating of light scenes or switching and dimming of lumi naire groups can be carried out with commercial push buttons via the DALI ...

Страница 5: ...luminaires and or groups of luminaires can be controlled either with a commercial installation push button or via mobile app on a tab let or smart phone Additional push buttons can be connected via an optional LiveLink DALI push button coupler that is simply integrated into the DALI control circuit The push button can be configured freely this way offline groups of luminaires can be controlled too...

Страница 6: ...Link control device via DALI The function of the push buttons is freely programmable during commissioning Fits into the flush device box The compact dimensions allow for an installation in flush device boxes with a minimum depth of 60 mm The push button cables may have maximum length of 25 m and must be installed in a separate plastic sheathed cable The connections at the push button coupler are n...

Страница 7: ...y Equipment and functions Two integrated HF sensors with dual directional characteristic for up to 20 metres of radial detection Detects equally well from any direction of walking Continuously variable electronic setting IR Quattro HD Detects the most minute of movements all the way into any corner The infra red presence detector IR Quattro HD is ideal for medium to large offices conference rooms ...

Страница 8: ...operation In the interior area of buildings In the interior area of buildings In the interior area of buildings Sensor system 13 detection areas 4800 switching zones High frequency 5 8 GHz transmitting power 1 mW Light value setting 10 1000 Lux 10 1000 Lux 20 800 Lux Protection rating IP20 IP54 with AP box IP20 IP54 with AP box IP20 Protection class II II II Temperature range 0 C to 40 C 0 C to 40...

Страница 9: ...INTRODUCTION SENSORS TECHNICAL DATA Page 9 77 Type Detection ranges at a height of installation of 2 8 3 0 m Quattro HD Dual HF LS PD LI Presence Circular Tangentially ...

Страница 10: ...he depth of the room The sensor should be positioned where it receives an average intensity of daylight for example in the middle of the room or near work spaces to which the light control will be calibrated If possible the light sensor should be positioned above a suitable area Ideally this area should also be utilised as reference area for the calibration of the illuminance If possible this area...

Страница 11: ...anged later see chapter Room setup room name Optionally the control device can be connected to an existing network infrastructure and utilised from there Selecting the WLAN with an iOS device In the menu item WLAN of the device settings all available WLANs are listed Upon tapping the LIVELINK WLAN the connection is established The exact name SSID of the re spective WLAN is located on the control d...

Страница 12: ...nd as a result make changes In this the user access is set up restrictively via a separate app and separate password and can merely control existing configuration but cannot create new or change existing configurations UTILISING THE WLAN WITH THE INFRASTRUCTURE Instead of a direct WLAN connection between the iOS and or Android device and the LiveLink control device an existing infrastructure can a...

Страница 13: ...l device WLAN password Password for the direct WLAN connection livelink Administrator password Password for using the administra tor menu of the Install app Each LiveLink room can be equipped with a separate administrator password Upon initial setup the user is offered the option to change the administrator password Subsequently the password can be changed in the administrator menu under Settings ...

Страница 14: ...ss the function is not available but can be re assigned to select push buttons BEHAVIOUR IN OPERATION The behaviour of the light control depends on how the system is being switched on Fully automatic presence detection Starting a scene with semi automatic presence detection Starting a scene with light control Manual switching on of select or all luminaire groups The decisive factor is which contro...

Страница 15: ... room the changed dimming levels of the illumina tion are retained CHANGE OF THE SCENE If a change is made to a scene that contains other operating modes constant light control and presence detection the behaviour does of course change as well see other pages in this chapter In case of strong ingress of sunlight the illu mination initially dims to a minimum If the overall illumination exceeds the ...

Страница 16: ... switching and dimming of luminaire groups is possible They remain main tained during the stay in the room If a change is made to a scene that contains other controls constant light control and presence detection the behaviour does of course change as well see other pages in this chapter Subsequent to a subsequent holding time the illumination turns off after the room has been left The presence de...

Страница 17: ...llumina tion are retained In case of strong ingress of sunlight the illu mination initially dims to a minimum If the overall illumination exceeds the target value by 25 for more than 5 minutes the illumi nation turns off If the daylight be comes less the il lumination switches itself on again and adjusts to the target value After leaving the room the illumi nation remains switched on After leaving...

Страница 18: ...e individual or all luminaire groups can be switched with a push button or via a tablet and or smart phone Of course scenes can also be started after man ually switching on the illumination see the other pages of this chapter depending on the control of the scene and switched off Upon switching back on the last dimming value is being re called dimmed MANUAL CONTROL STARTING A SCENE ...

Страница 19: ... LIVELINK INSTALL APP OVERVIEW There are iOS based and Android based apps available that do not differ in terms of functionality There merely are minor deviations in the screen presentation Shown in these instructions are screenshots of the iOS app Any dif ferences in the operation of the Android are pointed out as necessary The following screenshots show the basic elements of the app oper ation t...

Страница 20: ...light planners and loaded for utilisation as Private Use Cases PUBLIC USE CASES The public Use Cases are included in the delivery and can be updated in the Use Case administration see chapter Use Case administration The following Use Cases are going to be covered on the next pages Office Industry Education Shop Retail Health Care General Small Office Large Office Conference Room Manufacturing Hall...

Страница 21: ... all groups at 100 10 minutes switch off delay Night lighting Constant dimming level for all groups at 20 no automatic switch off Off All groups off Presetting of the luminaire groups Group of luminaires Function Work 1 4 Presence detection Daylight dependent control Additional e g for accentuating lighting Presence detection Presets of the scenes Scene Function Automatic 5 minutes switch off dela...

Страница 22: ...unction Automatic 10 minutes switch off delay for all groups fully automatic operation Daylight dependent control active Projection Constant dimming levels for the following groups Meeting 20 Additional 20 Presentation 0 10 minutes switch off delay Lecture Constant dimming levels for the following groups Meeting 50 Additional 20 Presentation 100 10 minutes switch off delay Service Constant dimming...

Страница 23: ... for groups Work 1 3 Presence detection for group Traffic Route Fully automatic operation with 10 minutes switch off delay Service Constant dimming level for all groups at 100 20 minutes switch off delay Night lighting Constant dimming level for all groups at 20 no automatic switch off Off All groups off Presetting of the luminaire groups Group of luminaires Function Traffic route 1 2 Presence det...

Страница 24: ...ups at 100 10 minutes switch off delay Night lighting Constant dimming level for all groups at 20 no automatic switch off Off All groups off Presetting of the luminaire groups Group of luminaires Function Hall Presence detection Daylight dependent control Presets of the scenes Scene Function Automatic standard 15 minutes switch off delay fully automatic operation Daylight dependent control active ...

Страница 25: ...daylight depending controls of the groups Cash Register S2 and Shop S3 Group Accent set to 100 no automatic switch off Service Constant dimming level for all groups at 100 20 minutes switch off delay Night Constant dimming level for all groups at 20 no automatic switch off Off All groups off Presetting of the luminaire groups Group of lumi naires Function Bed 1 3 Presence detection Daylight depend...

Страница 26: ...nce detection Daylight dependent control Presets of the scenes Scene Function Automatic 5 minutes switch off delay fully automatic operation Daylight dependent control active via sensor 1 Service Constant dimming level for all groups at 100 10 minutes switch off delay Night lighting Constant dimming level for all groups at 20 no automatic switch off Off All groups off Presets of the scenes Scene F...

Страница 27: ...Use Cases can be downloaded from the myTRILUX Portal and administrated Updating Updating the public Use Cases from the TRILUX portal Public Use Cases All available Use Cases are listed After a long tap there is the option to delete select Use Cases Private Use Cases Access to the TRILUX portal from which private Use Cases can be loaded at this point Use Case name Version number ...

Страница 28: ...he refresh button Caution Updating requires an Internet connection since the data is retrieved from a TRILUX server via the Internet Where applicable the WLAN must be switched or a mobile data connection must be utilised Deleting Use Cases After an update Use Cases may be listed multiple times with different version numbers Superfluous Use Cases can be deleted After a long tap on the Use Case pres...

Страница 29: ...Cases Administrating private Use Cases The input screen allows for access to the customer account at the myTRILUX portal Here the customised Use Cases created are available Caution The access to the myTRILUX portal requires an Internet connection Where applicable the WLAN must be switched or a mobile data connection must be utilised ADMINISTRATING PRIVATE USE CASES ...

Страница 30: ...ight control function ality like user app WLAN Hotspot Connecting the control device with an existing network infra structure Settings Allows for various additional settings Room administration After the initial setup select setup steps can be changed here Use Case Assignment Administrate push buttons Room name Administrate scenes ROOM ADMINISTRATION The Administrator menu includes the most import...

Страница 31: ...pared for the further configuration Initial connection to the WLAN The tablet is connected directly to the WLAN that is made available by the LiveLink control device Start the app For the configuration of LiveLink the LiveLink app is utilised which is available for iOS tablets at the Apple App Store and for Android tablets at the Google Play Store ...

Страница 32: ...can be selected Initially the room designation is a factory setting which can later be changed in the Room name menu In delivery condition the administrator password is livelink Change administrator password On the next screen a new administrator password is specified Start room configuration A tap on Create room starts the creation of a room and leads to the first step Select Use Case ...

Страница 33: ...is schematic confirms the selection and leads to the next step The dots serve for navigating through the Use Cases One dot corresponds to one Use Case The currently selected Use Case is displayed in white The number indicates the number of push button couplers connected plus the allowed push button on the control device Push buttons connected to a coupler are not included in the count at this poin...

Страница 34: ...r of devices connected A push button coupler is counted only once in this even though multiple push buttons may be connected there Identifying luminaires sensors When selecting the drive group Luminaires or Sensors the identification is started The respective icon is shown in red the registered luminaires and or the status lights of the sensors start to blink Tapping the icon again ends the identi...

Страница 35: ...new This is necessary if a previous search run was incomplete or incorrect for example if despite correct installation not all devices were found Caution A renewed search run impedes the functionality of the system Due to the read dressing of the devices the assignment needs to be performed once again Search for new devices finds devices that were installed subsequently This search run is signifi ...

Страница 36: ...hing Use Case is selected by swiping A rough schematic and the designation help in the correct selection wherein the schematic does not have to fit the room situation in all details Confirming the selection The selection is confirmed by tapping on the Use Case and this configuration step is completed ...

Страница 37: ...e push button assignment is performed in a later step Symbolic depiction of the available lumi naires and or sensors As soon as a device is selected it is displayed in colour and can then be assigned Overview of the luminaires and or sensors already as signed in comparison to those available 1 Group assignment of luminaires 2 Sensor assignment ROOM SETUP ASSIGNMENT In this view the luminaires and ...

Страница 38: ...ach dot in the lower area of this view represents a luminaire The luminaire is selected by tapping a dot The dot is shown bright and the luminaire blinks for identification Multiple selection Multiple luminaires can be selected one after another in order to assign them collectively in the next step ...

Страница 39: ...aire group at top If multiple luminaires were selected any one luminaire can be pushed in order to assign the whole selection The dots that symbolise the luminaires are no longer shown after the assignment Navigation in case of more than 12 luminaires If more luminaires are available the luminaire selection is navigated by swiping through the pages ...

Страница 40: ...The number of luminaires already assigned can be read on the symbols of the luminaire groups In addition it is shown in the bottom area of the view how many luminaires overall are available and how many have not yet been assigned A group is selected by tapping on it All corresponding luminaires blink ...

Страница 41: ...uminaires that have been assigned to this group The individual luminaires can be identified by tapping them and can be deleted by subsequently tapping the delete button Concluding the luminaire assignment Little by little additional luminaires can be assigned In this not all luminaires need to be assigned and not all luminaire groups need to be used ...

Страница 42: ... control lamp of the sensors serves for identification Testing the sensor Subsequent to a long tap on a positioned sensor different functions can be called up The function Testing the sensor shows detected movements This way the function of the sensor and its detection range can be tested If a Dual HF sensor is utilised the detection range can furthermore be adjusted here ...

Страница 43: ...th this function a sensor can be removed from the position It is then available again in the bottom area of the screen for a renewed assignment Push buttons The push buttons are set up only in the next steps Shown are both the connected push button couplers as well as the push button on the control device ...

Страница 44: ... pushing the button touch dim function Only one single light scene can be assigned to a push button But not all push buttons and light scenes need to be linked New push button assignments can be created by tapping the plus symbol Selecting the light scene or luminaire group respectively Testing the scene Subsequent to a long tap on a scene it can be activated for a test Choice between scenes and l...

Страница 45: ...utton assignments In this view all existing push button assignments are listed By swiping to the side the assignment can be deleted Creating a new push button assignment A tap on the plus symbol starts the setup of a new push button assignment In the next view the name for the assignment is being assigned ...

Страница 46: ...TTONS Page 46 77 Selecting scenes luminaire groups Initially it is selected whether the push button is intended to call up a light scene or to switch and dim a luminaire group Depending on the selection all light scenes or all luminaire groups are listed then respectively ...

Страница 47: ... and held for up to 5 seconds until the assignment is confirmed in the window Additional push button assignments and overwrit ing of assignments The push button assignment is concluded and is listed in the list Now additional push button assignments can be added But not all push buttons and light scenes need to be linked If a selected push button has already been assigned a note is being displayed...

Страница 48: ...The password serves for light control by the end user via the LiveLink Control app Caution Memorise the password Check the summary and apply optional settings In this view the room setup can be checked based on a summary If changes are necessary it is possible to jump back to the preceding steps via the navigation in the title bar If now changes are necessary the room setup is concluded Applying o...

Страница 49: ...7 ROOM SETUP OPTION RENAME ROOM In this view the room designation can be changed The room receives a new name that is adopted as WLAN designation and as room designa tion for utilisation in the apps Room name After tapping this box the keyboard is displayed to enter a new room name ...

Страница 50: ...TION RENAME ROOM Page 50 77 Change room name After tapping Change room name a new room name can be entered Reconnecting the WLAN By renaming the room name the WLAN also adopts this room name automatically Therefore the WLAN connection must be re established ...

Страница 51: ...for presence detection and or constant light control Different sensor settings are available for both modes of operation New scenes can be created and configured by tapping the plus symbol The dimming value of the individual groups is specified in percent A group is activated by tapping it and the value can be configured Provides access to the sensor options Selecting predefined scenes Prede fined...

Страница 52: ...ep a new name is assigned The subsequent steps guide through the setup of the scene they are identical to the setup of new scenes which are described on the following pages Edit scene Tapping on Edit starts the editing of the scene The subsequent steps are identical to the new setup of scenes which are described on the following pages Set default scene The default scene is activated automatically ...

Страница 53: ...VELINK INSTALL APP ROOM ADMINISTRATION ROOM SETUP OPTION ADMINISTRATE SCENES Page 53 77 Creating a new scene A tap on the plus symbol starts the setup of a new scene On the next screen the name is assigned ...

Страница 54: ...or options can be adjusted now Selecting luminaire groups A luminaire group is activated by tapping on it an active luminaire group is shown in red Multiple luminaire groups can be activated one after another in order to configure them at the same time Specifying the dimming value The activated luminaire groups can be dimmed to the desired level with the control wheel ...

Страница 55: ...an be configured Subsequent to the selection of a function the luminaire groups linked with this function are provided with a red background The assignment of the sensor controls to the luminaire groups takes place in the luminaire assignment see chapter Room setup Assignment Setting up the presence detection Tapping on the sensor symbol at the control wheel activates and or deactivates the sensor...

Страница 56: ...movements are registered the delay period is cut in half In case of constant utilisation of the room this does for example result in the illumination not being shut off directly when somebody leaves the room or if somebody is not moving for a while But if the room is used only sporadically the delay period is automatically reduced to 5 minutes Presence detection Fully automatic The illumination is...

Страница 57: ...ght This way it ensures a constant brightness at the highest efficiency Subsequent to selecting constant light control the desired brightness of the room is set via the control wheel and stored as reference value Constant light control In the calibration of the light control the following notes must be taken into consideration The calibration of the illuminance should be per formed with as little ...

Страница 58: ... to this function are marked in colour By tapping the luminaire groups these can be activated and or deactivated and as such different target values can be set Caution The target values are set for the condition of maximum incident daylight If daylight is available during the setup the target values can be adjusted optimally while observing the light distribution If no daylight is available the ta...

Страница 59: ... will not be explained further here Renaming a room Changing the designation of the room The WLAN name is adapted to the changed room designation Administrate scenes Administration of light scenes existing from the Use Case as well as setup of individualised light scenes Select Use Case Selecting a matching Use Case Assignment Assignment of luminaires and sensors Administrate push buttons Assignme...

Страница 60: ...nsition time between the dim ming levels Expanded sensor settings Update firmware Updating the operating software of the LiveLink control device Information of the control device Room designation and firmware version Version info of the app SETTINGS The Settings view in the administrator menu displays important system information and covers the basic settings of the LiveLink control device ...

Страница 61: ...ime is selected by swiping vertically and subsequently stored by tapping on Accept DALI fade time SETTINGS RESET LIVELINK AND HARDWARE RESET After tapping Reset LiveLink and subsequent confirmation the LiveLink control device is reset to delivery condition Caution All settings will be deleted For a hardware reset the DALI connections are short circuited connecting both DALI lines and at the same t...

Страница 62: ...nctions that can be adjusted are dependent of the sensor used Typical default values are already pre set in most cases these do not need to be adjusted All sensors are listed Here the desired sensor can be selected In this view the settings options for the sensor are listed Subsequent to tapping on a sensor function the value can be changed and stored The different sensor functions are described i...

Страница 63: ... Constant light control SwitchMode SwitchBoth SwitchBoth OnlySwitchON OnlySwitchOFF Switching behaviour in case of sufficient daylight SwitchBoth Switching on and off automatically in case of a sufficient share of daylight OnlySwitchOn No daylight depending switching off the illumination remains at a minimum level OnlySwitchOFF Automatic daylight dependent switching off but not switching back on u...

Страница 64: ...d in the LiveLink Install app To ensure that the most current firm ware is being utilised the app should be updated in advance Typical update process via the Apple App Store on iOS devices or the Google Play Store on Android devices Internet connection required A window shows which version is currently installed and to which version an update can be performed Upon confirmation the firmware is uplo...

Страница 65: ...NGS CHANGE PASSWORDS Page 65 77 SETTINGS CHANGE PASSWORDS The administrator password and the user password can be changed at any time The respective function is called and the old password must be entered first The new password must be entered twice ...

Страница 66: ...on off as well as setup of the connection Change password For an already existing connection WLAN CONNECT TO INFRASTRUCTURE The LiveLink control device can be connected to an existing infra structure WLAN The LiveLink room then is available on the existing network for configuration and operation ...

Страница 67: ... infrastructure Select network All available WLANs are listed The desired WLAN is selected IP setting dynamic DHCP If the LiveLink control device is to be assigned an IP dynamically by the existing network DHCHP the static filed remains deactivated IP setting static As an alternative static IP settings can be applied ...

Страница 68: ... WLAN CONNECT TO INFRASTRUCTURE Page 68 77 Enter WLAN password Upon entering the password for the infrastructure WLAN the connection is established Change WLAN password For an existing infrastructure connection the WLAN password can be changed ...

Страница 69: ...l of the already selected room can be called up directly in the administration menu of the LiveLink Install app The operation is identical to the functionality of the LiveLink Control app see corresponding chapter for the app Caution The light control can be selected only if the room was completely set up ...

Страница 70: ...ng Current status Displays the current switching state and dimming value Light scenes Listing all light scenes Tapping on a scene activates the re spective illumination setting In case of numerous scenes you can navigate through the list by swiping Back to room selection LIVELINK CONTROL APP OVERVIEW The completely set up system can be controlled via the LiveLink apps The user is able to dim switc...

Страница 71: ...ready active The app searches for LiveLink rooms on the network The desired room can be located by swiping and can subsequently be selected Caution The tablet and or smart phone must be connected to the LiveLink control device via WLAN Either directly to the WLAN of the control device or to an existing infrastructure WLAN see chapter WLAN ...

Страница 72: ... swiping For each luminaire group the current state and dim ming level are displayed With the field All all luminaire groups are selected Switching a luminaire group on off The currently selected luminaire group and the dimming value are being displayed in the control wheel By tapping the on off button the luminaire group is switched on red symbol or switched off grey symbol Dimming a luminaire gr...

Страница 73: ...The scene is activated by tapping on the respec tive line It is provided with a red background and marked with a check mark The current state of illumination is displayed how ever the operating fields of the manual light control are depicted grey Once the illumination scenario has been activated a manual intervention can be carried out immediate ly for this see chapter Manual setting of the room i...

Страница 74: ...s options are there on the sensor The detection range of the Steinel Quattro HD can be adjusted via a small thumb wheel on the back of the sensor Which settings options are there on the sensor via the software Via the software the shut off delay for the presence detection the value of the constant light control and the general detection area of the sensor can be set How large is the detection area...

Страница 75: ...y push buttons can I connect to a push button coupler A maximum of 4 push buttons can be connected per push button coupler Do I have to connect a push button coupler if I only need a single push button A single push button can be connected directly to the LiveLink controller For this terminal S on the controller is planned for What does DALI mean DALI Digital Addressable Lighting Interface is an i...

Страница 76: ...FAQ Page 76 77 ...

Страница 77: ... 19 60 D 59753 Arnsberg Tel 49 29 32 3 01 0 Fax 49 29 32 3 01 3 75 sales trilux com www trilux com TRILUX LlGHTING LlMITED TRILUX HOUSE Winsford Way Boreham Interchange Chelmsford Essex CM2 5PD Tel 44 12 45 46 34 63 Fax 44 12 45 46 26 46 info co uk trilux com www trilux com ...

Отзывы: