background image


Using AirProjector Client


32


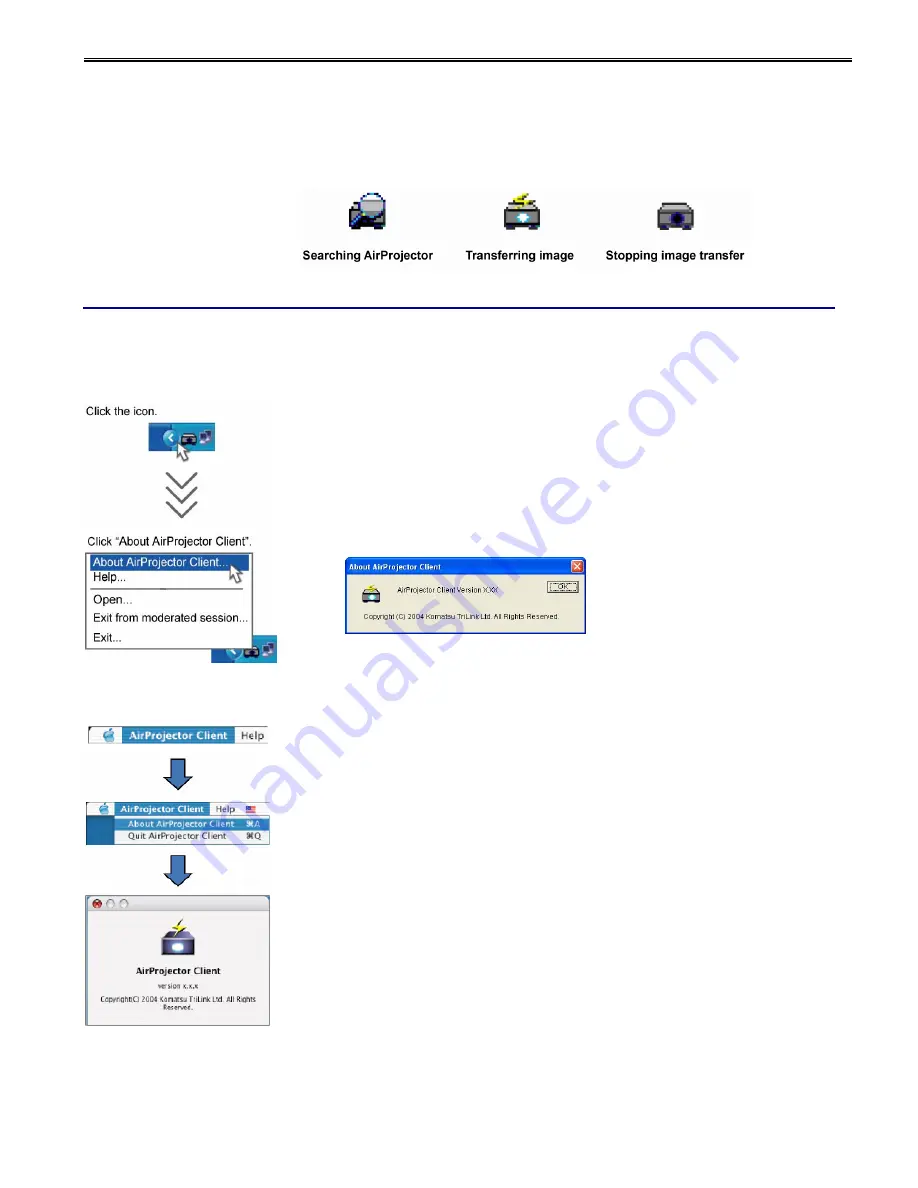
Display of Icon (For Windows only) 

While AirProjector Client is operating, its icon will appear in the task tray. 
The icon display changes according to the operating status: while AirProjector is being 
searched, while an image is being transmitted, and when transmission of the image is 
stopped, as shown below: 


Displaying Version Information 
 

Windows 


1.

  Click the icon in the task tray to display the pop-up menu. 


2.

  Click “About AirProjector Client” on the pop-up menu. 

The version information of AirProjector Client will appear. 


About AirProjector Client 


Macintosh 


1.

  The "AirProjector Client" menu at the upper left of a screen is clicked, and a menu 

is displayed. 


2.

  The version information of AirProjector Client will appear. 


Содержание AirProjector KJ-200

Страница 1: ...User s Manual Thank you for purchasing AirProjector KJ 200 This document contains basic operating instructions for KJ 200 Please read the contents of this User s Manual carefully before using your KJ 200 as well as the reference during the use of the unit and become thoroughly familiar with the feature of KJ 200 ...

Страница 2: ...careful attention and understanding Please become familiar with the contents of this section before proceeding to the main sections DANGER Failure to obey this safety warning may result in serious or fatal personal injury to yourself or to others CAUTION Failure to obey this safety warning may result in costly property damage or personal injury to yourself or to others DANGER and CAUTION labels DA...

Страница 3: ...autions Do not place any objects on the power cable Do not forcefully pull twist or bend the power cord Do not place the power cord near the sources of heat Do not suspend the AC adapter using the power cable Do not keep the power cord stretched out Handle AC adapter with care Failure to comply with this warning may cause fire or electric shock Furthermore maintain following safety precautions Rem...

Страница 4: ...n electrical storm is already in progress do not touch the KJ 200 unit and power adapter Failure to comply with this warning may cause electrical shock Use the electrical outlet which is located away from the devices that have voltage variation or emit electrical noise Do not drop the unit or subject it to other mechanical shocks Clean the unit with care When cleaning the unit and AC adapter alway...

Страница 5: ... or part of the Software except for backup purposes Article 4 Modification of Software The User must not modify or reverse engineer the Software for any reason Article 5 Property rights and copyright The copyright and all other property rights of the Software and its copies belong to Komatsu TriLink or the parties described in the Software in all cases Article 6 Assignment The User must not transf...

Страница 6: ...nsmission 29 Transmitting Images to Multiple AirProjector Units 29 To join the moderated session 29 Checking the Destination of Selected AirProjector 29 Changing Quality of Image 30 Setting as Default Network Adapter 30 Connecting to AirProjector in Different Network Segment 31 Assigning Nickname 31 Using Remote Control Function 31 Display of Icon For Windows only 32 Displaying Version Information...

Страница 7: ... relocate the receiving antenna Increase the separation between the equipment and receiver Connect the equipment into an outlet on a circuit different from that to which the receiver is connected Consult the dealer or an experienced radio TV technician for help FCC WARNING Changes or modifications not expressly approved by the party responsible for compliance could void the user s authority to ope...

Страница 8: ...d follow the steps below Checking Package Contents The package of the KJ 200 contains the following items When unpacking the package please be sure that all items in the following list are included If any part is missing consult the distributor where you purchased the product Main unit AC adapter CD ROM Quick Installation Guide Ceiling Mount Bracket Caution Do not use any AC adapter other than the...

Страница 9: ...1280 x 1024 and also support a 16 bit 65 536 colors or 24 32 bit 16 770 000 colors color setting Analog RGB settings of projector Display resolution Horizontal scanning frequency Hz Vertical scanning Frequency Hz Refresh rate VGA 640 x 480 31 469 59 940 SVGA 800 x 600 37 879 60 317 XGA 1024 x 768 48 363 60 004 SXGA 1280 x 1024 63 981 60 020 Unsupported Applications For Windows OS Applications usin...

Страница 10: ...light up for several seconds after power is on POWER LED Lights up green when power is on STATUS LED Lights up orange when a packet is received ERROR LED Lights up red when an error occurs RGB output port Used to connect an RGB cable Serial output port Used to connect a serial cable DC connector Used to connect the DC plug of the AC adapter TEST switch Press to reset the AirProjector to the factor...

Страница 11: ...ale Mini D sub 15 pin on AirProjector and connect the other end to the RGB port of the projector Point The following marks are printed on the back of the KJ 200 RGB output port Serial output port 2 Turn on the power to your projector 3 Set the Input mode of the projector to Analog RGB Point Refer to the owner s manual of the projector for how to set the Input source 4 Connect the DC plug of the AC...

Страница 12: ... into the CD ROM drive of your PC 2 The AirProjector Client installation program in the CD ROM will start up automatically displaying the Software License screen Read the contents on the screen If you agree with the contents check the Agreed radio button and click OK 3 When the main screen appears click KJ 200 Client The Install AirProjector Client icon will appear Click the icon to start installa...

Страница 13: ...OM drive icon Then double click AirProjector Client pkg 3 The Installer window will appear and subsequently the window describing the system requirements for AirProjector Client will appear If you agree with the statement click on Continue 4 If only you are agreeing with the terms in Software End User License Agreement click Continue and then click Agree 5 Specify the hard disk to which the applic...

Страница 14: ...icon Point An IEEE802 11b g wireless LAN adapter is required as the network adapter The following error message appears if the network adapter is not installed properly or not at all This message does not appear if the network adapter is operating normally Click OK to exit AirProjector Client The status of the network adapter that is installed in the PC can be checked with the device manager If th...

Страница 15: ...e main screen is disabled until the AirProjector search screen disappears 6 If AirProjector cannot be found the message will appear as shown on the left Click OK to close the message and display the main screen 7 Click Quick Setup on the main screen 8 A confirmation message appears prompting whether to change the wireless LAN settings of the PC to match the factory default settings of AirProjector...

Страница 16: ...available AirProjectors will be listed on the main screen Select the desired AirProjector from the list and click the Real Time Capture button The initial configuration of AirProjector is completed when the screen image of your PC is displayed on the projector Caution AirProjector Client may not be able to detect KJ 200 if the firewall feature in some PC virus detection programs is running To use ...

Страница 17: ...ity Point An IEEE802 11b g wireless LAN adapter is required as the network adapter The following error message appears if the network adapter is not installed properly or not at all This message does not appear if the network adapter is operating normally Click OK to exit AirProjector Client The status of the network adapter that is installed in the PC can be checked with the device manager If the...

Страница 18: ...ies Double click the Local Area Connections icon to display the Local Area Connection Status window and click Properties 3 Click to select Internet Protocol TCP IP from the Local Area Connection Properties window Then click Properties to display the Internet Protocol TCP IP Properties window 4 On the Internet Protocol TCP IP Properties window make the following settings and then click OK Click to ...

Страница 19: ...click Launch AirProjector Client icon 7 When AirProjector searching is complete the available AirProjectors will be listed on the main screen Select the desired AirProjector from the list and click the Real Time Capture button The initial configuration of AirProjector is completed when the screen image of your PC is displayed on the projector Caution AirProjector Client may not be able to detect K...

Страница 20: ...con to display the Network window 3 On the Network window click to select the TCP IP for your wireless LAN adapter and then click Properties to display the TCP IP Properties window 4 On the TCP IP Properties window make the following settings and then click OK Click to select Specify an IP address Set the IP address and Subnet mask as follows IP Address 169 254 100 1 Subnet Mask 255 255 0 0 ...

Страница 21: ...nt from Main Menu and click Launch AirProjector Client icon 7 When AirProjector searching is complete the available AirProjectors will be listed on the main screen Select the desired AirProjector from the list and click the Real Time Capture button The initial configuration of AirProjector is completed when the screen image of your PC is displayed on the projector Caution AirProjector Client may n...

Страница 22: ... Click AirProjector Client icon in Komatsu TriLink folder AirProjector Client folder 3 Main screen will appear and subsequently will begin searching for AirProjector units in the proximity 4 Upon completing the search the main screen will display a list of available AirProjector units in the area Select a unit from the list and click Real time Capture button If the image on your Macintosh screen a...

Страница 23: ... devices communicate with each other via a wireless LAN access point In Infrastructure mode an access point serves as a gateway between wireless and wired networks allowing the devices on both sides to communicate with each other All devices in Infrastructure mode are associated with the SSID of the access point Projecting Image in Infrastructure Mode To project images in Infrastructure mode the w...

Страница 24: ...or Setting button on the ADVANCED SETTINGS screen to display the Web based configuration screen Caution AirProjector Client may not be able to detect KJ 200 if the firewall feature in some PC virus detection programs is running To use AirProjector Client disable the firewall feature temporarily 4 Configure wireless settings of AirProjector to match the settings in the access point From Advanced Se...

Страница 25: ...n will appear Select the AirProjector to be connected from the list on the main screen Click the Real Time Capture or One Shot Capture button The screen image of the PC will be projected from the projector AirProjector Client for Macintosh does not have Quick Setup button ...

Страница 26: ...rojector Client icon in Komatsu TriLink folder AirProjector Client folder Starting AirProjector Client directly from the CD ROM Windows 1a Insert the CD ROM supplied with AirProjector into the CD ROM drive of your PC 1b The AirProjector Client startup program in the CD ROM will start up automatically displaying the Software License screen Read the contents on the screen If you agree with the conte...

Страница 27: ...rProjector Client may not be able to detect KJ 200 if the firewall feature in some PC virus detection programs is running To use AirProjector Client disable the firewall feature temporarily Main Screen of AirProjector Client The names and functions of the buttons and items on the main screen of AirProjector Client are shown below AirProjector Client for Macintosh does not have Quick Setup button ...

Страница 28: ...uested again while this application is being executed Caution If the password is protected in the screen saver settings of Windows XP the real time capture operation is stopped while the screen saver is operating Transmitting Still Images One Shot Capture One shot capture is used to project an instant screen image of the PC 1 Click to select the target AirProjector from the list on the main screen...

Страница 29: ...Projector Select multiple AirProjectors from the list on the main screen by pressing the Ctrl key To select multiple AirProjector units from the list press and hold Ctrl key while selecting multiple units For Macintosh computer press and hold Command key while selecting the units from the list To join the moderated session Join Moderated Session button will allow participants to join the moderated...

Страница 30: ...either Faster Speed or Better Quality on this screen Faster Speed is selected by default Setting as Default Network Adapter The network adapter you are using can be set as the default network adapter The network adapter currently being used is set as the default network adapter by checking Set as Default Network Adapter on the ADVANCED SETTINGS screen When AirProjector Client is started next time ...

Страница 31: ...the PC to which AirProjector is connected The nickname set here will appear on the standby screen of the projector when the Blink button is clicked 1 In Create Nickname on the ADVANCED SETTINGS screen enter a nickname up to sixteen alphanumeric characters in the text box Using Remote Control Function To use the remote control function AirProjector and the projector must be connected in advance usi...

Страница 32: ...ted and when transmission of the image is stopped as shown below Displaying Version Information Windows 1 Click the icon in the task tray to display the pop up menu 2 Click About AirProjector Client on the pop up menu The version information of AirProjector Client will appear About AirProjector Client Macintosh 1 The AirProjector Client menu at the upper left of a screen is clicked and a menu is d...

Страница 33: ...irProjector Client will appear Macintosh 1 The help in the menu at the upper left of a screen is clicked and a menu is displayed 2 Click AirProjector Client Help on the menu Help of AirProjector Client will appear Activating Main Screen Windows 1 Click the icon in the task tray to display the pop up menu 2 Click Open on the pop up menu The main screen is activated ...

Страница 34: ...ession Refer to Moderator Feature User s Guide for more detailed instructions on how to use this feature Exiting AirProjector Client Windows 1 Click the icon in the task tray to display the pop up menu 2 Click Quit AirProjector Client on the pop up menu AirProjector Client will be exited Macintosh 1 The AirProjector Client menu at the upper left of a screen is clicked and a menu is displayed 2 Cli...

Страница 35: ...indows Start button Programs AirProjector Client AirProjector Client If you are launching AirProjector Client from the CD ROM click KJ 200 Client from Main Menu and click Launch AirProjector Client icon For Macintosh computer click AirProjector Client icon in Komatsu TriLink folder AirProjector Client folder 3 Select the AirProjector to be configured from the list on the main screen 4 Click the Ai...

Страница 36: ...anced Settings 36 Configuration Screen Format The configuration screen consists of a menu frame left and display field right When the item is selected in the menu the corresponding information will appear ...

Страница 37: ...er is displayed Wireless Mode Displays the wireless communication mode Wireless Link Status Displays the link connection status of the wireless communication mode WEP Encryption Displays the setting status of WEP encryption Current SSID Displays the current SSID Current Channel Displays the current wireless channel in which the AirProjector unit is operating Data Transfer Rate Displays the current...

Страница 38: ...HCP or BOOTP is selected in IP Configuration Method Subnet Mask Set an appropriate subnet mask When DHCP or BOOTP is selected in IP Configuration Method it is not necessary to set a subnet mask manually since the subnet mask is automatically set according to the setting status of DHCP server or BOOTP server Gateway Address Set an appropriate gateway address When DHCP or BOOTP is selected in IP Con...

Страница 39: ...setting status of DHCP server or BOOTP server Gateway Address Set an appropriate gateway address When DHCP or BOOTP is selected in IP Configuration Method it is not necessary to set a gateway address manually since the gateway address is automatically set according to the setting status of DHCP server or BOOTP server If the data will not be transmitted beyond the router leave the gateway address a...

Страница 40: ...is input in ASCII code or HEX hexadecimal number 0 to F can be selected Key Index 1 Key Index 2 Key Index 3 Key Index 4 Set a WEP key The number of characters of a WEP key differs depending on the setting of WEP and the type of input ASCII or HEX as follows WEP of 64 40 bits 5 bytes ASCII 10 bytes HEX WEP of 128 104 bits 13 bytes ASCII 26 bytes HEX WEP of 152 128 bits 16 bytes ASCII 32 bytes HEX C...

Страница 41: ... AirProjector cannot communicate properly In this case restore factory default settings and start over the configuration refer to 10 Restore Factory Default Settings Point Up to four WEP keys can be set Only the one whose radio button is checked is valid Make both the values of the key index to be validated and the WEP key the same as those of the PC and wireless LAN access point Use key index 1 f...

Страница 42: ...wise no image will be projected from the projector Standby Screen Display Set how to display the standby screen from Enable Disable or Customize Status Display Set Enable or Disable the task bar to be displayed in the standby screen Select from Full view Simplified view or Hide Displayed Cursor Shape Set Fixed or Variable mouse cursor shape Standby Screen File Downloading Specify the JPEG file to ...

Страница 43: ... admin password to be set Please enter a password with up to 16 alphanumeric characters The entered password will be masked with Re enter New Admin Password Re enter the new admin password set in Enter New Admin Password Please enter a password with up to 16 alphanumeric characters The entered password will be masked with User Password Settings Page A user password is necessary for transferring im...

Страница 44: ...whether to allow interruptive connection by other clients during real time capture Select Enable or Disable Baud rate Specify the baud rate for serial transmission Select Disable 2400 bps 4800 bps 9600 bps 19200 bps 38400 bps or 57600 bps Character length Specify the data length size for serial transmission Select 7 bits or 8 bits Parity Specify the parity for serial transmission Select Disable Od...

Страница 45: ...2 Power OFF Command Name Up to 16 bytes ASCII Command Up to 128 bytes ASCII Command description examples To set ABC describe ABC in Command To set 0x11 describe 11 in Command To set in ASCII describe in Command Several commands can be described sequentially Viewing Komatsu TriLink Home Page Clicking Komatsu TriLink on the menu jumps to the main website of Komatsu TriLink Ltd However your PC must b...

Страница 46: ...ions Standby Screen Format The standby screen consists of an image display section and status indications Any image can be selected to be displayed in the image display section The status indications on the task bar on the bottom of the standby screen display information on current configuration and communication status Point For Hi security version the model will indicate Hi Scr ...

Страница 47: ...fter approx 10 seconds all LEDs flash 5 Upon verifying that all the LEDs are flashing release the TEST switch Factory Default Settings Parameter Factory Default Settings IP Configuration Manual IP Address 169 254 Subnet Mask 255 255 0 0 Gateway Address 255 255 255 255 ARP PING Enable Wireless Mode 802 11b Network Type AdHoc SSID WIRELESS all uppercase Channel 11 WEP Disable Refresh rate SXGA 1280 ...

Страница 48: ...me field and click OK The MS DOS Prompt command prompt window will be opened 4 Enter the arp command as follows and execute C arp s 192 168 0 156 00 c0 6f 00 12 34 IP address to be set to AirProjector MAC address of AirProjector Every two characters are delimited by hyphen The MAC address is printed on the label on the rear panel of AirProjector 5 Enter the ping command as follows and execute C pi...

Страница 49: ...tor AirProjector Client and click AirProjector Client If you are launching AirProjector Client from the CD ROM click Launch AirProjector Client icon when Autorun displays the main window For Macintosh computer click AirProjector Client icon in Komatsu TriLink folder AirProjector Client folder 3 Select AirProjector unit from the list Click Configure button in Advanced Settings window This will auto...

Страница 50: ...ess settings for your wireless adapter to the same settings as the access point Point Refer to the user guide for your wireless adapter on how to properly configure the adapter 7 Launch AirProjector Client again Wireless Mode Change to Infrastructure SSID Set the SSID as same as the one set in the access point WEP Encryption Enabled 802 1x LEAP LEAP username Enter the username set in the access po...

Страница 51: ...t to analog RGB Applications using Direct X and motion picture reproduction such as MS Office Assistant and DVD are not supported Check if the display device currently connected to KJ 200 supports the display resolution set in your PC Symptom Images can be transferred but the Web based configuration screen is not displayed Check Check the version and setting of the browser Refer to Web Browser Set...

Страница 52: ... method of compressing the image of AirProjector Client Refer to Changing Quality of Image to Be Projected in 7 Using AirProjector Client Check the system requirements of the PC Refer to 1 Overview of AirProjector Symptom The mouse cursor movement is not smooth during real time capture Check Change the Quality setting in Advanced Settings to Faster Speed The factory default setting is Faster Speed...

Страница 53: ...1 Mbps auto switching IEEE802 11g 6 9 12 18 24 36 48 54 Mbps auto switching Security 802 1x LEAP configurable with Hi Security version only WEP64 40 bits 128 104 bits 152 128 bits SSID Power Input Power 100 to 120 VAC 50 60 Hz AC adapter included Power Consumption 8 5 W Projector Interface External Interface Analog RGB output port Min D sub 15 pins female Serial output port D sub 9 pins male Envir...

Страница 54: ...ng to attach protection circuit to this equipment or any system using this equipment the circuit should be placed outside the equipment or the system We shall not be responsible for the changes that are made to the inside of the equipment Trademarks and Copyright Information Windows Windows 98 Windows Me Windows 2000 Windows XP are U S registered trademarks of Microsoft Corporation Macintosh and M...

Страница 55: ...KJ 200 User s Manual April 26 2004 1st edition September 13 2004 2nd edition Created copyrighted and published by Komatsu TriLink Ltd No part of this manual may be copied or reproduced ...

Страница 56: ...The contents of this manual are subject to change without prior written notice ...

Отзывы: