
42
6-4
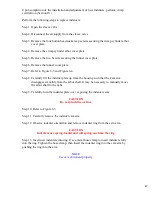
TRANSFER TIP (CONT.)
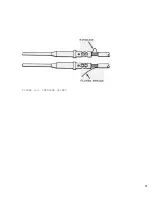
Step1 Inspect the transfer tip to see if a contact is present but does not appear
seated. If a contact is visible, open the sleeve valve. Remove the
contact from the transfer tip. Close the sleeve valve. Verify the
transfer tip is "the one designated for the contact being used.
or
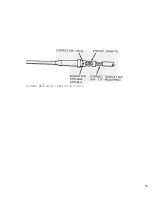
Step 2. Verify the alignment between the transfer tip and drop tube. If
alignment appears off, consult the factory or you~ local area service
representative for further instructions.
or
Step 3. If contact is fully seated in proper transfer tip, verify transfer tip
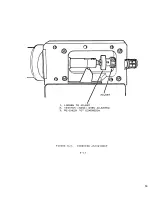
sensor 8-6 is operational by performing the following:
A - Turn air off.
B - Remove contact from transfer tip.
C - Remove Power Pack from outlet.
D - Remove control unit cover. E - Turn air on.
F - Locate 8-6 and vacuum line.
G - Fully pinch vacuum line repeatedly and verify if 8-6 is switching on and
off. An audible click should be heard from the switch each time it is
activated.
Please Note:
Should the work environment be too noisy for an effective audible check, an
electrical meter may be used instead. (Top tab is common, bottom tab is
normally open position.)
If switch S-6 fails the above test, consult factory for adjustment instructions.
No adjustments should be attempted prior to factory instructions.
Содержание PORTA TAC E Series
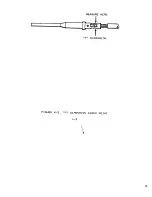
Страница 7: ...7 FIGURE 1 1 PORTA TAC CRIMPER FRONT VIEW ...
Страница 8: ...8 FIGURE 1 2 PORTA TAC CRIMPER WITH MAGAZINE ...
Страница 9: ...9 FIGURE 1 3 PORTA TAC CRIMPER SIDE VIEW ...
Страница 11: ...11 ...
Страница 17: ...17 ...
Страница 26: ...26 FIGURE 4 1 CRIMP CYLINDER ARBOR OPEN ARBOR COVER PLATE REMOVED ...
Страница 27: ...27 FIGURE 4 1 CRIMP CYLINDER ARBOR CLOSED ARBOR COVER PLATE REMOVED ...
Страница 30: ...30 FIGURE 4 3 CRIMP INSPECTION POINTS ...
Страница 31: ...31 FIGURE 4 4 IMPROPER CRIMPS ...
Страница 32: ...32 ...
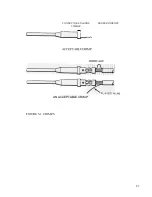
Страница 37: ...37 CONDUCTOR STARNDS PROPER INDENTS VISIBLE ACCEPTABLE CRIMP BIRDCAGE UNACCEPTABLE CRIMP FIGURE 5 1 CRIMPS ...
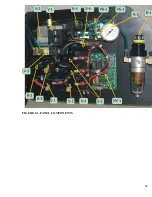
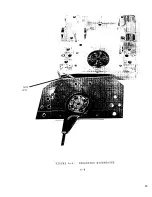
Страница 40: ...40 FIGURE 6 1 PANEL COMPONENTS ...
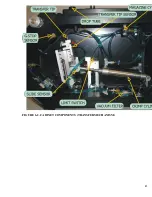
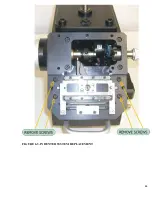
Страница 41: ...41 FIGURE 6 2 CABINET COMPONENTS TRANSFER MECHANISM ...
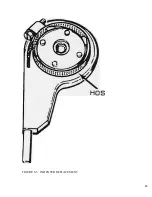
Страница 44: ...44 FIGURE 6 3 INDENTER SYSTEM REPLACEMENT ...
Страница 45: ...45 ...
Страница 46: ...46 FIGURE 6 5 INDENTER REPLACEMENT ...
Страница 50: ...50 ...
Страница 53: ...53 ...