TRENDnet TV-IP742SIC Скачать руководство пользователя страница 23


© Copyright 2013 TRENDnet. All Rights Reserved.


TRENDnet User’s Guide


TV-IP742SIC 

21


In the left side of this page, there is a 

Category

 menu. Except for 

Motion Detection

, and 

Sound Detection

, within each category, there are multiple pages available that are used 

to configure different types of features available on this camera. 
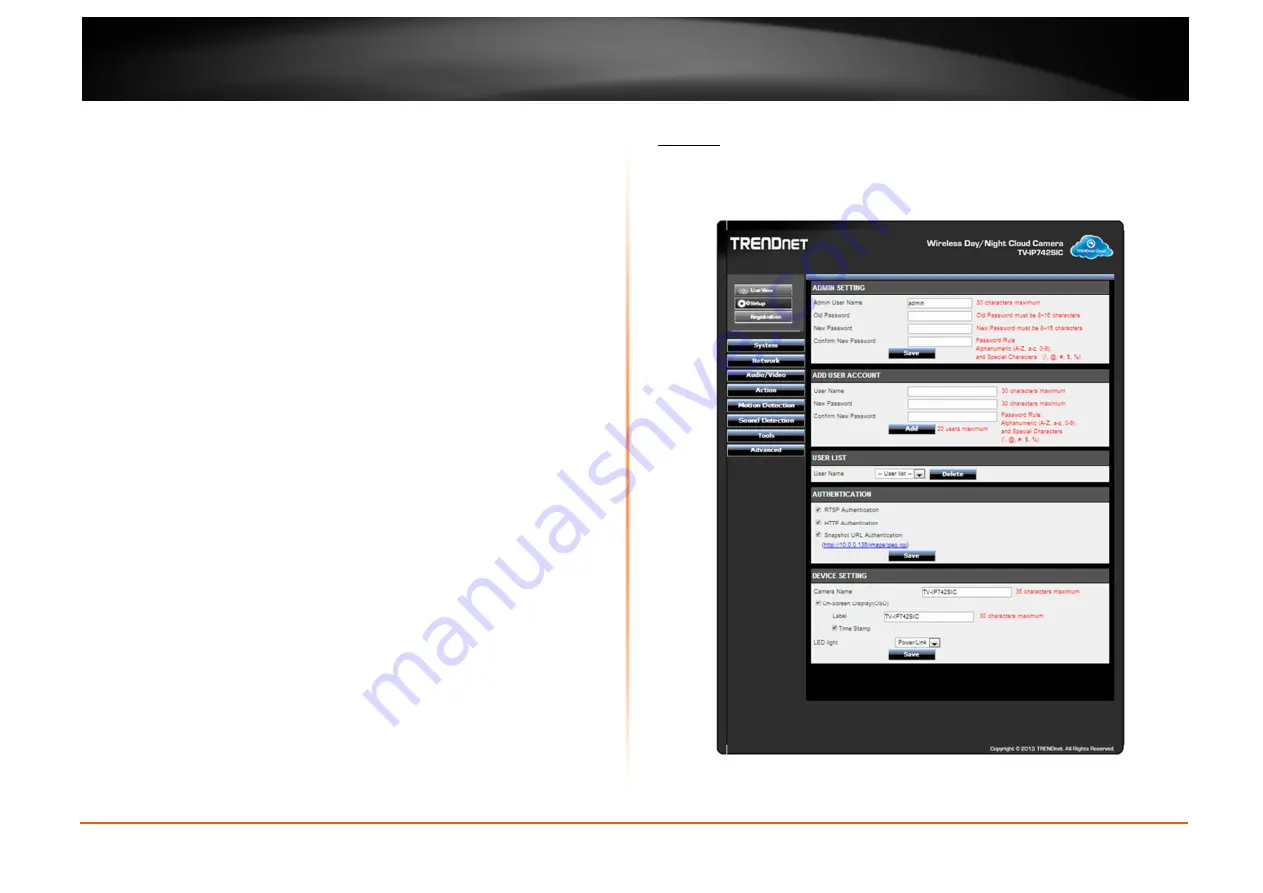
 

System 

The first category option available is 

System

. In the 

System

 category we can  configure 

administrative settings and the date and time settings. 


Содержание TV-IP742SIC

Страница 1: ...Cover Page TV IP742SIC Wireless Day Night Cloud Camera...

Страница 2: ...Interface 10 Configuration 16 Main Web User Interface 18 Setup 20 System 21 Admin 22 Time and Date 23 Network 24 Network 25 Direct Connection 25 Router Connection Configuration 25 In the Router Connec...

Страница 3: ...g mounting kit is included and the camera s white housing blends into most environments Wide Platform Support The IP camera supports TCP IP networking HTTP and other Internet related protocols and can...

Страница 4: ...onnected to a network 3 IR LED Built in IR LED for night vision uses 4 Camera Lens The camera lens 5 Night Day Sensor Detects the light source to turn IR on or off 6 Microphone Built in microphone for...

Страница 5: ...router which supports WPS follow the steps below 1 Attach the Power Supply Attach the included power supply to the DC 5V 1 0A power adapter on the rear panel of the camera and then connect it to a wa...

Страница 6: ...ettings are turned off and you have a wi fi network card enabled 3 Look under network available devices for the SSID TRENDnet742 and connect to the device 4 Using your web browser connect to IP addres...

Страница 7: ...ghts Reserved TRENDnet User s Guide TV IP742SIC 5 To remove the camera from the plate using a screwdriver insert the screwdriver into the shallow indentation at the front of the base and wall plate an...

Страница 8: ...a similar URL http 73859116 cam trendnetcloud com on the label Write it down 2 Open your browser type the URL listed at the back of your camera and hit Enter to connect to the camera s live stream Ple...

Страница 9: ...ick the checkbox and click next The next step is changing the username and password Enter a username and the existing password Enter the new password and re type it to confirm it Click OK to complete...

Страница 10: ...ode The camera now displays the Cloud view via the TRENDnet cloud service If you look under the Live View you will notice Mode 1 The first login method is for MODE 1 If you wish to access the other mo...

Страница 11: ...configuration and management options but not an Advanced Configuration mode Cloud Mode 3 Mode 3 indicates the camera is connecting to the Internet or local network through a firewall This mode offers...

Страница 12: ...his button to toggle between Sound and Mute 6 Microphone Toggle between On Off 7 Snapshot take a snapshot 8 Start recording Toggle between Start Stop 9 Configure settings in the cloud service 10 Profi...

Страница 13: ...Select your video encoding type from the drop down list 3 Resolution Select the video resolution size from the drop down menu 4 Frame Rate Select the frame rate speed from the drop down menu 5 Encodin...

Страница 14: ...ider to adjust the hue 5 Mirror Click the checkbox to mirror the image 6 Flip Click the checkbox to flip the image 7 Black and White Click the checkbox to change the image to black and white Click OK...

Страница 15: ...nfiguration Manual Recording and Snapshot Set Folder Storage Click the button to Select the directory you want to save your recordings and images Once you have highlighted the folder you wish to use c...

Страница 16: ...y Admin can use this option in Mode 1 Advanced Camera Settings Click the Settings button to be redirected your IP camera This configuration method is similar to the one you already have locally if you...

Страница 17: ...ettings you want to view and create a profile Zoom in and zoom out Click this icon to zoom in and zoom out Each camera selection appears as you select a viewing option or view the aspect ratio using t...

Страница 18: ...nsult the DHCP client list on the DHCP server However if there is no DHCP server available the static default IP address of this camera is 192 168 30 30 These initial steps are using Internet Explorer...

Страница 19: ...P742SIC 17 After the add on was successfully installed the Live View video feed will be displayed For a non internet explorer browser download the plugin to a folder on the local PC and run the downlo...

Страница 20: ...stream control application will be installed Note Make sure all Internet browsers are closed during this installation Click the Close button to finish the installation Main Web User Interface After su...

Страница 21: ...ording Day Mode will be displayed when the camera is supplying video feed in a daylight normal light environment Night Mode will be displayed when the camera is supplying video feed in a night time lo...

Страница 22: ...feed from the camera Click this icon to enable or disable the audio feed to the camera Click this icon to manually toggle the video feed between the Day and the Night Modes Click one of these options...

Страница 23: ...nu Except for Motion Detection and Sound Detection within each category there are multiple pages available that are used to configure different types of features available on this camera System The fi...

Страница 24: ...an configure the user account s login credentials that will be used to login to the camera s Web UI In the User Name field enter the login username that will be used for this camera In the New Passwor...

Страница 25: ...mera has power and a network link When selecting the Off option the LED will be turned off When selecting the Blinking option the LED will rhythmically blink Time and Date In the Time Configuration se...

Страница 26: ...nually section we can configure the following Tick the Setup Date and Time Manually option to manually configure the date and time settings for this camera Select the Year Month Day Hour Minute and Se...

Страница 27: ...spaces provided In the Port Settings part enter the HTTP Port and RSTP Port numbers used In the UPnP part tick the UPnP option to enable the UPnP feature on this camera Tick the UPnP Port Forward opti...

Страница 28: ...l of IP addresses and this address is used only for the duration of that specific connection This method of dynamically assigning addresses extends the usable pool of available IP addresses A dynamic...

Страница 29: ...Resolution size option from the drop down list Resolutions that can be selected are 1280x720 640x352 320x176 and 160x80 The resolution of 1280x720 is only available on profiles 1 and 3 Select the Fra...

Страница 30: ...to permanently set the color and Black White operations Also note even when the camera is set to color mode it will switch to Black White night vision if there is no longer enough ambient light to su...

Страница 31: ...switch the IR LEDs on earlier when the area becomes darker Selecting the sensitivity level closer to the Darkest option will switch the IR LEDs on later when the area becomes darker After selecting th...

Страница 32: ...o flip the video image horizontally Tick the Flip option to flip the video image vertically for upside down mounting Select the video Frequency value from the drop down list Select to enable or disabl...

Страница 33: ...will change depending on the selections made After selecting the Motion option as the Trigger by event the following can be configured Selecting Motion will tell the camera only to record when motion...

Страница 34: ...hot will be taken at every interval configured Only Profile 3 can be used for this selection When selecting the Video option the following can be configured Selecting this option will tell the camera...

Страница 35: ...en to record over the oldest recordings Click the Apply button to apply the modifications made Video Clip This camera allows users to record video clips and then send it to an FTP server or email the...

Страница 36: ...an be configured Selecting Sound will tell the camera only to record when sound is detected Tick the Schedule option to only record video when sound is detected at specific times of the week Tick the...

Страница 37: ...and STARTTLS Click the Test button to test the E mail connection Click the Apply button to apply the modifications made Snapshot Snapshots can be taken by this camera based on the trigger by event In...

Страница 38: ...End times After selecting the Always option as the Trigger by event the following can be configured Selecting Always will tell the camera to always take snapshots After selecting the Sound option as t...

Страница 39: ...ble the passive mode feature Click the Test button to test the FTP connection After selecting E mail as the Target the following will be available Enter the Recipient E mail Address SMTP Mail Server a...

Страница 40: ...ith Red Blocks When the Erase motion area option is selected in the live video feed block use the left mouse button to erase the area that was used for motion detection Enter the Sensitivity value in...

Страница 41: ...of this camera up to a file that will be saved on the local computer Click the Choose File button to navigate to the backed up configuration file on the local computer and then click the Restore butto...

Страница 42: ...ction click the Choose File button to navigate to the saved firmware file located on the local computer and then click the Upload button to upload that firmware to the camera The camera will then use...

Страница 43: ...about the camera s configuration Log In the Current Log section we can view a list of system log entries that was generated based on events that occurred during the runtime of this camera Click the C...

Страница 44: ...amic DNS page and Enable DDNS Select the Dynamic DNS provider from the Server Address drop down list and enter the Host Name User Name and Password information in the spaces provided 7 Go to Access Vi...

Страница 45: ...uter s user manual for more detailed information about the Virtual Server Some routers might use Port Forwarding or Special applications for this function The setup steps should be very similar 8 From...

Страница 46: ...WPS connection Power Consumption Max 5 Watts Power Input 100 24 0 V AC 1 A 50 60 Hz Output 5 V DC 1 A external power adapter Dimension L x H 87 8 x 70 mm 3 46 x 2 76 in Weight 97 g without bracket Op...

Страница 47: ...oding H 264 MPEG4 Resolution 640x480 320x240 160x112 Max frame rate 30fps RTSP http ipcamera_ip play2 sdp Profile 3 Encoding JPEG Resolution 640x480 320x240 160x112 Max frame rate 30fps JPEG Quality l...

Страница 48: ...s appear on the image from the camera It could be that the CMOS sensor a square panel situated behind the lens that measures the light signals and changes it into a digital format so your computer can...

Страница 49: ...20cm between the radiator your body This transmitter must not be co located or operating in conjunction with any other antenna or transmitter Europe EU Declaration of Conformity This device complies...

Страница 50: ...ce does not off power management functionality such as Off mode or Standby mode IMPORTANT NOTE NCC AND FCC Warning Statement FOR COUNTRY CODE SELECTION USAGE WLAN DEVICES Note This country code select...

Страница 51: ...5 CE Latviski Latvian Ar o TRENDnet deklar ka TV IP742SIC atbilst Direkt vas 1999 5 EK b tiskaj m pras b m un citiem ar to saist tajiem noteikumiem Lietuvi Lithuanian iuo TRENDnet deklaruoja kad is T...

Страница 52: ...mited to duty tax and other fees WARRANTIES EXCLUSIVE IF THE TRENDNET PRODUCT DOES NOT OPERATE AS WARRANTED ABOVE THE CUSTOMER S SOLE REMEDY SHALL BE AT TRENDNET S OPTION REPAIR OR REPLACE THE FOREGOI...

Страница 53: ......

Отзывы: