6.
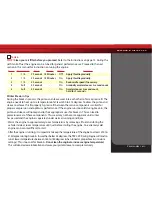
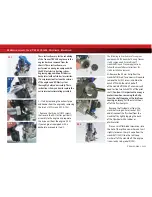
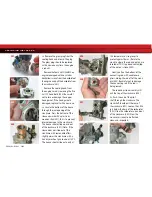
Flush the crankcase and bearings
out with out with denatured alcohol or
electric motor spray. Dry the crankcase
with compressed air (601).
Caution: Do not let the compressed air
spin the bearings and always use eye
protection when using compressed air.
Inspect the crankcase and bearings
for damage or missing parts. Make sure
that the bearing cages are not broken
and check for corrosion inside of the
crankcase. The bearings should feel
smooth and have little play. Make sure
the bearings spin freely and that there
are no particles or grit in them. Replace
the bearings if there are any signs of
damage. Inspect the exhaust O-ring
gasket and the backplate O-ring gasket
for tears (602). Replace these O-rings
if needed.
7.
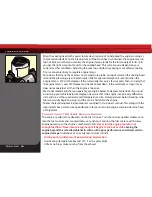
Apply a few drops of machine oil or
after-run oil to the bearings. Inspect the
crankshaft for corrosion and also check
for scratches or score marks around the
intake port of the crankshaft (see arrow).
Check the crank pin for wear (701). The
connecting rod should fit and rotate
smoothly on the crank with no play
between the rod and the crank pin. If
there is play between a NEW connecting
rod and the crank pin then the crank pin
is worn and the crankshaft will need to
be replaced.
Important:
Do not reuse a damaged
or worn crankshaft. This will dramatically
shorten the life of your rebuilt engine.
If there are damaged or worn parts beyond
the piston, sleeve and connecting rod it may
be best to take advantage of the Traxxas
Engine Replacement Program.
8.
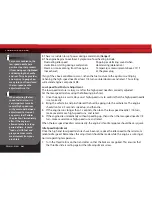
Slide the crankshaft back through the
crank bearings until it stops. Inspect the
carburetor O-rings for damage and the
rubber throttle arm boot for tears (801 & 802).
Unscrew the hi-speed needle all the way
out of the needle housing (803) and flush out
the hi-speed needle housing and the
carburetor body with denatured alcohol or
electric motor spray. Use compressed air to
dry the components.
Remember:
Always
wear safety glasses when using compressed
air to prevent injury. Reinstall the hi-speed
needle into the needle housing and return
the mixture setting back to the factory
recommended break-in setting (four turns
out from fully closed).
Carefully insert the carburetor into
the crankcase until fully seated. While
pressing the carburetor firmly into the
crankcase, tighten the pinch bolt (804).
This process ensures that the upper
O-ring forms a good seal between the
carburetor and the crankcase.
601
602
701
801
803
804
802
TRX 2.5R • 35
REBUILDING THE TRX 2.5R
Содержание TRX 2.5R
Страница 1: ...OWNERS MANUAL ...
Страница 40: ...1 1 00 Klein Road Plano Texas 75074 1 888 TRAXXAS 051007 ...

