background image

EN-49

User’s Manual >>

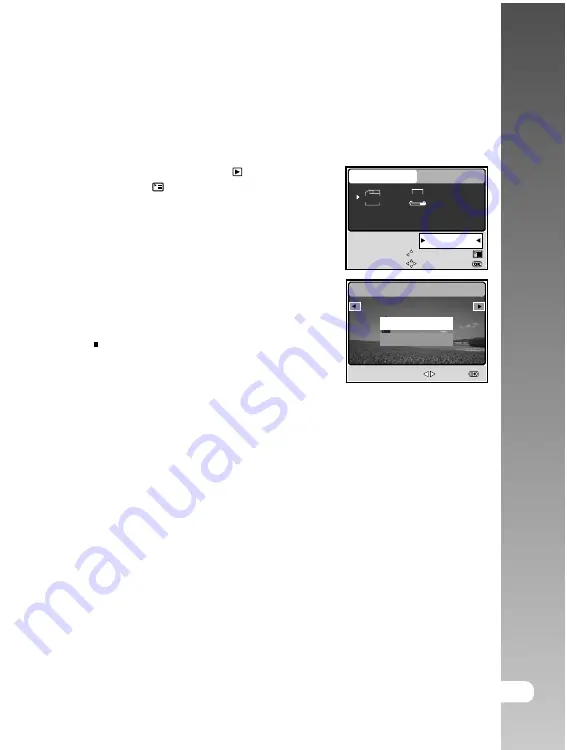
Changing the Camera Startup Screen

This feature lets you specify one of your recorded images as your startup
screen, which will be displayed on the monitor whenever you turn on the camera.

1. Slide the mode switch to [ 

 ].

2. Press the 

 button to enter [PLAY]

menu.

3. Use the 

S

/

T

/

W

/

X

 buttons to select

[CHANGE LOGO],  then press the 

OK

button.

4. Use the 

W

/

X

buttons to select the

desired image you want to set as the

startup screen.

5. Use the 

S

/

T

 buttons to select [EXECUTE],

then press the 

OK

 button to confirm.

The new screen will welcome you the

next time you turn on the camera.

CHANGE LOGO

SELECT IMAGE :

SET :

EXECUTE

CANCEL

SELECT ITEM:

EXIT:

ENTRY:

CHANGE LOGO

EXECUTE

LOGO

DPOF

PLAY

SETUP

SELECT PAGE:

Содержание Slimline X5

Страница 1: ...communications However there is no guarantee that interference will not occur in a particular installation If this equipment does cause harmful interference to radio or television reception which can...

Страница 2: ...y be different from those described in this manual This is due to the fact that different retailers often specify slightly different product inclusions and accessories to suit their market requirement...

Страница 3: ...cause fire or electric shock For repair or internal inspection ask the store of purchase Use the supplied AC power adapter only with the indicated power supply voltage Use with any other power supply...

Страница 4: ...ra is a precision instrument Do not drop it strike it or use excessive force when handling the camera This might cause damage to the camera Do not use the camera in humid steamy smoky or dusty places...

Страница 5: ...rmance and lifetime we recommend that you fully charge the battery and discharge it for at least one complete cycle before use The battery may feel warm after long period of continuous use of the came...

Страница 6: ...ng the Date and Time 21 Choosing the Screen Language 22 Formatting an SD Memory Card or Internal Memory 23 Setting Image Resolution and Quality 25 CAMERA MODE 25 Capturing Images 26 Setting the Scene...

Страница 7: ...54 Step 2 Connecting the digital still camera to your computer 55 Step 3 Downloading images videos or voice files 56 CONNECTING TO A PICTBRIDGE COMPLIANT PRINTER 59 USING THE DIGITAL STILL CAMERA AS...

Страница 8: ...sh An auto flash sensor automatically detects the shooting lighting conditions and determines whether the flash should be used 9MB internal built in memory You may capture and store images without the...

Страница 9: ...r Common Product Components 1 x Traveler Slimline X5 Digital Still Camera 1 x Traveler 256MB SD Memory Card 1 x Traveler Conversion adapter 1 x Traveler AC Adapter Charger 2 x Traveler Rechargeable Li...

Страница 10: ...W YOUR CAMERA Front View 1 2 3 6 7 4 5 8 9 1 Shutter button 2 POWER Power button 3 Flash 4 Mode switch Camera mode Movie mode Playback mode 5 Self timer LED AF auxiliary light 6 Speaker 7 Lens 8 Conve...

Страница 11: ...Zoom out Wide angle button 5 Menu button 6 Delete button 7 Strap eyelet 8 Control buttons 9 Battery SD memory card cover 10 Tripod socket Control Buttons 1 2 3 4 5 1 Flash button S Up button 2 Exposu...

Страница 12: ...nt 6 Adapter indicator Battery power indicator Full battery power Medium battery power Low battery power Virtually no battery power 7 Scene mode AUTO PORTRAIT LANDSCAPE NIGHT SCENE SPORTS MACRO 8 Flas...

Страница 13: ...4 5 9 T W 6 7 8 VGA 3 Playback mode Image Playback 1 Playback mode 2 Frame number 3 SD memory card indicator if present 4 Battery power indicator 5 Image size resolution 6 Camera mode Playback mode Vi...

Страница 14: ...UME T VOLUME 1 2 3 4 5 SELECT FILE AUD_0003 LED Indicators Indicator Status Description Activity 1 The digital still camera is powering up Solid red 2 The digital still camera is in the process of bat...

Страница 15: ...he battery 1 Open the battery SD memory card cover 2 Insert the battery in the correct orientation shown Tilt the battery lock lever in the direction of the arrow and orient the battery so that its la...

Страница 16: ...he AC adapter charger to the DC IN terminal of the conversion adapter 3 Connect the other end of the AC adapter charger to a wall outlet Charging time differs depending on the ambient temperature and...

Страница 17: ...off while transferring files to your computer Perform the steps in the preceding section Charging the Battery Make sure to use only the AC adapter charger specified for the camera Damage caused by th...

Страница 18: ...se the battery SD memory card cover To remove the SD memory card make sure the camera is turned off Press lightly on the edge of the memory card and it will eject Be sure to format an SD memory card w...

Страница 19: ...a certain period of time while the camera is powered on the camera will switch to an idle mode and eventually turn itself off to conserve power The power is turned off automatically when the camera h...

Страница 20: ...switch to 3 Press the X button to select SETUP menu 4 Use the S T W X buttons to select DATE SETUP then press the OK button 5 Press the W X buttons to select the Year Month Day and Time fields To inc...

Страница 21: ...he LCD monitor 1 Press the POWER button to turn on the camera 2 Slide the mode switch to 3 Press the X button to select SETUP menu 4 Use the S T W X buttons to select LANGUAGE then press the OK button...

Страница 22: ...ORMAT then press the OK button 5 Use the S T buttons to select YES then press the OK button to confirm To cancel formatting select NO You should format an SD memory card with the camera before using i...

Страница 23: ...quality perform these steps below 1 Press the POWER button to turn on the camera 2 Slide the mode switch to 3 Press the button The PICTURE menu is displayed 4 Use the S T W X buttons to select SIZE th...

Страница 24: ...ts Still Image The following table shows the approximate images that you can capture at each setting based on an SD card 2560 x1920 SUPER FINE FINE NORMAL 2048 x1536 SUPER FINE FINE NORMAL 1280 x 960...

Страница 25: ...the captured image will be displayed while the image is being recorded onto the memory The LCD monitor darkens in strong sunlight or bright light This is not a malfunction To prevent your images from...

Страница 26: ...s the button The screen of scene mode menu is displayed 3 Use the W X buttons to select the desired scene mode then press the OK button to confirm To cancel the selection and exit from the scene mode...

Страница 27: ...sh is fixed at Select this mode when you want to leave the settings up to the camera to capture images with ease Scene mode Description Select this mode when you want to capture an image that makes th...

Страница 28: ...digital zoom 1 Slide the mode switch to or 2 Compose the image with the zoom button Pressing the T button zooms in on the subject and enlarges the subject on the LCD monitor Pressing the W button prov...

Страница 29: ...b Select FUNCTION with the X button c Select DIGITAL ZOOM with the S T W X buttons and press the OK button d Select ON with the S or T buttons and press the OK button e Press the button to exit from t...

Страница 30: ...ress the POWER button to turn on the camera 2 Slide the mode switch to 3 Press the button The screen of flash mode menu is displayed 4 Use the W X buttons to select the desired flash mode then press t...

Страница 31: ...ll camera as possible Use this mode in the environment that the flash use is prohibited or under the situation that the distance to the subject is too far away for the flash to have any effect The fla...

Страница 32: ...mera 3 Slide the mode switch to 4 Toggle the button to select the desired self timer mode 5 Compose your image and press the shutter button The self timer function is activated and the status of count...

Страница 33: ...exposure value with the S T buttons Press the S button to increase the value Press the T button to decrease the value The setting range of the exposure compensation is as follows 2 0 1 7 1 3 1 0 0 7 0...

Страница 34: ...his setting allows you to set the white balance when capturing images under specific lighting conditions 1 Slide the mode switch to 2 Press the button The PICTURE menu appears 3 Use the S T W X button...

Страница 35: ...ON menu 3 Use the T button to select CAPTURE MODE then press the OK button 4 Use the S T buttons to select CONTINUOUS then press the OK button 5 To exit from the menu press the button The indicator is...

Страница 36: ...e the mode switch to 2 Press the button then use the X buton to select the FUNCTION menu 3 Use the T button to select CAPTURE MODE then press the OK button 4 Use the S T buttons to select AEB A then p...

Страница 37: ...switch to 2 Press the button The PICTURE menu appears 3 Use the T X buttons to select MANUAL WB then press the OK button 4 Point the camera at an enclosed gray card for which you can set the white ba...

Страница 38: ...o view the previous image press the W button To view the next image press the X button Pressing the S T buttons during image playback will rotate the image 90 degrees The S button rotates the image cl...

Страница 39: ...button To enlarge the selected image press the T button To return to normal magnification press the W button The magnification factor is displayed on the LCD monitor 4 To view different portion of th...

Страница 40: ...W X buttons then press the OK button 3 Use the S T buttons to choose the desired number of thumbnail images to be displayed then press the OK button Press the button to exit from PLAY menu 4 Press th...

Страница 41: ...ip is presented by the first frame of the video clip To stop the slide show display press the OK button Resizing an Image You can change the image size of a captured image to one of the following size...

Страница 42: ...e set while composing the scene Optical zoom cannot be used during movie capture 4 Press the shutter button to start recording 5 Press the shutter button again to stop recording The flash and self tim...

Страница 43: ...o playback press the shutter button To stop playback press the OK button Use the T button to start fast reverse playback Use the S button to start fast forward playback The zoom function cannot be act...

Страница 44: ...videos on TV 1 Slide the mode switch to 2 Connect one end of the A V cable to the conversion adapter terminal of the camera If you use the conversion adapter to connect the A V cable insert the conve...

Страница 45: ...cancel the deletion select NO To delete a single image video clip in playback mode 1 Slide the mode switch to 2 Use the W X buttons to select the image you want to delete 3 Press the button 4 When th...

Страница 46: ...n ONE IMAGE Protect one image video ALL IMAGES Protect all images videos at once EXIT Exit from this menu 4 Use the S T buttons to select LOCK then press the OK button Press the button to return to th...

Страница 47: ...uttons then press the OK button The DPOF setup screen is displayed 4 Use the W X buttons to select the desired image you want to set DPOF 5 Use the S T buttons to select ONE IMAGE or ALL IMAGES then p...

Страница 48: ...our setting which will be saved in the memory card Select ENABLE or DISABLE with the S T buttons then press the OK button 7 Press the button to return to the image playback mode 8 The is displayed on...

Страница 49: ...ton to enter PLAY menu 3 Use the S T W X buttons to select CHANGE LOGO then press the OK button 4 Use the W X buttons to select the desired image you want to set as the startup screen 5 Use the S T bu...

Страница 50: ...ed on the screen Recording stops when you press the shutter button again STOP AUD_0001 AUD_0002 W VOLUME T VOLUME RECORD AUD_0003 Playing Back a Voice File 1 Perform the above steps 1 3 Voice playlist...

Страница 51: ..._0003 NO YES To Press Functional Description Power on off POWER Press the POWER button to turn on off the camera Start stop voice recording Shutter Press the shutter button to start button or stop rec...

Страница 52: ...rst Before you starts to install the USB driver you need to check your system according to the following table System Requirements System Requirements Windows Macintosh CPU Pentium 166 MHz processor P...

Страница 53: ...ME XP is not necessary 1 Insert the CD ROM that came with the camera into your CD ROM drive 2 When the welcome screen appears click INSTALL USB DRIVER Follow the on screen instructions to complete the...

Страница 54: ...minal of the conversion adapter 2 Connect the other end of the USB cable to an available USB port on your computer 3 Turn on the camera USB screen is displayed 4 Use the S T buttons to select PC then...

Страница 55: ...images are inside these folder s Select the desired still images video clips audio files and then choose Copy from the Edit menu Open the destination location folder and choose Paste from the Edit men...

Страница 56: ...properly connected to a PictBridge compliant printer the PRINT MODE SELECT screen is displayed on the monitor Use the S T buttons to select the print mode In PRINT Mode Lets you print the specified i...

Страница 57: ...ettings use the S Tbuttons to select EXIT 5 After configuring the print settings you can still use the W X buttons to change the image that you want to print Then press the OK button to print 6 Use th...

Страница 58: ...the desired item depending on the type of printer being used 3 Use the S T buttons to select PRINT then press the OK button to confirm 4 The printing starts and the message TRANSFERRING is displayed o...

Страница 59: ...Network or Internet connection Video conferencing or video editing software is not included with the digital still camera This mode is not supported for Mac Step 1 Installing the PC camera driver The...

Страница 60: ...a as a PC camera it is necessary to install the battery into the digital still camera or use an AC power adapter Step 3 Running your application software i e Windows NetMeeting To use Windows NetMeeti...

Страница 61: ...ne tool for owners of digital cameras WebCams DV camcorders scanners or anyone who strives to effectively organize a large collection of digital media 1 Insert the CD ROM that came with the camera int...

Страница 62: ...photographic filters and special effects Embellish projects by adding creative design elements such as frames callouts and stamp objects Share results with family and friends via e mail and multiple...

Страница 63: ...the W X buttons to select PICTURE FUNCTION menu 3 Use the S T W X buttons to select the desired item in PICTURE FUNCTION menu then press the OK button 4 To exit from the menu press the button SELECT I...

Страница 64: ...H NORMAL LOW COLOR Sets the color of the image that will be captured NORMAL B W SEPIA Q R G B WHITE Sets the white balance when capturing images under specific BALANCE lighting conditions AUTO AUTO DA...

Страница 65: ...W Sets to display a captured image on LCD monitor immediately after you have captured the image ON OFF EXPOSURE Sets to obtain the correct exposure when the subject is much brighter or darker than the...

Страница 66: ...ts the size of the image that will be recorded 640 x 480 320 x 240 COLOR Refer to the section in this manual titled COLOR in Camera Menu PICTURE Settings for further details LCD BRIGHT Refer to the se...

Страница 67: ...to the section in this manual titled Slideshow Display for further details 3SEC 5SEC 7SEC 9SEC PROTECT Set the data to read only to prevent images from being erased by mistake Refer to the section in...

Страница 68: ...you want 4 9 RESIZE Changes the size of a recorded image 2560 x 1920 2048 x 1536 1280 x 960 640 x 480 EXIT CHANGE LOGO Allows you to specify one of your recorded images as your startup screen which w...

Страница 69: ...l titled Formatting an SD Memory Card or Internal Memory for further details YES NO SLEEP If the camera goes unused for a certain period of time while the camera is powered on it will switch to idle m...

Страница 70: ...ayed on the LCD monitor Refer to the section in this manual titled Choosing the Screen Language for further details VIDEO OUT Sets video output standard of the camera so you may connect your camera to...

Страница 71: ...EN 71 User s Manual CONNECTING YOUR CAMERA TO OTHER DEVICES...

Страница 72: ...Macro mode LCD monitor 2 5 LTPS color LCD Flash mode AUTO FLASH FORCED FLASH RED EYE NO FLASH Self timer 3 second delay 10 second delay Exposure compensation 2 0EV 2 0EV in 0 3EV increments White bal...

Страница 73: ...and unused so the auto power off cuts it off The battery is exhausted Camera malfunction It is being used in extreme low temperature Many shots are being captured in dark places inside requiring flas...

Страница 74: ...or is dark The LCD monitor is not on The lens or Self timer LED is dirty The distance to the subject is smaller than the effective range Measure Recharge or use the AC power adapter Turn the power on...

Страница 75: ...ion Load a new memory card Adjust the brightness of LCD monitor The flash does not fire The flash cannot recharge Even though the flash fired the image is dark The image is too dark The image is too b...

Страница 76: ...n the power off and remove the battery once and try again Set the correct date and time Set the date and time again Symptom Cannot download images Cause The free space on the hard disk in your compute...

Отзывы: