48
z
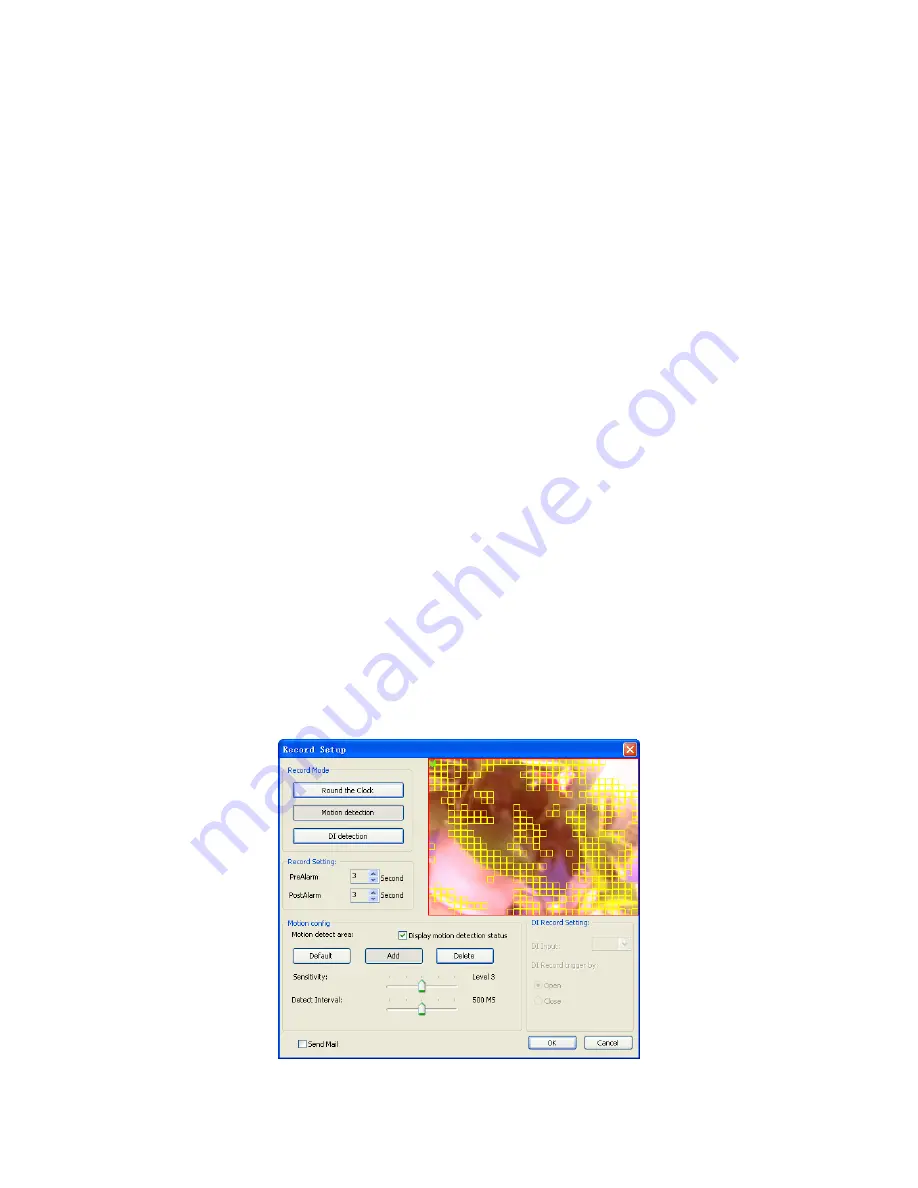
Motion detection:
When system time reach the schedule begin time and motion alarm is
triggered, system will start recording work immediately and continually until the system
time is over the post-alarm seconds.
z
DI Detection:
When system time reach the schedule begin time and DI alarm is triggered,
system will start recording work immediately and continually until the system time is over
the post-alarm seconds. If the pre-alarm seconds is set, when motion detection has been
triggered, the recorded file will include pre-alarm seconds by setting.
¾
Record Setting:
z
PreAlarm:
When set to Motion detection or DI detection record mode, the user can set
the Pre-Alarm second(s) which the recorded file will keep a slice of image defined as the
setting second(s) before event was triggered.
z
PostAlarm:
Set the Post-Alarm second(s) which the recorded file will keep a slice of
image defined as the setting second(s) after the event was triggered.
¾
Motion Config:
z
Default:
Select the full image for motion detection.
z
Add:
Define a rectangle area on the image first, and then click
Add
to add a new region.
z
Delete:
Define a rectangle area on the image first, and then click Delete to remove the
region that was defined.
z
Sensitivity:
Set sensitivity level of motion detection. Level 5 means the highest motion
detection sensitivity. On the contrary, level 1 is the lowest level of sensitivity.
z
Motion Interval:
Set this value to define the interval of motion detection. If set longer
value, means system will use less CPU computing power to check motion detection.
z
Display Motion detection status:
Check the check box to display the area(s) where
motion detection is triggered.
z
Preview window:
Red area is the motion detection area. The other areas are
non-motion detection region. The yellow rectangles are triggered regions of motion
detection areas.
¾
DI Record Setting:
When you set the DI record mode, select the DI input from the combo box,


