background image


26 


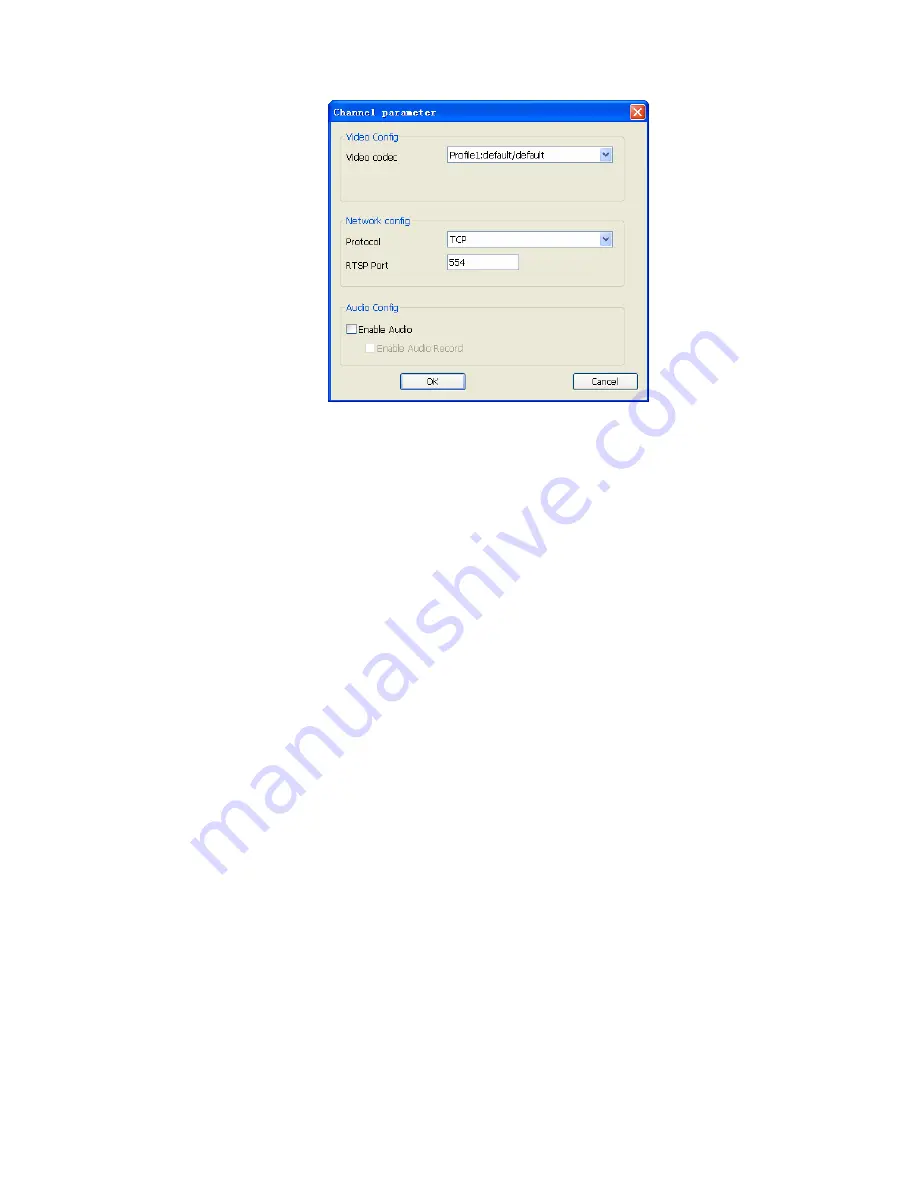
Video codec: 

Select the Video codec which system will receive from camera. Note that 

the codec capability depends on the camera.


Protocol: 

Select the protocol via which the system connects to the camera.


RTSP Port: 

Specify RTSP port for connecting to camera.


Enable Audio: 

Set Audio enabled to receive audio streaming form camera. If you need 

to listen live audio, this function must be enabled.


Enable Audio Record: 

Check this box to save audio data into recorded file.


)

 Note:


The Audio Record must Enabled with “Enable Audio” value both. 

Click 

OK

 to save the connection configuration and return to the previous page. Click 

Cancel

 to cancel the configuration on this page and return to the previous page. 

z


Channel parameter Page(NVR)

:           

Channel: 

Select which channel for backup.


Network config: 

Set RTSP connection port.


Enable Audio: 

Set Audio enabled to receive audio streaming form NVR. If you need to 

listen live audio, this function must be enabled.


Enable Audio Record: 

Check this box to save audio data into recorded file.


Содержание TL-SC3230

Страница 1: ...Surveillance Manager REV 1 0 0 1910010755...

Страница 2: ...ion 19 4 3 Operation with sub screen 20 4 3 1 Define display camera s sequence 20 4 3 2 Digital Zoom at sub screen 20 4 3 3 Switch to Full screen 20 4 3 4 Snapshot of sub screen 21 4 3 5 Restore divis...

Страница 3: ...to AVI file 57 5 4 Switch audio play mode 59 5 5 Playback setting 59 5 6 Snapshot dialog 59 5 7 Backup history file s 61 5 8 Playback status 62 5 9 Operation with sub screen 62 5 9 1 Define display ca...

Страница 4: ...tX 9 0c or above Intel 945G or Intel 965G or above OS Windows XP Vista Win 7 32bits or 64bits Hard disk 60GB Ethernet 100Mbps 1Gbps Chipset Intel 945 or Intel 965 or above If you install the Surveilla...

Страница 5: ...exe which is included on the Resource CD 2 2 Starting the Installation Step1 The Installation Wizard will start Select your preferred language for the Surveillance Manager Step2 The License Agreement...

Страница 6: ...ct Surveillancee Manager then click Next button Step4 The Choose Install Location window will open Select the folder which you wish to install Surveillance Manager to and then click on Install button...

Страница 7: ...4 Step5 The Installation Complete window will open next Click on Close button to complete the installation...

Страница 8: ...P camera s to the system by following the steps below 3 2 Add IP Camera s Step1 Click Start All Programs Surveillancee_Manager Surveillancee_Manager Step2 Enter the user name and password to login Sur...

Страница 9: ...s configuration and then click Add Auto Detect Click Auto Detect button to detect camera and the system will check and set model automatically Please confirm the Vendor and Model setting is matched t...

Страница 10: ...nt connection z Check Enable Audio if you need to receive audio streaming If you need to record audio into file you must check both Enable Audio and Enable Audio Record Search Click the Search button...

Страница 11: ...8 Step5 Confirm all added camera s setting parameters Step6 Click OK button Step7 Now you can preview live stream at main page...

Страница 12: ...9 3 3 Configuration of schedule recording Step1 Click the Schedule Setup button Step2 Select the schedule type that you need...

Страница 13: ...le was set when the system time matched the Special day setting system will execute this special day setting immediately as top priority even system has the same time period setting of daily or weekly...

Страница 14: ...control or drag the period bar below Step6 After setting with time period if you want to add a new schedule click Add or you want to modify a selected schedule click Edit Step7 Choose Round the clock...

Страница 15: ...Motion detection mode you have to configure the detection area or use default setting z Add detection area Click Add then drag a rectangle window on the preview image z Remove detection area Click Del...

Страница 16: ...ored area while the rest of the window will not be monitored DI Record Mode z Select trigger recording and specify the DI input source z Set trigger recording depend on whether status of DI is open or...

Страница 17: ...14 3 4 Playback Step1 Click the playback button to launch playback panel Step2 Click the search button to approach search dialog...

Страница 18: ...lick Search Step4 System will display recorded file s status in control list below Blue Round the clock recorded file Green Motion detection recorded file Red DI triggered recorded file Step5 Drag mou...

Страница 19: ...16 Step6 Click OK to finish search recorded files for playback job Step7 Click the play button to start playback procedure...

Страница 20: ...system providing live stream preview system setup E Map schedule setup playback start or stop monitor PTZ controls and so on 4 1 System status Function buttons PTZ buttons Rolling Full screen Exit Sy...

Страница 21: ...ttons function just the same as normal mode Restore Switch display mode to normal Exit Shut down Surveillance Manager Version Display version number System status The system status can configure at sy...

Страница 22: ...ra display just double click on a particular sub screen Double click on the screen again to restore previous screen division layout Divide to 1 Screen Divide to 4 Screen s Divide to 6 Screen s Divide...

Страница 23: ...popup menu 4 3 2 Digital Zoom at sub screen 1 Click mouse right button on sub screen and check Digital Zoom 2 Move mouse cursor to the position that you want to zoom in 3 Roll mouse wheel forward to z...

Страница 24: ...switch image to grayscale mode Sharp Click Sharp button to increase image sharp level Soft Click Soft button to increase image soft level Reset Click Reset button to restore image to original image Pr...

Страница 25: ...tor all Auto monitors all cameras when main console starts up z Auto Full Screen Auto configure as full screen when main console starts up z Minimized at started Auto minimize main console when system...

Страница 26: ...ay on system status window Check means this status will be displayed on main console status window Otherwise it will display nothing z Hide when minimized If Hide when minimized is check when the main...

Страница 27: ...n on target camera and select Paste on pop up menu 4 Click Apply all button will toggle update all cameras setting with the copied setting OSD Config System could show some information on the sub scre...

Страница 28: ...ed camera z Add Click Add to insert camera configuration to system z Delete Click Delete to remove camera configuration from system z Edit Click Edit to modify the configuration from system z Clear Cl...

Страница 29: ...Record Check this box to save audio data into recorded file Note The Audio Record must Enabled with Enable Audio value both Click OK to save the connection configuration and return to the previous pa...

Страница 30: ...the user can access system setup page z EMap The privilege of the user can use E Map function z Preview Quad control The privilege of the user can change division of sub screen z PTZ control The privi...

Страница 31: ...Confirm password Retype the password z Description The user can specify some description for this account z Disable User Check this box to disable the user account z Add Enter user s information and...

Страница 32: ...t which you want to delete then click Delete Edit address book record Select the record which you want to modify Modify the information and then click Edit Change photo of contact Click the button bel...

Страница 33: ...Send Test Click Send test to send a test mail Mail Content Set the Subject and Body of event notice mail Alarm Setting Configure the attached snapshot picture rule of event notice mail z Pre Alarm Set...

Страница 34: ...6 Muti Monitor Monitor list tab control Select which monitor to be configuration Monitor Status Displays monitor information Run at Start Check the functions which will be run at selected monitor on...

Страница 35: ...full screen or normal 2 PTZ Up Down Left Right Up Left Up Right Down Left Down Right Home Move Pan Tilt camera direction 3 Switch to next division Switch to previous division Switch to One division Ch...

Страница 36: ...w many buttons will display on setting page depends on joystick driver each button can define one function in the list above System will auto detect joystick connect status If you can t find out your...

Страница 37: ...34 4 5 Alarm Setting Click system setup button and select Alarm Setup to approach Alarm setup dialog Event Setting Add Event 1 Select the camera which you want to add event...

Страница 38: ...delete this event Event Setting Edit Event 1 Select the Event which you want to modify 2 Click the Edit button or double click the Event which was selected 3 Configure the event setting then click OK...

Страница 39: ...it would automatically stop alarm after setting seconds z Event Detect Period Always Detect When Alarm Monitor is activated the detection job will always execute Detect by Schedule The detection job w...

Страница 40: ...tection sensitivity z Set detection interval Set this value to define the interval of motion detection If set longer value means system will use less CPU computing power to check motion detection z Ad...

Страница 41: ...itivity with higher level to trigger camera move alarm easier otherwise set lower level to prevent false alarm Event Setting Edit Action Select an action from the Action list then click Edit or double...

Страница 42: ...te Action Select an action which you want to delete and then click Delete to remove this action Event Setting Clone Event setting Select an event and click Copy or pop up menu and then select the came...

Страница 43: ...ice will stop working HTTP Port In case you need to change HTTP port please stop remote service first and then enter new port value The default HTTP port is 80 RTSP Port If you need to change RTSP por...

Страница 44: ...41 System Log page 1 Select Log Type 2 Select Log time period...

Страница 45: ...ct the input source that triggered the event Digital Input Event 4 Specify search time period 5 Click Search to list event logs 6 Click Export to export search result to TXT file 7 Double click on the...

Страница 46: ...43 Error Log page 1 Select Log Type 2 Specify Log time period 3 Click Search to list Logs 4 Click Export to export search result to TXT file...

Страница 47: ...alog and click OK and the system will restore setting by selected file z Export Setting Select a file from save file dialog and click OK the system will create a setting file to destination folder 4 9...

Страница 48: ...k on the camera name which you want to modify The schedule configuration of this camera will display at left of dialog System defaults the schedule from 00 00 to 23 59 round the clock recording mode T...

Страница 49: ...lect Paste on Monday to Friday will update selected camera s Monday to Friday schedule setting as same as copied Weekday setting 5 Click Paste and select Paste on Saturday to Sunday will update select...

Страница 50: ...t of dialog 2 Click on the slice in the list which you want to modify The other way you can click on the slice bar on the time bar control 3 Click on the hour section or minute section on the date tim...

Страница 51: ...slice of image defined as the setting second s after the event was triggered Motion Config z Default Select the full image for motion detection z Add Define a rectangle area on the image first and the...

Страница 52: ...trigger recording 4 10Start Stop Monitor Click Start Stop Monitor button to control system monitor job Start Monitor All Check it to start all type of monitor job Start Monitor Schedule Check it to s...

Страница 53: ...e of this event z Remark The description of this event z Cancel Event Select the events and click Cancel Event to stop alarm actions and reset event status z Cancel All Event Stop all event action and...

Страница 54: ...ways as below 1 Select the camera icon which you want to move and then drag it onto the position where you prefer 2 Double click on the camera make it as a focus camera and then click Move Move the mo...

Страница 55: ...op Two way Audio Two way Audio function depends on camera s capability This button is only enabled when the focused camera is with two way audio capability If the channel s two way audio was enabled b...

Страница 56: ...and converts file format on history recorded file s The user could find out the critical image in minutes by playback tools and back up these images to the user assigned storage by selected period an...

Страница 57: ...54 Click exit button to leave playback application 5 1 Search history recorded file s Click the search button on Playback page and the Search history file s dialog will display...

Страница 58: ...Check the modes which you want to search System will search recorded files within these modes only z Check Event types which you want to display system will display event triggered time on list You co...

Страница 59: ...or click Cancel to abort this job and return to Playback main page 5 2 Playback control button s These buttons are used to control playback start pause backward play and the other operations The user...

Страница 60: ...normal speed 1 2X Half of normal speed 1 4X Quarter of normal speed Division control buttons Divide to 1 screen Divide to 4 screen s Divide to 6 screen s Divide to 9 screen s Divide to 16 Screen s Fu...

Страница 61: ...e a time slice by the Start time and End time picker control or drag mouse cursor on record list to define convert period Select cameras to convert job Check camera s IDs from list to convert job Sele...

Страница 62: ...back now Mute No audio data will play Live Audio Play the live audio stream Playback Audio Play the playback audio stream 5 5 Playback setting Click the Setting button to pop up the menu of playback s...

Страница 63: ...o select a folder to save snapshot images Select file format Select the image file format in the combo box Save snapshot images Click OK to save all selected images or click Cancel to abort this snaps...

Страница 64: ...61 Cam000_AM3220 192 168 0 143_20090908111559901 jpg 5 7 Backup history file s Click the backup button to approach backup dialog to select backup file s...

Страница 65: ...ted files and information are saved in backup folder You can execute the Player exe in backup directory The operation procedure is the same as playback job Note The backup files must place in the same...

Страница 66: ...out the image 5 Press and click to drag the image at sub screen to the position where you needed 6 To cancel digital zoom mode click mouse right button and un check the Digital Zoom 5 9 3 Switch to F...

Страница 67: ...image sharp level z Soft Click Soft to increase image soft level z Reset Click Reset to restore image to original image z Print Click Print to print out image to printer z Save Click Save and then cho...

Страница 68: ...e event will be triggered easier Detect Interval Select Detect Interval to define the interval of motion detection If set longer value it means the system will use less CPU computing power to check mo...

Страница 69: ...lder Define search time period We need to define time period for the sequential search task We could define time period by two ways and the selected time period will display on the upper left corner 1...

Страница 70: ...for display the detail snapshot You could move the detail window and resize it to get bigger preview image size Preview mode of search result You could define the preview mode of search result by thes...

Отзывы: