background image

TL-SC3000

3GPP Surveillance Camera


12


Address Book

Click to show the predefined IP address(es). You can 
add, remove or search the IP address to log in the 
network camera remotely. 


Miscellaneous 
Control 

Click to show the main operation functions: audio 
volume control, color setting, backup, record setting, 
server setting, upgrade, and find status log list. 


 / 


Record /   
Stop Record 

Click to start / stop the manual recording.   


Snapshot 

Click to take a snapshot of the current view. The 
snapshot will be saved in the path you specified in
“Record Setting” on Page 21. 


Information 

Click to show the current network connection details. 

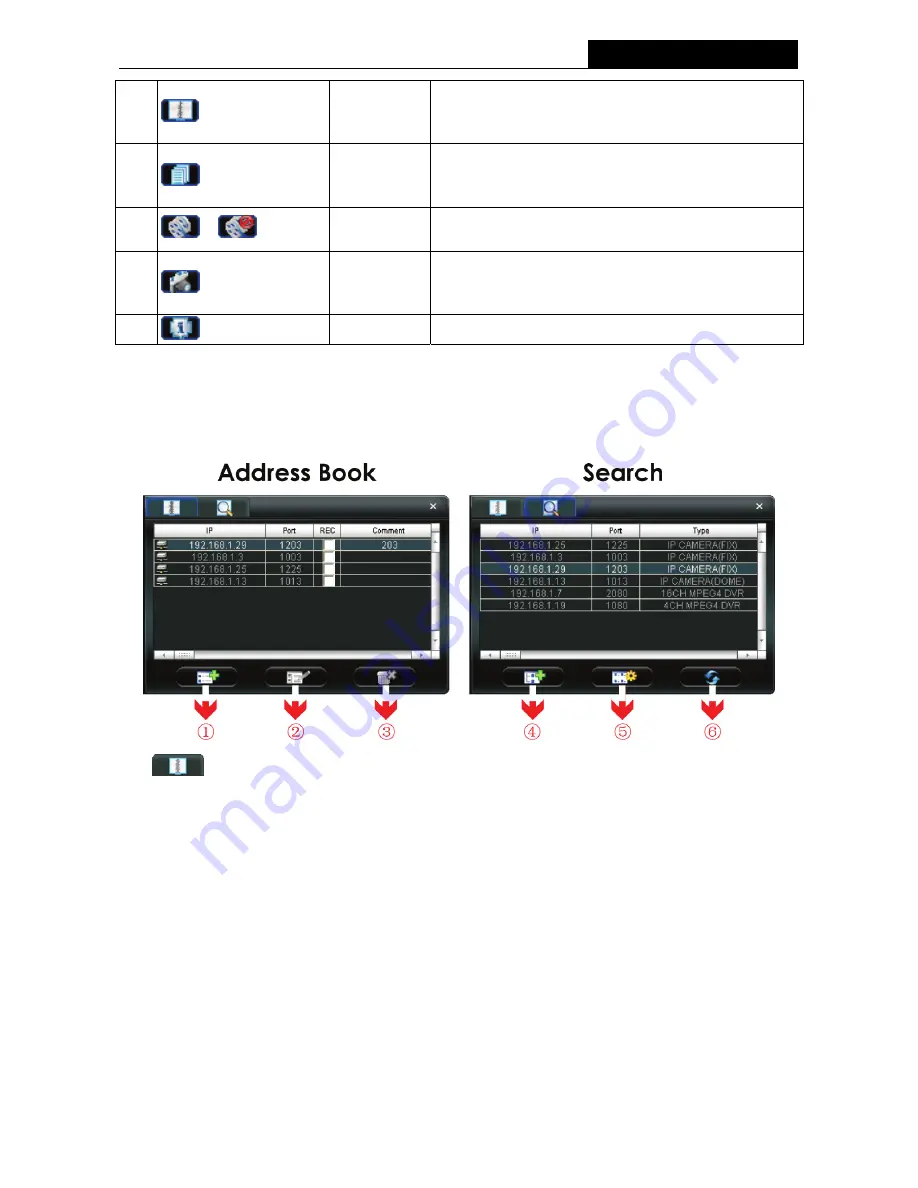
4.2  Address Book 

This view is displayed when the Video Viewer is activated for you to log in / out the network camera from 
the current address list, or search the available IP address as follows: 


¾


 (Address Book) 

Click to view the pre-defined network camera access details. 
To log in, choose one IP address from the address list, and click the address twice; to log out, click the 
connected IP address twice. 
You can also create new IP address information, or modify or remove the current IP address information. 

Содержание TL-SC3000

Страница 1: ...TL SC3000 3GPP Surveillance Camera Rev 1 0 0 1910010104...

Страница 2: ...are trademarks or registered trademarks of their respective holders No part of the specifications may be reproduced in any form or by any means or used to make any derivative such as translation tran...

Страница 3: ...correct the interference by one or more of the following measures Reorient or relocate the receiving antenna Increase the separation between the equipment and receiver Connect the equipment into an ou...

Страница 4: ...yback 15 4 5 Snapshot 16 4 6 Information 17 Chapter 5 Video Viewer Miscellaneous Control Panel 18 5 1 Color Setting 19 5 2 Backup For DVR only 20 5 3 Record Setting 21 5 4 Server Setting 24 5 4 1 Gene...

Страница 5: ...up 47 8 2 1 Software download 47 8 2 2 GPRS 3G Mobile Phone 48 8 2 3 PDA 49 8 3 Available Functions 51 8 3 1 GPRS 3G Mobile Phone 51 8 3 2 PDA 51 Appendix 1 Recording Time Table 53 Appendix 2 User Lev...

Страница 6: ...P Surveillance Camera One Adapter and power cord One Bracket One RJ45 network cable Quick Installation Guide One Resource CD including z This User Guide z Video Viewer AP Software Note Make sure that...

Страница 7: ...video transmission in the format of H 264 MPEG4 or MJPEG and you can easily operate the camera via the web browser or the supplied video viewer AP software Video surveillance over IP network infrastr...

Страница 8: ...xels 640 H x 480 V Lens f3 6mm F number F2 0 Viewing Angle 80 55 6 Shutter Speed 1 60 1 50 to 1 100 000 sec Min Illumination 1 Lux F2 0 Video Output 1 0 Vp p 75 BLC AUTO White Balance ATW Others Remot...

Страница 9: ...ll reset all parameters including the IP address to factory default settings Power Indicator When the camera is power supplied this indicator will be on as red Video Output Connect to the video input...

Страница 10: ...ure the video output won t be up side down Note The illustrations below are based on the ceiling mounted installation For the detailed cable connection please refer to the section Rear Panel on Page 4...

Страница 11: ...racket with the supplied 3 screws to the place you want to install by using a power drill Figure 3 2 Screw the base to the ceiling 3 Assemble the bracket a Align the stem with the central hole of the...

Страница 12: ...mounted With the upper side of the camera facing up align the mounting screw hole on the upper side with the screw thread of the joint lock and rotate the camera to secure as shown in Figure 3 5 Desk...

Страница 13: ...ted Insert the cap to the mounting screw hole on the underside of the camera as shown in Figure 3 6 Desktop Insert the cap to the mounting screw hole on the upper side of the camera Figure 3 6 Insert...

Страница 14: ...ts the Address Book panel will be displayed on the right side of the Video Viewer control panel Click Search Refresh to search the available IP address es The found address es will be listed and can b...

Страница 15: ...Default Setting IP Address 192 168 1 10 User Name admin Password admin Port Number 80 c Click Address Book Add button to key in the IP address user name password and port number of the network camera...

Страница 16: ...cted click the corresponding blue tab The camera title shown in the blue tab can be customized For example 01 02 03 and 04 The default camera title is Camera1 For detailed camera title setting please...

Страница 17: ...nt view The snapshot will be saved in the path you specified in Record Setting on Page 21 Information Click to show the current network connection details 4 2 Address Book This view is displayed when...

Страница 18: ...efault setting is unchecked Search Click to search and view the available IP address es for the network camera connection You can choose one address to add into the address book edit the details or up...

Страница 19: ...book panel to start manual recording When the record function is started a flashing indication icon will be shown at the bottom right corner of the image display view And the recordings will be saved...

Страница 20: ...sort out the logs you want to speed up the search time For details please see Status List on Page 38 To immediately play a recording file select a log from the list and click Play button or double cl...

Страница 21: ...lick Snapshot on the main control panel Once the current view is captured you ll see an icon shown at the bottom right corner of the image display view The snapshot will be saved in the path you speci...

Страница 22: ...Information Click this button to show the current network connection details 1 IP Address 7 Resolution 2 Transfer Type 8 Quality 3 Stream Format 9 Server Time 4 AV Option 10 Online Users 5 Bit Rate 11...

Страница 23: ...TL SC3000 3GPP Surveillance Camera 18 Chapter 5 Video Viewer Miscellaneous Control Panel Click Miscellaneous Control on the Video Viewer control panel and 7 functions are available as follows...

Страница 24: ...20 4 Record Setting Click this button to go to the detailed record setting For details please refer to Record Setting on Page 21 5 Server Setting Click this button to go into the detailed server setti...

Страница 25: ...e network cameras don t have network backup function This function is available when the Video Viewer is connected to a DVR You can log into the DVR via this software and remotely backup the video dat...

Страница 26: ...the log you want To view the earlier or later logs that are not shown in the current page click Prev Page or Next Page To refresh the event list click Reload 5 File Path Assign the location where the...

Страница 27: ...from 0 10 seconds by pressing and dragging the slider Hard Disk Overwrite Check this checkbox to overwrite from the oldest recorded data when the HDD is full Record Time Range There are two options av...

Страница 28: ...Schedule Motion Alarm and set the start end date and time b Press Add and a pop up window will appear and ask you to confirm your setting Click OK to add the record setting or Cancel to discard the s...

Страница 29: ...the video clips or snapshots 5 4 Server Setting Click Miscellaneous Control Server Setting to go into the Server Setting page and you can view set or modify all the network camera setting All the chan...

Страница 30: ...l the logs for the network camera such as Power On Reset Default Net Login and SNTP Update etc To refresh the logs click Reload To view the earlier or later logs that are not shown in the current page...

Страница 31: ...t the password that will be used for remote login The password allows up to 31 characters Set the security level of an account to give the permission to control different Video Viewer functions There...

Страница 32: ...ick Refresh Trigger Click Miscellaneous Control Server Setting General Trigger to enter this page Motion Trigger Item Description Motion In this section you can select to enable the function of motion...

Страница 33: ...to enable the function of E mail and or FTP notification Item Description Method Email If the E mail notification function is activated the network camera will send the captured video clip to the ass...

Страница 34: ...DNS section for details Function Description Web Port Typically the default TCP port used by HTTP is 80 However in some cases it is better to change this port number for added flexibility or security...

Страница 35: ...DNS account before setting PPPOE or DHCP connection DDNS is a service for transforming the dynamic IP corresponding to a specific host name Go to a website which provide free DDNS services and apply a...

Страница 36: ...sary for signing up an account according to the website instructions Sign up 1 Key in a user name for login This name is not equal to the domain name 2 Key in your E mail address and input it again to...

Страница 37: ...within 48 hours and complete the procedure to activate your account according to the instructions in the email Go to the hyperlink in the email and you will see Account Confirmed Your account is creat...

Страница 38: ...TL SC3000 3GPP Surveillance Camera 33 1 Input a meaningful host name 2 Choose a domain tplinkipcam tplinkipcam...

Страница 39: ...the local area time of the system automatically Server Name Users can simply use the default SNTP server For example time stdtime gov tw Sync Server Time The network camera will synchronize the time...

Страница 40: ...SMTP server address provided from your e mail system supplier Mail From Enter the entire mail address to ensure E mails will not be blocked by SMTP The account would be the mail sender Verify Password...

Страница 41: ...can be adjusted to adapt to the bandwidth on the network Set the desired image frequency to the maximum FULL or to a specified frame rate HALF ONE THIRD QUARTER ONE FIFTH ONE TENTH The actual frame r...

Страница 42: ...ess After upgraded you will see a message shown on the screen Update Firmware Succeeded Don t plug off power the machine will reboot automatically System Backup For DVR only If you want to backup your...

Страница 43: ...ew all the event and record logs All or search for the specific log s by date or by record type Condition There are three types of logs Record Backup and Event To playback the recorded data for a spec...

Страница 44: ...cted log s or click Delete All to clear the current log list Tip To select more logs all at once press and hold the Ctrl key on your keyboard and click to select the logs you want to remove Play Click...

Страница 45: ...hen all the search criteria are set click to search the specified logs The result will be displayed in the log list arranged by time from the earliest to the latest Delete Delete All Click Delete to r...

Страница 46: ...Delete Delete All Click Delete to remove the selected log s or click Delete All to clear the current log list Tip To select more logs all at once press and hold the Ctrl key on your keyboard and clic...

Страница 47: ...d the progress percentage 3 Playback Operation This area is enabled only when the playback is started Rewind Forward Stop Pause Play Rewind Forward Click once to get 2X fast rewind forward twice to ge...

Страница 48: ...n example Host name ipcam dyndns org Port number 202 Key in http ipcam dyndns org 202 into the URL address box and press Enter Step 2 Enter the user name and password the same as the ones used at the...

Страница 49: ...TH For details please refer to Video section of the Video Viewer on Page 35 System Type Set the system type of the connected network camera NTSC PAL Stream Format Select the stream format of the netwo...

Страница 50: ...w The snapshot will be saved in the path you specified in the Snapshot Path of the Camera menu from the IE browser Chapter 7 QuickTime Player You can also use the QuickTime player to log into the netw...

Страница 51: ...ey in the user name and password for accessing your network camera The user name and password are the same as the ones you use to log into the Video Viewer If the information is correct press OK to go...

Страница 52: ...DVR or network camera is NOT 80 The suggested port number is 88 8 2 Installation and Setup 8 2 1 Software download STEP1 To download the software for mobile surveillance please visit the following web...

Страница 53: ...ed For PDA the application will save to Programs 8 2 2 GPRS 3G Mobile Phone The setting interface of each mobile phone may vary depending on its individual brand Therefore the interface shown below on...

Страница 54: ...e the port number from 0 65536 except 80 It s recommended to use 88 STEP3 Make sure the information above is correct and confirm the connection set to save the setting and at the same time you will re...

Страница 55: ...s Enter the IP address of the device you want to connect 4 Port Enter the port number used by the device you want to connect 5 User Name Enter the user name used to access the device you want to conne...

Страница 56: ...With EagleEyes J2ME New version installed DVR Mode Single channel switch 4 cut 9 cut 16 cut display mode switch Quality change DVR Mode Main Panel DVR Mode Quality Select DVR Mode Quality Options 8 3...

Страница 57: ...TL SC3000 3GPP Surveillance Camera 52 DVR Mode PTZ Mode...

Страница 58: ...SC3000 Resolution Quality Frame Rate MB Hrs Full 992 1 2 728 1 3 552 1 4 458 1 5 442 1 10 232 Best 1 15 153 2 full 826 1 2 490 1 3 364 1 4 330 1 5 296 1 10 163 2 High 1 15 128 8 full 490 1 2 278 1 3 2...

Страница 59: ...TL SC3000 3GPP Surveillance Camera 54 1 15 66 6 full 288 1 2 172 1 3 140 6 1 4 124 1 5 111 6 1 10 63 Normal 1 15 55 4 full 166 1 2 112 1 3 91 8 1 4 80 6 1 5 83 6 1 10 49 4 Basic 1 15 36 2...

Страница 60: ...Update X X X Language Status List Record Snapshot Information For Web Browser Supervisor Power User Normal User Guest Main Connection Mode Protocol Quality X Change resolution X Network DDNS X X SNTP...

Отзывы: