background image

TD-W8962ND 

300Mbps Wireless N ADSL2+ Modem Router User Guide


62 

¾


Enable ICMP-Flood Attack Filtering


-

 Enable or Disable the ICMP-Flood Attack Filtering. 

¾


ICMP-Flood Packets Threshold (5~3600)


-

 The default value is 50. Enter a value between 

~

 3600. When the current ICMP-Flood Packets number is beyond the set value, the 

Modem Router will startup the blocking function immediately. 

¾


Enable UDP-Flood Filtering


-

 Enable or Disable the UDP-Flood Filtering. 

¾


UDP-Flood Packets Threshold (5~3600)


-

 The default value is 500. Enter a value between 5 

~

 3600. When the current UPD-Flood Packets number is beyond the set value, the Modem 

Router will startup the blocking function immediately. 

¾


Enable TCP-SYN-Flood Attack Filtering


-

 Enable or Disable the TCP-SYN-Flood Attack 

Filtering. 

¾


TCP-SYN-Flood Packets Threshold (5~3600)


-

 The default value is 50. Enter a value 

between 5 

~

 3600. When the current TCP-SYN-Flood Packets numbers is beyond the set 

value, the Modem Router will startup the blocking function immediately. 

¾


Forbid ping packet from LAN port


-

 Enable or Disable Forbid ping packet from LAN port. 

The default setting is disabled. If enabled, the ping packet from LAN cannot access the  
Modem Router. This function can be used to defend against some viruses.   

Click the 

Save

 button to save the settings. 

Click the 

Blocked DoS Host List 

button to display the DoS host table by blocking. 


4.12  Bandwidth Control 

Choose menu “

Bandwidth Control

”, and then you can view and configure the corresponding 

function in the next screen as shown in Figure 4-54. 


Figure 4-54 

In this screen you can configure the Upstream Bandwidth and Downstream Bandwidth. The 
values you configure should be less than 100000Kbps. For optimal control of the bandwidth, 
please select the right Line Type and ask your ISP for the total bandwidth of the egress and 
ingress.


¾


Enable Bandwidth Control:

 Check this box so that the Bandwidth Control settings can take 

effect.


¾


Line Type:

 Select the right type for you network connection. If you don’t know how to choose, 

please ask your ISP for the information.


¾


Total Upstream Bandwidth 

- The upload speed through the WAN port

.


Содержание TD-W8962ND

Страница 1: ...TD W8962ND 300Mbps Wireless N ADSL2 Modem Router 1910010687 Rev 1 0 0...

Страница 2: ...are trademarks or registered trademarks of their respective holders No part of the specifications may be reproduced in any form or by any means or used to make any derivative such as translation tran...

Страница 3: ...ion is subject to the following two conditions 1 This device may not cause harmful interference 2 This device must accept any interference received including interference that may cause undesired oper...

Страница 4: ...accept any interference including interference that may cause undesired operation of the device Cet appareil est conforme aux norms CNR exemptes de licence d Industrie Canada Le fonctionnement est sou...

Страница 5: ...nect the product or the power adapter from the power source z Don t disassemble the product or make repairs yourself You run the risk of electric shock and voiding the limited warranty If you need ser...

Страница 6: ...duct within the scope of Council Directives Directives 1999 5 EC Directives 2004 108 EC Directives 2006 95 EC Directives 1999 519 EC Directives 2011 65 EU The above product is in conformity with the f...

Страница 7: ...cting the Modem Router 8 Chapter 3 Quick Installation Guide 10 3 1 Configuring the PC 10 3 2 Quick Installation Guide 13 3 2 1 Wireless ADSL Router 15 3 2 2 Wireless Router 19 Chapter 4 Configuring th...

Страница 8: ...49 4 8 3 RIP Settings 50 4 9 Forwarding 51 4 9 1 Virtual Servers 51 4 9 2 Port Triggering 52 4 9 3 DMZ 54 4 9 4 UPnP 54 4 10 Parent Control 55 4 11 Firewall 56 4 11 1 Rule 57 4 11 2 LAN Host 58 4 11 3...

Страница 9: ...ings 70 4 16 6 Backup Restore 71 4 16 7 Factory Defaults 71 4 16 8 Firmware Upgrade 72 4 16 9 Reboot 73 4 16 10 Statistics 73 Appendix A Specifications 75 Appendix B Troubleshooting 76 Appendix C Tech...

Страница 10: ...Adapter for TD W8962ND 300Mbps Wireless N ADSL2 Modem Router Quick Installation Guide One RJ45 cable Two RJ11 cables One ADSL splitter One Resource CD for TD W8962ND 300Mbps Wireless N ADSL2 Modem Ro...

Страница 11: ...l for handling multiple data streams at the same time which ensures your network stable and smooth The performance of this 802 11n wireless Router will give you the unexpected networking experience at...

Страница 12: ...unction with quick response semi conductive surge protection circuit High speed and asymmetrical data transmit mode provides safe and exclusive bandwidth Supports All ADSL industrial standards Compati...

Страница 13: ...th a successful Internet connection Flash There is data being transmitted or received via the Internet Internet Off There is no successful Internet connection or the Modem Router is operating in Bridg...

Страница 14: ...already made a right connection please contact your ISP to make sure if your Internet service is available now 2 If the Internet LED is off please check your ADSL LED first If your ADSL LED is also o...

Страница 15: ...od two Restore the default setting from Maintenance SysRestart of the Modem Router s Web based Utility WiFi The switch for the WiFi function LAN1 LAN2 LAN3 LAN4 WAN Through these ports you can connect...

Страница 16: ...r Apple Safari 2 2 Installation Environment Requirements The Product should not be located where it will be exposed to moisture or excessive heat Place the Modem Router in a location where it can be c...

Страница 17: ...to the wall socket Method two You can use a separate splitter External splitter can divide the data and voice and then you can access the Internet and make calls at the same time The external splitter...

Страница 18: ...TD W8962ND 300Mbps Wireless N ADSL2 Modem Router User Guide 9 Figure 2 2...

Страница 19: ...uter or connect your adapter to a Hub Switch which has connected to the Modem Router you need to configure your PC s IP address Follow the steps below to configure it Step 1 Click the Start menu on yo...

Страница 20: ...TD W8962ND 300Mbps Wireless N ADSL2 Modem Router User Guide 11 Figure 3 2 Step 3 Select General tab highlight Internet Protocol TCP IP and then click the Properties button Figure 3 3...

Страница 21: ...Obtain DNS server address automatically in the screen above Now you can run the Ping command in the command prompt to verify the network connection Please click the Start menu on your desktop select r...

Страница 22: ...PC s IP address must be within the range of 192 168 1 2 192 168 1 254 3 2 Quick Installation Guide With a Web based utility it is easy to configure and manage the TD W8962ND 300Mbps Wireless N ADSL2 M...

Страница 23: ...PPP connections 2 If the above screen does not pop up it means that your Web browser has been set to a proxy Go to Tools menu Internet Options Connections LAN Settings in the screen that appears canc...

Страница 24: ...ides two system mode Wireless ADSL Router and Wireless Router Choose the right mode which you need then click Next Figure 3 10 3 2 1 Wireless ADSL Router 1 Change the VPI or VCI values which are used...

Страница 25: ...by your ISP and then click Next Figure 3 13 Note If you are using the Modem Router on a new DSL line and have not completed your DSL provider s online registration you may be using a generic username...

Страница 26: ...as shown below You can create a unique and easy to remember name for your wireless network or just keep the default SSID Then select Region Channel Mode and set a Password for your network Disable Sec...

Страница 27: ...ter User Guide 18 Figure 3 16 5 You will see the Complete screen below click Reboot to complete Quick Setup Figure 3 17 Note Now your Modem Router has been configured and is rebooting Please do not tu...

Страница 28: ...te If you are using the Modem Router on a new DSL line and have not completed your DSL provider s online registration you may be using a generic username and password When registration is completed yo...

Страница 29: ...for your wireless network or just keep the default SSID Then select Region Channel Mode and set a Password for your network Disable Security is not recommended Then click Next to continue Figure 3 21...

Страница 30: ...ter User Guide 21 Figure 3 22 4 You will see the Complete screen below click Reboot to complete Quick Setup Figure 3 23 Note Now your Modem Router has been configured and is rebooting Please do not tu...

Страница 31: ...way 4 1 Login After your successful login you will see the fifteen main menus on the left of the Web based utility On the right there are the corresponding explanations and instructions The detailed...

Страница 32: ...r Guide 23 Figure 4 1 4 3 Quick Setup Please refer to Section 3 2 Quick Installation Guide 4 4 System Mode The Modem Router provides two system modes Wireless ADSL Router and Wireless Router You can c...

Страница 33: ...u will see the WAN Port Information Table in the screen similar to Figure 4 3 which describes the WAN port settings and the relevant manipulation to each interface There are five different configurati...

Страница 34: ...ess N ADSL2 Modem Router User Guide 25 Figure 4 4 4 5 1 1 Static IP Select this option if your ISP provides static IP information to you You should set static IP address IP subnet mask and gateway add...

Страница 35: ...apsulation Mode Select the encapsulation mode for the Static IP Address Here you can leave it default ATM Qos Type Select ATM Qos Type provided by ISP and the type is UBR by default WAN Service Setup...

Страница 36: ...all Enable IGMP Proxy IGMP Internet Group Management Protocol is used to manage multicasting on TCP IP networks Some ISPs use IGMP to perform remote configuration for client devices such as the Modem...

Страница 37: ...e is disabled and if you are not sure please contact your ISP or just leave it Get IP Unicast This is disabled by default The minority of DHCP Server of ISP will not support to enable this When the Ro...

Страница 38: ...automatically And once there is traffic send or receive the connection will be automatically on Click Advanced advanced selections for WAN Service Setup can be shown Service Name Server Name Enter the...

Страница 39: ...t Gateway select a WAN Interface from the drop down list as the IPv4 default gateway 4 5 1 6 Bridge If you select this type of connection the modem can be configured to act as a bridging device betwee...

Страница 40: ...ical connections it is very flexible for user host management bandwidth allocation and resource optimization If you want to active this function this function must be enabled Note It is not allowed to...

Страница 41: ...4 13 Please configure the parameters for LAN ports according to the descriptions below Figure 4 13 IP Address You can configure the Modem Router s IP Address and Subnet Mask for LAN Interface IP Addre...

Страница 42: ...dresses Because the default IP address for the Modem Router is 192 168 1 1 the default Start IP Address is 192 168 1 100 and the Start IP Address must be 192 168 1 100 or greater but smaller than 192...

Страница 43: ...thod used to enable Point to Point sessions via the Internet on the Layer Two level To allow L2TP tunnels to pass through the Modem Router click Enable IPSec Passthrough Internet Protocol security IPS...

Страница 44: ...your DSL connection uses Annex Type Select the DSL operation Annex Type which your DSL connection uses Click the Save button to save your settings 4 6 DHCP Server Choose DHCP Server you can see the ne...

Страница 45: ...er will be automatically assigned a new dynamic IP address The default is 24 hours Default Gateway Optional It is suggested to input the IP address of the LAN port of the Modem Router The default valu...

Страница 46: ...MAC Address The MAC address of the DHCP client IP Address The IP address that the Modem Router has allocated to the DHCP client Valid Time The time of the DHCP client leased After the dynamic IP addre...

Страница 47: ...of the computer for which you want to reserve an IP address 3 Click the Save button Figure 4 20 To modify or delete an existing entry 1 Click the Edit in the entry you want to modify If you want to d...

Страница 48: ...r the vendor class Click the Save button Figure 4 22 To modify or delete an existing entry 4 Click the Edit in the entry you want to modify If you want to delete the entry click the Delete 5 Modify th...

Страница 49: ...interface hide the network from active scans set the wireless network name also known as SSID and restrict the channel set based on Region requirements SSID Wireless network name shared among all poin...

Страница 50: ...l Width selecting field will turn grey and the value will become 20M which is unable to be changed Enable Wireless Router Radio If you want to use wireless features you must select Enable Wireless Rou...

Страница 51: ...sable the WPS function here Current PIN The current value of the Modem Router s PIN is displayed here The default PIN of the Modem Router can be found in the label or User Guide Restore PIN Restore th...

Страница 52: ...II Enter the client device s PIN on the Modem Router Use this method if your client device has a Wi Fi Protected Setup PIN number Step 1 Keep the default WPS Status as Enabled and click the Add devic...

Страница 53: ...Wireless Function of the Modem Router is disabled Please make sure the Wireless Function is enabled before configuring the WPS 4 7 3 Wireless Security Choose menu Wireless Wireless Security you can c...

Страница 54: ...gits any combination of 0 9 a f A F zero key is not promoted or 5 ASCII characters 128 bit You can enter 26 hexadecimal digits any combination of 0 9 a f A F zero key is not promoted or 13 ASCII chara...

Страница 55: ...he Add New button The following page will appear shown in Figure 4 30 Figure 4 30 To add or modify a MAC Address Filtering entry follow these instructions 1 Enter the appropriate MAC Address into the...

Страница 56: ...ng Rules 3 Delete all or disable all entries if there are any entries already 4 Click the Add New button 1 Enter the MAC address 00 1D 0F 11 22 33 00 0A EB 00 07 5F in the MAC Address field 2 Enter wi...

Страница 57: ...ch indicates the DTIM Interval is the same as Beacon Interval Enable Short GI This function is recommended for it will increase the data capacity by reducing the guard interval time Enabled Client iso...

Страница 58: ...wn list as the system default gateway Figure 4 33 Click the Add Interface button you can add WAN Interfaces Click the Save button to save your settings 4 8 2 Static Route Choose Route Settings Static...

Страница 59: ...e Interface name in the text box or else the default Use Interface will be adopted for the Static Route Status Select Enabled or disabled from the drop down list 3 Click Save to save your settings as...

Страница 60: ...ternal Service Ports You can enter a service port or a range of service ports the format is XXX YYY XXX is the Start port and YYY is the End port IP Address The IP address of the PC running the servic...

Страница 61: ...s enabled disabled Click the Delete Selected button to delete selected entries Note If you set the service port of the virtual server as 80 you must set the Web management port on System Tools Remote...

Страница 62: ...his rule Trigger Protocol The protocol used for Trigger Ports either TCP UDP or All all protocols supported by the Modem Router Open Port The port or port range used by the remote system when it respo...

Страница 63: ...3 DMZ Choose menu Forwarding DMZ and then you can view and configure DMZ host in the screen shown in Figure 4 41 The DMZ host feature allows one local host to be exposed to the Internet for a special...

Страница 64: ...rnal Port The port which the Modem Router opened for local host IP Address The IP address of the local host which initiates the UPnP request Status Either Enabled or Disabled Enabled means that the po...

Страница 65: ...olling PC or you can make use of the Copy To Above button below MAC Address of Current PC This field displays the MAC address of the PC that is managing this Modem Router If the MAC Address of your ad...

Страница 66: ...w Click the Add New button to add a new rule entry Enable Selected Click the Enable Selected button to enable the selected rules in the list Disable Selected Click the Disable Selected button to disab...

Страница 67: ...isting entry To add a new entry please follow the steps below 1 Click the Add New button 2 In the Mode field select IP Address or MAC Address z If you select IP Address please follow the steps below 1...

Страница 68: ...try To add a new entry please follow the steps below 1 Click the Add New button 2 In Mode field select IP Address MAC Address or URL Address If you select IP Address the screen shown is Figure 4 48 Fi...

Страница 69: ...set a Schedule list in the next screen as shown in Figure 4 51 Figure 4 51 Description Here displays the description of the schedule and this description is unique Edit Here you can modify an existing...

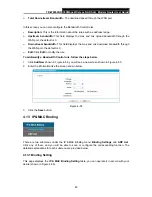
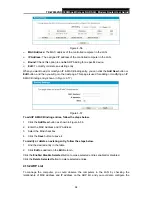
Страница 70: ...nd then you can view and set DDoS in the next screen as shown in Figure 4 53 Figure 4 53 DoS protection Denial of Service protection Check the Enable or Disable button to enable or disable the DoS pro...

Страница 71: ...tup the blocking function immediately Forbid ping packet from LAN port Enable or Disable Forbid ping packet from LAN port The default setting is disabled If enabled the ping packet from LAN cannot acc...

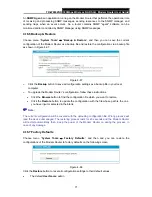
Страница 72: ...he default is 0 Edit Click Edit to modify the rule To add modify a Bandwidth Control rule follow the steps below 1 Click Add New shown in Figure 4 54 you will see a new screen shown in Figure 4 55 2 E...

Страница 73: ...g entry shown in Figure 4 57 Figure 4 57 To add IP MAC Binding entries follow the steps below 1 Click the Add New button as shown in Figure 4 56 2 Enter the MAC Address and IP Address 3 Select the Bin...

Страница 74: ...n to load selected items to the IP MAC Binding list Click the Refresh button to refresh all items 4 14 Dynamic DNS Choose menu Dynamic DNS and you can configure the Dynamic DNS function The Modem Rout...

Страница 75: ...ider Username Password Type the User Name and Password for your DDNS account Enable DDNS Activate the DDNS function or not Login Logout Login to or logout of the DDNS service 4 15 Diagnostic Choose Di...

Страница 76: ...d explanations for each submenu are provided below 4 16 1 System Log Choose menu System Tools System Log and then you can view the logs of the Modem Router Figure 4 61 Log Type By selecting the log ty...

Страница 77: ...Time Settings and then you can configure the time on the following screen Figure 4 63 Time Zone Select your local time zone from this pull down list Date Enter your local date in MM DD YY into the rig...

Страница 78: ...ost IP Address and Host MAC Address Account Management Here you can set the account user information about Old Password New User Name New Password and Confirm Password Service Configuration Here you c...

Страница 79: ...nd Password that provided the ACS server to login the Modem Router Connection Request Path Enter the path that connects to the ACS server Connection Request Port Enter the port that connects to the AC...

Страница 80: ...local computer To upgrade the Modem Router s configuration follow these instructions Click the Browse button to find the configuration file which you want to restore Click the Restore button to updat...

Страница 81: ...e downloaded file on the computer into the File Name blank 3 Click the Upgrade button 4 The Modem Router will reboot while the upgrading has been finished Note 1 New firmware versions are posted at ht...

Страница 82: ...tings to factory defaults system will reboot automatically Update the configuration with the file system will reboot automatically 4 16 10 Statistics Choose menu System Tools Statistics and then you c...

Страница 83: ...total number of bytes received and transmitted in the last Packets Statistic interval seconds ICMP Tx The number of the ICMP packets transmitted to WAN per second at the specified Packets Statistics i...

Страница 84: ...100M Auto Negotiation RJ45 ports Auto MDI MDIX One RJ11 port LEDs Power ADSL Internet WLAN WPS 1 2 3 4 LAN Network Medium 10Base T UTP category 3 4 5 cable 100Base TX UTP category 5 Max line length 6...

Страница 85: ...onfigure the Modem Router T2 What can I do if I don t know or forget my password 1 Restore the Modem Router s configuration to its factory default settings If you don t know how to do that please refe...

Страница 86: ...TD W8962ND 300Mbps Wireless N ADSL2 Modem Router User Guide 77 Click Properties Right click Local Area Connection Double click Internet Protocol TCP IP...

Страница 87: ...TD W8962ND 300Mbps Wireless N ADSL2 Modem Router User Guide 78 Select Obtain DNS server address automatically Select Obtain an IP address automatically Click OK Click OK...

Страница 88: ...bps Wireless N ADSL2 Modem Router User Guide 79 For Windows Vista OS Go to Start Settings Control Panel and then you will see the following page Click View network status and tasks Click View status C...

Страница 89: ...962ND 300Mbps Wireless N ADSL2 Modem Router User Guide 80 Double click Internet Protocol Version 4 TCP IPv4 Select Obtain an IP address automatically Select Obtain DNS server address automatically Cli...

Страница 90: ...Modem Router User Guide 81 For Windows 7 OS Go to Start Settings Control Panel and then you will see the following page Click Change adapter settings Click Properties Right click Local Area Connection...

Страница 91: ...962ND 300Mbps Wireless N ADSL2 Modem Router User Guide 82 Double click Internet Protocol Version 4 TCP IPv4 Click OK Select Obtain DNS server address automatically Select Obtain an IP address automati...

Страница 92: ...r s factory default settings and reconfigure your Modem Router following the instructions in 4 1 Login Please feel free to contact our Technical Support if the problem still exists T4 What can I do if...

Страница 93: ...gain 4 If you still cannot access the Internet please restore your Modem Router to its factory default settings and reconfigure your Modem Router by following the instructions in 4 1 Login 5 Please fe...

Страница 94: ...nd holidays in Russian Federation Switzerland Tel 41 0 848 800998 German Service E mail support ch tp link com Fee 4 8 Rp min depending on rate of different time Service time Monday to Friday 9 00 AM...

Отзывы: