background image

ADVANCED FUNCTIONS

103

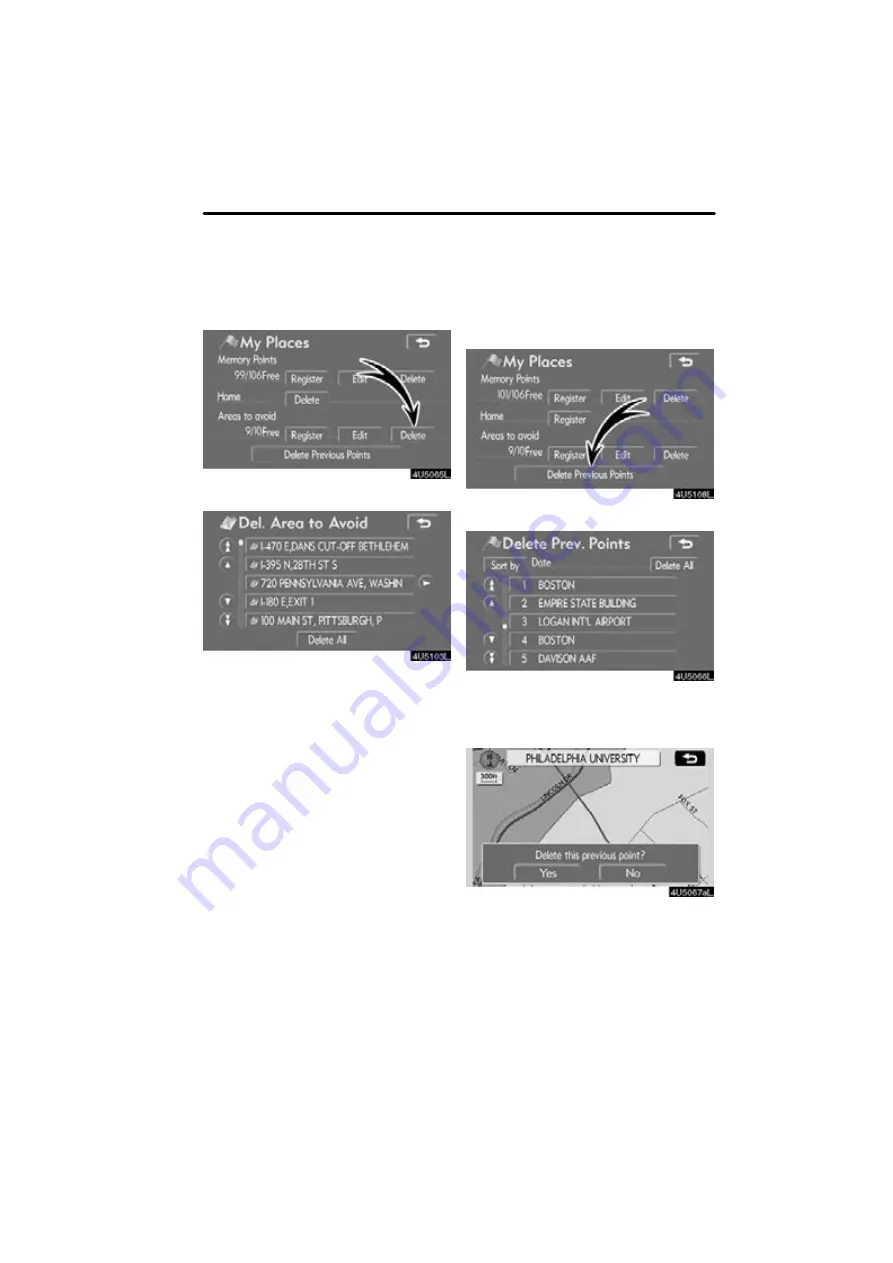
1. Push the “MENU” button.

2. Touch “My Places”.

3. Touch “Delete”.

4. Touch the button to be deleted.

“Delete All”: 

To delete all registered areas

to avoid in the system.

5. To delete the area, touch “Yes”.  To
cancel the deletion, touch “No”.

The previous destination can be deleted.

1. Push the “MENU” button.

2. Touch “My Places”.

3. Touch “Delete Previous Points”.

4. Touch the button you want to delete.

“Delete All”: 

To delete all previous points

in the system.

5. To delete the point, touch “Yes”.  To
cancel the deletion, touch “No”.

— Deleting area to avoid

— Deleting previous points

Содержание OM30875U

Страница 1: ...tination that is unfamiliar to you in an efficient manner The system uses DENSO maps The calculated routes may not be the shortest nor the least traffic congested Your own personal local knowl edge or short cut may at times be faster than the calculated routes The navigation system s database includes about 75 Point of Interest categories to allow you to easily select destinations such as restaura...

Страница 2: ...itations that may affect their ability to perform properly The accuracy of the vehicle s position depends on the satellite con dition road configuration vehicle condition or other circumstan ces For more information on the limitations of the system refer to pages 138 through 139 ...

Страница 3: ... ing the destination and if used properly can do so The driver is solely responsible for the safe operation of your vehicle and the safety of your passengers Do not use any feature of this system to the extent it becomes a distraction and pre vents safe driving The first priority while driving should always be the safe opera tion of the vehicle While driving be sure to observe all traffic regulati...

Страница 4: ...rmine the current vehicle position correctly there is a possibility of incorrect late or non voice guidance The data in the system may occasionally be incomplete Road conditions including driving restrictions no left turns street clo sures etc frequently change Therefore before following any instruction from the system look to see whether the instruction can be done safely and legally This system ...

Страница 5: ...is figure indicates the map scale 33 3 MAP VOICE button Push this button to repeat a voice guid ance cancel one touch scroll start guidance and display the current posi tion 26 68 4 DEST button Push this button to display the Destina tion screen 11 12 38 39 5 MENU button Push this button to display the Menu screen 7 9 84 86 87 88 91 104 149 Quick guide Overview buttons and guidance screen ...

Страница 6: ... the map scale 33 12 Foot print map touch screen button Touch this button to display the foot print map and the building information 34 13 DISP button Push this button to display the Display screen 130 14 Screen configuration touch screen button Touch this button to change the screen mode 31 15 Distance and time to destination Displays the distance the estimated travel time to the destination and ...

Страница 7: ... the DEST button 2 Touch If home has not been registered you can register it by touching 3 There are 11 different methods to search your home See Destination search on page 39 4 Touch Enter The Memory Point screen is displayed Registering home ...

Страница 8: ...egistration of home is complete You can also register home by touching the MENU button See Registering home on page 98 You can change the icon quick access name location and phone number See Editing memory points on page 93 ...

Страница 9: ...s buttons You can set a memory point to one of the quick access buttons which has not been set 3 There are 12 different methods to search a preset memory point See Destination search on page 39 4 Touch Enter The Memory Point screen is displayed Registering preset memory point Quick access ...

Страница 10: ...set destinations by touching the MENU button See Registering memory points on page 92 You can change the icon quick access name location and phone number See Editing memory points on page 93 The registered points can be used on the Destination screen See Destination search by Quick access on page 42 ...

Страница 11: ... on page 39 3 Touch Enter The navigation system performs a search for the route 4 Touch Guide and start driving Routes other than the one recommended can also be selected See Starting route guidance on page 59 5 Guidance to the destination is given via voice and on the guid ance screen Operation flow guiding the route ...

Страница 12: ...ing home on page 98 3 Touch Enter The navigation system performs a search for the route 4 Touch Guide and start driving Routes other than the one recommended can also be selected See Starting route guidance on page 59 5 Guidance to the destination is given via voice and on the guid ance screen Setting home as the destination ...

Страница 13: ...Initial screen 20 D Touch screen operation 22 D Inputting letters and numbers List screen operation 22 D Function help 26 D Map screen operation 26 Current position display 26 Screen scroll operation 27 Switching the screens 31 Map scale 33 Foot print map 34 Orientation of the map 35 ...

Страница 14: ...perating always apply the parking brake for safety After a few seconds the CAUTION screen will be displayed After about 5 seconds the CAUTION screen automatically switches to the map screen When the MAP VOICE button is also pushed the map screen is dis played While the CAUTION screen is displayed the DEST or MENU button cannot be operated And if the Language Cal endar or Maintenance buttons on the...

Страница 15: ...again touch Do Not Display This Message Again To register Maintenance information see Maintenance information on page 116 D Memo information This system notifies about a memo entry At the specified date the memo informa tion will be displayed when the navigation system is in operation The memo informa tion screen will be displayed every time the system is turned on The memo of the current date can...

Страница 16: ... screen D The displayed image may become darker and moving images may be slightly distorted when the display is cold D Under extremely cold conditions the map may not be displayed and the data input by a user may be de leted Also the touch screen but tons may be harder than usual to depress D When you look at the screen through polarized material such as polarized sunglasses the screen may be dark...

Страница 17: ...ed On certain letter entry screens letters can be entered in upper or lower case To enter in lower case To enter in upper case D To input numbers and symbols To display the number keys and symbol keys touch 0 9 Enter numbers and symbols by touching the number keys and symbol keys directly Touching this button erases one letter By holding this button letters will continue to be erased Touching this...

Страница 18: ...wn to the right side of the screen If the number of matching items is more than 9 999 the system displays on the screen D List screen operation When a list is displayed use the appropri ate button to scroll through the list To shift to the next or previous page To scroll up or down one item at a time This expresses a displayed screen position If appears to the right of the item name the complete n...

Страница 19: ...rent location Date To sort in the order of the date Category To sort in the order of the category Icon To sort in the order of the icons Name To sort in order by name Attribute To sort in order by attribute TYPE B Dist Sort To sort in the order of dis tance from the current vehicle location The distance from current vehicle position up to the destination is displayed to the right of the name Name ...

Страница 20: ...n return to this map screen that shows your current position at any time from any screen by pushing the MAP VOICE button While driving the current vehicle position mark is fixed on the screen and the map moves The current position is automatically set as the vehicle receives signals from the GPS Global Positioning System If the current position is not correct it is automatically corrected after th...

Страница 21: ...tion is activated The cur rent vehicle position mark will continue to move along your actual route and may move off the screen When the MAP VOICE button is pushed the current ve hicle position mark returns to the center of the screen and the map moves as the ve hicle proceeds along the designated route INFORMATION When the one touch scroll feature is used the current vehicle position mark may disa...

Страница 22: ...a few seconds and then the map screen returns The registered point is shown by on the map To change the icon or name etc see Editing memory points on page 93 Up to 106 memory points can be regis tered If there is an attempt to register more than 106 a message appears for confirmation D To see information about the icon where the cursor is set To display information about an icon set the cursor on ...

Страница 23: ...ition of the cursor is set as a destination If there is already a set destination Add to and Replace are displayed Add to To add a destination Replace To delete the existing des tinations and set a new one To register this POI as a memory point touch Mark See page 92 If is touched the registered telephone number can be called INFORMATION The desired Point of Interest can be displayed on the map sc...

Страница 24: ...yed Add to To add a destination Replace To delete the existing des tinations and set a new one To edit a memory point touch Edit See Editing memory points on page 93 To delete a memory point touch Delete If is touched the registered telephone number can be called DESTINATION INFORMATION When the cursor is set on a destination icon the name and Info are displayed on the top of the screen Touch Info...

Страница 25: ...ain screen configuration buttons cannot be selected To display the single map screen See page 32 To display the dual map screen See page 32 To display the compass mode screen See page 33 To display the turn list screen See page 66 To display the arrow screen See page 66 To display the freeway information screen See page 65 To display the intersection guid ance screen or the guidance screen on the ...

Страница 26: ...ile on a different screen touching will display the dual map screen The screen shows the dual map The map on the left is the main map The right side map can be edited Touch the right side map to display the edit screen This screen can perform the following pro cedures 1 Changing the map scale 2 Displaying the POI icon 3 Changing the orientation of the map Touch OK when you complete edi ting The sc...

Страница 27: ...e compass mode screen Touch or to change the scale of the map display The scale bar and indi cator at the bottom of the screen indicates the map scale menu The scale range is 150 feet 50 m to 250 miles 400 km Touch or until the scale bar changes By continuing to touch the but ton the scale bar changes smoothly The scale of the map display can be changed by touching the scale bar directly It is not...

Страница 28: ...ered by the foot print map the screen scale automatically changes to 150 feet 50 m D On the foot print map a one way street is displayed by D It is not possible to perform scroll ing on the foot print map one touch scroll while driving D To display building information Information is available only for buildings for which information is recorded on the map disc 1 Touch Info while the foot print ma...

Страница 29: ... North up screen Heading up screen The orientation of the map can be changed from North up to Heading up by touching the orientation symbol at the top left of the screen North up symbol Regardless of the direction of vehicle trav el North is always up Heading up symbol The direction of vehicle travel is always up A red arrow indicates North Orientation of the map ...

Страница 30: ...BASIC FUNCTIONS 36 ...

Страница 31: ... access 42 Destination search by Address 43 Destination search by POI 46 Destination search by Phone 53 Destination search by Emergency 53 Destination search by Memory 54 Destination search by Previous 54 Destination search by Map 55 Destination search by Intersection 56 Destination search by Freeway Ent Exit 57 Destination search by Coordinates 58 Deleting set destinations 58 D Starting route gui...

Страница 32: ...om the previous starting point 54 5 Memory The location can be selected from the reg istered Memory points To register memory points see Registering memory points on page 92 54 6 Emergency One of the four categories of emergency service points that are already stored in the system s database can be selected 53 7 Map A destination can be selected simply by touching the location on the displayed map...

Страница 33: ...e Quick Access for each memory point To register a Quick Access see Editing memory points on page 93 42 14 Home touch screen button A personal home address can be selected without entering the address each time If home has not been registered a message will be displayed and will automatically switch to the setting screen To use this function it is necessary to set Home for the memory point To regi...

Страница 34: ...d the Destination screen returns SELECTING THE REGION TO SEARCH ON THE INPUT SCREEN Change the selected region in order to set a destination from a different region by us ing Address POI Freeway Ent Exit or Intersection 1 Touch the region to search button like US8 on the input screen to dis play a map of the United States and Canada divided into 12 regions For map database information and updates ...

Страница 35: ...Illinois Indiana Kentucky Michigan Ohio Wisconsin US7 Arkansas Alabama Louisiana Mississippi Tennessee US8 Connecticut Massachusetts Maine New Hampshire New Jersey New York Rhode Island Vermont US9 Washington D C Delaware Maryland New Jersey Pennsylvania Virginia West Virginia US10 Florida Georgia North Carolina South Carolina HI Hawaii Canada Button Provinces and regions in cluded in the search r...

Страница 36: ...ome if Enter is touched even while driving 1 Push the DEST button 2 Touch any of the quick access touch screen buttons on the Destina tion screen The screen changes and displays the map location of the quick access point and the route preference See Starting route guidance on page 59 If a quick access point has not been regis tered a message will be displayed and will automatically switch to the s...

Страница 37: ...se number and a street name 1 Touch numbers directly on the screen to input a house number After inputting a house number touch OK to display the screen for inputting a street name It is possible to input a street name first Touch Street to display the screen for in putting a street name 2 Input the street name and touch List Destination search by Address ...

Страница 38: ...ress exists in more than one city the current screen changes to the city list screen 4 Select or enter the desired city Input Name To narrow down the listed items by inputting the city name If inputting a street name first the screen changes The house number can then be input If the above screen appears an address range on the screen can be selected If the same address exists in more than one city...

Страница 39: ...n touch Selected Region D To cancel the city setting touch Any City INPUTTING THE CITY NAME 1 Touch Input City Name 2 Input a city name 3 Touch the button of the desired city name from the displayed list Map To display the selected destination and the route preference See Starting route guidance on page 59 The current screen changes to the screen for inputting a house number or a street name See a...

Страница 40: ...FROM THE LAST 5 CITIES Touch the button of the desired city name If the navigation has not be used no cities will be displayed on the screen The current screen changes to the screen for inputting a house number or a street name See a Inputting a house number and a street name on page 43 There are two ways to search by POI Points of Interest a Search by name b Search by category 1 Push the DEST but...

Страница 41: ...putting the name of a specific Point of Interest and there are two or more sites with the same name the list screen is displayed Touch the button of the desired des tination If the same name exists in more than one city a search can be performed more easi ly with City and Category See Se lecting a city to search on page 48 and Selecting from the categories on page 49 INFORMATION The desired Point ...

Страница 42: ...ut the city name 2 Select from the nearest 5 cities 3 Select from the last 5 cities INFORMATION D To change the selected region touch Select Region D To cancel the city setting touch Any City INPUTTING THE CITY NAME 1 Touch Input City Name 2 Input the city name 3 Touch the button of the desired city name from the displayed list ...

Страница 43: ... the navigation has not be used no cities will be displayed on the screen D Selecting from the categories Touch Category If the desired POI category is on the screen touch the name to display a de tailed list of the POI category If the desired POI category is not on the screen touch List All Categories to list all POI categories When the desired category is touched the POI name list screen is disp...

Страница 44: ... from any destina tion It is possible to display the names of POIs located within approximately 20 miles 32 km from the selected search point INPUTTING THE CITY CENTER 1 Touch Input City Center 2 Input the city center name 3 Touch the button of the desired city center name When an arrow facing the desired point is touched the map scrolls in that direction Releasing the finger from the arrow will s...

Страница 45: ... scrolls in that direction Releasing the finger from the arrow will stop the scrolling 2 Touch Enter The search point is set and the POI Cate gory screen will be displayed SETTING THE SEARCH POINT FROM DESTINATIONS 1 Touch the destination buttons at the bottom of the screen When an arrow facing the desired point is touched the map scrolls in that direction Releasing the finger from the arrow will ...

Страница 46: ...elect the desired POI categories from the list and touch OK The selected category icon appears on the top left of the screen Select Category To return to the POI category selection screen Show List To display the list of POIs in the selected categories By touching the button of the desired item the screen changes and displays the map location of the selected destination and the route preference Se...

Страница 47: ...e registered pre viously See page 97 1 Push the DEST button 2 Touching Emergency on the Destination screen The display changes to a screen to select police stations dealers hospitals or fire stations While driving only nearby police stations dealers hospitals or fire stations are shown The current position is shown with an address and the latitude and the longitude at the top of the screen 3 Touch...

Страница 48: ...e selected destination and the route preference See Starting route guidance on page 59 1 Push the DEST button 2 Touch Previous on the Destina tion screen The previous starting point and up to 100 previously set destinations are displayed on the screen 3 Touch the button of the desired des tination The screen changes and displays the map location of the selected destination and the route preference...

Страница 49: ...Delete Previous Points on the My Places screen when the vehicle is stopped See Deleting previous points on page 103 1 Push the DEST button 2 Touch Map on the second page of the Destination screen The screen changes and displays the map location that was previously displayed just before the destination input operation and the route preference See Starting route guidance on page 59 INFORMATION Guida...

Страница 50: ...tersecting streets the screen changes and displays the map location of the selected destination and the route preference See Starting route guidance on page 59 If the same two streets cross at more than one intersection the screen changes and displays the menu to select the city name where the streets intersect Select the city and the map location of the selected des tination and the route prefere...

Страница 51: ...e the state designation before the number CA 118 3 Select the desired freeway by touch ing the button 4 Either a freeway Entrance or Exit can be selected 5 Touch the button of the desired en trance or exit name The screen changes and displays the map location of the selected destination and the route preference See Starting route guidance on page 59 Input Name An applicable list is dis played by t...

Страница 52: ...ting route guidance on page 59 A set destination can be deleted 1 Push the DEST button 2 Touch Del Dest on the Destina tion screen When more than one destination is set a list will be displayed on the screen 3 Touch the destination for deletion Delete All To delete all destinations on the list A message appears to confirm the request to delete 4 To delete the destination s touch Yes If Yes is touc...

Страница 53: ...oute pref erence 1 When an arrow facing the desired point is touched the map scrolls in that direction Releasing the finger from the arrow will stop the scrolling 2 Touch Enter The system starts route search and dis plays recommended routes If there is already a set destination Add to and Replace are displayed Add to To add a destination Replace To delete the existing des tinations and set a new o...

Страница 54: ...e for returning may not be the same as that for going D The route guidance to the destina tion may not be the shortest route nor a route without traffic conges tion D Route guidance may not be avail able if there is no road data for the specified location D When setting the destination on a map with a scale larger than 0 5 miles 800 m the map scale changes to 0 5 miles 800 m auto matically Set the...

Страница 55: ...calculated route includes a trip by ferry the route guidance shows a sea route After you travel by ferry the current vehicle posi tion may be incorrect Upon recep tion of GPS signals it is automati cally corrected 3 ROUTES SELECTION 1 To select the desired route from three routes touch 3 Routes 2 Touch Quick1 Quick2 or Short to select the desired route Quick1 Recommended route This route is indica...

Страница 56: ...DESTINATION SEARCH 62 1 Time necessary for the entire trip 2 Distance of the entire trip 3 Toll road 4 Freeway 5 Ferry ...

Страница 57: ... destination 70 D Setting and deleting destination 71 Adding destinations 70 Reordering destinations 70 Deleting destinations 71 D Setting route 73 Search condition 72 Detour setting 73 Route preference 75 Starting route from adjacent road 75 D Map view 77 Display POI icons 76 Route overview 78 Route preview 79 Route trace 80 Point of Interest ...

Страница 58: ...traveled on D When you arrive at your destina tion the destination name will be displayed on the top of the screen Touching OFF clears the display D During freeway driving During freeway driving the freeway exit in formation screen will be displayed This screen displays the distance to the next junction and exit or POIs in the vicin ity of the freeway exit 1 Current position 2 Points of Interest t...

Страница 59: ...eeway disappears and the map screen appears When touching or pushing the MAP VOICE button the guidance screen on freeway reappears D When approaching an intersection When the vehicle approaches an intersec tion the intersection guidance screen will be displayed 1 Next street name 2 Distance to the intersection 3 Current position OFF The intersection guidance screen disappears and the map screen ap...

Страница 60: ...xt street name or destination name 2 Turn direction 3 Distance between turns 4 Current street name ARROW SCREEN On this screen information about next turns on the guidance route can be viewed Touching during guidance displays the arrow screen 1 Exit number street name contain ing number or next street name 2 Turn direction 3 Distance to the next turn 4 Current street name ...

Страница 61: ...Right turn 4 Beep sound only INFORMATION On freeways interstates or other highways with higher speed limits the voice guidance will be made at earlier points than on city streets in order to allow time to maneuver 4 2 miles 0 25 miles 1 Proceed about 4 miles to the traffic circle 2 In a quarter of a mile traffic circle ahead and then 3rd exit ahead 3 The 3rd exit ahead 4 The exit ahead 5 Beep soun...

Страница 62: ...Beep sound only The system announces the approach to the final destination 1 Your destination is ahead 2 You have arrived at your des tination The route guidance is now finished INFORMATION D If the system cannot determine the current vehicle position correctly in cases of poor GPS signal recep tion the voice guidance may be made early or delayed D If you did not hear the voice guid ance command p...

Страница 63: ...he distance the estimated travel time and the estimated arrival time from the cur rent position to the selected destination are displayed Estimated travel time is dis played Estimated arrival time is dis played To switch to estimated arrival time To switch to estimated travel time Displayed while driving off the guidance route The destina tion direction is indicated by an arrow INFORMATION When th...

Страница 64: ... same way as the destination search See Destination search on page 39 4 Touch the desired Add to deter mine the arrival order of the additional destination When more than one destination is set you can change the arrival order of the destinations 1 Touch Route 2 Touch Reorder Setting and deleting destination Adding destinations Reordering destinations ...

Страница 65: ...from the previously input number 4 After selecting the destinations touch OK The system searches for the guidance route again and displays the entire route Even if OK is not touched the entire route is displayed automatically within a few seconds when the order is fixed A set destination can be deleted 1 Touch Route 2 Touch Delete When more than one destination is set a list will be displayed on t...

Страница 66: ...ta cannot be re covered If No is touched the previous screen will return 5 If more than one destination is set touch OK after deleting the destina tions The system searches for the guidance route again and displays the entire route You can designate the route conditions of the route to the destination 1 Touch Route 2 Touch Search Condition 3 Touch Quick Quick1 Quick2 or Short and touch OK Setting ...

Страница 67: ...displayed Guide To start guidance Route To change a route See pages 70 and 72 While the route guidance is operating you can change the route to detour around a section of the route where a delay is caused by road repairs or an accident etc 1 Touch Route 2 Touch Detour Detour setting ...

Страница 68: ... new route to the destination This picture shows an example of how the system would guide around a delay caused by a traffic jam 1 This position indicates the location of a traffic jam caused by road repairs or an accident 2 This route indicates the detour sug gested by the system INFORMATION D When your vehicle is on a freeway the detour distance selections are 5 15 and 25 miles km D The system m...

Страница 69: ...ce by touching the button When searching for a route the system will avoid routes when the indicator is off 4 After choosing the desired route preference touch OK You can start the route guidance from the adjacent road ex When route guidance is set on the freeway but the vehicle is driven parallel along the freeway 1 Touch Route 2 Touch Start from Adjacent Road When there is no adjacent road this ...

Страница 70: ... POI location sym bols on the map screen By selecting the desired POI category and then touching OK the selected POI icons are displayed on the map screen To turn off the Points of Interest icon on the map screen touch Delete Other POIs If the desired Point of Inter est can not be found on the limited choice screen touch this button Local POI List When searching for the nearest Point of Interest t...

Страница 71: ...e screen By selecting the desired POI category and then touching OK the selected POI icons are displayed on the map screen To return to the POI category selection screen touch More D To display the local POI list Points of Interest that are within 20 miles 32 km of the current position will be listed from among the selected categories 1 Touch Local POI List on the Dis play POI icons screen 2 Touch...

Страница 72: ...d on the screen The distance shown is measured as a straight line from the current vehicle position to the POI 2 When the desired Point of Interest overlaps with the cursor touch Enter The screen changes and displays the map location of the selected destination and route preference See Starting route guidance on page 59 1 Touch Map View 2 Touch Route Overview The entire route from the current posi...

Страница 73: ...hat runs through two or more cities the name change will not appear on the list The street names will be displayed in order from the starting point along with the dis tance to the next turn These marks indicate the direction in which you should turn at an intersection Touch Map on the Turn List screen The point which you choose is displayed on the map screen 1 Touch Map View 2 Touch Route Preview ...

Страница 74: ... previous destination or starting point To review the route to the previous destination or starting point in fast forward mode To indicate the previous destina tion or starting point It is possible to store the traveled route up to 124 miles 200 km and retrace the route on the display INFORMATION This feature is available on the map with more detailed map scale than 30 miles 50 km Touch Map View R...

Страница 75: ... the route trace Stop To stop recording the route trace If you touch Stop to display the following screen Touching Yes stops recording and the route trace remains displayed on the screen Touching No stops recording and the route trace is erased ...

Страница 76: ...ROUTE GUIDANCE 82 ...

Страница 77: ...rence Setup screen 86 D Suspending and resuming guidance 87 D Volume 88 D User selection 89 D My places 92 Registering memory points 92 Editing memory points 93 Deleting memory points 97 Registering home 98 Deleting home 99 Registering area to avoid 99 Editing area to avoid 100 Deleting area to avoid 103 Deleting previous points 103 D Setup 105 ...

Страница 78: ...uidance 87 3 Function help for the Menu screen can be viewed on this screen 26 4 Map DVD Displays information regarding the disc version or covered area 140 5 Select User Up to 3 different settings for different users can be memorized 88 6 Setup Enables various settings for the navigation system 85 104 7 My Places Enables changes to Memory points Home and Areas to avoid Enables deletion of the pre...

Страница 79: ...ut Key layout can be changed 106 4 Function The choice whether to display each touch screen button and current street name on the map screen can be set 107 5 Display POI Icons A selection of 6 icons displayed on the Display POI Icons top screen is possible 107 6 Display Building Shapes Selection of either ON or OFF to display the building shape on the map screen is possible 108 7 Traffic Restrict ...

Страница 80: ...Calibration Adjustment of the current vehicle position mark can be done manually 112 13 Default This touch screen button initializes all of the settings 104 14 Function help for the Setup screen can be viewed 26 D To suspend guidance 1 Push the MENU button 2 Touch Suspend Guidance INFORMATION Without route guidance Suspend Guidance cannot be used The screen will return to the current posi tion map...

Страница 81: ...idance 1 Push the MENU button 2 Touch Resume Guidance The screen will change to the current posi tion map with route guidance The voice guidance volume can be ad justed or switched off 1 Push the MENU button 4U5552L 2 Touch Volume Volume ...

Страница 82: ...changed to other screens Adaptive Volume Control By turning Adaptive Volume Control on the volume is turned up automatically when the ve hicle speed exceeds 50 mph 80 km h To turn the Adaptive Volume Control system on touch the button The indicator will be highlighted The system can memorize the following settings for up to three users D Map direction D Map scale D Map configuration D Guidance mod...

Страница 83: ... register 1 Touch Memorize The confirmation screen will be displayed 2 To register touch Yes To return to the previous screen touch No or When a button that is already registered is touched the following screen appears To replace touch Yes To cancel the re placement touch No or ...

Страница 84: ...nge user Touch User number The above message appears then the map screen will be displayed D To delete user 1 Touch Delete The confirmation screen will be displayed 2 To delete touch Yes To return to the previous screen touch No or ...

Страница 85: ...ed 1 Registers memory points See Registering memory points on page 92 2 Edits memory points See Editing memory points on page 93 3 Deletes memory points See Deleting memory points on page 97 4 Registers or deletes home See Registering home on page 98 or Deleting home on page 99 5 Registers areas to avoid See Registering area to avoid on page 99 6 Edits areas to avoid See Editing area to avoid on p...

Страница 86: ...way as for a destination search See Des tination search on page 39 After memory point registration is com pleted the Memory Point screen will be displayed 5 Touch OK To edit registered information see Editing memory Points on page 93 INFORMATION Up to 106 memory points can be reg istered Registering memory points ...

Страница 87: ...uch the button to be edited Icon To select icons to be displayed on the map See page 94 Quick Access To set an attribute Memory points with a set attribute can be used as a Quick access or Home but ton See page 95 Name To edit memory point names The names can be displayed on the map See page 96 Location To edit location information See page 96 Phone To edit telephone numbers See page 97 6 Touch OK...

Страница 88: ...CONS When the vehicle approaches the memory point the selected sound will be heard 1 Touch with Sound on the Change Icon screen 2 Touch the desired sound icon The next screen appears when Bell with Direction is touched Touch either or to adjust the direction Touch Enter The bell sounds only when the vehicle ap proaches this point in the direction that has been set ...

Страница 89: ...n page 42 and Destination search by Quick access on page 42 1 Touch Quick Access on the Memory Point screen 2 Touch the desired attribute It is possible to replace a registered attrib ute 3 To replace the attribute touch Yes To return to the previous screen touch No or INFORMATION One Home and five Quick Access can be set DELETING Quick Access 1 Touch Del 2 To delete an attribute touch Yes To retu...

Страница 90: ...layed DISPLAYING MEMORY POINT NAMES The name of a memory point that may be displayed on the map can be set To show the name touch ON on the Memory Point screen To not show it touch OFF D To change Location 1 Touch Location on the Memory Point screen 2 Touch the eight directional touch screen button to move the cursor to the desired point on the map 3 Touch Enter The previous screen will be display...

Страница 91: ... number using number keys 3 Touch OK The previous screen will be displayed 1 Push the MENU button 2 Touch My Places 3 Touch Delete 4 Touch the button to be deleted Delete All To delete all memory points in the system 5 To delete the memory point touch Yes To cancel the deletion touch No Deleting memory points ...

Страница 92: ...n search by Home on page 42 1 Push the MENU button 2 Touch My Places 3 Touch Register 4 Enter the location in the same way as for a destination search See Des tination search on page 39 When registration of home is completed the Memory Point screen will be dis played 5 Touch OK To edit registered information see Editing memory points on page 93 Registering home ...

Страница 93: ... other reasons can be registered as areas to avoid 1 Push the MENU button 2 Touch My Places 3 Touch Register 4 Enter the location in the same way as for a destination search or display the map of the area to be avoided See Destination search on page 39 5 Touch the eight directional touch screen button to move the cursor to the desired point on the map 6 Touch Enter Deleting home Registering area t...

Страница 94: ...h the area to be avoided may be shown D Up to 10 locations can be regis tered as points areas to avoid If there are 10 locations already reg istered the following message will be displayed Unable to register additional points Perform opera tion again after deleting unneces sary points The name location and or area size of a registered area can be edited 1 Push the MENU button 2 Touch My Places 3 T...

Страница 95: ...e touch ON on the Edit Area to Avoid screen To turn off the feature touch OFF on the Edit Area to Avoid screen 6 Touch OK D To change Name 1 Touch Name on the Edit Area to Avoid screen 2 Enter the name using alphanumeric keys Up to 24 letters can be entered 3 Touch OK The previous screen will be displayed DISPLAYING NAMES OF AREAS TO BE AVOIDED The name of an area to be avoided that may be display...

Страница 96: ...ectional touch screen button to move the cursor to the desired point on the map 3 Touch Enter The previous screen will be displayed D To change Area Size 1 Touch Area Size on the Edit Area to Avoid screen 2 Touch either or to change the size of the area to be avoided 3 Touch OK The previous screen will be displayed ...

Страница 97: ...5 To delete the area touch Yes To cancel the deletion touch No The previous destination can be deleted 1 Push the MENU button 2 Touch My Places 3 Touch Delete Previous Points 4 Touch the button you want to delete Delete All To delete all previous points in the system 5 To delete the point touch Yes To cancel the deletion touch No Deleting area to avoid Deleting previous points ...

Страница 98: ...FORMATION To reset all setup items touch De fault D Unit of measurement Unit of measurement can be changed 1 Push the MENU button 2 Touch Setup on the Menu screen 3 Touch km or miles of Unit of Measurement to choose the distance unit The selected button is highlighted 4 Touch OK INFORMATION This function is available only in En glish or Spanish To switch language see Selecting a language on page 1...

Страница 99: ...in street and Freeway To set the default speeds touch De fault 5 After setting of the desired speeds is completed touch OK INFORMATION D The displayed time to the destina tion is the approximate driving time that is calculated based on the se lected speeds and the actual posi tion along the guidance route D The time shown on the screen may vary greatly depending on prog ress along the route which ...

Страница 100: ... layout Key layout can be changed 1 Push the MENU button 2 Touch Setup on the Menu screen 3 Touch ABC or QWE of Key board Layout to choose the input key layout LAYOUT TYPE ABC type QWE type The selected button is highlighted 4 Touch OK ...

Страница 101: ...4 Touch the button to be turned off The button becomes dimmed To set the default touch Default 5 Touch OK D POI category change Display POI Icons Select from among the 6 icons displayed on the Display POI Icons top screen so that setting of the icons to be displayed on the map screen can be done easily 1 Push the MENU button 2 Touch Setup on the Menu screen 3 Touch Change of Display POI Icons 4 To...

Страница 102: ...g Shapes fea ture is turned on the system will display the building shape on the map screen using a scale of 150 feet 50 m to 300 feet 100 m To turn the Display Building Shapes on 1 Push the MENU button 2 Touch Setup on the Menu screen Then touch to display page 2 of the Setup screen 3 Touch ON of Display Building Shapes The selected button is highlighted 4 Touch OK ...

Страница 103: ...y page 2 of the Setup screen 3 Touch ON of Traffic Restrict No tification The selected button is highlighted 4 Touch OK D Voice recognition guidance When the Voice Recognition Guidance feature is turned on the voice recognition guidance can be heard automatically To turn the Voice Recognition Guidance on 1 Push the MENU button 2 Touch Setup on the Menu screen Then touch to display page 2 of the Se...

Страница 104: ... display page 2 of the Setup screen 3 Touch ON of Voice Guidance in All Modes The selected button is highlighted 4 Touch OK D Auto voice guidance When the Auto Voice Guidance feature is turned on the voice guidance can be heard automatically When the Auto Voice Guidance feature is turned off the voice guidance can be heard only if the MAP VOICE button is pushed To turn the Auto Voice Guidance mode...

Страница 105: ...u screen Then touch twice to display page 3 of the Setup screen 3 Touch ON of Pop up Message The selected button is highlighted 4 Touch OK When the Pop up Message is turned off the following messages will not displayed This message appears when the system is in the POI mode and the map scale is 1 mile 1 6 km or greater The message appears when the map is switched to the dual map screen mode ...

Страница 106: ...bration 4 Touch the desired button INFORMATION For additional information on the ac curacy of a current vehicle position see Limitations of the navigation system on page 138 POSITION DIRECTION CALIBRATION When driving the current vehicle position mark will be automatically corrected by GPS signals If GPS reception is poor due to location you can manually adjust the current vehicle position mark 1 ...

Страница 107: ...unc tion will adjust the miscalculation caused by the circumference difference between the old and new tires If this procedure is not performed when the tires are replaced the current vehicle position mark may be incorrectly displayed To perform a distance calibration pro cedure touch Tire Change on the Calibration screen The message appears and the quick dis tance calibration is automatically sta...

Страница 108: ...ADVANCED FUNCTIONS 114 ...

Страница 109: ...7 Maintenance information setting 116 Dealer setting 118 D Calendar with memo 121 Adding a memo 122 Editing a memo 123 Memo list 123 D Speech command system 126 D Help screen 128 D Clock adjustment 129 D Screen adjustment 131 D Screen setting 132 D Beep setting 135 D Selecting a language 135 ...

Страница 110: ...ll To cancel all conditions which have been inputted Reset All To reset the item which has satisfied a condition Set Dealer To register or edit dealer in formation See Dealer setting on page 118 If ON is selected the system gives main tenance information with the Information screen when the system is turned on See page 21 If OFF is selected the Information screen is disabled When the vehicle needs...

Страница 111: ...ted separately from provided ones 4 Input the conditions Notice of Date The next maintenance date can be input Notice of Distance The driving dis tance until the next maintenance check can be input Delete To cancel the date and distance conditions Reset To reset the date and distance conditions 5 Touch OK The screen then returns to the Mainte nance screen INFORMATION D For scheduled maintenance in...

Страница 112: ...destination search See Destination search on page 39 When Set Dealer registration is finished the Edit Dealer screen will be displayed 5 Touch the button to be edited Dealer To enter the name of a dealer See page 119 Contact To enter the name of a dealer member See page 119 Location To set a location See page 119 Phone To set a telephone number See page 120 Delete Dealer To delete the dealer in fo...

Страница 113: ...ng the alphanu meric keys Up to 24 letters can be entered 3 Touch OK The previous screen will be displayed D To edit Location 1 Touch Location on the Edit Deal er screen 2 Touch the eight directional touch screen button to move the cursor to the desired point on the map 3 Touch Enter The previous screen will be displayed ...

Страница 114: ...revious screen will be displayed It is possible to enter memos for particular dates on the calendar The system informs you of the memo entry when the system is turned on See page 21 Memos can also be used for route guid ance if the memo has been registered with location information 1 Push the INFO button 5U5612L 2 Touch Calendar Calendar with memo ...

Страница 115: ...o screen Memos can be edited by touching the list button See Editing a memo on page 123 Add Memo To add a memo See Adding a memo on page 122 Mark f To change the color of the mark displayed next to the date To default the mark color touch Delete on the Mark color screen Date f To change the color of the date To default the date color touch Delete on the Date color screen Prev Day To go to the Memo...

Страница 116: ...the Calendar screen 4 Touch Add Memo Up to 100 memos can be added 5 Touch Memo 6 Enter text using the keys Up to 24 letters can be entered After entering the text touch OK at the bottom right of the screen 7 When registering information on the memo touch Location A screen similar to the destination search screen appears Search the same way as searching a destination See Destination search on page ...

Страница 117: ...See Starting route guid ance on page 59 Delete To delete the memo It is possible to display a memo list by set ting a condition 1 Push the INFO button 2 Touch Calendar 3 Touch List on the Calendar screen 4 Touch the desired search condition to list the memos This Week To display the list of memos for the current week This Month To display the list of me mos for the current month Future To display ...

Страница 118: ...played 6 To delete touch Yes To cancel the deletion touch No D To display memos for a specified pe riod of time 1 Touch Period on the Memo Search screen 2 Enter the period using the numeral keys The period from January 1 2005 through December 31 2024 can be set for search ing 3 After setting the period touch OK The Memo List screen will be displayed ...

Страница 119: ...k the command list touch Help to display the help screen See Help screen on page 127 When you touch Cancel the previous screen returns If the navigation system does not respond or the confirmation screen does not disap pear please push the talk switch and try again If no command is given a beep sounds and the indicator disappears 6 seconds later If the system does not recognize your speech the sys...

Страница 120: ...dridge Avenue Hawaii or Hawaii area is not covered by the voice recognition If your home is not registered you will hear Home is not registered 3 If the system recognized the com mand the recognition result Home is displayed on the top of the screen with the screen message Displayed mes sage and the touch screen buttons on the screen depend on the situation Touch or say Cancel and the system will ...

Страница 121: ...ory INFORMATION In the following conditions the sys tem may not recognize the command properly D The command is not correct or clear D There are some noises such as wind noise etc This system has a function which dis plays the voice recognition help screen You can see the command list and operating guide on it a Command list 1 If the Operating Guide screen is displayed touch Command List on the up...

Страница 122: ... buttons on the right side of the Operating Guide screen 3 You can scroll through the list of the operating guide by touching or Touch OK after you check it Clock adjustment The clock in this system can be cor rected manually or by using signals from the GPS Daylight Saving Time setting or your desired time setting is available 1 Push the INFO button 5U5613L 2 Touch Adjust Clock ...

Страница 123: ...st hour touch 00 switch Daylight Saving Time Daylight saving time can be set or canceled While daylight saving time is set this switch is highlighted in green Time Zone You can select the time zone Touching this switch changes to the time zone selection screen Touch the switch of your desired area The time zone for the area is set and the pre vious screen returns When you touch Others this screen ...

Страница 124: ...ngthens the contrast of the screen Contrast Weakens the contrast of the screen Brightness Brightens the screen Brightness Darkens the screen 3 After adjusting the screen touch OK The screen goes off when Screen Off is touched To turn the display screen back on push any button such as INFO etc The selected screen appears INFORMATION When you do not touch any button on the Display screen for 20 seco...

Страница 125: ...de on the adjustment screen for brightness and contrast control If the screen is set in the day mode with the headlight switch turned to on this condi tion is memorized in the system even with the engine turned off When the instrument panel light control switch is set to MAX Day Mode is not dis played 1 Push the INFO button to display the Information screen 5U5614L 2 Touch Screen Setting Screen se...

Страница 126: ...oner screen Select ON or OFF and then touch OK ON The navigation screen automatical ly returns from the audio air conditioner screen 20 seconds after the end of audio air conditioner screen operation OFF The audio air conditioner screen remains on b Switch color You can select the color of the touch screen buttons Select Blue or Gold and then touch OK ...

Страница 127: ...ts D Areas to avoid D Previous points D Route trace D User selection settings D Phone book data D Dialed numbers and received calls D Speed dial D Bluetooth phone data D Security code This function is available only when the ve hicle is not moving 1 Touch Delete personal data The Delete personal data screen ap pears 2 Touch Delete The Confirmation to delete all personal data screen appears 3 Touch...

Страница 128: ...U5615L 2 Touch Beep Off Beep Off is highlighted To switch the beep sound on touch Beep Off again The language of the touch screen but tons pop up messages and the voice guidance can be changed 1 Push the INFO button 5U5616L 2 Touch Language Beep setting Selecting a language ...

Страница 129: ...ñol to select a language If a screen other than for the navigation system is displayed the current screen would change to the CAUTION screen by pushing the MAP VOICE DEST or MENU button 4 Touch OK The language is changed and the screen returns to the map display ...

Страница 130: ...OTHER FUNCTIONS 136 ...

Страница 131: ...SECTION 6 APPENDIX 137 APPENDIX Appendix D Limitations of the navigation system 139 D Map database information and updates 141 ...

Страница 132: ...thin a few seconds When your vehicle is receiving signals from the satellites the GPS mark ap pears at the top left of the screen The GPS signal may be physically ob structed leading to inaccurate vehicle position on the map display Tunnels tall buildings trucks or even the placement of objects on the instrument panel may ob struct the GPS signals The GPS satellites may not send signals due to rep...

Страница 133: ...ibration see page 112 b Inappropriate route guidance may occur in the following cases D When turning at an intersection off the designated route guidance D If you set more than one destination but skip any of them auto reroute will dis play a route returning to the destination on the previous route D When turning at an intersection for which there is no route guidance D When passing through an int...

Страница 134: ...s is correct This system uses the maps of DENSO 2007 DENSO CORPORATION 2006 NAVTEQ All rights reserved 2006 Tele Atlas North America Inc All rights reserved This material is pro prietary and the subject of copyright protection and other intellectual prop erty rights owned by or licensed to Tele Atlas North America Inc The use of this material is subject to the terms of a license agreement You will...

Страница 135: ...es Post al ServiceR The following trademarks and registrations are owned by the USPS United States Postal Service USPS and ZIP 4 TERMS AND CONDITIONS Personal Use Only You agree to use this Data together with the navigation system for the solely personal non commercial purposes for which you were licensed and not for service bu reau time sharing or other similar pur poses Accordingly but subject t...

Страница 136: ... fitness for a particular purpose usefulness use or results to be obtained from this Data or that the Data or server will be uninterrupted or error free Disclaimer of Warranty CLIENT AND ITS LICENSORS INCLUDING THEIR LICENSORS AND SUPPLIERS DIS CLAIM ANY WARRANTIES EX PRESS OR IMPLIED OF QUALITY PERFORMANCE MERCHANTABIL ITY FITNESS FOR A PARTICULAR PURPOSE OR NON INFRINGE MENT Some States Territor...

Страница 137: ...rom or in connection with the Data provided to you hereunder Government End Users If the Data is being acquired by or on behalf of the United States government or any other entity seeking or applying rights similar to those customarily claimed by the United States government this Data is a commercial item as that term is defined at 48 C F R FAR 2 101 is licensed in accordance with these End User T...

Страница 138: ... DATABASE according and subject to the terms and conditions of this Agreement You shall not alter obscure or remove any copyright notices trademark notices or other restrictive legends relating to the DATABASE The DATABASE comprises confiden tial and proprietary information and materials of TANA Accordingly you shall hold the DATABASE in confi dence and trust You shall take rea sonable steps to pr...

Страница 139: ...EEMENT OR YOUR USE OF THE DATABASE INCLUDING WITHOUT LIMITATION LOST PROF ITS OR COSTS OF COVER LOSS OF USE OR BUSINESS INTERRUP TION OR THE LIKE REGARDLESS OF WHETHER THE PARTY WAS AD VISED OF THE POSSIBILITY OF SUCH DAMAGES IN NO EVENT WILL THE TOTAL LI ABILITY OF DENSO OR TANA OR THEIR LICENSORS OR SUPPLI ERS EXCEED THE AMOUNTS PAID BY YOU FOR THE DATABASE WARNINGS The DATABASE comprises facts ...

Страница 140: ... 603 643 0330 The DATABASE is 1984 2006 by Tele Atlas North Ameri ca Inc ALL RIGHTS RESERVED For purpose of any public disclosure provision under any federal state or lo cal law it is agreed that the DATABASE is a trade secret and a proprietary com mercial product and not subject to dis closure If you are an agency department or other entity of any State government the United States Government or ...

Страница 141: ...MENT Personal Use Only You agree to use this information for solely personal non commercial purposes and not for service bureau time sharing or other similar purposes You may not modify the information or remove any copy right notices that appear on the infor mation in any way You may not de compile disassemble or reverse engi neer any portion of this information and may not transfer or distribute...

Страница 142: ...of or in connection with any use or possession by you of this information END USER NOTICE The marks of companies displayed by this product to indicate business loca tions are the marks of their respective owners The use of such marks in this product does not imply any sponsor ship approval or endorsement by such companies of this product There are two types of areas available for route guidance In...

Страница 143: ...tabase is normally updated once a year Contact your Lexus dealer for information about the availability and pric ing of an update D To confirm the database version and disc coverage area 1 Push the MENU button 2 Touch Map DVD ...

Страница 144: ...N For vehicles sold in U S A and Canada D Laser products D Do not take this unit apart or at tempt to make any changes yourself This is an intricate unit that uses a laser pickup to re trieve information from the sur face of compact discs The laser is carefully shielded so that its rays remain inside the cabinet Therefore never try to disas semble the player or alter any of its parts since you may...

Отзывы: