


19 TRUCK DIMENSIONS
en‐92
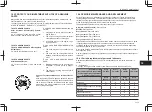
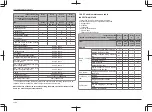
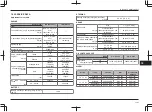
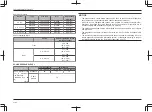
19.1 Truck weight
kg
8FG35N
408FD35N
8FG40N
408FD40N
8FG45N
408FD45N
8FG50N
408FD50N 408FD60N 408FD70N 408FD80N
Truck total weight
5700
5780
6070
6150
6610
6690
7140
7220
8360
9090
9940
Front axle load (with load)
8670
8690
9360
9380
10430
10450
10880
10910
12850
14330
15860
Front axle load (without load)
2550
2570
2480
2500
2830
2850
3000
3030
3705
3640
3630
Rear axle load (with load)
1030
1090
1210
1270
1170
1230
1260
1310
1510
1760
2080
Rear axle load (without load)
3150
3210
3590
3650
3780
3840
4140
4190
4655
5450
6310
Содержание 40--8FD35N
Страница 92: ...19 TRUCK DIMENSIONS en 93 19...


