6
7
ENGLISH
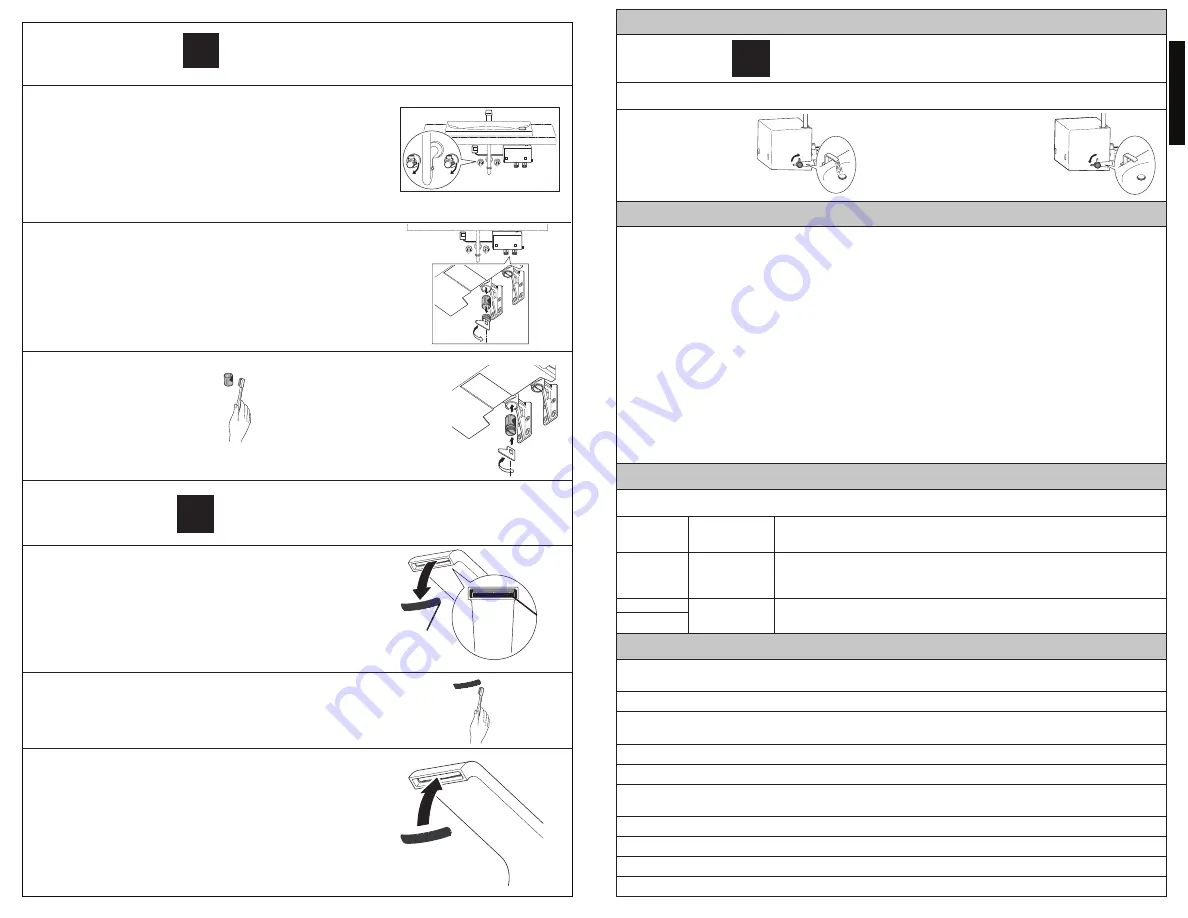
Cleaning the Filter
Limpiando el Filtro
Nettoyage de la Commande
1) Remove the cover and pull out the filter.
1) Retire la cubierta y jale el filtro hacia afuera.
1) Retirez le couvercle et extrayez le filtre.
2) Clean the filter with a brush.
2) Limpie el filtro con un cepillo.
2) Nettoyez le filtre à l’aide d’une
brosse.
3) Put the filter back and
close the cover.
3) Ponga el filtro de vuelta
y cierre la cubierta.
3) Replacez le filtre et re-
fermez le couvercle.
Cleaning the Filter in the Spout
Limpiando el Filtro en el Surtidor
Entretien du Filtre du Robinet
1) Remove the filter with a fine-tipped tool.
1) Retire el filtro con una herramienta con punta fina.
1) Retirez le filtre à l’aide d’un outil muni d’une pointe
aplatie.
2) Clean the filter with a brush.
2) Limpie el filtro con un cepillo.
2) Nettoyage le filtre à l’aide d’une brosse.
CLEANING AND CARE
Clean the parts regularly to prevent the accumulation of dirt and lime-scale.
For daily cleaning, use a neutral cleaner.
Acids are necessary ingredients of cleaning materials for removing lime. However, please pay attention to the follow-
ing points when cleaning fittings:
• Only use cleaning materials which are explicitly recommended for this type of application.
• Never use cleaning materials which contain hydrochloric, formic or acetic acid, as they may cause considerable
damage.
• Do not use phosphoric acid as it can also cause damage.
• Never use cleaning materials or appliances with an abrasive effect, such as cleaning powders, sponges or microfi-
ber cloths.
Please follow the cleaning material manufacturer’s instructions. In addition, pay attention to the following points:
• When using spray cleaners, spray first onto a soft cloth or sponge. Never spray directly onto the fittings, as drops
could enter openings and gaps, which can then cause damage.
• After cleaning, rinse thoroughly with clean water to remove any cleaner residue.
Components with damaged surfaces must be exchanged, otherwise this can cause an injury. Damage caused by
improper treatment will not be covered by our warranty.
Check the flashing light pattern of the handle and refer to the following table:
ERROR INDICATIONS
SPECIFICATIONS
NOTE: Close the two stop valves (hot/cold) before maintenance.
Open the two valves after completing the maintenance.
NOTA: Cierre las dos válvulas de cierre (caliente/frío) antes del
mantenimiento. Abra las dos válvulas después de comple-
tar el mantenimiento.
REMARQUE: Fermez les deux robinets d’arrêt (chaud/froid) avant
l’entretien. Ouvrez les robinets d’arrêt une fois
l’entretien terminé.
Operation of the Manual Operating Valve
The handle cannot be operated during a power outage. Use the manual operating valve instead.
1) To start the water:
Turn the valve
clockwise.
2) To stop the water:
Turn the valve
counter-clockwise.
3) Put the filter back. The filter is curve-shaped, so please
make sure it is placed back at the right angle.
3) Ponga el filtro de vuelta. El filtro tiene forma de curva,
asegúrese que esté colocado de vuelta en el ángulo
correcto.
3) Remettez le filtre en place. Le filtre est incurvé, pour
cette raison faites attention à le remetrre dans le bon
angle.
C
D
E
Flashing
Pattern
Problem
Solution
Red flashing
(2 times per
second)
Hot water
temperature is
extremely high
Wait for a moment and then press the handle again.
• If the hot water temperature exceeds 122°F, the water will stop automatically.
• Operation is not possible until the water temperature in the controller is lowered.
Pink flashing
Blue flashing
Malfunction of
the controller.
Disconnect the main plug and then reconnect it.
If the flashing continues, request a repair.
• Operating pressure range: Min: 10 psi (0.07 MPa) flow pressure
Max: 80 psi (0.55 MPa) static pressure
- Recommended: 30 psi-44 psi (0.2-0.3 MPa)
• Hot water supply temperature: 120°F-180°F (49°C-82°C)
(Refer to your local code for the maximum allowed temperature)
• Cold water supply temperature: 39°F-80°F (4°C-27°C)
• Discharge water temperature: 93°F-112°F (34°C-44°C)
• Flow rate: 1.3 gpm (5 lpm) or 2.0 (7.6 lpm)
(Refer to the “How To Use” section in this manual)
• Supply voltage: AC 100-240 VAC (50/60 Hz)
• Waterproof specifications: IPX3 (handle)
IPX3 (controller)
• Water inlet: 1/2” NPSM
OPERATION DURING A POWER OUTAGE


