background image

55

Adjustments &

Settings

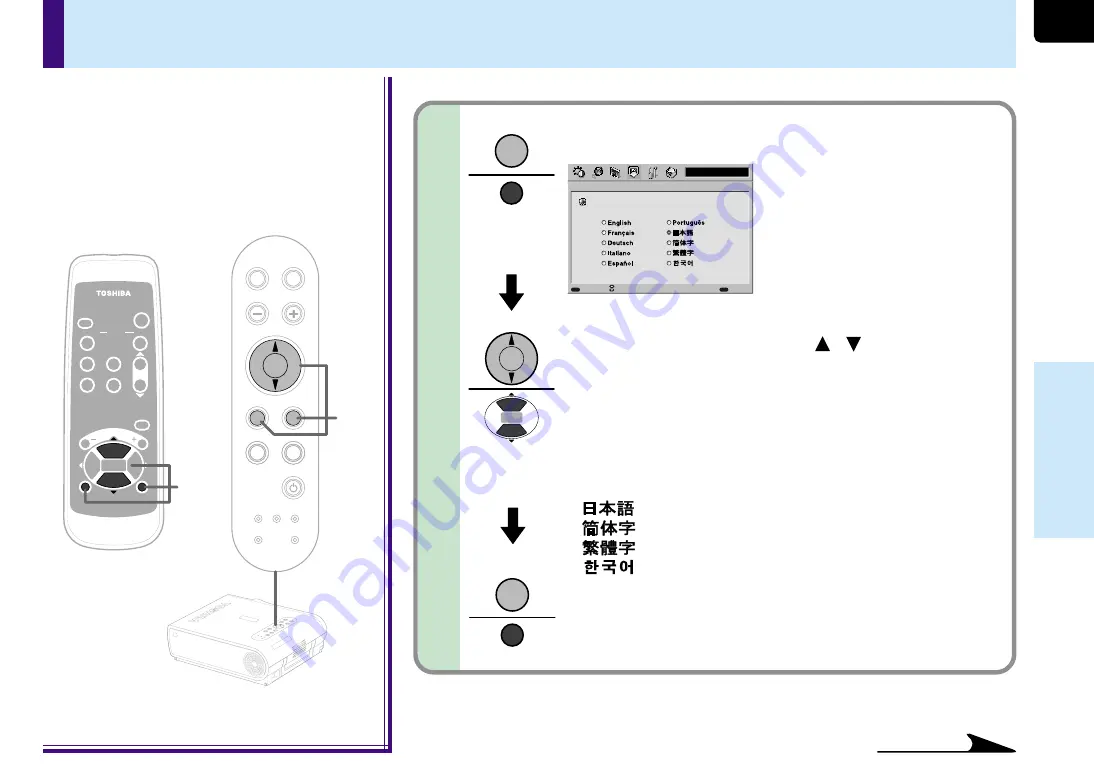
Press ENTER.

The sub-menu of “Language” appears.

Use the selection buttons (  /  ) to select a
language.

Press EXIT to return to the FULL MENU.

MENU

ON /

INPUT

ENTER

CT-90072

KEYSTONE

AUTO

SET

EXIT

PIP

FREEZE

MUTE

CALL

RESIZE

VOL/ADJ

STANDBY

TEMP LAMP

ON

BUSY

FAN

ON/STANDBY

KEYSTONE

SET

AUTO

AUTO

MENU

INPUT

VOL/ADJ.

4-a

4-a

EXIT

ENTER

MENU

INPUT

TEM

P LA

MP

ON

BUSY

FAN

ON/S

TAND

BY

KEYS

TONE

SET

AUTO

AUTO

EXIT

ENTE

R

MEN

U

INPU

T

VOL/A

DJ.

S-Video

Display

Language

MENU

EXIT

QUICK

Select

Back

When selecting “Language” in step 3.

: English
: French
: German
: Italian
: Spanish
: Portuguese
: Japanese
: Chinese (Simplified)
: Chinese (Traditional)
: Korean

English
Français
Deutsch
Italiano
Español
Português

FULL MENU settings – Display (continued)

Continued

4-a

Remote control

Control panel

(Main unit side)

EXIT

EXIT

ENTER

ENTER

Содержание TLP-MT7 - LCD Projector - 1000 ANSI Lumens

Страница 1: ...ER S MANUAL 3LCD PROJECTOR TLP MT7E TEM P LA MP ON BU SY FAN ON ST AN DB Y KE YS TO NE SE T AU TO AU TO EX IT EN TER ME NU INP UT VO L A DJ CO MPU TER IN 1 Y PB PR CO NTRO L S VIDE O VIDE O VIDEO IN R AUDIO L AU DIO IN 23565376 ...

Страница 2: ... servicing instructions in the literature accompanying the appliance WARNING TO REDUCE THE RISK OF FIRE OR ELECTRIC SHOCK DO NOT EXPOSE THIS APPLIANCE TO RAIN OR MOISTURE DANGEROUS HIGH VOLTAGES ARE PRESENT INSIDE THE ENCLOSURE DO NOT OPEN THE CABINET REFER SERVICING TO QUALIFIED PERSONNEL ONLY CAUTION Laser beam is emitted when the laser button of the remote control is pressed Do not look from th...

Страница 3: ...et as it was originally packed at the factory Avoid Volatile Liquid Do not use volatile liquids such as an insect spray near the unit Do not leave rubber or plastic products touching the unit for a long time They will mar the finish Moisture Condensation Never operate this unit immediately after moving it from a cold location to a warm location When the unit is exposed to such a change in temperat...

Страница 4: ...IS BOOKLET FOR FUTURE REFERENCE This set has been designed and manufactured to assure personal safety Improper use can result in electric shock or fire hazard The safeguards incorporated in this unit will protect you if you observe the following procedures for installation use and servicing This unit is fully transistorized and does not contain any parts that can be repaired by the user DO NOT REM...

Страница 5: ...leaners Use a damp cloth for cleaning 8 Power Cord Protection Power supply cords should be routed so that they are not likely to be walked on or pinched by items placed upon or against them paying particular attention to cords at plugs convenience receptacles and the point where they exit from the product 9 Overloading Do not overload wall outlets extension cords or integral convenience receptacle...

Страница 6: ... vertically Do not use the product in the upright position to project the pictures at the ceiling or any other vertical positions It may fall down and dangerous IMPORTANT SAFETY INSTRUCTIONS continued S3125A Continued 15 Accessories Do not place this product on an unstable cart stand tripod bracket or table The product may fall causing serious injury to a child or adult and serious damage to the p...

Страница 7: ... Unauthorized substitutions may result in fire electric shock or other hazards Replacement of the lamp only should be made by users 20 Safety Check Upon completion of any service or repairs to this product ask the service technician to perform safety checks to determine that the product is in proper operating condition 16 Damage Requiring Service Unplug this product from the wall outlet and refer ...

Страница 8: ...lowing types of cable In Singapore use the UK type plug cable The UK type plug MP5004 of this model is approved by PSB Plug configuration Plug type EURO UK Line voltage 220 240V 220 240V Use a 5A fuse which is approved by ASTA or BSI to BSI362 Always replace the fuse cover after changing the fuse ...

Страница 9: ...he picture size 30 Cutting off the picture and sound temporarily 31 Freezing the picture 32 Adjusting the picture automatically computer input 33 Displaying PIP Sub pictures 34 Displaying Information 35 Adjustments Settings Adjustments and settings on the menu screen 36 Operating the menu screen 37 QUICK MENU adjustments and settings 38 FULL MENU adjustments and settings Picture 44 FULL MENU setti...

Страница 10: ...de Left side Anti theft lock hole Speaker Air intake Air intake Foot adjuster release button Foot adjuster Zooming lever Focusing ring Also mounted on the front of the left side AC IN socket Lens cover Lens Carrying handle Open to carry the projector 27 19 19 27 18 15 CAUTION Openings in the cabinet are provided for ventilation and to ensure reliable operation of the product and to protect it from...

Страница 11: ...r FAN indicator LAMP indicator ON indicator INPUT button ENTER button Selection button EXIT button VOL ADJ buttons AUTO KEYSTONE button AUTO SET button MENU button ON STANDBY button Control panel To set and or adjust values on the menu To adjust volume when the menu is not displayed To select the input source To turn the projector on or off standby To correct the keystone distortion of the picture...

Страница 12: ...ct a computer to control the projector COMPONENT IN connector To enter component video signal Y PB PR Signal from a video equipment or RGB signal from a computer etc S VIDEO connector To enter S video signal from a video equipment etc Right side AUDIO IN jack Audio input ø3 5mm stereo mini jack To enter audio signal from a computer or a video equipment with component video output Y PB PR signal ou...

Страница 13: ... select the input source To correct the keystone distortion of the picture automatically To turn the projector on or off Standby To adjust the image of the Computer input automatically To enlarge the picture size To cut off the picture and sound temporarily To display the video input image as a small size picture in the computer image display window To display the information To freeze the picture...

Страница 14: ...ew and old batteries When you will not be using the remote control for a prolonged period take the batteries out of the remote control When the remote control stops working or only works from very close distance replace all the batteries with new ones When replacing the batteries use a more longer life alkaline batteries If a battery leaks carefully wipe off any residue inside the battery case bef...

Страница 15: ...sual circumstances the remote control may not operate well due to the location being used or the surroundings At such times change the direction of the remote control to the projector and retry the operation About 15 About 15 About 15 About 15 About 5m About 15 About 15 About 15 About 15 About 5m TEM P LAM P ON BUS Y FAN ON STA NDB Y KEY STO NE SET AUT O AUT O EXIT ENT ER MEN U INP UT VOL AD J TEM...

Страница 16: ...llation Floor mounted rear projection Viewing a picture projected through the back of the screen from a floor installation Viewer Translucent screen There are two ways to place the floor mounted projector Perform the Projection mode setting on the menu screen for the projection method 59 For the ceiling mounted projector placement refer to the page 20 Continued Viewer ...

Страница 17: ...the lens height and the bottom of projection area cm The values are approximations 1 2 90 90 TEMP LAMP ON BUSY FAN ON STANDBY KEYSTONE SET AUTO AUTO EXIT ENTER MENU INPUT VOL ADJ Point the lens straight at the center of the screen as above Determine the screen size projected on the screen The projection size depends on the distance between the lens and the screen Adjust the projection size by chan...

Страница 18: ...ient temperature If the screen is exposed to direct sunlight or other strong light the projected picture becomes too faint to see Shut out the light with curtains or other means If the screen and the projector are not installed properly the projected picture may be distorted 3 4 Floor mounted projector placement continued Light Orange The three indicators TEMP LAMP and ON light in green for severa...

Страница 19: ...the button to lock in position Lift up Lower Lift up Lower 1 Turn the foot adjuster to make fine adjustment of the height Turn clockwise to lift up Turn counterclockwise to lower 2 Notes To put the foot adjuster back hold down the foot adjuster release button and lower the front slowly Be sure to hold the projector when putting the foot adjuster back so as not to let the front fall on your fingers...

Страница 20: ...h the back of the screen from a ceiling installation Perform the Projection mode setting on the menu screen for the projection method 59 Note The relation between the projection size and the distance to the screen is the same as that of the floor mounted projection mode 16 Translucent screen Ceiling mounted projector placement CAUTION When a ceiling mount is required please consult with the dealer...

Страница 21: ...EO IN R AUDIO L AUDIO IN Continued COMPONENT IN Connector For use as both Y PB PR input and computer input At shipping from factory it is set for use as Y PB PR input AUDIO IN jack For use as both audio signals for Y PB PR input and computer input To COMPONENT IN connector Be sure to connect in the proper direction Component cable Mini D sub 15P Pin Not supplied To AUDIO IN jack Audio cable Suppli...

Страница 22: ...R CONTROL S VIDEO VIDEO VIDEO IN R AUDIO L AUDIO IN COMPONENT IN COMPUTER CONTROL S VIDEO VIDEO VIDEO IN R AUDIO L AUDIO IN S VIDEO connector At shipping from factory the projector is set so that this connector cannot be selected by the INPUT button Change the setting on the menu screen when using 41 To S VIDEO connector Be sure to connect in the proper direction To S video output S video cable No...

Страница 23: ...ower for the projector and computer is off before connecting the cables COMPONENT IN COMPUTER CONTROL S VIDEO VIDEO VIDEO IN R AUDIO L AUDIO IN COMPO NEN T IN COMPU TER CONTROL S VIDEO VIDEO VIDEO IN R AUDIO L AUDIO IN COMPONENT IN Connector For use as both Y PB PR input and computer input At shipping from factory it is set for use as Y PB PR input Change the setting on the menu screen when using ...

Страница 24: ...VIDEO VIDEO IN R AUDIO L AUDIO IN You can control the projector by a computer connected with the control cable supplied 75 Check that the power for the projector and computer is off before connecting the cables Note Do not connect a cable other than the exclusive one supplied To CONTROL connector Be sure to connect in the proper direction Control cable Supplied Computer To RS 232C port ...

Страница 25: ...art up display appears CAUTION Do not look into the projection lens while operating the projector Projection on the screen ON LAMP ON LAMP FAN FAN Green Green Flashing Green Green Green Green 1 2 Continued MENU ON INPUT ENTER CT 90072 KEYSTONE AUTO SET EXIT PIP FREEZE MUTE CALL RESIZE VOL ADJ STANDBY TEMP LAMP ON BUSY FAN ON STA NDBY KEYST ONE SET AUTO AUTO EXIT ENTER MENU INPUT VOL AD J TEMP LAMP...

Страница 26: ...uter model In this case turn off the computer display For details on controlling the computer display etc refer to the computer s manual and description on the software for the computer used An image on a computer is displayed enlarged or reduced so quality of the screen becomes a bit inferior The projector can be also applied to DDC2B Display Data Channel 2B If your computer is applied to the DDC...

Страница 27: ...t compatible to the projector the icon appears When signals are not input from the input source the icon appears Adjust the picture size by turning the zooming lever Turn to the right to enlarge the picture Turn to the left to reduce the picture Projection on the screen continued Focus on the picture by turning the focusing ring A still picture is recommended for focusing 4 5 MENU ON INPUT ENTER C...

Страница 28: ...T ENTER MENU INPUT VOL AD J 1 2 2 MENU ON INPUT ENTER CT 90072 KEYSTONE AUTO SET EXIT PIP FREEZE MUTE CALL RESIZE VOL ADJ STANDBY ON Orange Green Green Orange Green off Orange Off off FAN ON LAMP LAMP FAN Flashing ON LAMP FAN A B C ON STANDBY ON STANDBY ON STANDBY ON STANDBY B C Indicators A Remote control Control panel Main unit side Notes The projector consumes about 20W of power in the standby ...

Страница 29: ...e to digital correction processing some of the information may dropped or the picture quality may be degraded depending on the keystone correction setting or the contents of the signal source Keystone distortion is not corrected properly when the screen is not installed vertically In this case adjust from the menu screen Even if the projector is set horizontal keystone distortion may occur if the ...

Страница 30: ...l the resize mode and return to the original size MENU ON INPUT ENTER CT 90072 KEYSTONE AUTO SET EXIT PIP FREEZE MUTE CALL RESIZE VOL ADJ STANDBY EXIT RESIZE RESIZE RESIZE EXIT Notes Enlarged images can be frozen by pressing the FREEZE button When frozen images cannot be enlarged or reduced The resize mode is cancelled if any operation other than setting the freeze mode is performed This projector...

Страница 31: ...etc on the screen Note The mute mode is cancelled if another operation is performed during the mute mode MENU ON INPUT ENTER CT 90072 KEYSTONE AUTO SET EXIT PIP FREEZE MUTE CALL RESIZE VOL ADJ STANDBY MUTE MUTE Press MUTE The sound and picture are cut off temporarily To cancel the mute mode press MUTE again The image and sound will be output The icon appears in the mute mode Remote control ...

Страница 32: ... mode The freeze mode cannot be set when there is no input when no signals are being supplied from a signal source The input source s image continues to play even when the projector is set to the freeze mode MENU ON INPUT ENTER CT 90072 KEYSTONE AUTO SET EXIT PIP FREEZE MUTE CALL RESIZE VOL ADJ STANDBY FREEZE FREEZE Press FREEZE The picture freezes To release the picture press FREEZE again The ico...

Страница 33: ... the AUTO SET button Sampling phase The sampling phase is the timing at which the computer s analog RGB signals are sampled If the sampling phase is off the individual dots cannot be sampled at the proper timing resulting in blurred or flickering images Adjusting the picture automatically Computer input 1 2 You can adjust the optimum horizontal position vertical position sampling phase and samplin...

Страница 34: ... source other than a computer input source is selected The PIP function cannot be used with no signals supplied from a computer signal source The sub picture turns off if any other operation is performed The signal source size display position and audio input source to display sub pictures can be changed from the menu screen 63 PIP Displaying PIP Sub pictures MENU ON INPUT ENTER CT 90072 KEYSTONE ...

Страница 35: ...0072 KEYSTONE AUTO SET EXIT PIP FREEZE MUTE CALL RESIZE VOL ADJ STANDBY CALL Displaying Information Information on the input signal source etc can be displayed Remote control Press CALL The information described below is displayed The information display turns off when the CALL button is pressed again Status display Input current input source H resolution the horizontal resolution of the input sig...

Страница 36: ...he audio output from the speaker on the main unit Item Meaning Speaker output Set the speaker output On Off Channel select RCA Select the channel of AUDIO L R jack in VIDEO IN Loudness RCA Set the loudness of AUDIO L R jack On Off in VIDEO IN Channel select Mini Select the channel of AUDIO IN jack Loudness Mini Set the loudness of the AUDIO IN jack On Off Keystone Item Meaning Keystone Adjust the ...

Страница 37: ...CK MENU screen simple explanations of the selected items are displayed There are also items with sub menus displayed by pressing the ENTER button Some items in the FULL MENU have sub menus The button operation guide is displayed here Remote control Control panel Main unit side The contents of the operation guide differ accord ing to the type of menu and the selected item The FULL MENU appears when...

Страница 38: ...STONE SET AUTO AUTO EXIT ENTER MENU INPUT VOL ADJ MENU ON INPUT ENTER CT 90072 KEYSTONE AUTO SET EXIT PIP FREEZE MUTE CALL RESIZE VOL ADJ STANDBY 1 1 MENU Computer 0 Picture mode Bright True color 0 0 QUICK MENU Contrast Brightness Adjust the contrast of the image Keystone Input source setting Language 6 ENTER ENTER MENU EXIT FULL Item Adjust Quit Phase MENU MENU To cancel the QUICK MENU screen pr...

Страница 39: ...fferent depending on the type of input source currently selected See the table below 2 Note The Keystone adjustment and the Input source setting and Language settings are applied to all the input sources Continued Remotecontrol Control panel Main unit side Adjustments Yes Adjustable No Not displayed Items Inputs Computer Y PB PR Video S Video Contrast Yes Yes Yes Yes Brightness Yes Yes Yes Yes Col...

Страница 40: ...nputs Contrast Lower Higher Brightness Darker Brighter Color Thinner Deeper Phase Adjust flickers Adjust flickers Keystone Reduce the lower width Reduce the upper width Settings Picture mode Except computer input Standard Fit for movies Fit for sports Picture mode Computer input Bright Set the picture with its brightness priority True color Set the picture with its quality color priority QUICK MEN...

Страница 41: ...een of input source setting appears QUICK MENU adjustments and settings continued TEMP LAMP ON BUSY FAN ON STA NDBY KEYST ONE SET AUTO AUTO EXIT ENTER MENU INPUT VOL AD J TEMP LAMP ON BUSY FAN ON STANDBY KEYSTONE SET AUTO AUTO MENU INPUT MENU ON INPUT ENTER CT 90072 KEYSTONE AUTO SET EXIT PIP FREEZE MUTE CALL RESIZE VOL ADJ STANDBY 3 b EXIT ENTER VOL ADJ 3 b Computer QUICK MENU MENU EXIT FULL Item...

Страница 42: ...NTER MENU INPUT VOL AD J When selecting Language in step 2 Set the language used in the menu display Press ENTER The sub menu screen of language setting appears Use the selection buttons to select a language Press EXIT to return to the QUICK MENU ENTER ENTER EXIT EXIT Computer MENU EXIT FULL Select Back QUICK MENU Language English Français Deutsch Italiano Español Português English French German I...

Страница 43: ...ONE SET AUTO AUTO EXIT ENTER MENU INPUT VOL ADJ MENU ON INPUT ENTER CT 90072 KEYSTONE AUTO SET EXIT PIP FREEZE MUTE CALL RESIZE VOL ADJ STANDBY ENTER 4 4 EXIT EXIT Note If the power is turned off by pressing the ON STANDBY button the adjustments or settings made are automatically stored in the memory If the power cord is unplugged or if a power failure occurs while the projector is on the adjustme...

Страница 44: ...cture MENU MENU EXIT QUICK Page Item Adjust Quit Computer 0 Picture mode Bright True color 0 0 QUICK MENU Contrast Brightness Adjust the contrast of the image Keystone Input source setting Language 6 ENTER ENTER MENU EXIT FULL Item Adjust Quit Phase Use the selection buttons to select the adjustment and setting items The types of adjustment and setting items are different depending on the type of ...

Страница 45: ...n size Yes Yes Yes Yes Signal format No Yes No No Video mode No No Yes Yes When selecting Contrast Brightness Color Tint Sharpness Phase Frequency Picture mode Screen size in step 2 2 Continued Press VOL ADJ to adjust and set Adjustments Items Inputs Contrast Lower Higher Brightness Darker Brighter Color Thinner Deeper Tint Redder Greener Sharpness Softer Sharper Phase Adjust flickers Adjust flick...

Страница 46: ... SSSSSSSSSSSSSSSS SSSSSSSSSSSSSSSS SSSSSSSSSSSSSSSS SSSSSSSSSSSSSSSS SSSSSSSSSSSSSSSS SSSSSSSSSSSSSSSS Screen size Computer input Screen size Video input S Video input Y PB PR input Thru Icon Type Signal of 4 3 Vista Size CinemaScope 1080i 720p Resolution under SVGA Resolution over XGA Full Thru Full 3 a Continued FULL MENU adjustments and settings Picture continued ...

Страница 47: ...u of selected items appears Position Level Use the selection buttons to select adjustment items Press VOL ADJ to adjust Press EXIT to return to the FULL MENU Items Inputs Position H position Move the picture leftward Move the picture rightward V position Move the picture down Move the picture upward R level To reduce red To increase red Level G level To reduce green To increase green B level To re...

Страница 48: ... EXIT QUICK Select Back Video Picture Video mode Auto NTSC PAL SECAM PAL M PAL N PAL60 NTSC4 43 MENU EXIT QUICK Select Back Press ENTER The sub menu of selected items appears Signal format Video mode Use the selection buttons to select setting items Signal format Y PB PR input Auto Determine the type of the signal input automatically If not determined properly select among the signals shown below ...

Страница 49: ...ANDBY ENTER 4 4 After the adjustments and settings are finished press EXIT The menu screen disappears Note If the power is turned off by pressing the ON STANDBY button the adjustments or settings made are automatically stored in the memory If the power cord is unplugged or if a power failure occurs while the projector is on the adjustments or settings are not stored in the memory 4 FULL MENU adjus...

Страница 50: ...e mode Input source setting Language 6 0 0 0 ENTER ENTER QUICK MENU Adjust the contrast of the image MENU EXIT FULL Item Adjust Quit Video Audio MENU Speaker output Channel select Mini On L R R L Off EXIT QUICK Item Set Quit Page Loudness Mini On Off Press MENU twice When pressed once the QUICK MENU screen appears When pressed twice the Picture screen of the FULL MENU appears 1 MENU MENU 2 Use the...

Страница 51: ...cally stored in the memory If the power cord is unplugged or if a power failure occurs while the projector is on the settings are not stored in the memory The Audio settings are applied to all the input sources It is impossible to change the settings for each input source Speaker output When set to Off no sound is produced from the speakers Channel select L R The sound of the left and right channe...

Страница 52: ...R Keystone Keystone Horizontal reference value reset 0 ENTER MENU EXIT QUICK Page Item Adjust Quit FULL MENU settings Keystone 1 MENU MENU 2 Use the selection buttons to display the Keystone menu Use the selection buttons to select the setting items 3 If the screen is not installed vertically you can adjust the keystone distortion manually The projector stores the standard conditions of horizontal...

Страница 53: ...eystone in step 3 Press VOL ADJ to adjust and set Keystone To reduce the lower width To reduce the upper width Notes If the power is turned off by pressing the ON STANDBY button the adjustments or settings made are automatically stored in the memory If the power cord is unplugged or if a power failure occurs while the projector is on the adjustments or settings are not stored in the memory The Key...

Страница 54: ...eo Contrast Brightness Color Keystone Picture mode Input source setting Language 6 0 0 0 ENTER ENTER QUICK MENU Adjust the contrast of the image MENU EXIT FULL Item Adjust Quit S Video Display Language No signal background Icon Menu position Menu background translucent Start up screen ENTER On Off Logo None Blue background On Off On Off MENU EXIT QUICK Item Quit Page FULL MENU settings Display You...

Страница 55: ...AUTO MENU INPUT VOL ADJ 4 a 4 a EXIT ENTER MENU INPUT TEMP LAMP ON BUSY FAN ON STA NDBY KEYST ONE SET AUTO AUTO EXIT ENTER MENU INPUT VOL AD J S Video Display Language MENU EXIT QUICK Select Back When selecting Language in step 3 English French German Italian Spanish Portuguese Japanese Chinese Simplified Chinese Traditional Korean English Français Deutsch Italiano Español Português FULL MENU sett...

Страница 56: ... on the settings are not stored in the memory The Display settings are applied to all the input sources It is impossible to store different settings for each input source No signal background Setting of screen of no signal input Logo The TOSHIBA logo screen is displayed Blue background The entire screen is blue None The screen is black Icon When set to Off the icons displayed normally when the inp...

Страница 57: ...r 0 0 QUICK MENU Contrast Brightness Adjust the contrast of the image Keystone Input source setting Language 6 ENTER ENTER MENU EXIT FULL Item Adjust Quit Phase Computer Default setting Input source setting Projection mode No signal power off Power on ENTER ENTER Off 5 min Manual Auto MENU EXIT QUICK Item Quit Page 1 2 Use the selection buttons to display the Default setting menu Use the selection...

Страница 58: ...rce to be set then press ENTER to check it The check turns on and off each time the ENTER button is pressed When a check box is checked that input source can be selected by the INPUT button When selecting COMPONENT Press VOL ADJ to select the type of input source The setting whose button is displayed in yellow is the one currently set Press EXIT to return to the FULL MENU Press ENTER The sub menu ...

Страница 59: ...Press EXIT to return to the FULL MENU TEMP LAMP ON BUSY FAN ON STA NDBY KEYST ONE SET AUTO AUTO EXIT ENTER MENU INPUT VOL AD J TEMP LAMP ON BUSY FAN ON STANDBY KEYSTONE SET AUTO AUTO EXIT ENTER MENU INPUT VOL ADJ MENU ON INPUT ENTER CT 90072 KEYSTONE AUTO SET EXIT PIP FREEZE MUTE CALL RESIZE VOL ADJ STANDBY ENTER 4 b 4 b Computer Default setting Standard Rear Ceiling Rear ceiling Projection mode M...

Страница 60: ...ged or if a power failure occurs while the projector is on the settings are not stored in the memory The settings of Default setting are applied to all the input sources It is impossible to store different settings for each input source No signal power off OFF The power does not turn off automatically even if the no signal status continues 5 min The power turns off automatically if the no signal s...

Страница 61: ...TER ENTER Picture MENU MENU EXIT QUICK Page Item Adjust Quit Y PB PR Factory reset mode Return each item on the menu to factory default setting Press the ENTER button if you agree Picture only All EXIT MENU QUICK Select Quit Page FULL MENU settings Factory reset mode 1 2 Use the selection buttons to display the Factory reset mode menu Use the selection buttons to select the setting items Picture o...

Страница 62: ...gs according to the conditions selected in step 3 5 Notes If the power is turned off by pressing the ON STANDBY button the setting made is automatically stored in the memory If the power cord is unplugged or if a power failure occurs while the projector is on the setting is not stored in the memory When the Factory reset mode menu is executed the adjustments and settings for all the inputs return ...

Страница 63: ... screen disappears 3 You can make the PIP sub picture settings and the sound settings when a PIP sub picture is displayed MENU MENU EXIT EXIT Source Set the PIP sub picture input source Video input or S video input can be selected Size Set the PIP sub picture size Small or Large Position Set the display position of the PIP sub picture Upper left Upper right Lower left or Lower right Audio Set the ...

Страница 64: ...he power cord and call the dealer The power turns off or does not come on The inside is too hot or the projector has been working in an area of high temperature Place the projector correctly so the intake and exhaust fans holes are not covered Turn the projector off and leave it for a while and turn it on again Clean the air filter 65 The icon appears before the power turned off The projector retu...

Страница 65: ...r cord Take off the air filter cover The filter is on the right side of the projector Pull the bottom side of the cover upward to remove the filter cover Detach the air filter Detach the air filter from the air filter cover The air filter cover air filter and filter frame can be disassembled Cleaner s nozzle Clean the air filter Use a vacuum cleaner to carefully remove any dust and dirt from the a...

Страница 66: ...es When the air filter is dusty the ventilation is impaired This causes the temperature inside the projector to rise and may damage the unit Attach the air filter cover firmly after the cleaning If it is not set correctly the dusts will enter and they will be projected and overlapped on the picture If you wash the air filter with water be sure to let it dry fully before reinstalling it Using it da...

Страница 67: ...ins from the surface To remove difficult stains use a soft cloth slightly moistened with a weak solution of synthetic detergent and water and finish with a soft dry cloth Replacing the intake exhaust fans and air filter To maintain the efficiency of the projector replace the intake and exhaust fans about every two to three years Ask the dealer for the replacement CAUTION If you use the projector m...

Страница 68: ...ely For detail refer to the lamp instruction If you have been using the projector the lamp will be very hot and may cause burn injuries Wait for the lamp to cool for longer than 1 hour before replacing it If the lamp should break please handle with care to avoid injury due to broken pieces and contact your dealer for repair service Unplug the power cord 1 Wait until the lamp gets cold enough 2 3 T...

Страница 69: ...ly after replacing the lamp If it is not set correctly the power will not turn on Use a new lamp when replacing it The lamp is made of glass and is very fragile Do not touch the lamp with your bare hands and do not jolt or damage it Do not use an exhausted lamp Dispose the exhausted lamp as toxic wastes Lamp replacement continued 5 Load a new lamp Slide until it hits the bottom and tighten the two...

Страница 70: ...The projection distance is not appropriate The projecting light is not hitting the screen squarely The Brightness Contrast Sharpness or Phase adjustments are not correct The Brightness or Contrast adjustments are not correct The lamp life is ending Correction Firmly plug in the power cord Attach the cover correctly Lower the ambient temperature of the projection room and turn the power on Take off...

Страница 71: ...acing the remote sensor The remote control is too far There is an obstruction between the remote control and the remote sensor The batteries are exhausted Correction Make the Picture adjustments Replace the lamp Face the remote control transmitter toward the remote sensor on the projector Operate within about 5 meters Remove the obstacle Replace the batteries Page 44 68 15 15 Before calling servic...

Страница 72: ...larity V sync signal TTL level positive negative polarity Pin No 1 2 3 4 5 6 7 8 9 10 11 12 13 14 15 Computer input Video signal Red Video signal Green Video signal Blue GND GND GND Red GND Green GND Blue N C GND GND DDC2B data H sync signal V sync signal DDC2B clock Component input Color difference signal PR Luminance signal Y Color difference signal PB GND PR GND Y GND PB Description Do not conn...

Страница 73: ...6 SVGA75 800 x 600 160 800 16 80 1056 46 875 75 000 49 500 21 600 1 3 625 SVGA85 800 x 600 152 800 32 64 1048 53 674 85 061 56 250 27 600 1 3 631 MAC16 832 x 624 216 832 40 64 1152 49 725 74 550 57 283 39 632 1 3 667 XGA43i 1024 x 768 56 1024 8 176 1264 35 522 43 479 44 900 20 768 0 4 817 XGA60 1024 x 768 160 1024 24 136 1344 48 363 60 004 65 000 29 768 3 6 806 XGA70 1024 x 768 144 1024 24 136 132...

Страница 74: ...0 65 000 175 500 46 1200 1 3 1250 UXGA70 1600 x 1200 304 1600 64 192 2160 87 500 70 000 189 000 46 1200 1 3 1250 UXGA75 1600 x 1200 304 1600 64 192 2160 93 750 75 000 202 500 46 1200 1 3 1250 Mode Resolution A Pixels B Pixels C Pixels D Pixels E Pixels fh kHz fv Hz clock MHz G Lines H Lines I Lines J Lines K Lines Notes Signal sources marked are displayed in compressed format so some of their data...

Страница 75: ... ALF decrease adjustment value For usable items marked Yes send after the selection command The Yes marks in the input source columns indicate that that command can be used 1 Not possible for PAL SECAM 2 Not possible for 480i mode 7 8 6 3 4 5 1 2 CONTROL RS 232C Description Receiving data Consent to send Data set ready Signal ground Request to send No connection Sending data No connection Pin No 1...

Страница 76: ...0p 720p 1080i Screen size Full Computer Thru Screen size Full Component Video Thru S Video Normal Zoom 1 Zoom 2 Level R level G level B level Selection Command PHP PVP MVB MVP PM0 PM1 PM2 KV0 KV1 KV2 KV3 KV4 KV5 KV6 KV7 SG0 SG1 SG2 SG3 SG4 MSF MST MSF MST MSN MSV MSC VLR VLG VLB Adjustment Command Yes Yes Yes Yes Yes Y PB PR Yes Yes Yes Yes Yes Yes Yes Yes Yes Yes Yes Yes Yes Yes Yes Yes Computer ...

Страница 77: ...ue background Non Icon On Off Menu position Upper left Lower left Upper right Lower right Selection Command AS1 AS0 APA APL APR LR0 LR1 AMA AML AMR LM0 LM1 PKS PKR LEN LFR LGR LIT LSP LPO LJP LPK LKT LKK BG0 BG1 BG2 MO0 MO1 MP1 MP2 MP3 MP4 Adjustment Command Yes Y PB PR Yes Yes Yes Yes Yes Yes Yes Yes Yes Yes Yes Yes Yes Yes Yes Yes Yes Yes Yes Yes Yes Yes Yes Yes Yes Yes Yes Yes Computer Yes Yes ...

Страница 78: ...ower off Off 5 min Power on Manual Auto Factory reset mode Picture only All Status display CALL Selection Command MB1 MB0 MS0 MS1 I10 I11 IS0 IS1 I30 I31 I40 I41 PJ0 PJ1 PJ2 PJ3 PN0 PN1 AP0 AP1 DRV DRS DON Adjustment Command Y PB PR Yes Yes Yes Yes Yes Yes Yes Yes Yes Yes Yes Yes Yes Yes Yes Yes Yes Yes Yes Yes Yes Yes Yes Computer Yes Yes Yes Yes Yes Yes Yes Yes Yes Yes Yes Yes Yes Yes Yes Yes Ye...

Страница 79: ...e Small Large PIP position Upper left Upper right Lower left Lower right PIP audio input source Main Sub AUTO SET AUTO KEYSTONE Selection Command VLU VLD IN0 IN1 IN3 IN4 RUP RDW PO1 PO2 PO3 PO4 RS0 FON FOF MON MOF PIN PIF PI0 PI1 PS0 PS1 PP0 PP1 PP2 PP3 PA0 PA1 PAT PKA Adjustment Command Y PB PR Yes Yes Yes Yes Yes Yes Yes Yes Yes Yes Yes Yes Yes Yes Yes Yes Yes Yes Computer Yes Yes Yes Yes Yes Ye...

Страница 80: ...ately Replacement lamp TLPLX10 The design and specifications are subject to change without notice Main unit Power consumption 265W Standby 18W Mass 5 3kg Dimensions 345 x 104 x 281 mm W H D Cabinet Material ABS resin Ambient environment Temperature 0 C to 35 C Humidity 30 to 70 RH Lamp High pressure mercury lamp Projection screen size 28 to 250 inches Projection distance 1 38 to 9 83m Speaker 2W m...

Отзывы: