background image

E

ng

lis

h


CAUTION!


Do not use solvents such as benzene, thinner, 


commercially available cleaners, or anti-static sprays 

intended for analog discs. Since the optical unit 


(laser) of the DVD system operates at a higher 

power than regular DVD or CD players, cleaning 

CDs intended for DVD or CD players may damage 

the optical unit (laser). Therefore, refrain from using 

a cleaning CD.

  Moisture Condensation 


Moisture condensation damages the DVD player. 

Please read the following carefully. Moisture 

condensation occurs, for example, when you pour a 

cold drink into a glass on a warm day. Drops of water 

form on the outside of the glass. In the same way, 

moisture may condense on the optical pick-up lens 

inside this unit, one of the most crucial internal parts 

of the DVD player.


If you use the DVD player in such a situation, it may 

damage discs and internal parts. Remove the disc, 

connect the power cord of the DVD player to the wall 

outlet, turn on the DVD player, and leave it for two or 

three hours. After two or three hours, the DVD player 

will have warmed up and evaporated any moisture. 

Keep the DVD player connected to the wall outlet 

and moisture condensation will seldom occur.


Region Codes


This DVD player is designed to support the Region 

Management System. Check the regional code 

number on the disc package. If the number does 

not match the player

'

 s region number (see table on 

page 5), the player may be unable to playback the 

disc.


Tips:


-It may not be possible to play CD-R/RW , DVD

+

R/

RW , or DVD

+

R DL in all cases due to the type of 

disc or condition of the recording.


-

If you are having trouble playing a certain disc, 

remove the disc and try a different one. Improperly 

formatted disc will not play on this DVD Player.


              WARNING:


              RISK OF ELECTRIC SHOCK!  


Never attempt to service this product yourself. 


Opening and removing the covers may expose you 

to dangerous voltage or other hazards. Failure to 

follow this WARNING may result in death or serious 

injury. Refer all servicing not specified in this manual 

to a Toshiba Authorized Service Center.

  Setup


Finding a suitable location


-Place the set on a flat, hard and stable surface. 


-Do not place the set on a carpet.


-Do not position the set on top of other equipment


that might heat it up (e.g., receiver or amplifier).


-Do not put anything under the set 


 (e.g.CDs, magazines).


-Install this unit near the AC outlet and where the


AC power plug can be reached easily.


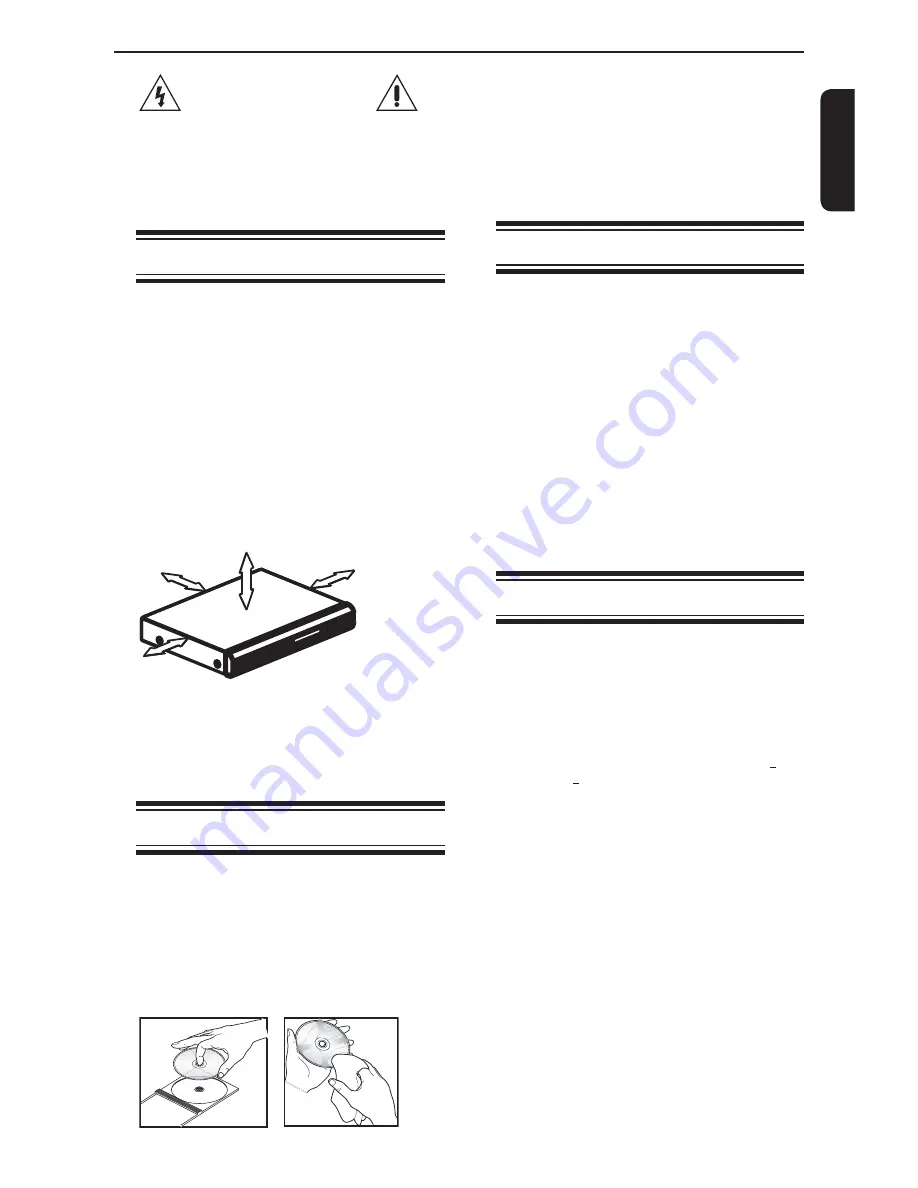
Space for ventilation


-Place the apparatus in a location with adequate 

ventilation to prevent internal heat build up. Allow at 

least 10 cm (4.0

''

) clearance from the rear and the 

top of the set and 5 cm (2.0

''

) from the left and right 

to prevent overheating.


10cm (4.0")

10cm (4.0")

5cm (2.0")

5cm (2.0")


Avoid high temperatures, moisture, water and 

dust


-Apparatus shall not be exposed to dripping or 

splashing.


-Do not place any sources of danger on the 


apparatus (e.g., liquid filled objects, lighted candles).

  Cleaning discs


Some problems occur because the disc inside the 

system is dirty (frozen picture, sound disruptions, 

picture distortions). To avoid these problems, discs 

should be cleaned on a regular basis.


To clean a disc, use a micro fibre cleaning cloth 

and wipe the disc from the center to the edge in a 

straight line. Do not touch the playback side of the 


disc.


Introduction

Содержание SD3010KB

Страница 1: ...SD3010KB ...

Страница 2: ...ience receptacles and the point where they exit from the apparatus 10 Only use attachments accessories specified by the manufacturer 11 Use only with the cart stand tripod bracket or table specified by the manufacturer or sold with the apparatus When a cart is used use caution when moving the cart apparatus combination to avoid injury from tip over 12 Unplug this apparatus during lightning storms ...

Страница 3: ...d or legs with the fixings provided according to the instructions DON T listen to headphones at high volume as such use can permanently damage your hearing DON T leave equipment switched on when it is unattended unless it is specifically stated that it is designed for unattended operation or has a stand by mode Switch off using the switch on the equipment and make sure that your family know how to...

Страница 4: ...ed when in standby mode To disconnect this equipment completely from the mains power pull out the power plug from the wall outlet Environmental Information All unnecessary packaging has been omitted The packaging has been made easy to separate into three materials cardboard box polystyrene foam buffer and polyethylene bags protective foam sheet Your DVD player consists of materials which can be re...

Страница 5: ...f disc or condition of the recording If you are having trouble playing a certain disc remove the disc and try a different one Improperly formatted disc will not play on this DVD Player WARNING RISK OF ELECTRIC SHOCK Never attempt to service this product yourself Opening and removing the covers may expose you to dangerous voltage or other hazards Failure to follow this WARNING may result in death o...

Страница 6: ...ddlestone Road Weybridge Surrey KT15 2UL United Kingdom Following information is only for EU member States The use of the symbol indicates that this product may not be treated as household waste By ensuring this product is disposed of correctly you will help prevent potential negative consequences for the environment and human health which could otherwise be caused by inappropriate waste handling ...

Страница 7: ...Setting the language 12 13 Playback from Disc Playable discs 13 Playback Feature Starting disc playback 13 14 Basic playback control 14 Operations for video playback DVD VCD SVCD 14 15 Selecting various repeat functions 15 Viewing the disc playback Information 15 Special DVD Features 15 16 Special VCD and SVCD Features 16 Playing MP3 JPEG Kodak picture CD 16 17 DVD Menu Options Using the Language ...

Страница 8: ...make sure that all the devices are disconnected from the power outlet If your TV has a DVI IN jack you need a HDMI DVI adapter cable to connect the HDMI out jack on the DVD player This HDMI DVI cable has only video output capability so it is necessary to use separate analogue cable to transfer the audio signals See Connecting to a Stereo System or Connecting to a Digital AV Receiver in page 8 Sele...

Страница 9: ... on the stereo system cable not supplied Connecting to a Digital AV Receiver Receiver has a PCM Dolby Digital or MPEG decoder A Select one of the video connections CVBS VIDEO IN SCART IN or HDMI IN depending on the options available on your TV B Connect the COAXIAL jack of the DVD player to the corresponding Digital Audio In jack on your Receiver cable not supplied C Set the DVD Player s Digital O...

Страница 10: ... any connections make sure that all the devices are disconnected from the power outlet Connecting the power cord After everything is connected properly plug in the AC power cord to the power outlet Never make or change any connections with the power switched on ...

Страница 11: ...put of a TV an amplifier receiver or stereo system Product Overview Front and Rear panels I 2ON STANDBY Turns the player on or switches it to standby mode B X PLAY PAUSE Starts or pauses playback STOP Stops playback SCART OUT Connects to SCART input of a TV VIDEO Out CVBS Connects to CVBS Video input of a TV HDMI Connect to HDMI compatible device No disc Bad disc Multifunctional indicator indicate...

Страница 12: ...ack from point A to B on a disc 14 SLOW Do a slow forward 14 CLEAR Delete the mistyped entries or cancel some functions REMOTE SIGNAL EMITTER 12 Point remote control to the sensor on the front panel 2ON STANDBY 13 To switch the DVD player to ON or standby mode T SEARCH 15 Start playback from a designated point SETUP 12 17 Enters or exits the system setup menu 14 16 17 Cursor buttons for moving to ...

Страница 13: ...ween the lowest and highest channels and may be called FRONT A V IN or VIDEO See your TV s manual for more details Or you may go to channel 1 on your TV then press the Channel down button repeatedly until you see the Video In channel Or the TV remote control may have a button that chooses different video modes C If you are using external equipment such as audio system or receiver turn it on and se...

Страница 14: ...nt only as a guide Use of CD RW for MP3 files is not recommended You must obtain any required permission from copyright owners to download or use copyrighted content Toshiba cannot and does not grant such permission Tip MPEG Layer 3 audio coding technology licensed from Fraunhofer IIS and Thomson Supported Formats MP3 tracks The file extensions have to be mp3 ISO format Maximum 8 characters displa...

Страница 15: ...ss any buttons for about 22 minutes after the disc has stopped playing Program playback During playback press PROG then the OSD will appear as below For VCD Program Track 1 Track 2 Track 3 Track 4 Track 5 Track 6 Play Clear Clear All 1 3 5 7 9 11 13 15 2 4 6 8 10 12 14 16 For DVD Program Title 1 Title 2 Title 3 Title 4 Play Clear Clear All 1 3 5 7 9 11 13 15 2 4 6 8 10 12 14 16 A Use the and OK bu...

Страница 16: ... display the status of the disc The following display appears For VCD VCD 2 0 Time 00 02 10 00 03 00 Track 1 14 Elapsed remaining time for current track Track No If PBC is enabled PBC on will be displayed For DVD DVD Video Time 00 03 33 01 24 46 Title 1 1 Chapter 2 8 Elapsed remaining time for current title Title No Chapter No B Press DISPLAY again Audio 1 1 D 5 1Ch Eng Subtitle 1 1 Eng Angle 1 1 ...

Страница 17: ... repeatedly to pause resume playback For MP3 Within the first 5 seconds press PREV to go back to the previous track After the first 5 seconds of playback press PREV to go back to the beginning of current track During playback press to access fast forward or fast reverse with the required speed X2 X8 X30 X100 Play modes for MP3 Audio CD JPEG You are able to modify the play modes through the toolkit...

Страница 18: ...onsistent with the disc s initial language setting Helpful hint The operating features described here might not be possible for certain discs Always refer to the instructions supplied with the discs If Repeat Single is selected Random cannot be selected and vice versa Edit Mode Program operation works only when Edit Mode is selected After finished storing the files tracks you want into the Program...

Страница 19: ...confirm C If you select Personal then proceed to steps D G The setup menu appears Using the Video setup menu A Press SETUP on the remote control The system setup menu appears Aspect Ratio View Mode 4 3 Auto Fit Aspect Ratio View Mode 4 3 Auto Fit Aspect Ratio View Mode 16 9 Auto Fit Video Out Smart Picture HDMI Standard HD Resolution Auto JPEG Interval 5 Seconds Language Video Audio Misc Rating TV...

Страница 20: ... Using the Audio setup menu A Press SETUP on the remote control The system setup menu appears Digital Output Night Mode Down Sampling All Off On Language Video Audio Misc Rating 3D Effects Off B Press to select Audio then press C Press to select an item then press to access Example Night Mode The options for the selected item appears If the selection in the menu is greyed out that means the featur...

Страница 21: ...he menu item E To exit press SETUP Rating Level settings Depending on the DVD you may be asked to change the parental level while playing the disc The rating levels are from 1 to 8 and are country dependent You can prohibit the playing of certain discs that are not suitable for your children or have certain discs played with alternative scenes A In Rating press to select Parental control then pres...

Страница 22: ...ears Use Default Settings Language Video Audio Misc Rating B Press to select Misc then press C Use Default Settings will be highlighted then press OK The menu will appear Use Default Settings Use Default Settings No Yes Yes Select this to reset to factory default settings No Select this to close the menu D Use to select a setting and press OK to confirm E To exit press SETUP Tray Lock Press SETUP ...

Страница 23: ... 65 dB Wow and flutter Below measurable level less than 0 001 W PEAK Operating conditions Temperature 5 O C to 35 O C Operation status Horizontal Outputs Video output 1 0 V p p 75 Ω pin jack x 1 Video output SCART 1 0 V p p 75 Ω SCART socket x 1 Audio output SCART 2 0 V rms 10K Ω SCART socket x 1 Audio output COAXIAL DIGITAL 0 5 V p p 75 Ω pin jack x 1 Audio output ANALOG 2 0 V rms 10K Ω pin jacks...

Страница 24: ...amount of picture distortion may appear depending on the disc being played back This is not malfunction May be caused by View Mode Setting see page 18 Set to Original for normal viewing Connect DVD Player directly to the TV Make sure the disc is compatible with the DVD player Ensure that the DVD Player s setting is set to match that of the disc and your TV Adjust the volume Check that the speakers...

Страница 25: ...reset the player unplug theAC cord from AC outlet for 5 10 seconds Operations may not be permitted by the disc Refer to the instructions of the disc jacket Use a commonly available cleaning CD DVD to clean the lens before sending the DVD Player for repair Press STOP twice before selecting system setup menu Depending on the disc availability some menu items cannot be selected Troubleshooting ...

Страница 26: ...the DVD System that send audio to another system TV Stereo etc Bit rate The amount of data used to hold a given length of music measured in kilobits per seconds or kbps Or the speed at which you record Generally the higher the bit rate or the higher the recording speed the better the sound quality However higher bit rates use more space on a disc Chapter Just as a book is split up into several cha...

Отзывы: