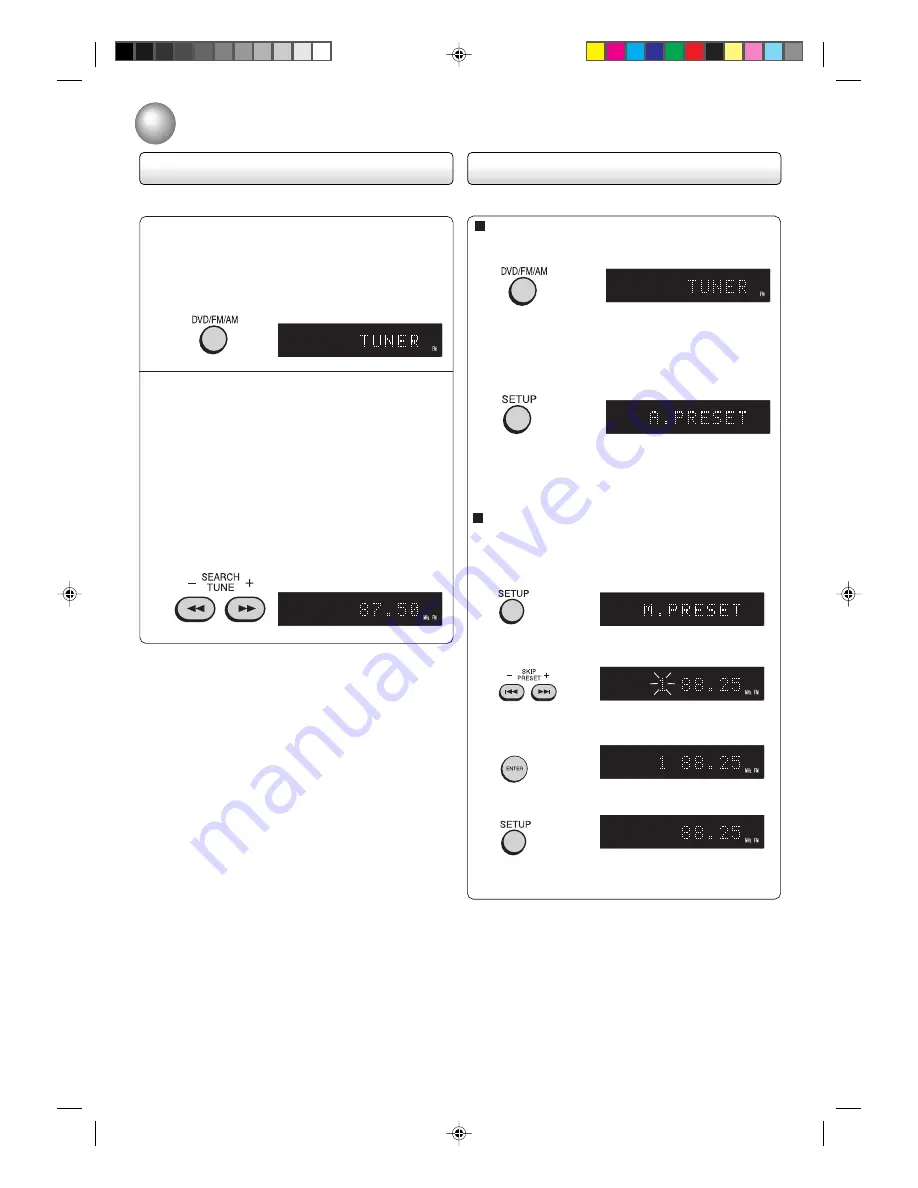
background image

36

Manual presetting
1. Tune the station to be preset as described in “Au-

tomatic/Manual tuning”.

2. Press SETUP. “M. PRESET” appears on the win-

dow display, then the preset position number blinks.

3. Press  or   to select the position num-

ber to be preset.

4. Press ENTER. The preset position number stops

blinking and now the station is preset in the
memory.

5. Press SETUP. The preset position number disap-

pears.

6. For presetting of other stations, repeat steps 1 ~ 5

above.

Radio operation

Presetting the radio stations

Automatic presetting

1. Press DVD/FM/AM to select FM or AM.

2. Press SETUP for 2 seconds. “A. PRESET” ap-

pears on the window display, then starts the au-

tomatic presetting from the low end of FM band

to the AM band.

After all FM and AM stations have been preset, au-

tomatic presetting stops and the station memorized

position 1 will be listened.

You can preset 30 stations for FM and AM.

Tuning the radio stations

Press DVD/FM/AM to select FM or AM.

“TUNER 

FM

” or “TUNER 

AM

” appears on the win-

dow display for 3 seconds and changes to radio

operation mode.

Automatic tuning

Press and hold TUNE + or  for 1 second to start

the automatic tunning. The scanning stops when

the unit tunes in a station. Press the button again

to tune the other stations.

Manual tuning

Press TUNE + or  briefly to tune in a station.

The frequency changes in 50 kHz steps for FM

and 9 kHz steps for AM.

1

2

 2D20401A P32-BACK

26/9/03, 6:03 PM

36

Содержание SD-63HK

Страница 1: ...DVD HOME CINEMA KIT SD 63HK OWNER S MANUAL DIGITAL VIDEO 2003 Toshiba Corporation 2D20401A Cover 26 9 03 6 01 PM 1 ...

Страница 2: ...r Model No Serial No Retain this information for future reference The following information applies only to the model for U K General Information If the socket outlets in your home are not suitable for the plug supplied with this unit the plug must be cut off and an appropriate one fitted The plug severed from this mains lead must be destroyed as it is hazardous if inserted into a live socket IMPO...

Страница 3: ...ts or naked flame sources such as lighted candles or nightlights on or close to equipment High temperatures can melt plastic and lead to fires DON T use makeshift stands and NEVER fix legs with wood screws to ensure complete safety always fit the manufacturer s approved stand or legs with the fixings provided according to the instructions DON T use equipment such as personal stereos or radios so t...

Страница 4: ...e parts are dirty or worn down the picture quality becomes poor To obtain a clear picture we recommend regular inspection and maintenance cleaning or parts replacement every 1 000 hours of use depending on the operating environment For details contact your nearest dealer Notes on moisture condensation Moisture condensation damages the DVD video player Please read the following carefully Moisture c...

Страница 5: ...rack 3 Track 4 Track 5 Structure of disc contents Normally DVD video discs are divided into titles and the titles are sub divided into chapters VIDEO CDs and AUDIO CDs are divided into tracks DVD video disc VIDEO CD AUDIO CD Each title chapter or track is assigned a number which is called title number chapter number or track number respectively There may be discs that do not have these numbers Not...

Страница 6: ... this DVD video player in the same way as an audio CD VIDEO CD equipped with PBC function Version 2 0 In addition to operation of a VIDEO CD not equipped with the PBC function you can enjoy playback of interactive software with search function by using the menu displayed on the TV screen Menu Playback Some of the functions described in this owner s manual may not work with some discs Playable disc...

Страница 7: ...eadphone socket 38 Selecting input source 38 Screen saver 38 Before calling service personnel 39 Specifications Backcover Table of contents SAFETY PRECAUTIONS 2 Precautions 4 Notes on discs 5 Table of contents 7 Identification of controls 8 Front panel 8 Rear panel 8 Display window 9 Remote control 10 Loading batteries 11 Operating with the remote control 11 Connections 12 Connecting to a TV 12 FM...

Страница 8: ...UT socket 14 SUBWOOFER socket 14 AUDIO OUTPUT socket for Subwoofer 13 OPTICAL IN socket 13 COAXIAL IN socket AUDIO L R VIDEO INPUT LINE IN2 sockets AUDIO L R VIDEO INPUT 13 LINE IN1 sockets 12 VIDEO OUTPUT socket VIDEO OUTPUT selector switch 12 AC mains lead COMPONENT VIDEO OUTPUT Y PB PR sockets 12 S VIDEO OUTPUT socket 12 38 HEADPHONE socket 12 AUDIO L R OUTPUT sockets 13 AM IN ANTENNA terminals...

Страница 9: ...During playback Example Playing track 1 Some discs may not display track numbers or elapsed time Some discs may not display track numbers or elapsed time RDS indicator Message or number indicator Title chapter track playing time or other information Dolby Pro Logic II indicator Dolby Digital indicator dts indicator TRK TRACK indicator Pause indicator Play indicator AM FM indicator 2D20401A P08 15 ...

Страница 10: ...EARCH buttons 26 TUNE buttons 36 30 MENU button Direction buttons D C B A 15 SLOW buttons 26 CANCEL button DVD ON STANDBY button 25 OPEN CLOSE button 25 TV VOL buttons 10 BASS BOOST buttons 15 SPKR SETUP button 17 DVD FM AM button 25 TV CH buttons 10 23 TOP MENU button 30 A BRPTbutton 28 STOPbutton 25 JUMPbutton 27 MARKERbutton 27 TONEbutton 15 MUTEbutton 38 INPUTSELECTbutton 38 VOL buttons 25 Num...

Страница 11: ...nge becomes reduced replace all batteries with new ones If battery leakage occurs wipe the battery liquid from the battery compartment then insert new batteries 1 Point the remote control at the remote sensor and press the buttons Distance About 7 m from the front of the remote sensor Angle About 30 in each direction of the front of the remote sensor Do not expose the remote sensor of the unit to ...

Страница 12: ... input Component video leads not supplied Scart lead supplied S video lead supplied Select the corresponding video input on your television to watch DVD video discs Connect the unit directly to your TV If you connect the unit to a VCR TV VCR combination or video selector the DVD playback picture may be distorted as DVD video discs are copy protected Note The S video output and component video outp...

Страница 13: ...djust the volume to a moderate listening level Otherwise the speakers may be damaged by a sudden high volume sound To AUDIO VIDEO INPUT To Optical output To OPTICAL IN OPTICAL lead not supplied COAXIAL lead not supplied To COAXIAL IN To Coaxial output DVD Player VCR To Audio Video outputs To Audio Video outputs Audio Video lead not supplied To AUDIO VIDEO INPUT Audio Video lead supplied Signal flo...

Страница 14: ...t speakers are same height But in normally place it above or below the television Rear speakers Place left and right behind the listening area These speakers recreate sound motion and atmosphere Required for surround playback For best results do not install the rear speakers too far behind the listening position and install them at or above the level of the listener s ears It is also effective to ...

Страница 15: ...indow 2 Press C or D to select BASS or TREBLE 3 Press B or A to adjiust the sound level 4 If setting is complete press TONE or ENTER 3 Press TONE or RETURN to close the Tone screen Bass Treble 5 5 1 2 Press BASS BOOST in DVD mode The Bass Boost screen appears Press A or ENTER then press C or D to select On or Off You can also set bass boost setting in FM AM or external input mode as follows 1 Pres...

Страница 16: ...ofer Notes There is no Dolby Surround effect when monaural pro gramme material is used When receiving weak FM broadcasts set it to 2 Channel The sound quality may improve Surround Auto Tone Bass Boost Surround SPKR Setup BACD Enter Return Surround Auto PLII 2 Channel Auto Tone Bass Boost Surround SPKR Setup BACD Enter Return 1 2 3 Dolby Digital Dolby Digital is the surround sound technology used i...

Страница 17: ...me level of each speaker 1 Press ENTER or A A A A A The Volume screen appears 2 Press B B B B B or A A A A A to select the desired speaker 3 Press C C C C C or D D D D D to adjust the volume level as desired 0 10 4 Repeat steps 2 3 for other speakers 5 Press SPKR SETUP or RETURN to close the SPKR Setup screen You can also adjust the volume level of each speaker in FM AM or external input mode as f...

Страница 18: ...Parental BACD Enter Setup Return OSD Menu Subtitle Audio English English Automatic English Press SETUP or RETURN to close the screen Press ENTER The selected language remains Press SETUP in the stop mode Press 5 5 5 5 5 or ENTER then press 4 4 4 4 4 or 5 5 5 5 5 to select OSD 1 3 4 OSD Menu English English Francais English Espanol Subtitle Automatic Deutsch Audio English Italiano Portugues Nederla...

Страница 19: ...rtugues Other Subtitle Automatic Automatic Audio English Off Language Picture Audio Parental BACD Enter Setup Return The same subtitle language can always be selected even if you replace the disc or turn the power off English Francais Espanol Deutsch Italiano Portugues Nederlands The language you have selected will play if it is recorded on the disc Other If you want to select another language ent...

Страница 20: ...een TV A wide screen picture is displayed full size You have the following screen size to choose from Press SETUP or RETURN to close the screen 5 Tv Screen Display 4 3 On 4 3 4 3 16 9 JPEG Interval Off Select Files All Language Picture Audio Parental BACD Enter Setup Return Press ENTER The selected TV screen remains 4 You can select an aspect ratio appropriate to your TV On On screen displays appe...

Страница 21: ...Interval Select Files Language Picture Audio Parental BACD Enter Setup Return 4 3 On All Off 1 Tv Screen Display JPEG Interval Select Files Language Picture Audio Parental BACD Enter Setup Return 4 3 On Off All All Music Only Pictures Only 3 Press a a a a a or ENTER then preess 4 4 4 4 4 or 5 5 5 5 5 to select your desired file type All Displays all files on the file menu Music Only Displays only ...

Страница 22: ...5 to select Line1 Select DRC Line1 Select Std Language Picture Audio Parental BACD Enter Setup Return Coaxial Press a a a a a or ENTER then press 4 4 4 4 4 or 5 5 5 5 5 to select your desired sound type 3 DRC Line1 Select Std Coaxial Language Picture Audio Parental BACD Enter Setup Return Max Std Min Max Full dynamic range is increased Std Full dynamic range is maintained Min Dynamic range is redu...

Страница 23: ...function Level 8 Virtually all DVD software can be played back Level 1 DVD software for adults cannot be played back Select from level 1 to level 8 The limitation will be more severe as the level number decreases Press ENTER to store the password 1 2 Press SETUP in the stop mode Press b b b b b or a a a a a to select Parental then press 5 5 5 5 5 or ENTER Press 4 4 4 4 4 or 5 5 5 5 5 to select Par...

Страница 24: ... 2528 Tibetan 1225 Breton 1228 Icelandic 1929 Panjabi 2611 Tigrinya 3019 Bulgarian 1217 Indonesian 1924 Pashto Pushto 2629 Tonga 3025 Burmese 2335 Interlingua 1911 Persian 1611 Turkish 3028 Byelorussian 1215 Irish 1711 Polish 2622 Turkmen 3021 Cambodian 2123 Italian 1930 Portuguese 2630 Twi 3033 Catalan 1311 Japanese 2011 Quechua 2731 Ukrainian 3121 Chinese 3618 Javanese 2033 Rhaeto Romance2823 Ur...

Страница 25: ...ding will appear on the display and then Incorrect Disc will be displayed Some discs may not work the resuming facility Resuming cannot function when you play a PBC featuredVideo CD while the PBC is on To turn off the PBC see page 31 Some playback functions of DVDs may be intentionally fixed by software producers This unit plays DVDs in accordance with the design intent of the software producers S...

Страница 26: ...2 x 1 5 3 x 2 0 Video CD 3 In the zoom mode press ZOOM repeatedly to return to a 1 1 view Off Picture zoom Locating a chapter or track Press SKIP Forward or SKIP Reverse during playback to locate a chapter or track that you want to watch Press SKIP briefly to select the next chapter track Press SKIP briefly to return to the beginning of the current chapter track Press SKIP twice in quick successio...

Страница 27: ...ng to the scenes 1 2 3 To cancel the mark Press CANCEL in step 2 To remove this display press MARKER Use the title chapter and time recorded on the disc to locate the desired playback point Locating desired scene Press number buttons 0 9 to change the number Press JUMP during playback Press ENTER Playback starts Press or to select the Time Title or Chapter Jump Time Title Chapter Enter 0 9 Cancel ...

Страница 28: ...ed Playback starts at the point that you selected Playback stops at the end point and resumes again at point A A A B 1 2 Press A B RPT during playback The start point is selected Press or ENTER once or twice to select Chapter or Title Press PLAYMODE during playback or stop mode Press PLAY to start Repeat playback DVD Title Chapter and Track Repeat playback Play Mode Off Repeat Off Enter Play Mode ...

Страница 29: ...elect the track number to be replaced To clear the programme one by one In the programme mode press 4 5 b or a to select the track number Then press CANCEL To clear all the programmes In the programme mode press 4 5 b or a to select Clear Then press ENTER Programme playback 1 2 3 4 Press or to select the program ming position Use number buttons 0 9 to input the Track numbers Repeat Play Mode Rando...

Страница 30: ...scene when you pressed MENU 1 8 Eng Dolby Digital Press AUDIO during playback The current soundtrack language will appear Press AUDIO repeatedly until the desired language is selected Notes If the desired language is not heard after pressing the but ton several times the soundtrack language is not recorded on the disc A selected soundtrack language may be cancelled when you open the disc tray The ...

Страница 31: ...y will appear on the screen and continue displaying DVD AUDIO CD VIDEO CD 00 34 56 01 12 33 00 34 56 01 12 33 1 9 Title 1 99 1 8 1 32 Chapter 1 999 EngDolby Digital Eng 00 12 04 32 00 12 04 32 Track PBC 34 56 71 33 Track 11 99 To make status display disappear press DISPLAY again Disc Status To turn off the PBC Press number button 1 in the stop mode then press ENTER 2D20401A P24 31 26 9 03 6 03 PM ...

Страница 32: ... of Athrough Z numbers of 0 through 9 and _ under score Other letters than those above are replaced in hyphen Notes on MP3 WMA JPEG files To play back MP3 WMA JPEG CD in the recorded order 1 Use MP3 WMA JPEG software that records data alphabetically or numerically 2 Name each file including two digit or three digit number e g 01 02 or 001 002 3 Refrain from making too many sub folders CAUTION Some...

Страница 33: ... CD R Hold Your Last Pops In case the folder includes more than 15 files press or to display next file list Press ENTER The selected file starts playing back 4 When PLAY has been pressed after displaying the file menu or when the disc tray has been closed using PLAY playback begins automati cally starting from the first file In this case if the first file is an MP3 WMA file only MP3 WMA files are ...

Страница 34: ...se if the first file is a JPEG file the first JPEG file is played back If the first file is an MP3 WMA file only MP3 WMA files are played back in order Press ENTER The selected picture appears on the screen 4 Press STOP to end playback The file menu appears on the screen If you want to watch the other file repeat steps 3 4 5 Rotating an image You can rotate an image by 90 degrees by pressing ANGLE...

Страница 35: ...ressive scan format the picture will appear scrambled if you select progressive scan output from the unit In such a case select PROGRESSIVE scan Off There are two types of source content in pictures recorded in DVD video discs film content pictures recorded from films at 24 frames per second and videocontent videosignalsrecordedat30framesper second When the unit plays back a film source material u...

Страница 36: ...SET ap pears on the window display then starts the au tomatic presetting from the low end of FM band to the AM band After all FM and AM stations have been preset au tomatic presetting stops and the station memorized position 1 will be listened You can preset 30 stations for FM and AM Tuning the radio stations Press DVD FM AM to select FM or AM TUNER FM or TUNER AM appears on the win dow display fo...

Страница 37: ...untries where by an inau dible stream of data is transmitted in addition to the nor mal radio signal This data contains various information including station transmitter identification traffic informa tion and a list of alternative frequencies for the radio sta tion being received Notes RDS is only available for FM reception The PS PROGRAM SERVICE NAME is displayed auto matically when a RDS statio...

Страница 38: ...tion of the other unit the sound may not be played correctly Screen saver The screen saver operates when you leave the unit in DVD stop mode for about five minutes You can set the DVD receiver to turn off automati cally at a specified time Press SLEEP to set the desired sleep time The SLEEP indicator and sleep time appears on the display window Each time you press SLEEP the setting changes in the ...

Страница 39: ...he remote control are exhausted Correction Connect the mains lead securely into the wall outlet Select the appropriate video input mode on the TV so the picture from the unit appears on the TV screen Connect the scart or video lead securely into the appropriate socket Select the correct operating mode Set the VIDEO OUTPUT selector to the appropriate position Set the INPUT SELECT to the appropriate...

Страница 40: ...ess than 0 1 distortion Impedance Centre 2 3 Ω Front Surround 3 Ω Subwoofer 2 2 Ω Power requirements 230V AC 50Hz 60W Supplied accessories Audio Video lead 1 S Video lead 1 Scart lead 1 AM loop aerial 1 FM aerial wire 1 Remote control SE R0117 1 Batteries AAA 2 Designs and specifications are subject to change without notice Speakers 6 Subwoofer lead 1 Speaker lead 3 pin 6m 1 Speaker lead 2 pin 15m...

Отзывы: