4 Replacement Procedures
4.8 Top Cover
4.8 Top Cover
Removing the Top Cover
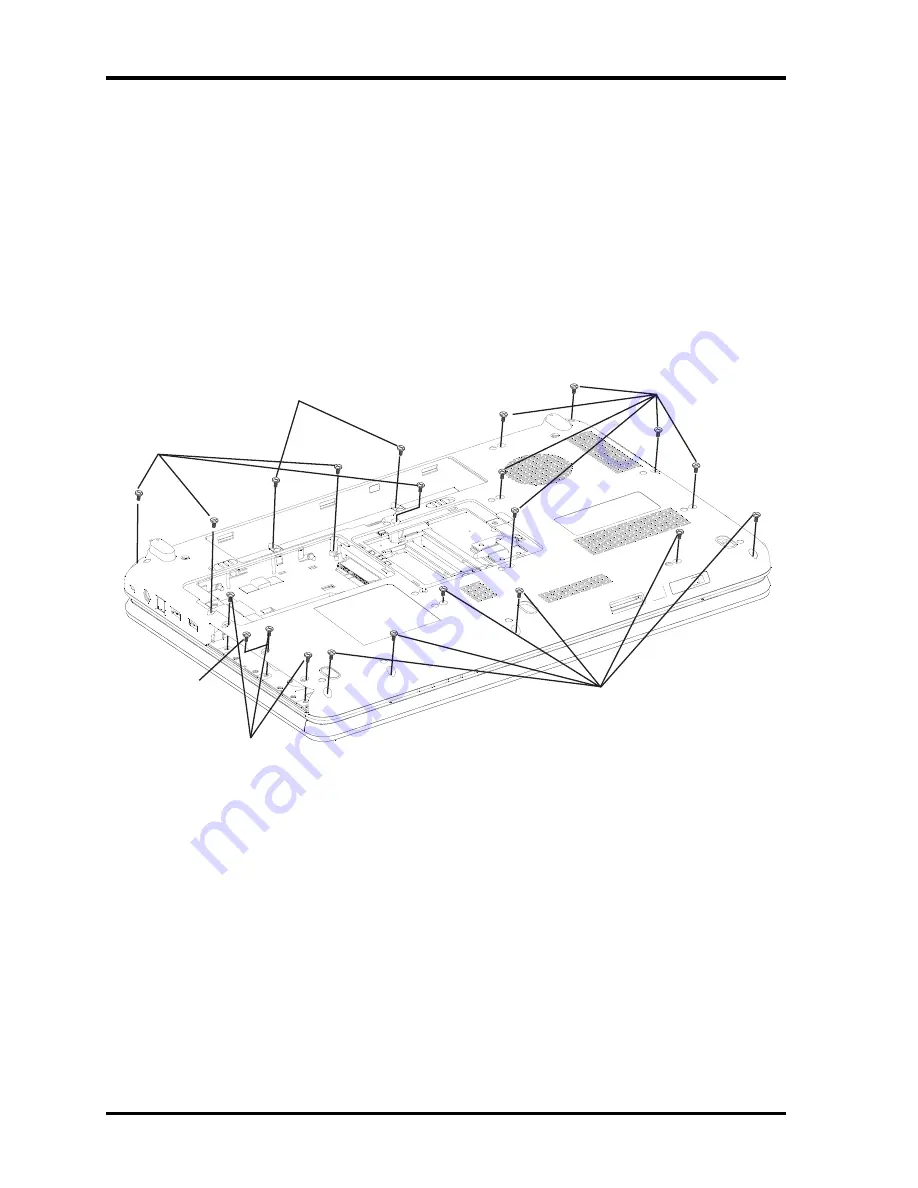
Remove the top cover according to the following procedures and Figures 4-11 and 4-12.
Turn the computer upside down and remove the following 21 screws:
- Sixteen M2.5x6 black flat head screws.
- Two M2.5x4 black flat head screws.
- Three M2x4 white flat head screws.
(When use Slot ODD, the middle screw use M2.5 black flat head screw.)
M2 5X4 black flat head screw
.
M2X4 white
flat head screw
M2x5 black
flat head screw
Slot ODD only
(
)
M2 5x6 black
flat head screw
.
M2 5x6 black
flat head screw
.
M2 5x6 black
flat head screw
.
Figure 4-11 Removing the screws from the bottom of the computer
2.
Turn the computer right side up.
3.
Remove two M2.5x6 black flat head screws on the top cover.
4.
Disconnect the touch pad board flat cable from CN12.
5.
Disconnect the hot key board flat cable from CN3.
6.
Disconnect the Power board cable from CN1.
7.
Lift up the top cover.
4-26
Satellite/Satellite Pro/A500/A505/A507/dynabook Maintenance Manual
Содержание Satellite Pro A500 series
Страница 14: ...Chapter 1 Hardware Overview ...
Страница 15: ...1 Hardware Overview ii Satellite Satellite Pro A500 A505 A507 dynabook Maintenance Manual ...
Страница 69: ...2 Troubleshooting 2 14 Cooling Module 2 28 Satellite Satellite Pro A500 A505 A507 dynabook Maintenance Manual ...
Страница 70: ...Chapter 3 Diagnostic Programs ...
Страница 73: ......
Страница 113: ...3 Diagnostic Programs 3 5 System Test 40 Satellite A500 Maintenance Manual ...
Страница 141: ......
Страница 143: ...Chapter 4 Replacement Procedures 4 1 ...
Страница 144: ...4 Replacement Procedures 4 ii Satellite Satellite Pro A500 A505 A507 dynabook Maintenance Manual ...
Страница 227: ...6000 1 次 Appendices ...


