430 Series
4-11
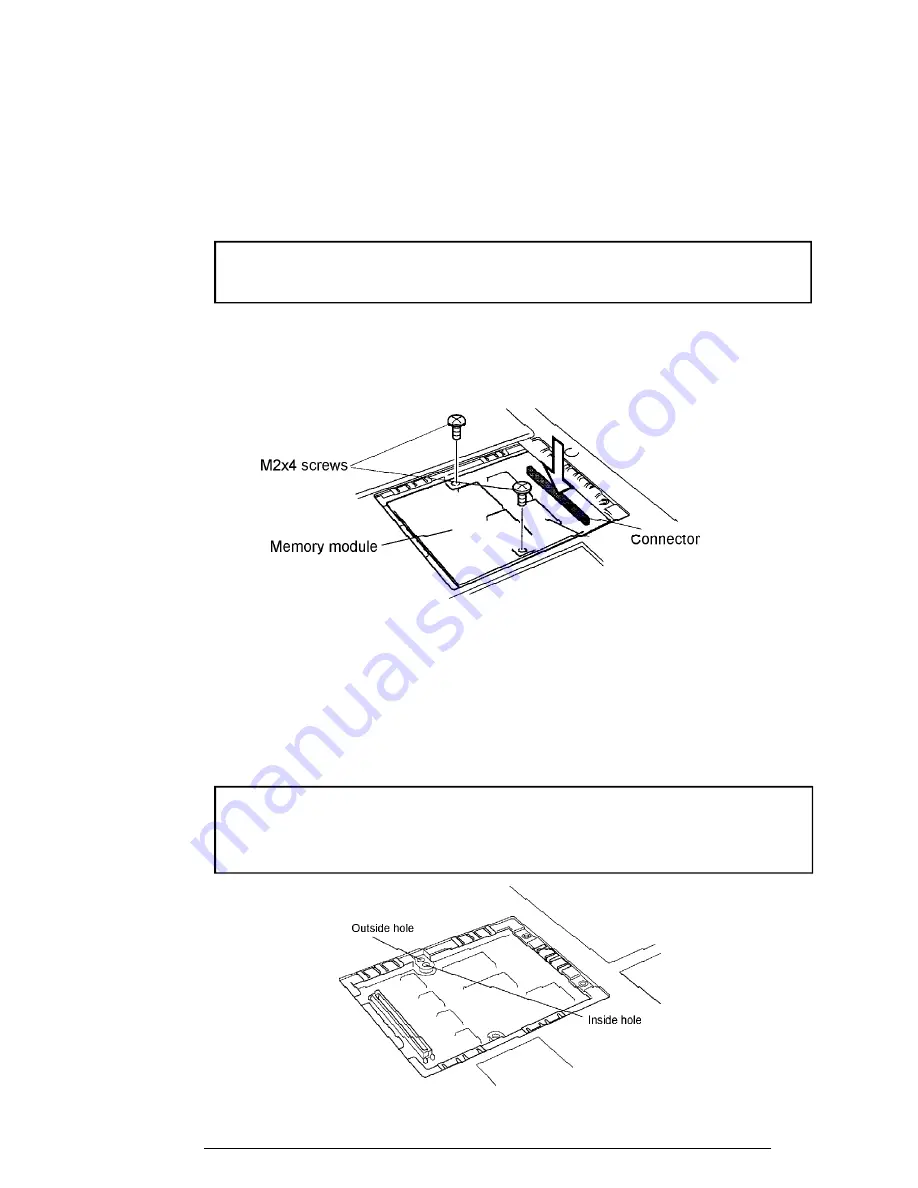
Installing an Optional Memory Module
To install an optional memory module, make sure the computer is in boot mode then follow
the steps below and refer to Figures 4-8 back to 4-6.
1.
Position the connector on the bottom of the
module
over the corresponding
connector on the computer (align the holes on the side of the module over the
screw holes on the brace).
NOTE:
Do not touch the connectors on the memory module or on the
computer. Debris on the connectors may cause memory access problems.
2.
Place your fingers above the connector and press firmly but gently to assure a
solid connection. The module should be seated level.
3.
Secure the module to the brace with
two M2x4 screws
.
Figure 4-8 Installing the memory module
4.
If the memory module has a plastic tab, fold it down first then lay the cover in
place.
5.
Secure it with
two silver M2x4 screws
.
6.
Install the battery pack and optional PC card as described in Sections 4.3 and 4.2.
NOTE:
There are two holes for the screw securing the memory module on
one side. When the module is installed, use the inside hole to secure the
module. Otherwise, secure the screw to the outside hole.
Figure 4-9 Securing the screw
Содержание Satellite Pro 430CDS
Страница 1: ...TOSHIBA 430Series PN 430 9400 CASM 2970307 B00 ...
Страница 23: ...430 Series 2 3 Figure 2 1 Troubleshooting flowchart ...
Страница 172: ...430 Series B 1 Appendix B Board Layout B 1 System Board Front View Figure B 1 Board layout front ...
Страница 173: ...B 2 430 Series B 2 System Board Back View Figure B 2 Board layout back ...
Страница 184: ...E 2 430 Series E 3 German GR Keyboard Figure E 3 GR keyboard E 4 French FR Keyboard Figure E 4 FR keyboard ...
Страница 185: ...430 Series E 3 E 5 Spanish SP Keyboard Figure E 5 SP keyboard E 6 Italian IT Keyboard Figure E 6 IT keyboard ...
Страница 186: ...E 4 430 Series E 7 Scandinavian SC Keyboard Figure E 7 SC keyboard E 8 Swiss German SL Keyboard Figure E 8 SL keyboard ...


