background image

Touch Pad control
buttons

Touch Pad control buttons are used like the
buttons on a standard mouse. Click the left
button to select a menu item or to manipulate text
or graphics designated by the pointer, and click
the right button to display a menu or other
function depending on the software you are
using.

AccuPoint control
buttons

AccuPoint control buttons allow you to select
menu items or manipulate texts and graphics as
designated by the on-screen pointer.
Refer to the 

AccuPoint

 section for more

information.

Keyboard

Keyboard contains character keys, control keys,
function keys, and special Windows keys.
Refer to 

The Keyboard

 section for more

information.

AccuPoint

A pointer control device in the center of the
keyboard is used to control the on-screen
pointer.
Refer to the 

AccuPoint

 section for more

information.

Hooks

Hooks secure the physical connection between
the tablet computer and the keyboard dock.

Guide pins

Guide pins make it easy for you to align the tablet
computer with the keyboard dock. They also
secure the physical connection between them.

Docking connectors

Docking connectors establish the data
communications with the tablet computer.
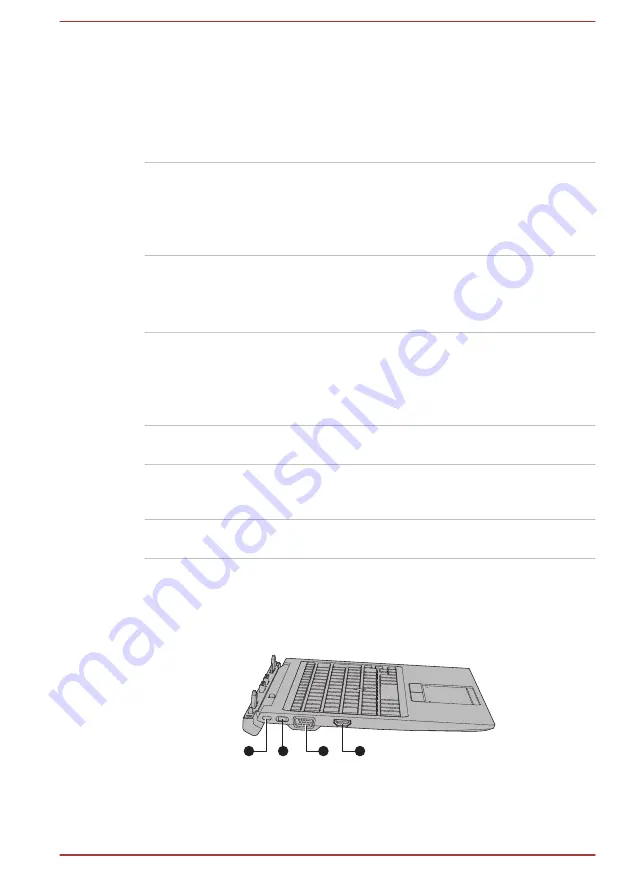
Left side

The following figure shows the left side of the keyboard dock.

Figure 3-3 The left side of the keyboard dock

4

3

2

1

1. Security lock slot

3. External RGB monitor port

2. Security lock switch

4. HDMI out port

Product appearance depends on the model you purchased.

User's Manual

3-8

Содержание PORTEGE Z20t-B Series

Страница 1: ...User s Manual PORTÉGÉ Z20t B PORTÉGÉ WT20 B ...

Страница 2: ... model name 2 3 Conventions 2 3 Using your computer for the first time 2 4 Getting to know Windows 2 13 Turning off the power 2 15 System Recovery 2 19 Chapter 3 The Grand Tour Tablet computer 3 1 TOSHIBA Keyboard Dock 3 7 Internal Hardware Components 3 11 Power Condition Descriptions 3 14 Chapter 4 Operating Basics Operating in tablet mode also for WT20 B 4 1 Using the Touch Screen 4 3 Using the ...

Страница 3: ...tility 5 10 TOSHIBA PC Health Monitor 5 11 TOSHIBA Setup Utility 5 12 Chapter 6 Troubleshooting Problem solving process 6 1 Hardware and system checklist 6 4 TOSHIBA support 6 14 Chapter 7 Appendix Specifications 7 1 AC Power Cord and Connectors 7 2 Information for Wireless Devices 7 4 Information about Intel AMT 7 14 Legal Footnotes 7 17 VCCI Class B Information Japan Only 7 19 OpenSSL Toolkit Li...

Страница 4: ...ond that stipulated above including conversion to digital format alteration transfer of copied material and distribution on a network without the permission of the copyright owner is a violation of copyright or author s rights and is subject to civil damages or criminal action Comply with copyright laws in making any reproduction from this manual Disclaimer This manual has been validated and revie...

Страница 5: ...tion herein might vary Pease check the ID information on the back of the device or box for specific information applicable to the model you purchased FCC information FCC notice Declaration of Conformity Information This equipment has been tested and found to comply with the limits for a Class B digital device pursuant to part 15 of the FCC rules These limits are designed to provide reasonable prot...

Страница 6: ... FCC conditions This device complies with part 15 of the FCC Rules Operation is subject to the following two conditions 1 This device may not cause harmful interference 2 This device must accept any interference received including interference that may cause undesired operation Contact Address TOSHIBA America Information Systems Inc 9740 Irvine Boulevard Irvine California 92618 1697 Telephone 949 ...

Страница 7: ... noted Only CE marked options should be connected implemented Only best shielded cables should be connected Working environment This product was designed to fulfil the EMC Electromagnetic Compatibility requirements to be observed for so called Residential commercial and light industry environments TOSHIBA do not approve the use of this product in working environments other than the above mentioned...

Страница 8: ...e la classe B respecte toutes les exigences du Règlement sur le matériel brouilleur du Canada Following information is only valid for EU member States Disposal of products The crossed out wheeled dust bin symbol indicates that products must be collected and disposed of separately from household waste Integrated batteries and accumulators can be disposed of with the product They will be separated a...

Страница 9: ...ly friendly disposal ensuring that the terminal contacts are covered by non conductive tape For more detailed information about the collection and recycling programmes available in your country please visit our website www toshiba eu recycling or contact your local council office or the retail outlet where you purchased the product These symbols might not stick depending on the country and region ...

Страница 10: ...ne getirmektedir The number of possible pixel failures of your display is defined according to ISO 9241 307 standards If the number of pixel failures is less than this standard they will not be counted as defect or failure Battery is a consumption product since the battery time depends on the usage of your computer If the battery can not be charged at all then it is a defect or failure The changes...

Страница 11: ...I DECODING AVC VC 1 AND MPEG 4 VIDEO THAT WAS ENCODED BY A CONSUMER ENGAGED IN A PERSONAL AND NONCOMMERCIAL ACTIVITY AND OR WAS OBTAINED FROM A VIDEO PROVIDER LICENSED BY MPEG LA TO PROVIDE SUCH VIDEO NO LICENSE IS GRANTED OR SHALL BE IMPLIED FOR ANY OTHER USE ADDITIONAL INFORMATION INCLUDING THAT RELATING TO PROMOTIONAL INTERNAL AND COMMERCIAL USES AND LICENSING MAY BE OBTAINED FROM MPEG LA L L C...

Страница 12: ...puter from Sleep Mode by pressing the power button Your ENERGY STAR certified computer should be set by default to enter a low power sleep mode after a period of inactivity Simply touching the mouse or keyboard wakes the computer in seconds These sleep features can save you up to 23 per year 200 kWh per year in electricity and prevent up to 300 pounds of greenhouse gas emissions annually To learn ...

Страница 13: ...e system failure computer or AC adaptor damage or a fire possibly resulting in serious injury Creating a computer friendly environment Place the computer on a flat surface that is large enough for the computer and any other items you are using such as a printer Leave enough space around the computer and other equipment to provide adequate ventilation Otherwise they might overheat To keep your comp...

Страница 14: ...o any form of strong impact as this can damage the computer s components or otherwise cause it to malfunction Cleaning the computer To help ensure long trouble free operation keep the computer free of dust and dirt and use care with all liquids around it Be careful not to spill liquids into the computer If the computer does get wet turn the power off immediately and let the computer dry completely...

Страница 15: ...ter with any cards installed This might damage either the computer and or the card resulting in computer failure Always use a suitable carry case when transporting the computer When carrying your computer be sure to hold it securely so that it does not fall or hit anything Do not carry your computer by holding any of its protruding elements Mobile phones Be aware that the use of mobile phones can ...

Страница 16: ...use of equipment or failure to follow instructions might cause data loss equipment damage or might result in minor or moderate injury Please read A note is a hint or advice that helps you make best use of your equipment User s Manual 1 13 ...

Страница 17: ...ith some models Reserve Pen in the pen slot and provided with some models AC adaptor and power cord 2 pin plug or 3 pin plug Cleaning cloth provided with some models Stylus Pen is included together with spare pen tips and a tip removal tool in the small case coming with the product Documentation Quickstart Instruction Manual for Safety and Comfort Warranty Information If any of the items are missi...

Страница 18: ...uter Figure 2 1 The main unit tablet computer Figure 2 2 The accessory unit TOSHIBA Keyboard Dock Product appearance depends on the model you purchased For availability of TOSHIBA Keyboard Dock refer to the following table Model Name TOSHIBA Keyboard Dock PORTÉGÉ Z20t B Satellite Pro Z20t B provided PORTÉGÉ WT20 B not provided tablet computer only Operating mode After docking your tablet computer ...

Страница 19: ... start using refer to Docking the tablet computer section for more information Your device is called computer when referred to as a single unit or where descriptions are not specifically for one of the operating modes in this manual Short model name Model name of your computer is shortened and referred to as the following in this manual Full Model Name Short Model Name PORTÉGÉ Z20t B Satellite Pro...

Страница 20: ...s in the lower left corner Using your computer for the first time Be sure to read the enclosed Instruction Manual for Safety and Comfort for information on the safe and proper use of this computer It is intended to help you be more comfortable and productive while using the computer By following the recommendations in it you can reduce your chance of developing a painful or disabling injury to you...

Страница 21: ...ing the tablet computer only for Z20t B Refer to the following recommended steps to dock your tablet computer Do not undock the tablet computer immediately after docking operation Wait at least 5 seconds Converting to laptop mode To use the computer in laptop mode do the following 1 Check the security lock switch on the left side of the keyboard dock and slide it to the unlocked position Figure 2 ...

Страница 22: ...tablet computer as a notebook computer The computer can be opened to a wide range of angles for optimal viewing To do this hold down the palm rest with one hand so that the body of the keyboard dock is not raised and slowly lift the tablet computer with the other hand holding the center position of the display screen as shown in the following figure Figure 2 5 Opening the computer Converting to pr...

Страница 23: ...e tablet computer and align the guide pins on the keyboard dock with the guide pin grooves on the bottom of the tablet computer 3 Gently press down the tablet computer until it clicks into place The hooks on the keyboard dock engage the tablet computer and the release latch goes back to the lock position Figure 2 7 Docking the tablet computer backward 1 1 2 2 2 3 1 Guide pins 3 Release latch 2 Gui...

Страница 24: ...let computer without unlocking by the release latch otherwise it might cause damage Do not slide the release latch without the tablet computer docked Be careful not to hurt your fingers when docking the tablet computer to the keyboard dock The rear of the keyboard dock is designed as a fulcrum and moves slightly upwards when the computer is opened Do not use the computer on soft surfaces or on rou...

Страница 25: ...k the tablet computer if the remaining power of Battery refers to the battery pack inside the tablet computer is 10 or less To check the remaining battery power click the battery icon on the Windows taskbar Do not dock the tablet computer immediately after undocking operation Wait at least 5 seconds To undock the tablet computer from the keyboard dock do the following 1 Disconnect and remove all p...

Страница 26: ... while holding down the keyboard dock b Figure 2 10 Undocking the tablet computer a b Connecting the AC adaptor Attach the AC adaptor when you want to charge the battery or operate from AC power The battery pack must be charged before you can operate from battery power The AC adaptor can automatically adjust to any voltage ranging from 100 volts to 240 volts and to a frequency of either 50 hertz o...

Страница 27: ...region the computer is bought and should not be used outside this region For use in other regions buy power cords that conform to safety rules and regulations in the particular region Do not use a 3 pin to 2 pin conversion plug When you connect the AC adaptor to the computer always follow the steps in the exact order as described in this User s Manual Connecting the power cable to a live electrica...

Страница 28: ...ing the DC output plug to the keyboard dock 1 2 1 DC IN 19V jack 2 DC output plug 3 Plug the power cord into a live wall outlet The Battery Second Battery indicator glows When you connect the AC adaptor to the DC IN 19V jack on the keyboard dock the second battery pack inside the keyboard dock also begins charging It might take longer to fully charge the second battery pack depending on the remain...

Страница 29: ... on the computer Initial setup The Windows Startup Screen is the first screen displayed when you turn on the power To install the operating system properly follow the on screen instructions on each screen When it is displayed be sure to read the license terms and license agreement carefully Getting to know Windows For detailed information on what is new and how to operate Windows refer to Get Star...

Страница 30: ... desktops so that running apps can be grouped for entertainment productivity or what you just want To do this click the Task view icon and then click New desktop Open the apps you want to use on that desktop To switch between desktops click Task view again Search Search on the Windows taskbar allows you to find apps files settings and more on the computer When Internet connection is available it a...

Страница 31: ... have multiple sign in methods set for a user account you can select an option on the Windows login screen by clicking sign in options Password authentication is the default sign in option Tablet mode Tablet mode enables touch optimized working environment without keyboard and mouse After switching to tablet mode Start menu and apps are running in full screen giving you more space to work in To us...

Страница 32: ...t Press CTRL ALT and DEL simultaneously once to display the menu window and then select Restart by clicking the power icon in the lower right corner Sleep Mode If you have to interrupt your work you are able to turn off the power without exiting from your software by placing the computer into Sleep Mode In this mode data is maintained in the main memory of the computer When you turn on the power a...

Страница 33: ...p Mode To prevent the computer from automatically entering Sleep Mode disable Sleep Mode within the Power Options To use the Hybrid Sleep function configure it in the Power Options Benefits of Sleep Mode The Sleep Mode feature provides the following benefits Restores the previous working environment more rapidly than the Hibernation Mode feature Saves power by shutting down the system when the com...

Страница 34: ...o the internal storage However for safety sake it is best to save your data manually Data will be lost if you disconnect the AC adaptor before the save is completed To prevent data loss do not switch to Hibernation Mode while transferring data to external media such as USB devices memory media or other external memory devices Benefits of Hibernation Mode The Hibernation Mode feature provides the f...

Страница 35: ...tion Mode When you turn off the power in Hibernation Mode the computer takes a moment to save the current data in memory to the internal storage After you turn off the computer and the content of memory has been saved to the internal storage turn off the power to any peripheral devices Do not turn the computer or devices back on immediately Wait a moment to let all capacitors fully discharge Syste...

Страница 36: ...ot use utilities including those intended to enhance internal storage access speed They might cause unstable operation and damage data Do not shut down log off or Sleep Hibernate while writing or rewriting the media Set the computer on a level surface and avoid places subjected to vibrations such as airplanes trains or cars Do not use on an unstable surface such as a stand A recovery image of the ...

Страница 37: ...to the state it was in when you originally received it To perform this restoration do the following Make sure that the AC adaptor is connected during the restoring process Make sure to dock the tablet computer to TOSHIBA Keyboard Dock before restoring the operating system only for Z20t B When you reinstall the Windows operating system the internal storage will be reformatted and all data will be l...

Страница 38: ... it to restore the recovery partition If you have not created Recovery Media contact TOSHIBA support for assistance Restoring the pre installed software from the Recovery Partition A portion of the total internal storage space is configured as a hidden recovery partition This partition stores files which can be used to restore pre installed software in the event of a problem If you set up your int...

Страница 39: ...e keyboard dock you can hold down the Volume up button until the Boot menu is loaded and then select HDD Recovery Choose Yes if you want to continue 3 Select Troubleshoot TOSHIBA Maintenance Utility TOSHIBA HDD Recovery 4 Follow the on screen instructions to finish the recovery User s Manual 2 23 ...

Страница 40: ...ch before you operate the computer Legal Footnote Non applicable Icons For more information regarding Non applicable Icons refer to the Legal Footnotes section Handle your computer carefully to avoid scratching or damaging the surface Tablet computer The following figure shows essential components of the tablet computer User s Manual 3 1 ...

Страница 41: ...k grooves 8 SIM card slot 22 Docking interface 9 Power button 23 DC IN 19V jack 10 Force shutdown hole 24 Web Camera LED back 11 Volume up down button 25 Web Camera back 12 Power indicator 26 Wireless communication antennas not shown 13 Battery indicator 27 ID information 14 Micro USB port Provided with some models Product appearance depends on the model you purchased Web Camera front Web Camera i...

Страница 42: ...ord sounds for your application Refer to the Sound System and Video mode section for more information Display screen 31 7 cm 12 5 LCD screen configured with the following resolution FHD 1920 horizontal x 1080 vertical pixels Be aware that when the computer is operating on the AC adaptor the image displayed on the internal screen is somewhat brighter than when it operates on battery power This diff...

Страница 43: ...dicator shows the charging condition of the battery pack inside the tablet computer White indicates the battery pack is fully charged while the power is being correctly supplied from the AC power adaptor Refer to the Power Condition Descriptions section for more information on this feature Micro USB port One Micro USB port which complies to the USB 2 0 standard is provided on the right side of the...

Страница 44: ...let computer might be lifted Any possible stress put on the body of the tablet computer might cause damage Memory media slot This slot lets you insert a micro SD SDHC SDXC memory card Refer to the Memory media section for more information Keep foreign metal objects such as screws staples and paper clips out of the Memory media slot Foreign metal objects can create a short circuit which can cause d...

Страница 45: ...ry pack Note that you must only use the model of AC adaptor supplied with the computer at the time of purchase Using the wrong AC adaptor can damage the computer The tablet computer cannot be docked when the AC adaptor is connected Web Camera LED back The Web Camera LED glows when the Web Camera is operating Web Camera back Your computer is also equipped with a back Web Camera used for recording v...

Страница 46: ...h Pad ON OFF icon 8 Release latch 3 TOSHIBA eco icon 9 Docking connectors 4 Touch Pad control buttons 10 Hooks 5 AccuPoint control buttons 11 Guide pins 6 Keyboard Product appearance depends on the model you purchased Touch Pad The Touch Pad located in the palm rest is used to control the movement of the on screen pointer To use the Touch Pad simply touch and move your fingertip across it in the d...

Страница 47: ...Keyboard section for more information AccuPoint A pointer control device in the center of the keyboard is used to control the on screen pointer Refer to the AccuPoint section for more information Hooks Hooks secure the physical connection between the tablet computer and the keyboard dock Guide pins Guide pins make it easy for you to align the tablet computer with the keyboard dock They also secure...

Страница 48: ...MI out port HDMI out port can connect with Type A connector HDMI cable Right side The following figure shows the right side of the keyboard dock Figure 3 4 The right side of the keyboard dock 5 4 3 1 1 2 1 Universal Serial Bus USB 3 0 ports 4 Second Battery indicator 2 LAN jack 5 DC IN 19V jack 3 Docking indicator Product appearance depends on the model you purchased Universal Serial Bus USB 3 0 p...

Страница 49: ...r second 1000BASE T Refer to LAN section for more information Do not connect any cable other than a LAN cable to the LAN jack It might cause damage or malfunction Docking indicator The Docking indicator glows white when data communications between the keyboard dock and the tablet computer are successfully established and in good condition Second Battery indicator The Second Battery indicator shows...

Страница 50: ...tly such as when the keyboard or the Touch Pad does not respond to your command do the following 1 Turn off the power and undock the tablet computer 2 Insert a slender object such as a needle into this hole to force reset the keyboard dock 3 Dock the tablet computer and turn on the power Internal Hardware Components This section describes the internal hardware components of your computer The actua...

Страница 51: ...f processor is included in your model click Control Panel System and Security System under Windows System group in All apps Legal Footnote CPU For more information regarding CPU refer to the Legal Footnotes section Internal storage The capacity of the hard disk drive varies depending on the model To check which type of internal storage is included in your model open the TOSHIBA PC Health Monitor u...

Страница 52: ...AC power mode and might decrease considerably when operating in battery power mode Legal Footnote Graphics Processing Unit GPU For more information regarding Graphics Processing Unit GPU refer to the Legal Footnotes section Intel Display Power Saving Technology Intel GPU models might include the Display Power Saving Technology feature that can save the power consumption of the computer by optimizi...

Страница 53: ...at the AC adaptor is connected and the battery pack inside the tablet computer is fully charged Flashing White Indicates a problem with the computer Disconnect the AC adaptor for several seconds and then reconnect the AC adaptor If it still does not operate properly you should contact your reseller or dealer No light Under any other conditions the indicator does not light Second Battery indicator ...

Страница 54: ...the computer s power is on or off Power indicator Check the Power indicator to determine the power status of the computer The following indicator conditions should be noted White Indicates that power is being supplied to the computer and the computer is turned on Flashing white Indicates that the computer is in Sleep Mode and that there is sufficient power available AC adaptor or battery to mainta...

Страница 55: ...tablet mode Remove all external peripheral devices and their connection cables from the computer before carrying Hold the computer firmly on your forearm Be careful not to accidentally touch the Windows button Remove the AC adaptor from the computer when using it held in your forearm Do not use the computer while walking or driving a car Do not drop the computer or apply excessive impact to it Do ...

Страница 56: ... following figure Figure 4 2 Use area of the pen Changing the screen orientation When operating the computer in tablet mode you can change the screen orientation by rotating the computer sideways The screen orientation automatically changes according to the rotation angle detected Figure 4 3 Rotating the computer sideways 1 2 1 Landscape mode 2 Portrait mode To manually disable the automatic scree...

Страница 57: ...aries depending on environmental conditions For example any source using electromagnetic or radio waves Before using any compass feature the compass needs to be calibrated for accuracy To calibrate disconnect the AC adaptor and remove all peripherals cables and then horizontally vertically rotate the computer with the power on several times as shown in the illustration below Please note this is th...

Страница 58: ...o move through what is on the screen Swipe Quickly move your finger in from the edge of the screen without pausing when you first touch it Swipe from the left edge views all your open apps in task view Swipe from the right edge opens the Action center Swipe from the top edge views title bars for full screened apps For details and more advanced touch screen gestures to interact with Windows operati...

Страница 59: ...y zooms in or out Two Finger Scroll Place two fingers down and slide them vertically or horizontally from anywhere on the Touch Pad This allows you to operate the scroll bars of a window Do not put items on the Touch Pad surface to prevent abnormal action Some of the Touch Pad operations described in this section are only supported in certain applications TOSHIBA Pointing Device AccuPoint To use t...

Страница 60: ... if You touch the AccuPoint during power up You apply constant soft pressure during power up There is a sudden temperature change Strong stress is applied to the AccuPoint If an error message appears reboot the computer If an error message does not appear wait a moment for the pointer to stop then continue operation Replacing the cap The AccuPoint cap is an expendable item that should be replaced ...

Страница 61: ...ent AccuPoint caps from your TOSHIBA authorized dealer Stylus Pen and Reserve Pen You can use the pen to execute actions and enter data Hold the pen in a natural position and tap press or trace on the screen lightly Figure 4 7 Stylus Pen 1 2 3 Figure 4 8 Reserve Pen 2 1 1 Pen point 3 Eraser 2 Pen button Pen point Provides the same function as left clicking the mouse once User s Manual 4 7 ...

Страница 62: ...unlight Store the pen without any pressure being applied to the buttons Failure to do so might cause a malfunction or characteristic deterioration The pen is composed of precision parts Do not drop the pen Strong impact causes a malfunction or characteristic deterioration Do not apply excessive force to the pen point and the side buttons Excessive force applied to these parts causes short life or ...

Страница 63: ... keep another pen set as a spare You can buy replacement pen sets from your TOSHIBA authorized dealer TOSHIBA is not liable for any problems arising on the products due to the use of the pen in an environment where the above conditions are not satisfied or because of its use by unspecified number of users Removing the Reserve Pen To remove the Reserve Pen slowly pull the Reserve Pen to remove it f...

Страница 64: ...nce Double tap Lightly tap the tip of the pen twice on an object and lift it immediately to execute an action A double tap is similar to left clicking the mouse twice Press and hold Tap the tip of the pen on the screen and hold until a white circle appears Lift the pen to open a pop up menu or execute a specific action Press and hold is similar to right clicking the mouse Drag Touch the pen on the...

Страница 65: ...ized dealer A short and worn pen point is difficult to pull out Replace the pen point with a refill before it becomes too short to remove It is recommended that you keep another pen set as a spare You can buy replacement pen sets from your TOSHIBA authorized dealer The Keyboard The number of keys available on the keyboard dock depends on which country region your computer is configured for with ke...

Страница 66: ... function keys are pressed in combination with the FN key Key Combination Function FN F1 Enters Lock computer mode To restore your desktop you need to log on again FN F2 Switches between the power plans FN F3 Switches the system to Sleep Mode FN F4 Switches the system to Hibernation Mode FN F5 Changes the active display device To use a simultaneous mode you must set the resolution of the internal ...

Страница 67: ... the display resolution FN E Cuts off all data communications with the keyboard dock FN Z Toggles the mode of the keyboard backlight between Timer On and Off To set up the brightness click System Settings under TOSHIBA group in All apps Click Keyboard tab and select a level under Keyboard Backlight Brightness Control To set up the timer launch the BIOS setup utility select Power Management Keyboar...

Страница 68: ...eric data input or cursor and page control Arrow Mode Press FN F10 to turn on Arrow Mode You are able to access cursor and page control functions by using the keys Press FN F10 again to turn off this overlay function Numeric Mode Press FN F11 to turn on Numeric Mode You are able to access numeric characters by using the keys Press FN F11 again to turn off this overlay function Temporarily using no...

Страница 69: ...tual keyboard allowing you to type on the touch screen To use the touch keyboard tap in an area where you can type The keyboard opens automatically To manually open the touch keyboard click the keyboard icon in the taskbar of your desktop Battery This section explains battery use recharging methods and handling Battery pack The tablet computer contains a battery pack inside Also depending on the m...

Страница 70: ...mputer while the Battery indicator flashes the computer enters Hibernation Mode so that you do not lose any data and automatically turn itself off You must recharge the battery pack when it becomes discharged Procedures To recharge the battery pack connect the AC adaptor to the DC IN 19V jack and plug the other end into a working outlet The Battery and or Second Battery indicator glows amber while...

Страница 71: ...the battery pack should begin charging The Battery and or Second Battery indicator might show a rapid decrease in battery operating time when you try to charge a battery pack under the following conditions The battery pack has not been used for a long time The battery pack has completely discharged and been left in the computer for a long time In such cases do the following 1 Fully discharge the b...

Страница 72: ...w long the charge lasts in a battery pack depends on Processor speed Screen brightness System Sleep Mode System Hibernation Mode Display power off period How often and for how long you use the internal storage and external disk drives for example optical disc How much charge the battery pack contained to begin with How you use optional devices such as a USB device to which the battery pack supplie...

Страница 73: ... IN 19V jack and to a wall outlet that is supplying power The Battery and or Second Battery indicator glows amber to indicate that the battery pack is being charged However if Battery and or Second Battery indicator does not glow this indicates that power is not being supplied Check the connections for the AC adaptor and the power cord 5 Charge the battery pack until the Battery and or Second Batt...

Страница 74: ...he SIM card slot and push the center of the tray to close it Press gently until it locks into place Figure 4 15 Inserting the SIM card 1 2 1 SIM card tray 2 SIM card Never allow metal objects such as screws staples and paper clips to enter the computer Foreign metal objects can create a short circuit which can cause damage and fire possibly resulting in serious injury Do not touch the connectors o...

Страница 75: ...ation might not be detected in the following places or situations Inside or directly under a building Inside a bag or box Among dense trees When there is an obstacle person or object in the front of the antenna Underground tunnel underground or underwater Buildings streets or residential areas Near to high voltage cables Bad weather such as heavy rain or snow LAN TOSHIBA Keyboard Dock has built in...

Страница 76: ... can connect with a CAT3 or higher cable Connecting the LAN cable To connect the LAN cable do the following Connect the AC adaptor before connecting the LAN cable The AC adaptor must remain connected during LAN use If you disconnect the AC Adaptor while the computer is accessing a LAN the system might hang up Do not connect any other cable to the LAN jack except the LAN cable Otherwise malfunction...

Страница 77: ... it is not possible to guarantee that all memory media can operate properly Figure 4 17 Examples of memory media microSD card Points to note about the memory media card microSD SDHC SDXC memory cards comply with SDMI Secure Digital Music Initiative which is a technology adopted to prevent unlawful copy or playback of digital music For this reason you cannot copy or play back protected material on ...

Страница 78: ...ned so that it can be inserted only one way Do not try to force the card into the slot Memory cards have a limited lifespan so it is important to back up important data Do not write to a card if the battery power is low Low power might affect writing accuracy Do not remove a card while read write is in progress For more details on using memory cards see manuals accompanying the cards Inserting mem...

Страница 79: ...llowing instructions apply to all types of supported media devices To remove memory media do the following 1 Click the Safely Remove Hardware and Eject Media icon on the Windows taskbar 2 Select memory media 3 Push the memory media until you hear a click to partially release it 4 Grasp the media and remove it If you remove the memory media or turn off the power while the computer is accessing the ...

Страница 80: ...ernal RGB monitor port Figure 4 19 Connecting the RGB cable to the External RGB monitor port 1 2 1 External RGB monitor port 2 RGB cable There are no fastening screws for an external monitor cable on the External RGB monitor port However external monitor cables which have connectors with fastening screws can still be used 2 Turn the external monitor s power on When you turn on the power the comput...

Страница 81: ...on properly To connect a device to the HDMI out port you must purchase a suitable HDMI cable 1 Plug one end of the HDMI cable into the HDMI in port of the HDMI display device 2 Plug the other end of the HDMI cable into the HDMI port on your tablet computer or on the keyboard dock 3 Turn the HDMI display device s power on Figure 4 20 Connecting the HDMI port 1 2 1 HDMI port 2 HDMI cable Type A conn...

Страница 82: ...layback device 4 Click the Set Default button 5 Click OK to close the Sound dialog Settings for display video on HDMI To view video on the HDMI display device be sure to configure the following settings otherwise you might find that nothing is displayed Be sure to use the function key to select the display device before starting to play video Do not change the display device or audio device while ...

Страница 83: ...an external display you can follow the steps as described below 1 Go to Settings and click Devices Connected devices 2 Click Add a device Your computer will start searching for the Wireless display device 3 After the Wireless display device is searched follow the on screen instructions to finish connection After the connection is established the name of the Wireless display device appears under Pr...

Страница 84: ...ds used for attaching security cables differ from product to product Refer to the instructions for the product you are using for more information Connecting the security lock To connect a security cable to the computer do the following 1 Turn the computer so its left side faces you 2 Slide the security lock switch to the locked position Figure 4 22 Slide the security lock switch 3 Align the securi...

Страница 85: ...e This section describes some of the audio control functions Volume Mixer The Volume Mixer utility lets you control the audio volume for playback of devices and applications under Windows To launch the Volume Mixer utility right click on the speaker icon on the Windows taskbar and then select Open Volume Mixer from the sub menu To adjust the volume level of speakers or headphones move the Speakers...

Страница 86: ... SmartAudio main screen 3 Select one from the device list for the device you plugged into Opening SmartAudio Help Clicking in the top right corner of the SmartAudio window will open the Help file in your selected language or in English if your selected language is not supported DTS Studio Sound DTS Studio Sound is a premium audio enhancement suite that utilizes revolutionary audio technology to pr...

Страница 87: ...ngs are configured via the Screen Resolution dialog To open the Screen Resolution dialog click Control Panel Appearance and Personalization Display Change display settings under Windows System in All apps If you are running some applications for example a 3D application or video playback you might see some disturbance flickering or frame dropping on your screen If that occurs adjust the resolution...

Страница 88: ...y This utility allows you to set a password to restrict access to the computer To access this utility click Password Utility under TOSHIBA group in All apps TOSHIBA System Settings This utility allows you to customize your hardware settings according to the way you work with the computer and the peripherals you use To access this utility click System Settings under TOSHIBA group in All apps TOSHIB...

Страница 89: ...ycle of the battery It is recommended using the computer with AC adaptor connected as the battery operating time is comparatively short in this mode Depending on the usage situation the life cycle of battery pack might not be extended properly To access this utility click eco Utility under TOSHIBA group in All apps For details on TOSHIBA eco utility see the help file TOSHIBA Service Station This a...

Страница 90: ...so be used to operate a Smartphone in hands free mode and speaker To access this utility click Bluetooth R Link under TOSHIBA group in All apps For details on this utility see the help file TOSHIBA Tablet Access Code Logon Utility You can use the utility to perform user login authentication using a hand written access code To access this utility click Tablet Access Code Logon Utility under TOSHIBA...

Страница 91: ...itions and also overwrite all sectors on the internal storage If there is an external hard disk drive connected to your computer it can also be erased However if you do not want to delete the data from the external hard disk drive disconnect it from your computer To access this utility 1 Go to Settings and click Update security Recovery 2 Click Restart now under Advanced startup 3 Click Troublesho...

Страница 92: ... SSD automatic power off 1 This feature automatically cuts off power to the Solid State Drive when it is not accessed for a specified time with power being restored when the hard disk drive is next accessed This can be specified in the Power Options System automatic Sleep Hibernation Mode 1 This feature automatically shuts down the system into either Sleep Mode or Hibernation Mode when there is no...

Страница 93: ...ed in the computer s main memory so that when you next turn on the power you can continue working right where you left off Hibernation Mode This feature lets you turn off the power to the computer without exiting from your software The contents of main memory are automatically saved to the internal storage so that when you next turn on the power again you can continue working right where you left ...

Страница 94: ...sword Utility under TOSHIBA group in All apps and click User Password User authentication might be required to validate user rights when using TOSHIBA Password Utility to delete or change passwords and so on Set button Click this button to register a password After a password is set you are prompted to enter it when you start the computer After you set the password a dialog box appears asking whet...

Страница 95: ... held responsible for any loss of any data any loss of use or access to your HDD or for any other losses to you or any other person or organization that result from the loss of access to your HDD If you cannot accept this risk do not register the HDD User Password When saving the HDD User Password shut down or restart the computer If the computer is not shut down or restarted the saved data might ...

Страница 96: ...stem Settings TOSHIBA System Settings is the TOSHIBA configuration management tool available through the Windows operating system To run TOSHIBA System Settings click System Settings under TOSHIBA group in All apps The TOSHIBA System Settings window contains a number of tabs to allow specific functions of the computer to be configured In addition there are also three buttons OK Cancel and Apply OK...

Страница 97: ... using a hand written access code Your access code is registered by using characters symbols speed of your signature pen pressure or directions in which you move the pen between characters or symbols Always register your access code in accordance with the procedure that appears on the screen You need to re enter the same code several times to register your access code properly Use multiple charact...

Страница 98: ...ce usage that is power settings battery temperature and recharging for models with battery CPU memory backlight illumination time and temperatures for various devices The collected information is not limited to the examples specified here The stored data uses a very small portion of the total hard disk capacity approximately 20 MB or less per year This information is used to identify and provide a...

Страница 99: ...ch might interfere with the operation of the program are detected Follow the instructions displayed on screen in the message TOSHIBA Setup Utility TOSHIBA Setup Utility is a BIOS setup utility that provides you a menu based user interface so that you can easily view and change BIOS settings To enter the BIOS setup utility do the following 1 Save your work 2 Click Start Power and then select Restar...

Страница 100: ...Button Key Function Volume up Up arrow key Select the previous item Volume down Down arrow key Select the next item User s Manual 5 13 ...

Страница 101: ...n this chapter are meant only as a guide they are not definitive problem solving techniques In reality many problems can be solved simply but a few might require help from TOSHIBA Support If you find you need to consult others be prepared to describe the problem in as much detail as possible Preliminary checklist You should always consider the simplest solution first The items detailed in this che...

Страница 102: ...m characters Make a screenshot of the current display and if possible look up the messages in the documentation included with the computer software or operating system Check that all connecting cables are correctly and firmly attached as loose cables can cause erroneous or intermittent signals Do any indicators light if so which ones what color are they and do they stay on or blink Write down what...

Страница 103: ...ff wait 10 15 seconds before turning on the power again by pressing the power button Insert a slender object such as a needle into the force shut down hole on the tablet computer Your program stops responding If you are working with a program that suddenly freezes all operations chances are the program has stopped responding You can exit the failed program without shutting down the operating syste...

Страница 104: ... Boot menu F12 Volume up Recovery options 0 zero If your computer starts to load the Operating System instead of desired advanced options do the following Make sure that fast startup is disabled in the Power Options by the following steps 1 Click Control Panel System and Security Power Options under Windows System in All apps 2 Click Choose what the power button does or Choose what closing the lid...

Страница 105: ...n automatically Leave the computer off until it reaches room temperature If the computer has reached room temperature and it still does not start or if it starts but shuts down quickly contact TOSHIBA Support AC power If you have trouble turning on the computer with the AC adaptor connected check the status of the DC IN Battery indicator Refer to the Power Condition Descriptions section for furthe...

Страница 106: ...tery the battery might not charge to its full potential In these instances you should fully discharge the battery and then attempt to charge it again Check the Power saver option under Choose or customize a power plan in the Power Options Real Time Clock Problem Procedure The BIOS setting and system date time are lost The lasting time of the Real Time Clock RTC has run out You must set the date an...

Страница 107: ... panel These marks might have come from contact with the keyboard and Touch Pad while the display panel has been closed Try to remove the marks by gently wiping the display panel with a clean dry cloth or if this fails with a good quality LCD screen cleaner In this latter instance you should always follow the instructions with the screen cleaner and always ensure that you let the display panel dry...

Страница 108: ...h your mouse Touch Pad Problem Procedure The Touch Pad does not work Check the Device Select settings by the following steps 1 Click Control Panel Hardware and Sound Mouse under Windows System in All apps 2 In the Advanced tab click Advanced feature settings Device Select On screen pointer does not respond to pointing device operation In this instance the system might be busy Try moving the mouse ...

Страница 109: ...s System in All apps If you are still unable to resolve the problem contact TOSHIBA Support USB mouse Problem Procedure On screen pointer does not respond to mouse operation In this instance the system might be busy Try moving the mouse again after waiting a short while Remove the mouse from the computer and then reconnect it to a free USB port to ensure that it is firmly attached Double clicking ...

Страница 110: ...tion supplied with the mouse for instructions on how to clean it If you are still unable to resolve the problem contact TOSHIBA Support USB device In addition to the information in this section also refer to the documentation supplied with your USB device Problem Procedure USB device does not work Remove the USB device from the computer and then reconnect it to a free port to ensure that it is fir...

Страница 111: ...her the internal microphone or an external microphone connected to the computer Refer to Sound System and Video mode for further information Volume cannot be adjusted during Windows start up or shut down If you are still unable to resolve the problem contact TOSHIBA Support External monitor Also refer to Operating Basics and to the documentation supplied with your monitor for further information P...

Страница 112: ...ternal monitor while the computer is in Sleep or Hibernation Mode Remember to turn off the computer before disconnecting the external monitor When the display panel and an external monitor are set to clone mode and they are turned off by the timer the display panel or the external monitor might not display when turned on again If this occurs press the function key to reset the display panel and ex...

Страница 113: ...dministrator Wireless LAN Problem Procedure Cannot access Wireless LAN Make sure that the wireless communication function of the computer is on If problems persist contact your LAN administrator Bluetooth Problem Procedure Cannot access Bluetooth device Check to ensure that the wireless communication function of the computer is on Check to ensure that the Bluetooth Manager application is running o...

Страница 114: ...n supplied with your software and or peripheral devices If a problem occurs when you are running software applications consult the software documentation for troubleshooting suggestions and consider calling the software company s technical support department for assistance Consult the reseller or dealer from where you purchased your computer and or software they are your best resource for current ...

Страница 115: ... millimeters Z20t B Approximately 309 0 w x 199 9 d x 8 8 h millimeters WT20 B not including parts that extend beyond the main body Environmental Requirements Conditions Ambient temperature Relative humidity Operating 5 C to 35 C 20 to 80 noncondensing Non operating 20 C to 60 C 10 to 90 noncondensing Wet bulb temperature 29 C maximum Conditions Altitude from sea level Operating 60 to 3 000 meters...

Страница 116: ...rved Reserved 12 SDA Serial Data Signal I O 13 HSYNC Horizontal Sync Signal O 14 VSYNC Vertical Sync Signal O 15 SCL Serial Clock Signal O I O I Input to computer I O O Output from computer AC Power Cord and Connectors The AC input plug of the power cord must be compatible with the various international AC power outlets and the cord must meet the standards for the country region in which it is use...

Страница 117: ...ctors power cord must be VDE type H05VVH2 F or H03VVH2 F and for three conductors power cord must be VDE type H05VV F For the United States and Canada two pin plug configuration must be a 2 15P 250 V or 1 15P 125 V and three pin plug configuration must be 6 15P 250 V or 5 15P 125 V as designated in the U S National Electrical code handbook and the Canadian Electrical Code Part II The following ill...

Страница 118: ...liant to Bluetooth Specification depending on the model you purchased as defined and approved by the Bluetooth Special Interest Group Logo certification with Bluetooth wireless technology as defined by the Bluetooth Special interest Group This Bluetooth product is not compatible with devices using Bluetooth Version 1 0B specifications The wireless devices have not completed verification of connect...

Страница 119: ...n some situations or environments the use of Wireless products may be restricted by the proprietor of the building or responsible representatives of the organization These situations may for example include Using the Wireless products equipment on board of airplanes or In any other environment where the risk of interference to other devices or services is perceived or identified as harmful If you ...

Страница 120: ...y recommends that you enable encryption functionality otherwise your computer is open to illegal access by an outsider using a wireless connection If this occurs the outsider might illegally access your system eavesdrop or cause the loss or destruction of stored data TOSHIBA is not liable for the loss of data due to eavesdropping or illegal access through the wireless LAN and the damage thereof Ca...

Страница 121: ...interference and or damage to LE LAN devices Bluetooth wireless technology Some computers in this series have Bluetooth wireless communication function which eliminates the need for cables between electronic devices such as computers printers and mobile phones When it is enabled Bluetooth provides the wireless personal area network environment which is safe and trustworthy that is quick and easy Y...

Страница 122: ... use Refarming of the 2 4GHz band has been ongoing in recent years to allow current relaxed regulation Full implementation planned 2012 Italy For private use a general authorization is required if WAS RLAN s are used outside own premises For public use a general authorization is required Luxembourg Implemented General authorization required for network and service supply Norway Implemented This su...

Страница 123: ...e used outside own premises Luxembourg Implemented General authorization required for network and service supply Russian Federation Limited e i r p 100mW Permitted to use only for indoor applications closed industrial and warehouse areas and on board aircraft 1 Permitted to use for local networks of aircraft crew service communications on board aircraft in area of the airport and at all stages of ...

Страница 124: ...ilisant les mêmes canaux Les utilisateurs devraient aussi être avisés que les utilisateurs de radars de haute puissance sont désignés utilisateurs principaux c à d qu ils ont la priorité pour les bandes 5 25 5 35GHz et 5 65 5 85GHz et que ces radars pourraient causer du brouillage et ou des dommages aux dispositifs LAN EL The term IC before the equipment certification number only signifies that th...

Страница 125: ...terference from legal communications or ISM radio wave radiated devices Australia and New Zealand regulatory compliance This equipment incorporates a radio transmitting device in normal use a separation distance of 20cm will ensure radio frequency exposure levels complies with the Australian and New Zealand Standards Using this equipment in Japan In Japan the frequency bandwidth of 2 400MHz to 2 4...

Страница 126: ...is equipment uses DS SS modulation 3 OF This equipment uses OFDM modulation 4 4 The interference range of this equipment is less than 40m 5 This equipment uses a frequency bandwidth from 2 400MHz to 2 483 5MHz It is possible to avoid the band of mobile object identification systems 3 Indication for Bluetooth The indication shown below appears on this equipment 4 1 2 3 1 1 2 4 This equipment uses a...

Страница 127: ...0NGW DSP Research Inc Approval Number D130092003 The following restrictions apply Do not disassemble or modify the device Do not install the embedded wireless module into other device Radio approvals for wireless devices This equipment is approved to the radio standard by the countries regions in the following table If you use this equipment in the countries regions which are not listed in the fol...

Страница 128: ...esents it is strongly recommended that you turn off the AMT function before connecting to a network If the AMT function is NOT turned off there is a danger that the management of AMT function will be abused by other parties which possibly lead to the leak of sensitive and or proprietary information data loss HDD erasure or file overwritten First you must do the following in the BIOS setup utility ...

Страница 129: ...on the US keyboard layout The following table shows examples of the special characters in US keyboard layout Special character you want to input Corresponding number key SHIFT key a number key 1 2 3 4 5 6 7 8 9 0 3 Select Intel R AMT Configuration and press the Enter key 4 Select Manageability Features Selection and press the Enter key 5 Select Disabled and press the Enter key 6 Press the Y key an...

Страница 130: ... network LAN Enable Disable items to be no longer changeable in BIOS setup utility Consult with your system administrator about details When using the AMT function TOSHIBA Keyboard Dock is required When using MEBx TOSHIBA Keyboard Dock or an external USB keyboard is required AMT function cannot be operated using a USB LAN adaptor The useable system memory for models equipped with the AMT function ...

Страница 131: ...0 meters or 3 280 feet above sea level use of computer at temperatures outside the range of 5 C to 30 C 41 86 F or 25 C 77 F at high altitude all temperature references are approximate and might vary depending on the specific computer model contact TOSHIBA support for details CPU performance might also vary from specifications due to design configuration Under some conditions your computer product...

Страница 132: ...ely 3 GB only Computers configured with a 64 bit operating system can address 4 GB or more of system memory Battery Life Battery life might vary considerably depending on product model configuration applications power management settings and features utilized as well as the natural performance variations produced by the design of individual components Published battery life numbers are achieved on...

Страница 133: ...le Graphics Memory is the total of as applicable Dedicated Video Memory System Video Memory and Shared System Memory Shared System Memory varies depending on system memory size and other factors Wireless LAN The transmission speed over the wireless LAN and the distance over which wireless LAN can reach might vary depending on surrounding electromagnetic environment obstacles access point design an...

Страница 134: ...OpenSSL Project for use in the OpenSSL Toolkit http www openssl org 4 The names OpenSSL Toolkit and OpenSSL Project must not be used to endorse or promote products derived from this software without prior written permission For written permission please contact openssl core openssl org 5 Products derived from this software may not be called OpenSSL nor may OpenSSL appear in their names without pri...

Страница 135: ...remains Eric Youngs and as such any Copyright notices in the code are not to be removed If this package is used in a product Eric Young should be given attribution as the author of the parts of the library used This can be in the form of a textual message at program startup or in documentation online or textual provided with the package Redistribution and use in source and binary forms with or wit...

Страница 136: ...IBILITY OF SUCH DAMAGE The licence and distribution terms for any publically available version or derivative of this code cannot be changed i e this code cannot simply be copied and put under another distribution licence including the GNU Public Licence FreeType License Issues The FreeType Project LICENSE 2006 Jan 27 Copyright 1996 2002 2006 by David Turner Robert Wilhelm and Werner Lemberg Introd...

Страница 137: ...eplace year with the value from the FreeType version you actually use Legal Terms 0 Definitions Throughout this license the terms package FreeType Project and FreeType archive refer to the set of files originally distributed by the authors David Turner Robert Wilhelm and Werner Lemberg as the FreeType Project be they named as alpha beta or final release You refers to the licensee or person using t...

Страница 138: ...form must provide a disclaimer that states that the software is based in part of the work of the FreeType Team in the distribution documentation We also encourage you to put an URL to the FreeType web page in your documentation though this isn t mandatory These conditions apply to any software derived from or based on the FreeType Project not just the unmodified files If you use our work you must ...

Страница 139: ...anted additions to the library and distribution If you are looking for support start in this list if you haven t found anything to help you in the documentation freetype devel nongnu org Discusses bugs as well as engine internals design issues specific licenses porting etc Our home page can be found at http www freetype org User s Manual 7 25 ...

Страница 140: ...screen 3 3 Documentation list 2 1 Dual Pointing Device Touch Pad 6 8 E Equipment checklist 2 1 External monitor problems 6 11 G Graphics Processing Unit 3 13 H HDMI Micro port 3 5 HDMI out port 3 9 K Keyboard function keys 4 12 Function keys F1 F12 4 12 problems 6 6 Windows special keys 4 14 Keypad overlay Arrow mode 4 14 Numeric mode 4 14 temporarily using normal keyboard overlay on 4 14 temporar...

Страница 141: ...2 13 Problems AC power 6 5 Analyzing the problem 6 2 Battery 6 6 Dual Pointing device 6 8 External monitor 6 11 Hardware and system checklist 6 4 Internal display panel 6 7 Internal Storage 6 7 Keyboard 6 6 Memory Media Card 6 7 Overheating power down 6 5 Power 6 5 Real Time Clock 6 6 Sound system 6 10 TOSHIBA support 6 14 Touch Pad 6 8 USB device 6 10 USB mouse 6 9 R Recovery hard disk drive 2 22...

Страница 142: ... problems 6 10 SSD automatic power off 5 5 T Touch Screen 4 3 U USB device problems 6 10 V Video mode 4 33 Video RAM 3 13 W Web Camera back 3 6 Web Camera front 3 2 Wireless communication 7 5 User s Manual Index 3 ...

Отзывы: