background image

63

Others

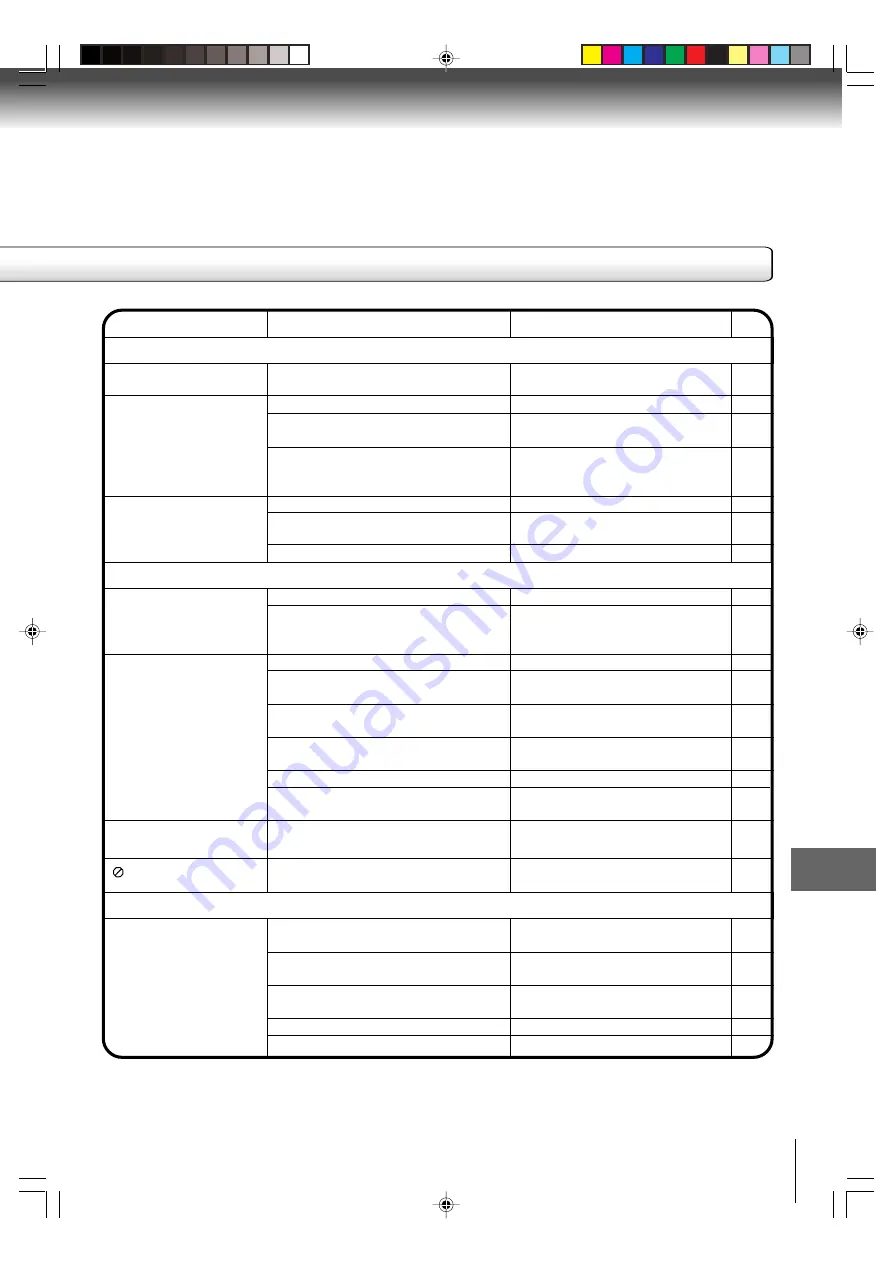
The video cassette's erase prevention tab
is broken off.
The time is not set correctly.
The recording start/end time is not set
correctly.
The TIMER REC buttons have not been
pressed at the same time (the TIMER
REC indicator is not lit).
Tape is old or worn.
Tracking adjustment is beyond range of
automatic tracking circuit.
Video heads are dirty.

The remote control is not aimed at the
sensor.
Distance is too far or too much light in the
room.
There is an obstacle in the path of the
beam.
The batteries are weak.
The batteries are not inserted correctly.

Remote control does not
operate.

Noise bars appear on the
screen.

Timer recording does not
work.

TV recording does not work.

Place a piece of adhesive tape over
the hole.
Reset the present time.
Reset the start/end time.

Press the TIMER REC buttons at the
same time (the TIMER REC indicator
is lit).
Replace the tape.
Adjust tracking manually using the TRK
+/– buttons on the remote control.
Clean the video heads.

Aim the remote control at the remote
sensor.
Operate within 7 m or reduce  the light
of the room.
Clear the path of the beam.

Replace the batteries.
Insert correctly.

SYMPTOMS

CAUSE

POSSIBLE SOLUTIONS

PAGE

VCR

REMOTE CONTROL

35

DVD

The playback picture has
occasional distortion.

The disc is dirty.
It is in fast forward or fast reverse
playback.

No disc is inserted.
An unplayable disc is inserted.

The disc is placed upside down.

The disc is not placed within the guide.

The disc is dirty.
The parental lock function is set.

It is in the mode of repeat playback,
memory playback, etc.

The function is prohibited with the unit or
the disc.

Eject the disc and clean it.
Some times a small amount of picture
distortion may appear. This is not a
malfunction.
Insert a disc.
Insert a playable disc (Check the disc
type and color system).
Place the disc with the playback side
down.
Place the disc correctly inside the
guide on the disc tray.
Clean the disc.
Cancel the parental lock function or
change the parental lock level.
These operations may prevent a
proper progress of the contents.

The unit does not start
playback.

Playback does not follow the
course of the disc’s program

appears on the screen.

35

20-22

43

43

37

39

7

50

8

50

50

7

59, 61

13

13

13

13

13

8

 5F10101C (E)p62-65

7:5:03, 18:58

63

Содержание MW27FN1

Страница 1: ...5 Introduction Connections Basic setup Playback VCR Recording VCR Other functions VCR DIGITAL VIDEO 2003 Toshiba Corporation 49 52 56 62 Basic playback DVD Advanced playback DVD Function setup DVD Others This device does not tape record copy protected DVD Video Discs 23 TV operation Illustration of MW20FN1 R 5F10101C E Cover 7 5 03 18 55 1 ...

Страница 2: ...TO ENSURE PROPER USE OF THIS PRODUCT PLEASE READ THIS USER S GUIDE CARE FULLY AND RETAIN FOR FUTURE REFERENCE SHOULD THE UNIT REQUIRE MAINTE NANCE CONTACT AN AUTHORIZED SERVICE LOCATION SEE SERVICE PROCEDURE USE OF CONTROLS ADJUSTMENTS OR THE PERFORMANCE OF PROCEDURES OTHER THAN THOSE SPECIFIED HEREIN MAY RESULT IN HAZARDOUS RADIATION EXPOSURE TO PREVENT DIRECT EXPOSURE TO LASER BEAM DO NOT TRY TO...

Страница 3: ...tilation is provided or the manufacturer s instructions have been adhered to 10 POWER SOURCES This unit should be operated only from the type of power source indicated on the rating plate If you are not sure of the type of power supply to your home consult your appliance dealer or local power company For units intended to operate from battery power or other sources refer to the respective pages on...

Страница 4: ...ollowing the operating instructions Adjust only those controls that are covered by the operating instructions as an improper adjustment of other controls may result in damage and will often require extensive work by a qualified technician to restore the unit to its normal operation e If the unit has been dropped or the cabinet has been damaged f When the unit exhibits a distinct change in performa...

Страница 5: ... wider than the other AC Outlet Wider Hole and Blade Power source ANTENNA DISCHARGE UNIT NEC SECTION 810 20 ANTENNA LEAD IN WIRE GROUNDING CONDUCTORS NEC SECTION 810 21 GROUND CLAMPS POWER SERVICE GROUNDING ELECTRODE SYSTEM NEC ART 250 PART H GROUND CLAMP ELECTRIC SERVICE EQUIPMENT NEC NATIONAL ELECTRICAL CODE S2898A IMPORTANT SAFEGUARDS Power Source 27 NOTE TO CATV SYSTEM INSTALLER This reminder ...

Страница 6: ...y precision device If the video head the head drum the optical pick up lens and disc drive parts are dirty or worn down the picture quality becomes poor To obtain a clear picture we recommend regular inspection and maintenance cleaning or parts replacement every 1 000 hours of use depending on the operating environment For details contact your nearest dealer Notes on moisture condensation Moisture...

Страница 7: ...cs are divided into titles and the titles are sub divided into chapters Video CDs and Audio CDs are divided into tracks DVD video disc Video CD Audio CD Each title chapter or track is assigned a number which is called title number chapter number or track number respectively There may be discs that do not have these numbers Notes on copyright It is forbidden by law to copy broadcast show broadcast ...

Страница 8: ... with PBC function Version 1 1 Sound and movie can be played on this unit in the same way as an audio CD Video CD equipped with PBC function Version 2 0 In addition to operation of a Video CD not equipped with the PBC function you can enjoy playback of interactive software with search function by using the menu displayed on the TV screen Menu Playback Some of the functions described in this owner ...

Страница 9: ... setup Preparation 49 Playback procedure 50 Special playback 51 Basic playback DVD Zooming Locating desired scene 52 Repeat Random and Program playback Repeat A B 53 Changing soundtrack language Subtitles 54 Changing angles Title selection DVD menu 55 Advanced playback DVD Before calling service personnel 62 Reception disturbances 64 Language code list 65 Specifications 66 Limited warranty 67 Othe...

Страница 10: ...ks 47 CHANNEL buttons 24 HEADPHONE jack 24 REW Rewind button 36 REC OTR button 40 PLAY button 36 FF Fast Forward button 36 Remote sensor 13 OPEN CLOSE button 50 VOLUME buttons 23 SKIP button 51 STOP button 50 PLAY button 50 SKIP button 51 POWER button AUDIO L R VIDEO IN LINE 1 IN jacks 47 AUDIO L R VIDEO OUT jacks 16 POWER indicator 20 REC OTR indicator 40 TIMER REC indicator 43 Disc tray 50 BITST...

Страница 11: ...ast forward Rewind Stop Eject Audio CD Video CD Notes When you play the Video CD Play list will not appear on the screen To turn off the PBC press Number button 1 in the stop mode then press ENTER Disc operation Disc operation Track number Play list 1 1 1 8Eng DolbyDigital 1 8 Eng 1 8 1 19 T C 0 07 18 2 02 31 Chapter number Title number Title elapsed playing time Title total time Audio language A ...

Страница 12: ... button DVD button DISPLAY button 11 SLEEP button 24 AUDIO SELECT button 46 REC buttons 40 TIMER REC buttons 43 PLAY button 36 REV button 36 COUNTER RESET button 38 ANGLE button 55 SP SLP button 40 RETURN button 56 MENU button 19 SETUP button 56 CLEAR button 53 CANCEL button 22 JUMP button 52 CM SKIP button 37 CLOSED CAPTION button 25 SLOW button SKIP button 37 51 CHANNEL RETURN button 24 STOP but...

Страница 13: ...teries may cause damage to the device To avoid a potential short circuit insert the end first 3 Do not mix different types of batteries together e g Alkaline and Carbon zinc or old batteries with fresh ones 4 If the device is not to be used for a long period of time remove the batteries to prevent damage or injury from possible battery leakage 5 Do not try to recharge batteries not intended to be ...

Страница 14: ... Attach the Combiner to the Antenna Jack Connect the UHF 300 ohm Twin lead Wire to the Combiner not supplied Connect the VHF 300 ohm Twin lead Wire to the 300 75 ohm Matching Trans former Attach the Transformer to the Combiner then attach the Combiner to the Antenna Jack UHF 300 ohm VHF 75 ohm Antenna Jack Combiner 300 75 ohm Matching Transformer UHF 300 ohm VHF 300 ohm Antenna Jack Combiner 75 oh...

Страница 15: ...y wish to use a signal Splitter and an A B Switch box available from the Cable company or an electronics supply store Follow the connections shown below With the switch in the B position you can directly tune any nonscrambled channels on your unit With the switch in the A position tune your unit to the output of the Converter Descrambler box usually channel 3 or 4 and use the Converter Descrambler...

Страница 16: ...ut sound of the unit has a wide dynamic range Be sure to adjust the receiver s volume to a moderate listening level Otherwise the speakers may be damaged by a sudden high volume sound Turn off the amplifier before you connect or disconnect the unit s power cord If you leave the amplifier power on the speakers may be damaged Connect the unit to your audio system PHONES L MONO R REW PLAY FF REC OTR ...

Страница 17: ...Systems Inc With an amplifier equipped with Dolby Digital Connect the equipment the same way as described in Connecting to an amplifier equipped with a Dolby Digital decoder Refer to that amplifier s owner s manual and set the amplifier so you can enjoy Dolby Pro Logic Surround sound With an amplifier not equipped with Dolby Digital Connect the equipment as follows Dolby Digital Dolby Digital is t...

Страница 18: ...it to the AC 3 RF input of a Dolby Digital Receiver This input on your A V Receiver is reserved for Laserdisc use only and is incompatible with the BITSTREAM PCM AUDIO OUT jack of the unit Connect the BITSTREAM PCM AUDIO OUT jack of the unit to the COAXIAL input of a Receiver or Processor Refer to the owner s manual of the connected equipment as well When you connect the unit to other equipment be...

Страница 19: ...are pressed for more than 60 seconds the TV VCR MENU screen will return to normal TV operation automatically Preparation Press POWER to turn on the unit Press TV VCR to select the TV VCR mode 1 3 1 4 SYSTEM SETUP CLOCK SET LANGUAGE IDIOMA LANGUE AUTO CLOCK ON OFF STANDARD TIME DAYLIGHT SAVING TIME ENTER MENU M E N U TIMER REC SET TV SETUP CH SETUP AUTO REPEAT ON OFF SYSTEM SETUP ENTER MENU ENGLISH...

Страница 20: ...perly if the reception condition is not good 4 Auto Clock adjustment To set Auto Clock to OFF POWER POWER DISPLAY The Auto Clock adjustment will be performed at 12 00 PM everyday if you turn off the unit If you use a cable box and you want Auto Clock adjustment to be performed the cable box must be left on The Auto Clock adjustment is not effective when there is a difference of more than 5 minutes...

Страница 21: ...nt to set the Daylight Saving Time manually on the first Sunday in April you set to ON and on the last Sunday in October you set to OFF ON OFF AUTO for manual setting forward one hour for manual setting back one hour for automatic setting read XDS in the signal ON OFF AUTO DAYLIGHT SAVING TIME ENTER MENU ATLANTIC GMT 4hours EASTERN GMT 5hours CENTRAL GMT 6hours MOUNTAIN GMT 7hours PACIFIC GMT 8hou...

Страница 22: ...ate and time manually for Timer Recordings ON OFF Timer and Daylight Saving Time if the Auto Clock process did not set them correctly 2 4 1 SYSTEM SETUP CLOCK SET LANGUAGE IDIOMA LANGUE AUTO CLOCK ON OFF STANDARD TIME DAYLIGHT SAVING TIME ENTER MENU M E N U TIMER REC SET TV SETUP CH SETUP AUTO REPEAT ON OFF SYSTEM SETUP ENTER MENU 8 30 AM WED CLOCK SET MONTH DAY YEAR TIME 10 29 WED 2003 8 30 AM á ...

Страница 23: ...ss the 3 digits in order Example to select channel 120 press 120 NOTE FOR CHANNELS 1 12 If only 1 or 2 button is pressed the corresponding channel will be selected in 2 seconds 5 Adjust the volume level by pressing VOLUME or The volume level will be indicated on the screen by green bars As the volume level increases so do the number of bars If the volume decreases the number of green bars also dec...

Страница 24: ...briefly appear on the screen The sound can be switched back on by pressing this button again or one of VOLUME or Mute MUTE MUTE Channel Press and release CHANNEL or The channel automatically stops at the next channel set into memory For proper operation before selecting channels they should be set into the memory See page 26 Setting channels automatically CH 012 CHANNEL Channel return This button ...

Страница 25: ...the channels are changed the Captions will be delayed ap proximately 10 seconds The Captions will appear in places on the screen where they will least interfere with the picture usually on the bottom of the screen News programs will usually show three line Closed Captions which scroll onto the screen Most other shows provide two or three lined Captions placed near the character who is speaking so ...

Страница 26: ...R ENTER TV CATV selection Setting channels automatically Notes If a station being viewed stops broadcasting the TV will automatically shut itself off after 15 minutes You can t select CH SETUP if you set the channel to LINE1 or LINE2 Press ENTER to select the TV or CATV The arrow indicates the selected mode 3 Press MENU repeatedly until the menu screen is cleared 4 ENTER SETUP MENU TV VHF UHF chan...

Страница 27: ...DD the Channel indication changes from red to green and the channel will be memorized If you select a memo rized channel the Channel indica tion will be green If you select DEL the Channel indication changes from green to red and the channel will be deleted from the memory 4 ENTER Press MENU repeatedly until the MENU screen is cleared 5 1 3 1 2 4 1 5 SETUP MENU ENTER M E N U TIMER REC SET TV SETUP...

Страница 28: ...NTER CANCEL MENU 0 8 7 9 6 5 4 3 2 1 ENTER 0 8 7 9 6 5 4 3 2 1 ENTER V CHIP SET PASSWORD CONFIRM 0 9 ENTER CANCEL MENU V CHIP SET menu appears IF YOU FORGET THE PASSWORD YOU CANNOT SET THE V CHIP TO AVOID FORGETTING THE PASSWORD WRITE IT DOWN AND KEEP IN A SAFE PLACE V CHIP SET V CHIP OFF TV RATING OFF MOVIE RATING OFF CHANGE PASSWORD ENTER MENU ENTER V CHIP SET V CHIP OFF TV RATING TV PG MOVIE RA...

Страница 29: ... CHANGE PASSWORD ENTER MENU Press or to select V CHIP 5 V CHIP SET V CHIP ON TV RATING TV PG MOVIE RATING PG 13 CHANGE PASSWORD ENTER MENU Press ENTER to display ON 6 ENTER ENTER Press MENU repeatedly until the MENU screen is cleared 7 SETUP MENU To use the TV after the TV is protected When the program applied to the V Chip setting is received enter the password then press the ENTER button When th...

Страница 30: ...TER ENTER ENTER 3 5 6 1 2 4 1 7 1 6 M E N U TIMER REC SET TV SETUP CH SETUP AUTO REPEAT ON OFF SYSTEM SETUP ENTER MENU V CHIP SET PASSWORD 0 9 ENTER CANCEL MENU V CHIP SET V CHIP ON TV RATING TV PG MOVIE RATING PG 13 CHANGE PASSWORD ENTER MENU V CHIP SET V CHIP ON TV RATING TV PG MOVIE RATING PG 13 CHANGE PASSWORD NEW PASSWORD 0 9 ENTER CANCEL MENU V CHIP SET V CHIP ON TV RATING TV PG MOVIE RATING...

Страница 31: ...TER CANCEL MENU ENTER Press or to set the desired hour then press ENTER 4 ON OFF TIMER ON TIMER 7 00AM CH 012 MON FRI SET OFF TIMER 12 00AM CANCEL ENTER CANCEL MENU ENTER Notes The unit will automatically turn off approximately 1 hour later after the ON TIMER turns on if no OFF TIMER has been set To continue watching the TV press any button to cancel the one hour automatic shut off To cancel ON TI...

Страница 32: ... press ENTER 4Press or to set the desired hour then press ENTER ON OFF TIMER ON TIMER 7 00AM CH 012 MON FRI SET OFF TIMER 12 00AM CANCEL ENTER CANCEL MENU ON OFF TIMER ON TIMER 7 00AM CH 012 MON FRI SET OFF TIMER 11 00PM CANCEL ENTER CANCEL MENU ENTER ENTER ENTER ON OFF TIMER ON TIMER 7 00AM CH 012 MON FRI SET OFF TIMER 11 30PM SET ENTER CANCEL MENU SETUP MENU ENTER Notes To cancel the OFF TIMER f...

Страница 33: ...ress or to adjust the brightness of the picture When the button is pressed the darker portions of the picture become lighter CONTRAST Press ENTER until CONTRAST appears on the screen then press or to adjust the contrast of the picture Pictures look sharpest in the daytime bright light by increasing the contrast At night dim light the sharpest picture is obtained by reducing the contrast BRIGHTNESS...

Страница 34: ...stronger makes the bass sound weaker makes the treble sound weaker makes the output level of left speaker stronger BASS 16 ENTER CANCEL MENU Pressing CANCEL while making sound control adjust ments will return all adjustments to the factory preset levels Notes The On screen display will disappear 6 seconds after finishing an adjustment or by pressing the MENU button three times The settings can onl...

Страница 35: ... your left An inverted cassette tape cannot be inserted Automatic playback When loading a cassette tape without an erase prevention tab playback will start automatically Automatic power ON When you insert a cassette tape the unit power will turn ON automatically 1 2 Erase prevention tab Adhesive tape Remove the cassette tape Erase prevention tab Unloading To prevent accidental erasure To prevent a...

Страница 36: ...he TV VCR button This unit selects the playback tape speed SP or SLP auto matically When you select the TV VCR mode during DVD playback DVD playback will change to the still mode and after 5 minutes it will change to the resuming playback mode automatically 2To start playback Playback Rewind or forward the tape To rewind the tape PressREWonthefrontpanelorpress REV on the remote To forward the tape...

Страница 37: ... seconds on the screen Press PAUSE STILL during playback Press SLOW one by one The picture advances frame by frame To return to playback press PLAY or PAUSE STILL SPEED SEARCH TIMES Digital tracking controls Still picture Slow motion Frame by frame picture Notes SP is more appropriate as less noise appeared during search and still playback for tape recorded in SP The audio output is muted during S...

Страница 38: ...e counter to 00 00 00 2 Begin Playback or Recording to start the tape the counter will display the elapsed time 3 When you wish to make the counter disappear press DISPLAY once again 4 The On Screen Real Time Tape Counter shows the tape running time in Hours Minutes and Seconds You can easily determine how long the tape has been running or how much time is left on the tape 8 40AM THU 00 00 00 SP C...

Страница 39: ...heads become dirty enough to be clogged no picture will be played back This can easily be de termined if during playback of a known good tape there is good sound but no picture picture is extremely snowy If this is the case have the unit checked by qualified service personnel Notes DO NOT ATTEMPT TO CLEAN THE VIDEO HEADS OR SERVICE THE UNIT BY REMOVING THE REAR COVER Video heads may eventually wea...

Страница 40: ...s Direct channel selection buttons or CH to select the channel to be recorded 4 Press both REC at the same time will appear on the screen for about 4 seconds and the REC OTR indicator on the front panel will light 5 Notes If power is switched off during recording the TV and the DVD sections go off and the VCR continues to record Press the STOP button to halt the recording and turn off the VCR The ...

Страница 41: ...ape has ended except during OTR and timer recording It will also eject the tape Auto Rewind feature To stop recording REC OTR STOP PAUSE STILL Note If the erase prevention tab is removed the tape will eject when both the REC buttons are pressed for recording Press PAUSE STILL to avoid recording unwanted material will appear on the screen and the REC OTR indicator will blink on and off Press PAUSE ...

Страница 42: ...seconds 2 Set TV or CATV option to the appropriate position 26 3 00 00 00 SP CH 110 CH 125 OTR 0 30 TV VHF UHF channels CATV CABLE TV channels Press Direct channel selection buttons or CH to select the channel to be recorded 4 Press both REC at the same time to begin recording Press the buttons again to stop recording after 30 minutes Each additional press of REC will increase recording time as sh...

Страница 43: ...se prevention tab is in the unit the tape will be ejected Press MENU Press or to select TIMER REC SET then press ENTER Preparation Press TV VCR to select the TV VCR mode Load a cassette tape with the erase prevention tab intact Check the time and date are correct 22 Example Program a timer recording for 23rd day channel 125 CATV 7 00 9 30 PM Tape speed SLP 1 Press or to select one of the program l...

Страница 44: ...tinuously until the recording is canceled or the tape reaches the end During timer recording the automatic rewinding mechanism does not function You can correct or cancel the programed setting in program confirm mode 8 00 11 00 9 00 10 00 Program 1 Prog 1 Deleted Parts Non Recorded Portion Parts Prog 2 Prog 3 Program 2 Program 3 Recording Control Settings Press PROGRAM once The TV screen displays ...

Страница 45: ...1 Press or to select SURROUND Then press ENTER to select ON Then press MENU repeatedly until the menu screen is cleared 2 SETUP MENU ENTER SETUP MENU ENTER M E N U TIMER REC SET TV SETUP CH SETUP AUTO REPEAT ON OFF SYSTEM SETUP ENTER MENU TV SETUP V CHIP SET ON OFF TIMER PICTURE AUDIO SURROUND STABLE SOUND SAP ON OFF ON OFF ON OFF ENTER MENU M E N U TIMER REC SET TV SETUP CH SETUP AUTO REPEAT ON O...

Страница 46: ...ut selection Your unit is fitted with a SAP broadcast system which enables you to switch to a Second Audio Program when viewing a se lected channel This function applies only when the program is broadcast in multi languages through the SAP broadcast system When the unit is turned on or a channel selection is made make certain the letters SAP appears on the screen This means that the SecondAudio Pr...

Страница 47: ...Select LINE2 on step 2 Press SP SLP to select the desired tape speed SP or SLP It is recommended that you set the Speed to the SP mode on the recording VCR for best results 1 Press INPUT SELECT once or twice to select AUDIO VIDEO input position LINE1 or LINE2 will appear on the screen 2 Press PLAY on the playback VCR then press PAUSE STILL 3Press both REC at the same time then press PAUSE STILL 4 ...

Страница 48: ...he playback picture or sound will be duplicated on the video cassette tape 4 Press STOP if you finish recording If you wish to stop a DVD CD disc press DVD to change the DVD mode then press STOP 5 Notes You may not record the beginning of the disc so start to playback the disc then start to record You cannot record the disc with copy guard function The following icon and text will show up on the T...

Страница 49: ...the remote control to turn on the unit The POWER indicator will light Every time you press POWER the unit starts from TV mode When using an amplifier switch on the amplifier Press DVD to select DVD mode The DVD startup screen will appear on the screen 3 POWER DVD welcome Notes When connecting to other equipment unplug the unit from the AC outlet If the unit does not operate properly Static electri...

Страница 50: ... the disc appears on the screen the unit will clear the stopped point 6 PLAY STOP To stop the playback press STOP Then press OPEN CLOSE on the unit The disc tray opens Remove the disc then press POWER The disc tray closes automatically and unit turns off 7 STOP POWER Notes If a non compatible disc is loaded Incorrect Disc Region Code Error or Parental Error will appear on the TV screen according t...

Страница 51: ...cating a chapter or track Note The unit is capable of holding a still video image or On screen display image on your television screen indefinitely If you leave the still video image or On screen display image displayed on your TV for an extended period of time you risk permanent dam age to your television screen Projection televisions are very susceptible SLOW Playing a Disc while the VCR section...

Страница 52: ...Pause Slow or Search playback in the zoom mode Some discs may not respond to zoom feature Use the title chapter and time recorded on the disc to locate the desired point to play back 1Press JUMP during playback Press ENTER Playback starts When you change the title playback starts from Chapter 1 of the selected title Some discs may not work in the above operation 4 Press Number buttons 0 9 to input...

Страница 53: ... and Program playback do not function on the Video CD Notes If you put a wrong number press CANCEL To cancel program play press STOP 3 times To clear the programs on the program menu press CANCEL until all programs will be cleared The program is cancelled when you open the disc tray or turn off the power Program Total 3 0 24 54 1 5 8 29 2 8 8 54 3 3 7 31 4 __ Enter 0 9 Cancel Play PlayMode Program...

Страница 54: ...with subtitles you can turn the subtitles on or off Press SUBTITLE during playback until Off appears Changing the subtitle language You can select the language when playing back a disc recorded with multilingual subtitles Press SUBTITLE repeatedly during playback until your desired language appears 1 1 8 Eng Off ZERO RETURN SUBTITLE ZERO RETURN SUBTITLE 2The on screen display will disappear after ...

Страница 55: ...OP MENU Press or to select the desired title 2 Press ENTER or PLAY The playback of the selected title will start 3 Notes Depending on the DVD you may not be able to select the title Depending on the DVD a title menu may simply be called a menu or title in the instructions supplied with the disc DVD DVD Menu Some DVDs allow you to select the disc contents using the menu When you play back these DVD...

Страница 56: ...D Language then press or ENTER 2 ENTER ENTER Press or to select desired language e g Eng lish then press ENTER The menu returns to Language menu automatically If you want to return to the previous menu press or RETURN 3 4 5 Repeat steps 2 3 for other Language setting Other Menu Audio Subtitle If you want to select another language enter the language code see the Language code list on page 65 Off s...

Страница 57: ...splays the wide picture with black bands at the top and bottom of screen 4 3 Panscan It displays the wide picture on the whole screen with left and right edges automatically cut off If you want to return to the previous menu press or RETURN 3 4 SETUP MENU 1 1 3 1 4 Function setup DVD ENTER ENTER RETURN Note If the DVD disc is not formatted in the pan scan style it displays 4 3 style Setting the as...

Страница 58: ...remove the Menu screen 4 Enter Setup Return Sound DRC On Enter Setup Return Sound DRC Off Main Menu Enter Setup Return Language Picture Sound Parental 2Press or ENTER to select DRC Press or ENTER to select On or Off If you want to return to the previous menu press or RETURN 3 ENTER ENTER ENTER SETUP MENU SETUP MENU Notes This function works only during playback of Dolby Digital recorded discs The ...

Страница 59: ...R Enter Setup Return Main Menu Language Picture Sound Parental Enter Setup Return Parental Password Off Parental Level Off ENTER Enter Setup Return Parental Level Off 1 2 3 4 5 Enter Setup Return Parental Password Off Parental Level 1 Enter 0 9 Cancel Return Password Password 1234 Enter Setup Return Parental Password On Parental Level 1 Press ENTER to store the password Note Now the rating is lock...

Страница 60: ...ter Setup Return Main Menu Language Picture Sound Parental ENTER SETUP MENU ENTER Enter Setup Return Parental Password On Parental Level 1 0 8 7 9 6 5 4 3 2 1 Enter 0 9 Cancel Return Password Password 1234 Enter Setup Return Parental Password Off Parental Level 1 ENTER 3 8 Enter Setup Return Parental Password Off Parental Level 1 ENTER ENTER Enter Setup Return Parental Level 3 4 5 6 7 8 Press or t...

Страница 61: ...digit password Then press ENTER Alternatively if the password has not been set playback will commence If you don t know or have forgotten the password select STOP The setting screen will disappear Press OPEN CLOSE to remove the disc To quit entering press RETURN 1 Playback will commence if the entered password was correct 4 3 2 IftheDVDdischasbeendesignedtotemporarily canceltheRatinglevel thescree...

Страница 62: ...r is not con nected or possible local interference TV station experiencing problems Picture control is not adjusted Possible local interference Antenna CATV connector is not con nected or possible local interference TV station experiencing problems Antenna CATV connector is not con nected or possible local interference Cable TV channel is scrambled CATV connector is not connected TV CATV Mode menu...

Страница 63: ...thin 7 m or reduce the light of the room Clear the path of the beam Replace the batteries Insert correctly SYMPTOMS CAUSE POSSIBLE SOLUTIONS PAGE VCR REMOTE CONTROL 35 DVD The playback picture has occasional distortion The disc is dirty It is in fast forward or fast reverse playback No disc is inserted An unplayable disc is inserted The disc is placed upside down The disc is not placed within the ...

Страница 64: ...ces such as drills or hair dryers SNOW If the TV VCR DVD is located far from the TV station in a fringe reception area where the signal is weak small dots may appear in the picture If the signal is extremely weak the installation of a larger external antenna may be necessary RADIO FREQUENCY INTERFERENCE RFI Caused by two way radios this type of interference produces moving ripples or diagonal stre...

Страница 65: ...egian 2425 Thai 3018 Bihari 1218 Hungarian 1831 Oriya 2528 Tibetan 1225 Breton 1228 Icelandic 1929 Panjabi 2611 Tigrinya 3019 Bulgarian 1217 Indonesian 1924 Pashto Pushto 2629 Tonga 3025 Burmese 2335 Interlingua 1911 Persian 1611 Turkish 3028 Byelorussian 1215 Irish 1711 Polish 2622 Turkmen 3021 Cambodian 2123 Italian 1930 Portuguese 2630 Twi 3033 Catalan 1311 Japanese 2011 Quechua 2731 Ukrainian ...

Страница 66: ...requency response Hi Fi dynamic range F FWD REW time at 25 C 77 F Applicable disc DVD Frequency range DVD S N ratio DVD Harmonic distortion DVD Wow and flutter DVD Dynamic range DVD Specifications General input output supplied accessories GENERAL Input Output Video input 1 0 V p p 75 Ω negative sync pin jack x 2 Video output 1 0 V p p 75 Ω negative sync pin jack x 1 Audio input 8 0 dBm 50kΩ negati...

Страница 67: ...responsible for all charges involved in the replacement You are responsible for all transportation and insurance charges for the set to and from the Service Station Rental Units The warranty for rental units begins with the first rental or thirty 30 days from the date of shipment to the rental firm whichever comes first Commercial Units Products sold and used for commercial use have a limited nine...

Страница 68: ...ay be brought or the exclusion or limitation of incidental or consequential damages so the above provisions may not apply to you ATTENTION CANADIAN CONSUMERS Canadian consumers are requested to complete the special Canadian Warranty Registration Form enclosed and forward this completed form with a copy of bill of sale to TOSHIBA OF CANADA to Register and Validate their warranty Products purchased ...

Отзывы: