37
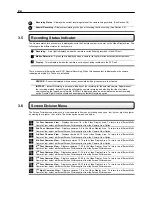
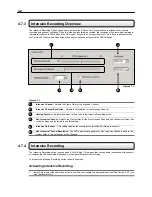
Recording Schedule Window
– Displays and allows you to edit the current Recording Schedule.
Enable/Disable
– Enabled the selected Sensor for the time period specified.
Emergency
Time
– Specifies the amount of time (in seconds) to transmit the video in the Emergency Agent
Software.
Emergency IP
– Specifies the IP Address to the send the Emergency Agent video to.
Event
– Allows you to define Motion as an Alarm Event, whether to transfer the Alarm Event to the SMS Multi-
site Software, and/or whether to send the video to the Emergency Agent software.
Use
– Allows the user to define which Emergency IP Addresses will be alerted.
4.5.2
Creating a Recording Schedule (Motion and Continuous)
Creating a Recording Schedule Based on Motion & Cont
1)
Select the Schedule Menu option.
2)
Select a single day to begin creating the schedule for -or- Select the SINGLE SELECTION MODE button to create
the schedule for all the days of the week at once.
3)
Highlight the time-blocks within the Recording Schedule Window for the camera(s) you wish to schedule. Once the
desired Time-Blocks are highlighted, press a RECORDING MODE button.
The Time-Blocks should now appear Blue for Motion, Yellow for Continuous and White for No Recording.
4.5.3
Creating a Recording Schedule (Sensor)
Creating a Recording Schedule Based on a Sensor Alarm
1)
Select the Schedule Menu option and press the SENSOR button. This will open the Sensor Recording Schedule
Window.
2)
Select a single day to begin creating the schedule for -or- Select the SINGLE SELECTION MODE button to create
the schedule for all the days of the week at once.
3)
Highlight the time-blocks within the Recording Schedule Window for the Sensor(s) you wish to enable and
schedule. Once the desired Time-Blocks are highlighted, press the ENABLE button.
The Time-Blocks should now appear Red.
The Sensors will supersede all other types of recording modes (MOTION, CONTINUOUS, NO RECORDING). This
means that regardless of what the cameras are currently set to, if a Sensor Event occurs and it is linked to one or more
cameras, the linked cameras will begin recording as a Sensor Event. Sensor Recordings will be ‘flagged’ and will be
easily searchable using the Index Search Mode option.
You can associate cameras to Sensors inside the CAMERA SETUP menu.
4.5.4
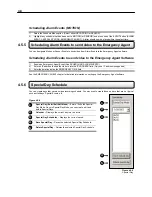
Scheduling Alarm Events
You can designate Motion or Sensor Events to be ‘Alarm’ events. Often times you may not want motion to be treated as
an Alarm event. For Example: During work hours Motion that occurs is expected and would not want to be treated an
as Alarm. However, after business hours are over, any motion that occurs should be treated as an Alarm.
There are three different types of Alarm Events:
ALARM EVENT:
This option logs the Alarm Events on the local server.
CENTRAL STATION:
This option sends the Alarm Events to Central Station software.
EMERGENCY AGENT:
This option sends the Alarm Event to the Emergency Agent software.
6
7
8
9
10
11
Содержание KV-DVR
Страница 1: ...i Surveillix KV EVR KV DVR Operations Manual ...
Страница 2: ...ii ...
Страница 17: ...3 ...
Страница 24: ...10 ...
Страница 48: ...34 ...
Страница 68: ...54 ...
Страница 109: ...95 ...
Страница 113: ...99 ...
Страница 114: ...100 C H A P T E R Backup Viewer This chapter includes the following information Overview Using the Backup Viewer ...
Страница 127: ...113 ...
Страница 128: ...114 C H A P T E R Web Viewer This chapter includes the following information Overview Configuring the Web Viewer ...
Страница 131: ...117 ...
Страница 132: ...118 C H A P T E R Remote Software This chapter includes the following information Overview Configuring Remote Software ...
Страница 137: ...123 ...
Страница 138: ...124 Appendix A Appendix A contains technical specifications for many of the DVR internal components ...


